vector-06c mini
A 50% size replica of my favourite 8-bit computer
A 50% size replica of my favourite 8-bit computer
To make the experience fit your profile, pick a username and tell us what interests you.
We found and based on your interests.
One expansion that's a must for every Vector-06c is a 256K ramdisk, colloquially known as kvaz (quasi-disk). It's in fact a ram expansion which presents itself as 4 64K pages of stack-addressable ram. Part of each 64K page can also be mapped as a 16K window in screen space area. A common improvement to this disk is a so-called Barkar Extension, which allows opening extra 2x 8K windows into 64K address space, thus making 128K of 256K directly addressable.
A common v06c would have one such attachment. However with some craftsmanship, two kvazas can be used with one machine. They would map to the same address space and be configured via separate I/O ports. However, there exists one test program that can simultaneously probe 8x kvaz, making up a total of 2MB of RAM. Unfortunately I don't know of any software that would make use of such a vast amount of memory, except for the test itself. Take note that even just zeroing 2M is a pretty serious undertaking for a 8080-based computer.
With 32x2Mbit PSRAM available on the FPGA chip it would be a crime not to support this feature (and with a lot of room to spare), so here we go.
So although the last update already had a lot of promise, the machine could not really survive much farther past the initial boot screen. After a couple of days of juggling around with various priority combinations and delays trying to squeeze memory accesses with PSRAM clocked at 48MHz I decided to finally give 72MHz a try. First attempt worked, but seemed flaky. After some trial and error I found a delay that seems to work well, at least mostly.
Now it's not ideal yet. There are sometimes video ram accesses that don't make it just in time. So it's subject for a deeper scrutiny later. I already found one program that fails terribly. And of course there's the eternal bane of all things Vector-06c: palette register write delay. When it's off, it looks like this:
Gowin version of Verilog is a bit weird, but after spending some very frustrating days hunting down the gotchas, I have the first signs of life. Behold, vector06cc on Tang Nano 9K with 800x480 RGB panel. The chip is GW1NR-LV9QN88PC6/15.
Quirk 1: `default_nettype none
It's been customary for me to use this to avoid implicit inference of forgotten or just mistyped nets. If the default type is none, a signal without an explicit declaration is an error and you instantly know. In Gowin flavour of Verilog if you set default nettype none, you become obliged to also declare each wire input / output of a module explicitly as wire. This looks exceedingly ugly and makes zero sense. But the worst part is that it makes your project incompatible with GAO. So I had to say goodbye to this and be extra alert with the warnings.
Quirk 2: discarded assignments after implicit net instantiation
For example if you have code like this:
mymodule instance(.input(important_wire), .output(something));
wire important_wire = a & b;
From the point of view of Quartus, it's perfectly fine. But in Gowin this results in important_wire flapping around in the breeze without a driver. Everything compiles but doesn't work and you're frustrated for many hours.
Apparently what happens is this. The compiler finds important_wire, instantiates the net as a wire. Then when it finds the actual declaration with assignment, it treats it as a duplicate and discards not just the declaration but the assignment as well. The solution here is to use declaration with assignments before use, like this:
wire important_wire = a & b;
mymodule instance(.input(important_wire), .output(something));
It also seems that a separate assign is safer than assignment in declaration because it will not get discarded in a similar situation.
PSRAM/HyperRAM
There's some confusion about what kind of memory different Tang Nano boards have. Sipeed's own documents don't do a good job explaining the differences.
TL;DR Tang Nano 9K == PSRAM, Tang Nano 20K == SDRAM.
To go a bit in detail you need to look at the chip family specs, "GW1NR series of FPGA Products Data Sheet", DS117-3.0E, 9/25/20. Table 1-1 "Product Resources" may make you believe that GW1NR-9 has both SDRAM and PSRAM. However table 1-2 "Package-Memory Combinations" on the next page shows that PSRAM and SDRAM are mutually exclusive. QN88P package used in Tang Nano 9K has 2x32Mbit PSRAM dies. From obscure sources, the die seems to be a copy/paste of W955D8MBYA.
I have the 9K, PSRAM.
A huge shout out to [Feng Zhou] for his PSRAM controller: https://github.com/zf3/psram-tang-nano-9k It was easy to tailor it to my needs with 32-bit reads.
I'm clocking PSRAM at 48MHz. A 16-bit read is completed in 10 cycles. For the video controller vector06cc to make it in time, it needs to read 32-bit words. A 32-bit read is done in 11 cycles.
After a lot of hesitation I finally made an attempt to put the thing together. It went on with variable success.
For the future reference: the gray top is MJF Nylon / Natural Gray / No surface finish. The white bottom is SLA / CBY Resin / Faint yellow / General sanding.
I made a lot of mistakes in measurements, so the display can't not fit in the window I left for it. Oh well. This offsets everything deeper, and of course it makes it impossible to close the back lid. With some cutting and swearing I was able to close it. The back lid cracked in several places, but it's the least of its problems.
Unfortunately, for some reason the SD card errors are making a comeback. Power issues are all back too so they're probably related. It's as if something happened to this board while it was waiting to be put in the case.
I think I should reconsider powering the keyboard pipico from the onboard 3V3 and power it with VBUS instead. I suspect ESP32's own regulator on this board is underpowered. As for the case, I think it calls for a second iteration, even though I'm not feeling very enthused about it at the moment.
I guess every project doesn't have to be brought to perfection. v06x-tiny/esp32 is not perfect but it's pretty great. It supports most essential features of Vector-06c, the sound is not as good as in the desktop v06x but it's fine for most games. There are things that are lacking, for example beeper support, or external ROM or joysticks or who knows what else.
But it runs most of the software, doesn't have a problem with the most demanding demos and all in a ll it's a pretty faithful reimagination of a modern Vector-06c. At this point I think it needs to get a case and a promotion from a pile of boards and wires on my desk to a proper dust collecting piece.
I considered various designs, some with upright screen placement, or even hinged screen like a real laptop. But this is really far beyond my normal mechanical capacity. I need something simple and efficient, IOW quadratisch, praktisch, gut.
I probed AI, hoping to get some useful design hints.
:
It's not overly complex, easily printable and should do the job. Waiting for the print to come...
ESP32 "port" was more of a complete rewrite of the original project. In fact it revealed a lot of flaws with the old project. I dare not call this port complete, the code is still a complete nightmare. I need at least to toss files around for any semblance of logical arrangement. But it's something that can be done gradually as the time and inspiration allows.
Meanwhile I have a Gowin Tang Nano 9K with exactly the same TFT display. And this could be pretty interesting.
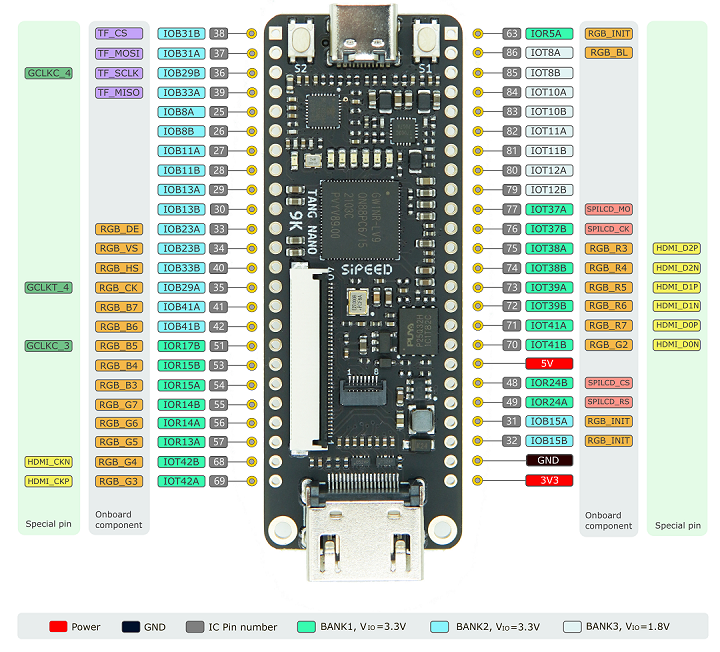 At least on the surface, it seems a fairly decent chip, also packaged on a fairly neat board. Maybe it could become the core of v06x-tiny/fpga, who knows!
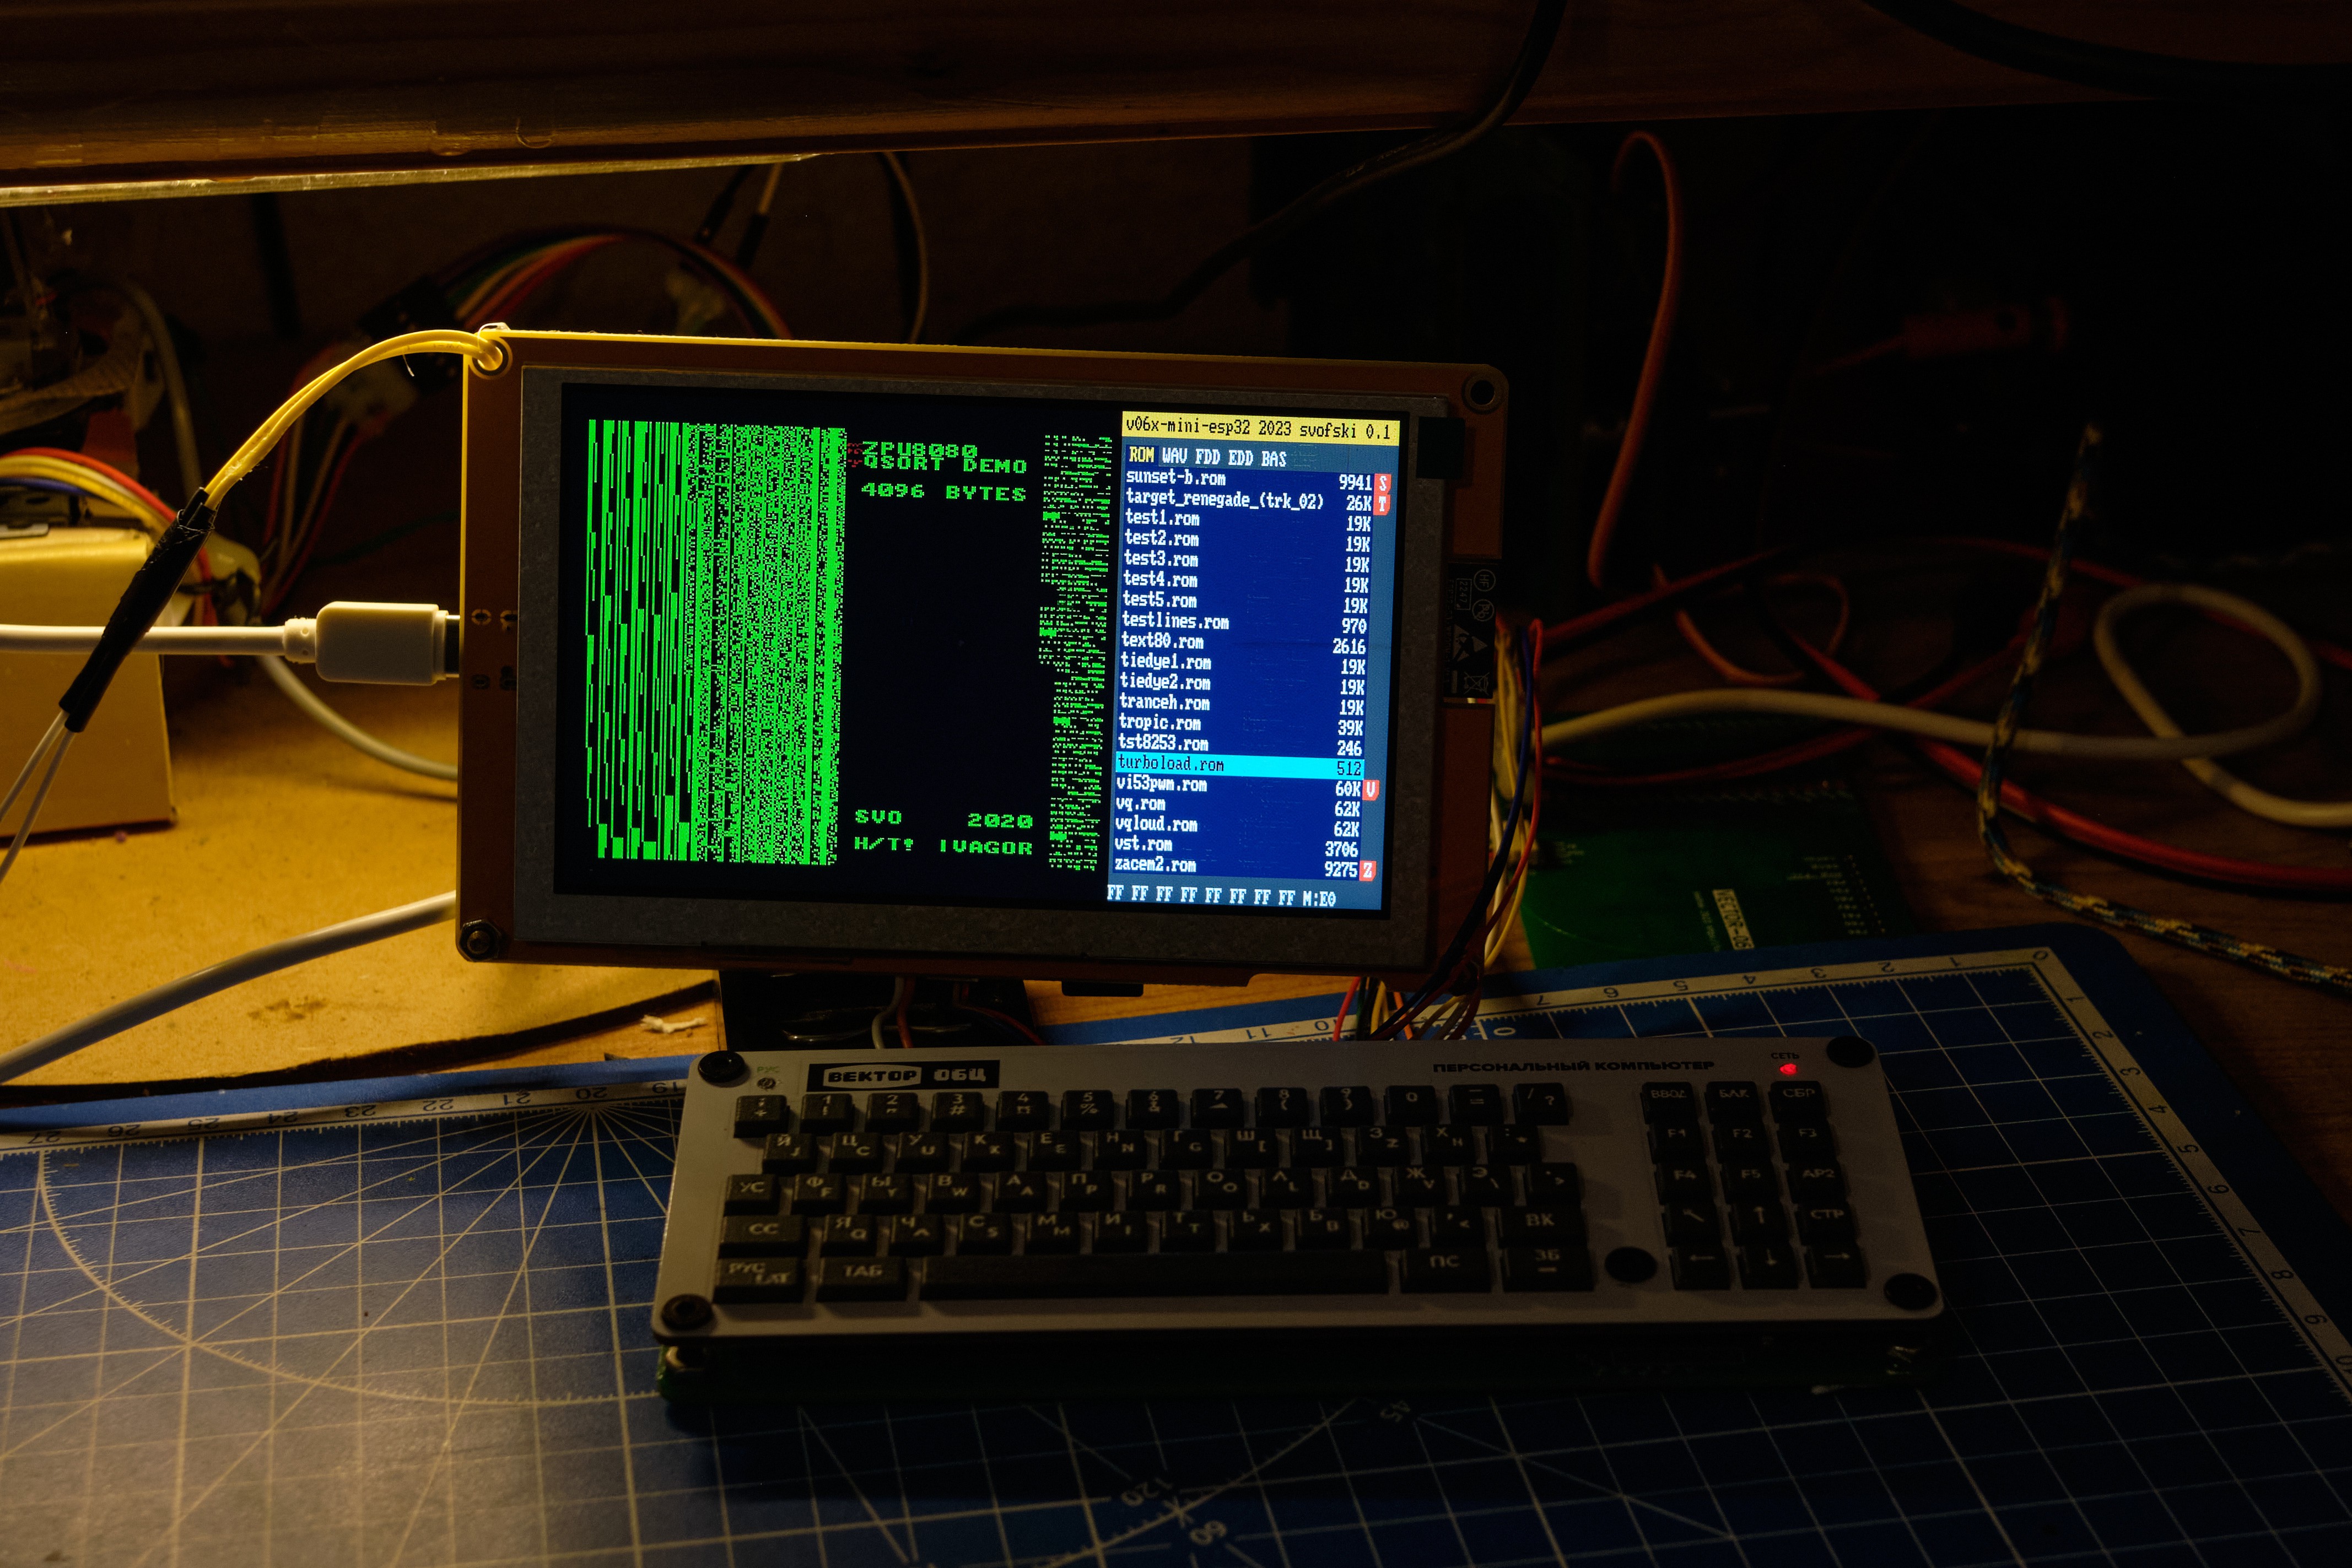
So SD card support has been extremely frustrating, to the point of complete despair. I'm still unable to make it work as I wanted it to, but I guess I managed to discover a narrow path, which if followed carefully allows safe passage from initial directory loading to loading file content, almost always. I'm still unable to show OSD and access SD card at the same time.
In the meantime I have found some really useful bits of code that should be standard in ESP32 SDK but they aren't:
better_readdir() is particularly important because stat() in FatFs is excruciatingly slow, it takes 1-3 seconds just to get one file size. Why? Don't know.
I also made good use of Graphics from @bitluni ESP32Lib. Excellent library, not perfectly optimised but easy to make modifications to. I implemented BGR233 canvas and added clipping. My OSD buffer is thus fairly small as it's in 8-bits. This allows it to be stored in DRAM. It's copied to screen using routine similar to the one that copies the main Vector-06c buffer. That's not ideal because it's fairly CPU-heavy, but I just love it when it's shown next to the main screen.
This also made me add support for 1:1 horizontal scaling of the main screen, which is switched on when OSD is displayed. It could also be made an optional mode without OSD.
Curious bit: a program that only has nops, for example when it's empty RAM, is a worst case for the emulator because this means maximum amount of instructions per scanline. When something like this is executed, the OSD becomes really reluctant to react to user input. Some programs even have flicker at the top left corner of the screen. Something to deal with at some point later.
So far only ROM loading is implemented.
So I though that loading files would be a trivial thing. So I implemented some basic ListView-like visual control for the OSD and started debugging it. Strange.. suddenly there are sdcard errors all over the place. Sometimes they are immediately after the start, sometimes later. But most frequently they appear after invoking the OSD. And if I invoke the OSD automatically at the boot time, the errors increase when the program executed by the emulator seems to create a heavier load on the emulator.
I tried a ton of regular things you do when trying to weed out a software error. All my stacks were silly oversized. I juggled around initialisation routines. Moved things between tasks and played with task priorities. Even sacrificed proper screen updates, giving SD card task the highest priority. But alas:
Searching for this kind of stuff also does rarely give useful input because every time it's someone forgot to connect a wire on a breadboard or something. But one of the discussions that I found mentioned power issues. 0x109 and CRC errors tend to be symptomatic to poor power delivery.
I examined the board and found buggerall capacitors:
There are some near the buck-boost converter near the USB-C connector and there's exactly 1 (one) 100nF capacitor near the ESP32 module. That's all. I suddenly remembered how this board sometimes doesn't want to boot, or wants me to plug it to another port on the hub, or seems to boot but then enters some weird loop and you need to replug it again...
Since yesterday I'm a happy owner of a brand new optical stereo microscope which I was eager to try out. Here's what I added:
220 tantalum and 10uF ceramic to the right of R15:
10uF ceramic near the ESP32 module. It has internal caps but it doesn't hurt having more:
All together:
Yes, it did fix the problem. SD card reads, no random inexplicable errors.
Update:
although it does seem to help, it's not ideal anyway. There are still errors. They seem to appear less frequently when I power this board with a powerbank rather than USB hub.
Update 2:
SD card problems persist and I'm not saying that they can only be explained by aliens, but it's aliens. I don't know if the capacitors helped anything at all now. Stuff is janky as usual.
TL;DR
Now for the ranty log...
So the idea was that the mini keyboard uses a Pi Pico as a kind of universal interface adapter, something that you can plug in into a PC and have a little keyboard for your v06x emulator and simultaneously be able to attach it to v06x-mini board via SPI interface and use it with the esp32 hardware emulator. The board layout actually even allows it to be plugged in directly into the original steamy DIP-packagey Vector-06c -- however in this case PiPico should not be soldered down as it's not 5V tolerant and scanning the keyboard would most likely damage it. So it's amazing and should be easy, right?
Oh so wrong...
SPI keyboard matrix scanning
rp2040 SPI peripheral is fundamentally broken in every possible regard, at least when you're trying to implement a slave device. On top of it there's a very raw driver in the SDK which introduces another layer of brokedity. After a day or so trying to figure out why I can't receive 2 bytes, I found out that in order to be able to transfer more than one byte in one CS assertion, you absolutely must use SPI mode 3.
That's not really a problem, why not use mode 3 indeed. After a while though it turns out that in mode 3 somehow the bit position tends to get garbled and it results in a bit-shifted message. I can't figure out a way to consistently deliver it. The only solution that I can find is to automatically reset SPI peripheral on the PiPico if the message is not right. And it seems to work.
So the protocol at this point would be something like this. When a program on the host v06x encounters an OUT instruction that selects columns, it retransmits this selection to the PiPico. E.g. "0xe5 0xfe" to select column 0. Later IN instruction sends a request "0xe6 0x00" and receives rows in return. For some other technical reasons I had to add a third byte to be able to reliably get the data back.
So all of this is minor technical details, something you always deal with when putting relatively unknown pieces together. What matters is that albeit with more complexity and slightly less pretty than initially imagined, stuff works.
SD card
Enter the second peripheral.
So there's also an SD card, which is a must have. There are more free pins on ESP32, but on this board it is connected to the same bus, using all the same wires as the external SPI peripheral, except for the CS pin obviously. That was a known from the beginning, and it should never be a problem. SPI slaves hi-Z their I/O when CS is not asserted and have no impact on the bus whatsoever.
I'm really glad that the Espressif SDK has SD/MMC card and FAT components conveniently standardized. Huge kudos to them for doing that. So I have put together my first little test that would just list files on the card and print them in the console. However, the card would not mount. After verifying all pin connections and some frustrating searching for similar errors, I remembered about the keyboard. Some long troubleshooting hours later I realised that SD card works when I disconnect MISO pin from the keyboard, and only then. No matter what I would do, MISO line connected to PiPico with initialised SPI peripheral (completely regardless of mode) would mean total and complete bus sabotage. Beautiful.
I have long suspected that eventually I would have to use a custom SPI peripheral built using PIO. So this seemed like a good moment to try. But after some research, and much later than I should have, I found that the only example doing that that I could find needs consecutive pins in an arrangement not compatible with the standard SPI peripheral pins. Which I very much need because...
Read more »Platform
I noticed that it's not immediately obvious which hardware platform I'm using, because it's not exceedingly common. It's impossible to remember its name because is "ESP32-8048S050". It's cheap and yellow and it shares DNA with the better known "Cheap yellow display", but it's not the same. This one has a 800x480 IPS screen and it's driven directly by ESP32-S3 LCD peripheral, thus allowing me full control of refresh rate, making it as close to 50Hz CRT as possible.
Now for the updates...
mode512
I was afraid it's not going to be possible because of timing constraints.
But it turns out it's alright. I already implemented the key optimisation for this in the early stages of porting. The pixeling is done in pairs. So that each pair of pixels, which are always the same in 256-pixel mode, requires only one palette RAM access. So I already had the 2-pixel palette in place.
All I needed to add was some palette processing for the 512-pixel mode. The values for left-pixel would be replicated into every index on the right side, and the values for the right-pixel would be replicated into every index on the left side. When the mode switches, precalculated palette is copied in place swiftly. The main raster loop didn't need to be modified at all !
There's something about this version of BASIC called Бейсик-Корвет that I find magical. It's the font and the fact that it's hi-res and black and white and just a bit of childhood sparkle.
A video short featuring giant hands working tiny keys:
RUS led
This is a feature not really well supported in the emulators. The matter of fact is that it's an output line directly connected to a 8255 pin and as such it is subject to all the regular abuse like PWM. Strangely there are no programs known to me that would implement LED breathing for example. The emulators tend to just take the whatever value and display it at the end of a frame, if they bother to display it at all.
In v06x-mini I initially tried to update it immediately, but for now I resorted to just output the state at the end of the frame like other emulators do. The reason for this is very slow SPI communication with ESP32 drivers, which takes at least one FreeRTOS tick to complete. I think implementing SPI link using SPI HAL should not be a problem, but it's a lower-priority task for now.
The keyboard is attached via SPI, clocked at 8MHz. Pi Pico is SPI slave. Unlike most emulators that connect a PS/2 or USB keyboard, the keyboard matrix is scanned by the actual software. So each OUT to the column select port is sent over to the keyboard, and each IN from the rows port is then channeled back. There are exceptions for the keys that are off-matrix, those are scanned once per frame because some programs poll them frequently and SPI transactions are slow.
Some takeaway points from this stage:
Please correct me if I'm mistaken in any of the above points, or point to solutions. I'm particularly interested in lower-level, more barebone access to ESP32-S3 SPI peripheral. For example, I can't properly output LED status in due time without hiccupping the main loop because it must wait for a whole FreeRTOS tick. It's not a problem in 100%-o(n) cases because nobody uses keyboard LED for anything useful, but I know that it's not right and it bothers me.
Things that need to be done for this thing to be a useful Vector-06c:
Not many games use 512 pixel mode. It is essential for everything MicroDOS or CP/M. It's not the most amazing stuff v06c-wise, but it's sometimes also the most advanced stuff. The problem with it is that it 1) adds a conditional to the very very tight loop of the pixel filler and 2) can't use the same pixel-filling trick that I'm using for the regular 256-pixel mode. In other words, I'm not sure if it's possible to do at all.
8253 support is currently limited, beeper is not supported at all. I need to implement them differently, taking notes from the AY implementation from ZX-ESPectrum project.
SD card support is just dead boring because it also means some UI to be usable and that's some completely separate project that I don't really find entertaining.
A case... I have some cardboard boxes.
Create an account to leave a comment. Already have an account? Log In.
Become a member to follow this project and never miss any updates
 Carson Herrington
 moosepr
 Stephen Holdaway
 ziggurat29