 Stephen Holdaway
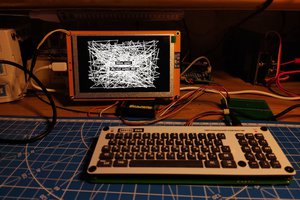
Classic binary data entry meets modern Unicode: 149K characters at your fingertips. A physical user interface to enter any Unicode character over USB, with a glyph preview and codepoint details rendered on-demand by the Raspberry Pi Pico under the hood.
- Large glyph preview (including colour emoji support) on a 280 x 240 display
- Modes for entering codepoints, UTF-8 encoding, and hex literals
- Acts as a USB HID keyboard to enter OS-specific sequences for codepoints
- ~200 MB of TTF font files accessed from an SD card, indexed on start-up for fast search by codepoint
- Unicode block and codepoint names embedded in firmware, refined from text files on unicode.org
- Brushed aluminium front panel with crispy legends applied by toner-transfer
I started this build for Hackaday's Odd Inputs and Peculiar Peripherals contest in mid-2022 on a tight deadline with a careful plan....but at the deadline, ready to submit with a low-fidelity build based on pre-rendered glyphs, I decided to bail on the contest. The build looked good, but it wasn't technically satisfying. It wasn't done. Fast-forward a year after the deadline around my chaotic work schedule, and this is finally in a place where I'm happy to write it up.
A full write-up on the build is here.
Whether you're selecting ASCII, Egyptian Hieroglyphs, or colour emoji, everything is rendered on device from true-type fonts. This is really stretching the legs of the Pico, and it was a challenge to pack it all in despite the impressive specs of the Pico in microcontroller terms.
If you want to play with the software, the code on GitHub can be built in "host" mode, which runs as an application on your computer using SDL2. This was done to allow quick iteration and debugging as the firmware image is large and takes a while to upload.
The initial build of this project is complete, but I'd still like to implement:
- Cycling through substitutions and ligatures from the GSUB table in a font. Many glyphs, particularly emoji, do not have a dedicated codepoint and are instead described as a sequence of other codepoints. Typically this would be handled with the layout library, Harfbuzz, but I had memory exhaustion issues doing basic tasks with that, so substitutions might need to be looked up manually.
- Drivers for Windows and Linux that allow directly injecting UTF-8 input (probably through the clipboard), rather than the slow and cumbersome approach of acting as a USB keyboard typing special key sequences. USB HID has no provision for sending Unicode, only keycodes which are mapped by the OS to the selected keyboard layout.
Notes and acknowledgements:
- User hsgw had a similar idea without a display for the same competition, which is also a nice build (and actually made it in for the deadline).
- The Pico C/C++ SDK is a dream to work with compared to other microcontroller vendor SDKs I've used. Kudos to the designers and developers!
- This project stands on the shoulders of open source works like FreeType, libpng,zlib, the Noto fonts project, and FatFS to name a few. Thank you to all of the maintainers and contributors who make these projects work. Building this toy project without your hard work would be an impossible undertaking.


 svofski
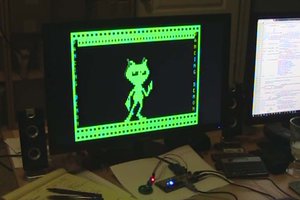
 ziggurat29
 Colin O'Flynn
I love the aesthetics of this! What toggle switches did you use, and do they feel as satisfying as they look?