Mrinnovative
Arduino-WiFi-Shield

Description
An Arduino Shield that allows you to prototype Arduino Wifi projects. It used Pin2,3 and Pin9,10 for Software Serial (Jumper Selectable). It can external power (9VDC) or be powered by the Arduino or from an FTDI Adapter.
The Arduino WiFi shield allows an Arduino board to connect to the internet using the WiFi library and to read and write an SD card using the SD library.
The WiFi Library is included with the most recent version of the Arduino IDE. The firmware for the WiFi shield has changed in Arduino IDE 1.0.4. It is strongly recommended to install this update per these instructions
The WiFI library is similar to the Ethernet library and many of the function calls are the same.
To use the shield, mount it on top of an Arduino board (e.g. the Uno). To upload sketches to the board, connect it to your computer with a USB cable as you normally would. Once the sketch has been uploaded, you can disconnect the board from your computer and power it with an external power supply.
Digital pin 7 is used as a handshake pin between the WiFi shield and the Arduino, and should not be used.
Applications
This shield provide great capability to arduino board to communicate over WIFI. we can control the arduino pins over WIFI. by using this shield we can log or read data from the server. We can also perform MQTT protocol means we can use it any IOT device.
Network Settings
The shield will connect to open networks, as well as those using WEP and WPA2 Personal encryption. The shield will not connect to networks using WPA2 Enterprise encryption.
The SSID (network name) must be broadcast for the shield to connect.
Depending on your wireless router configuration, you need different information.
For an open (unencrypted) network, you need the SSID.
For networks using WPA/WPA2 Personal encryption, you need the SSID and password.
WEP network passwords are hexadecimal strings known as keys. A WEP network can have 4 different keys; each key is assigned a "Key Index" value. For WEP encrypted networks, you need the SSID, the key, and key number.
Code Example
#include <WiFi.h>

char ssid[] = "yourNetwork";     //  your network SSID (name)
char key[] = "ABBADEAF01";    // your network key
int keyIndex = 0;            //your network key Index number
int status = WL_IDLE_STATUS;     // the Wifi radio's status

void setup() {
  // initialize serial:
  Serial.begin(9600);
  // attempt to connect using WEP encryption:
  Serial.println("Attempting to connect to WEP network...");
  status = WiFi.begin(ssid, keyIndex, key);
  // if you're not connected, stop here:
  if ( status != WL_CONNECTED) {
    Serial.println("Couldn't get a wifi connection");
    while(true);
  }
  // if you are connected, print out info about the connection:
  else {
    Serial.println("Connected to network");
  }
}

void loop() {
  // do nothing
}
CIRCUIT DIAGRAM

You can download the circuit file from here. https://oshwlab.com/ctbully/wifi-shield-prototype
PCB
This PCB is good invetment for your projects, it can help you in you IOT projects. it can addon WIFI capability to your project. and its fun to make project also
so guys if you like to order this WIFI shield PCB you so you can download all required files from the link given below.. I'll suggest you to try JLCPCB.com because JLCPCB.com is the one stop solution for all your PCB needs


You can download the PCB gerber file from here. https://oshwlab.com/ctbully/wifi-shield-prototype

SMT Assembly service of JLCPCB.com is cherry on top now get your PCB fully assembled and save your time and money Select components for your PCB from there Parts Library of 200k+ in-stock components they are offering $27 valued New User coupons & $24 SMT coupons every month $8.00 setup fee, and $0.0017 per joint
Now no need to order components separately for you PCB and get free from stress of soldering them on PCB just try PCB SMT assembly service and get you PCB with components pre assembled...
Read more »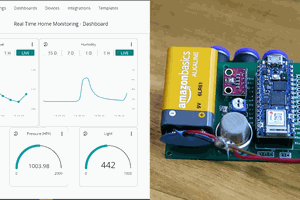
 Jithin Sanal
 ElectronicABC
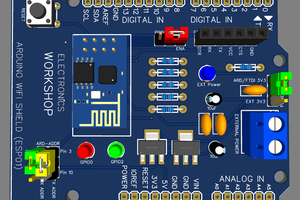
 electronicsworkshops