Jan Schlieper
-
Nesting
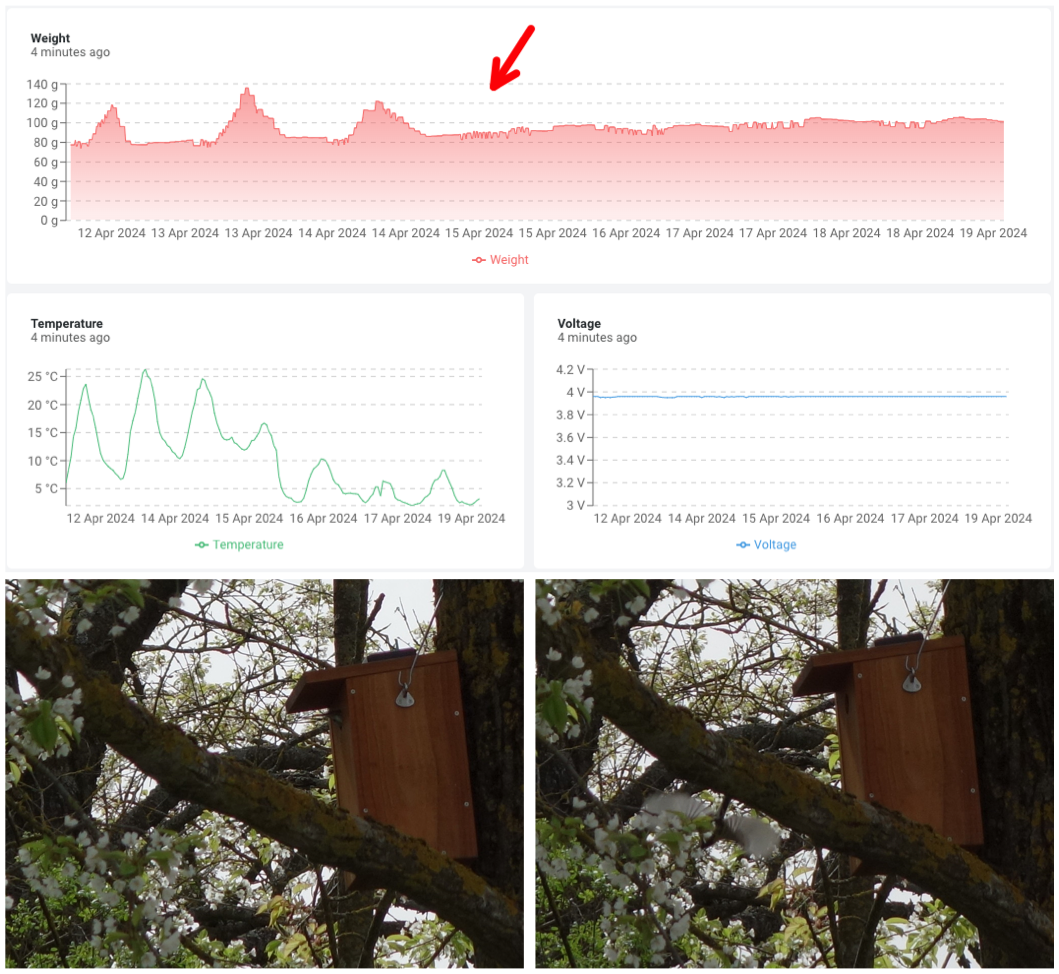
04/19/2024 at 08:49 • 0 commentsI just wanted to let everyone know that the birds have started nesting again. They started bringing in material around the the 19th of March. And 80 grams later the female now seems to be almost permanently inside the birdhouse (please see the image below). For comparison: Last year they also started bringing in material around the 19th of March and the female started nesting on April the 13th. The nest last year also weighed about 80 grams. It amazes me to see how precise the birds are timing all of this (without wearing a watch ;-) ).
![]()
-
Temperature Sensor
03/28/2024 at 17:51 • 0 commentsI have been testing the NAU7802 non calibrated internal temperature sensor to see if it is usable as a replacement for e.g. the TSic306. A MCP9808 calibrated I2C temperature sensor helped me get some reference temperature readings. For testing I put the NAU7802 and the MCP9808 into the freezer of my fridge and after a couple of hours took them out and watched them warm up. From what I can tell the NAU7802 build-in temperature sensor is very linear (please see the image below). The only problem I encountered can be seen in the histogram below. There seems to be a systematic error in the NAU7802 ADC reading the temperature sensor of about +-0.3 degree Celsius. I'm guessing this has something to do with me recalibrating the analog frontend of the NAU7802 whenever input channels are changed (but I haven't investigated further). Despite these errors I think the build-in temperature sensor is still adequate for the birdhouse. It measures the temperature exactly in the right spot and helps save power compared to any extra hardware.
![]()
-
Prototype Scale
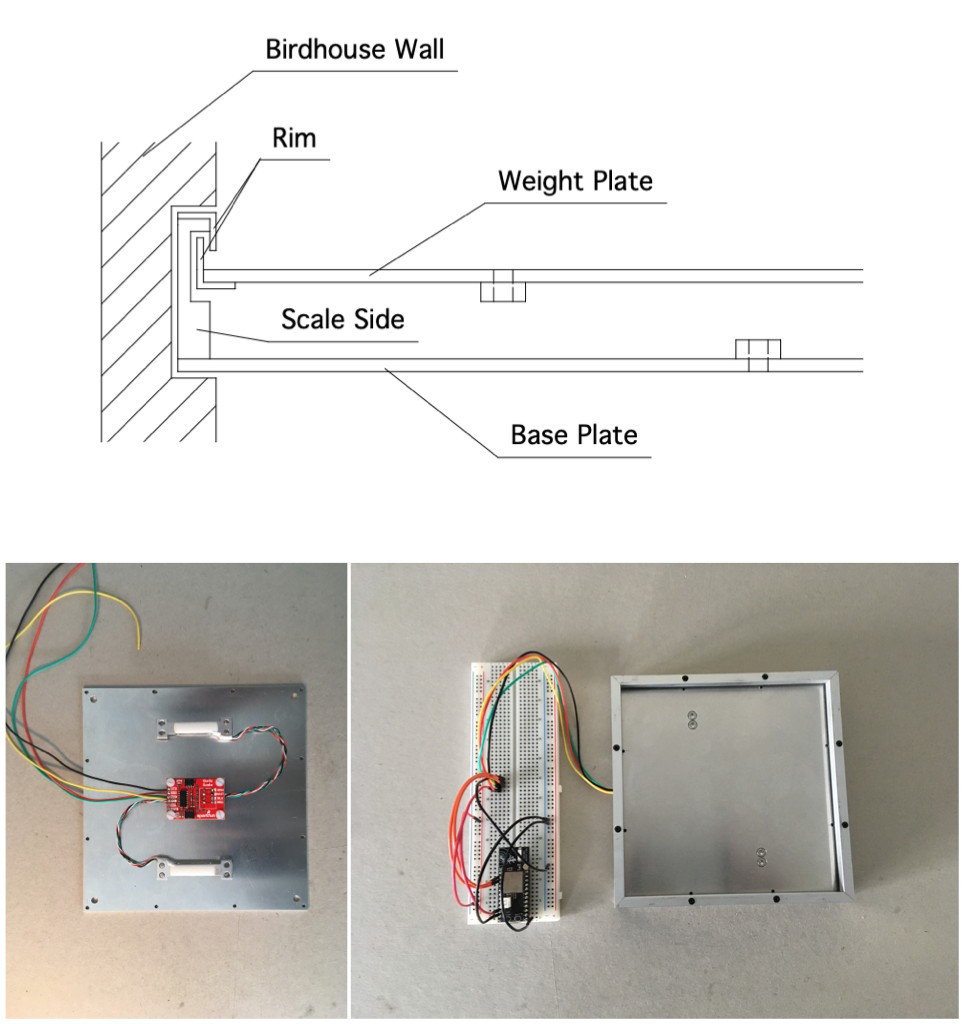
02/16/2024 at 10:51 • 0 commentsI have been working on a new scale over the past few weeks. The scale has some major changes compared to the previous one:
- NAU7802 ADC instead of the HX711
- Two load cells instead of one
- Better mechanical stability/durability
The NAU7802 is a much improved Analog Digital Converter (ADC) compared to the HX711. Some of it's features include an I2C bus for configuration and reading values, two input channels and a build in (non calibrated) temperature sensor. The two load cells provide better mechanical stability for the scale but also make getting a weight value from the scale more complicated. At first I tried hooking up the load cells in parallel to a single channel of the NAU7802. That did not work out too well. The scale produced all sorts of values depending on where the weight was placed on the scale. The configuration I am using now hooks up each load cell to a dedicated channel of the NAU7802. I'm calibrating each load cell as an individual scale and then add up the two weight values to get the total weight on the scale. This is just like two people carrying an object and sharing the load. One person might be carrying more of the weight because the load is not equally balanced but if you add up the weight each person is carrying you end up with the total weight of the object. And last but not least I have added a rim to the scale weight plate. This should make it harder for nesting material to clog up the scale.
![]()
-
Temperature Correction
10/24/2023 at 05:07 • 0 commentsI finally got around to sorting the temperature calibration of the scale. The scale now has four values used for calculating the weight:
- scaleOffset (ADC steps)
- scaleFactor (ADC steps per gram)
- temperatureOffset (grams at zero degree Celsius)
- temperatureCoefficient (grams per degree Celsius)
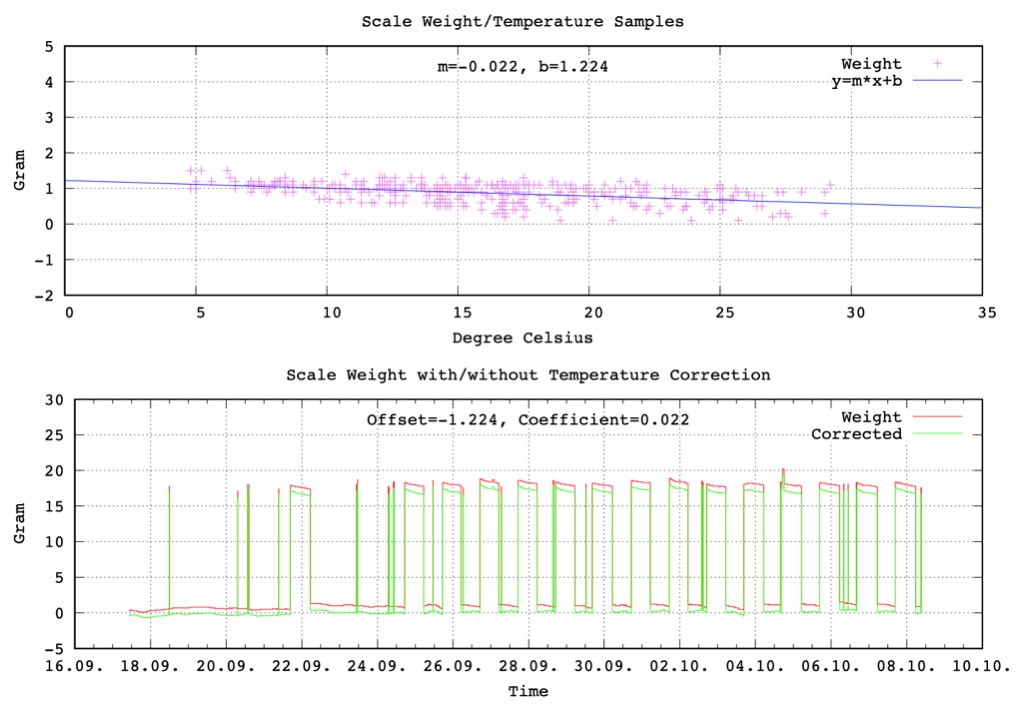
The first two are the ADC offset and factor. These are set when the scale gets calibrated for the first time. Both values are used in the HX711 library to calculate the weight. The scale also no longer does a tare (the results of a tare are sometimes very "dynamic"). The next two values are the offset and coefficient for the temperature correction. Weight and temperature correction get calculated using the following formulae:
weight = (adc_steps_measured - scaleOffset) / scaleFactor
correction = (temperatureCoefficient * current_temperature) + temperatureOffsetTo determine the values for the temperature correction I created a gnuplot script which does all the required math. As input the script needs a couple of days/weeks worth of zero weight values measured by the scale at different temperatures. During that time the little bird is allowed to sleep in the birdhouse but not build a nest (the script needs values without any weight on the scale). The script shows the zero weight values taken at different temperatures in the first plot (please see the image below). Gnuplot then fits a linear equation through those measurement points using the Marquardt-Levenberg algorithm. The second plot then shows the offset and coefficient just calculated applied to the input data. If the result is satisfactory the temperature offset and coefficient can then be sent via LoRaWAN downlinks to the birdhouse.
![]()
-
New Tenant
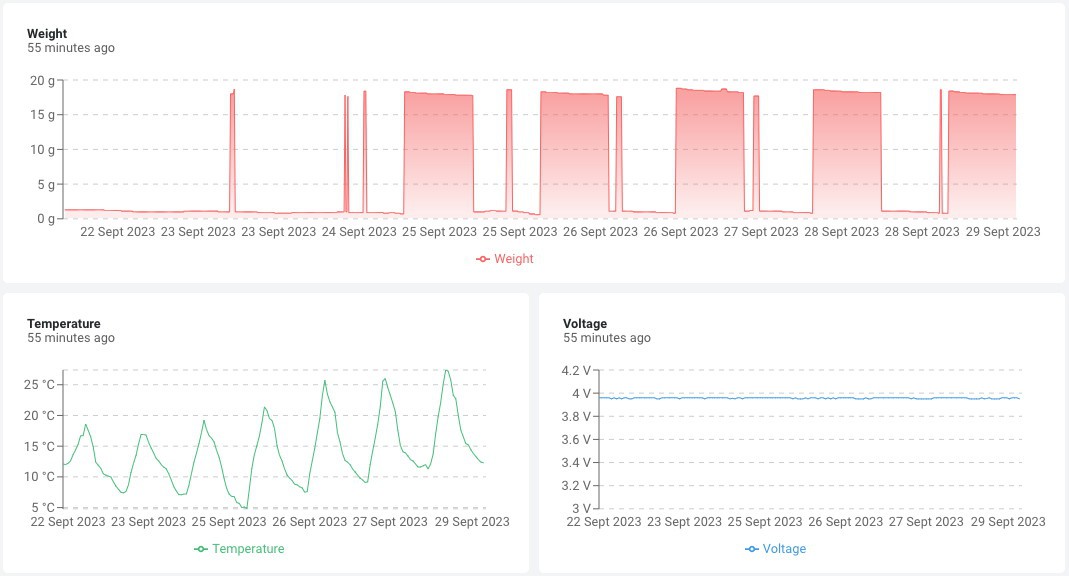
09/29/2023 at 05:39 • 0 commentsThe birdhouse has a new nightly visitor (please see the image below). This is early in the season compared to November 2. last year when the first nightly visits started.
![]()
-
Switch
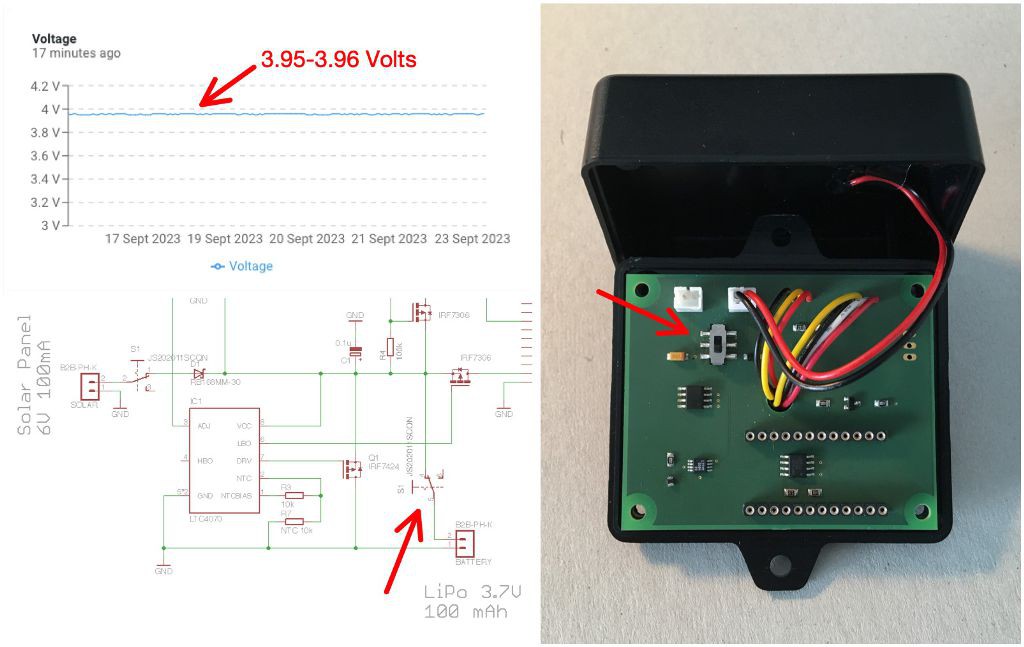
09/23/2023 at 09:30 • 0 commentsI made a mistake with the last PCB design. I added a switch to disconnect the battery and solar panel from the rest of the electronics if needed. Turns out that was not a good idea. The switch S1 is connected in series to the LiPo battery (please see the image below). What I did not realize was the LTC4070 sees the internal resistance of the switch (it's supposed to be less than 70 Milliohms) and now only charges the battery to about 3.95 Volts instead of the usual 4 Volts. In hindsight adding a switch to the PCB was a bad idea anyway. It just adds another point of failure to a system that is never supposed to stop running. At the time I just thought it would be nice to have a power switch while developing :-) .
![]()
-
New Antenna
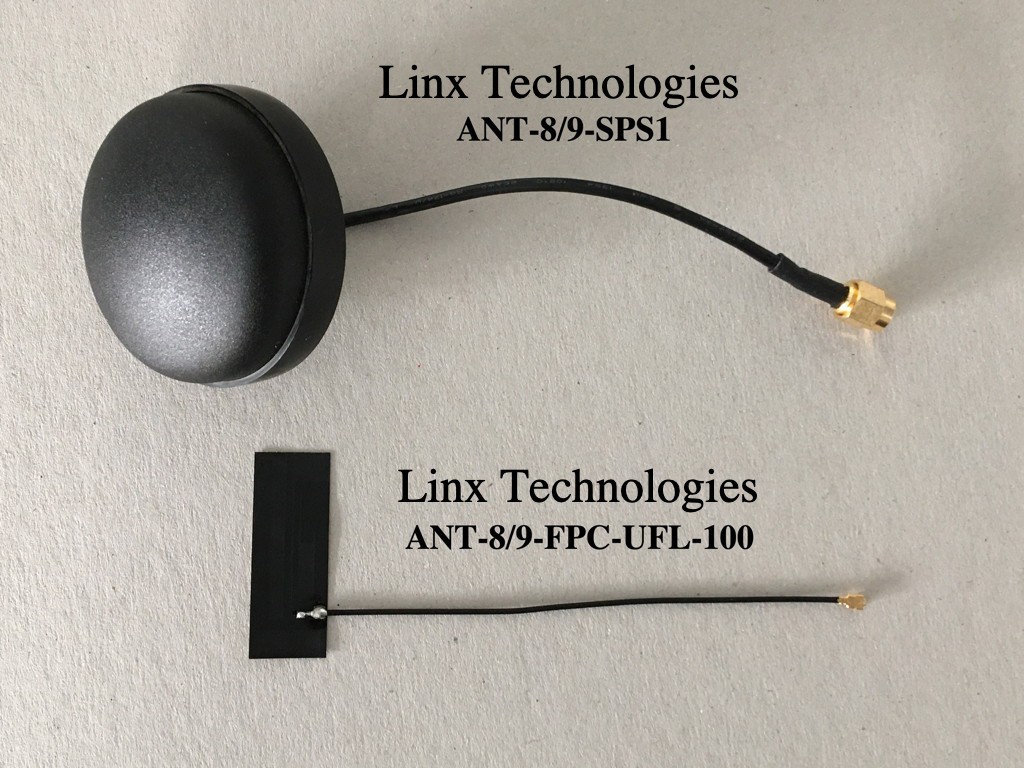
09/19/2023 at 08:16 • 0 commentsInstead of having an external panel mount puck-style antenna the new birdhouse uses a flexible embedded antenna inside the electronics enclosure (please see the image below). Both antennae are dipoles not requiring a ground plane. The new antenna has the disadvantage of having a solar panel above it which probably affects its radiation pattern.
![]()
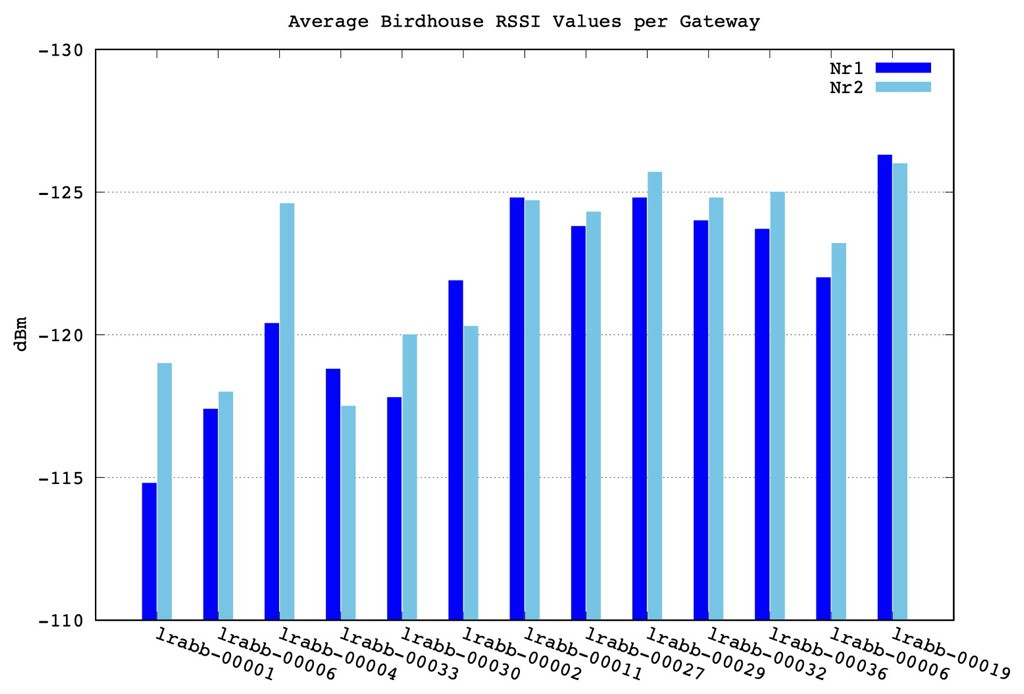
To compare the performance of the two antennae I gathered some RSSI values using TTN Mapper. In the chart below you can see the average RSSI values for the old (Nr1) and new (Nr2) birdhouse and the LoRaWAN gateways they use. Lower bars (higher RSSI values) in this chart are better. Except for a couple of outliers the new antenna outperformed my expectations. With most gateways the loss is only around 1-2 dB and there are a couple of gateways where the average performance is actually better.
![]()
-
Version 2.0
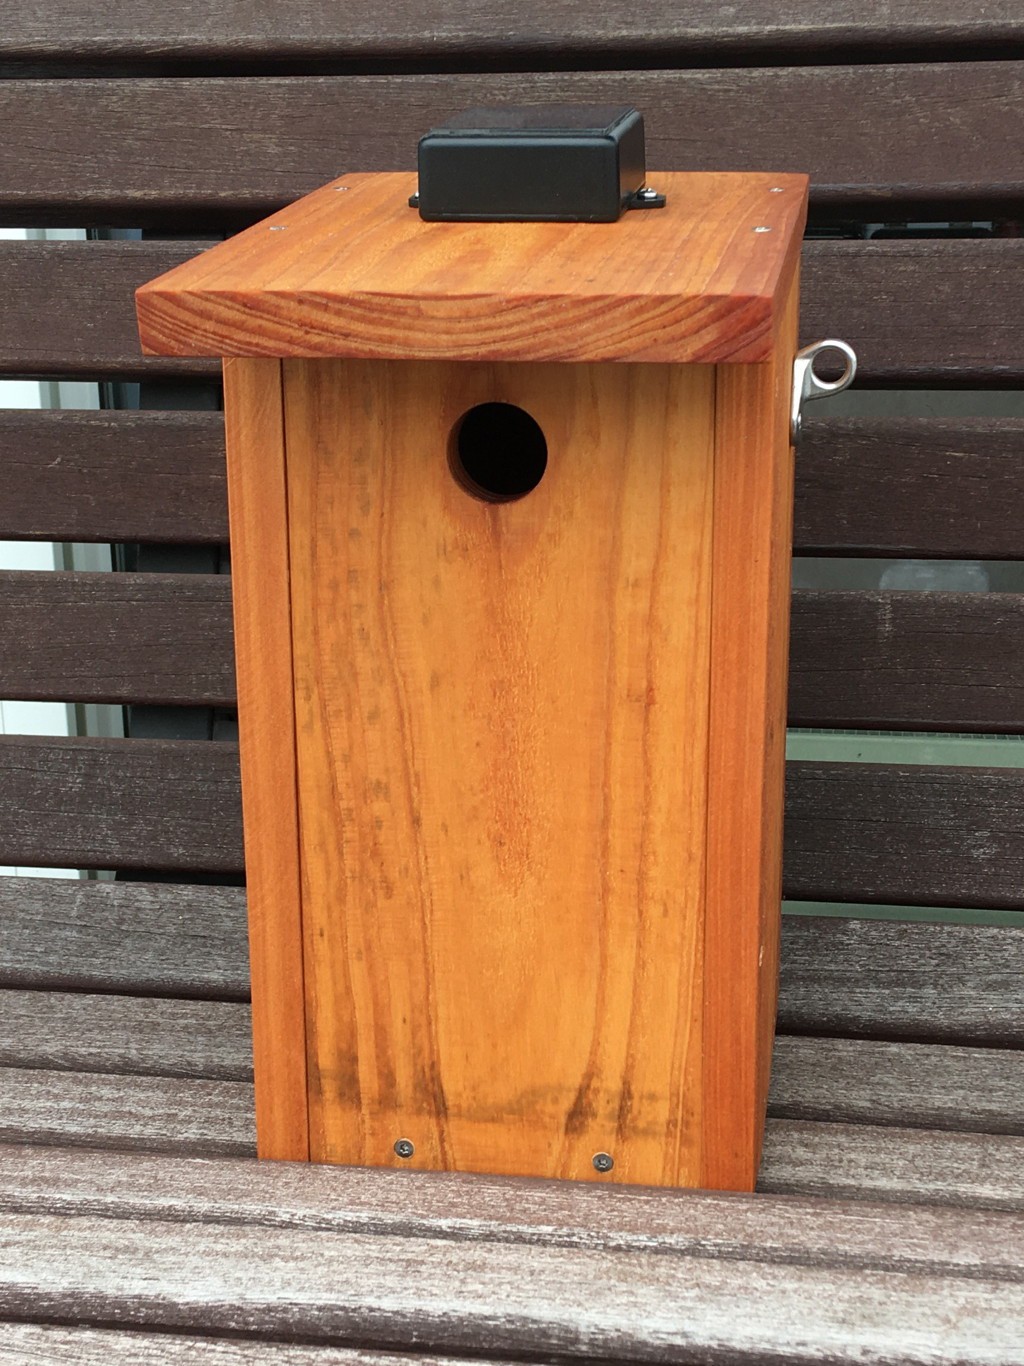
09/12/2023 at 08:19 • 0 commentsI have replaced the birdhouse today with a new (and hopefully improved) version. The new features include a wall to wall scale on the inside and the electronics, solar cell and antenna are now all in a single enclosure on top of the roof. There are a lot more smaller enhancements which you can check out in the Version2.0.zip file if you are interested (I have moved all of the older design files and images into the Version1.0.zip file).
![]()
-
New Tenant
05/31/2023 at 14:13 • 0 commentsI just wanted to let you know that shortly after I put the birdhouse back up again another great tit moved into the birdhouse and started building a new nest (please see the image below).
![]()
-
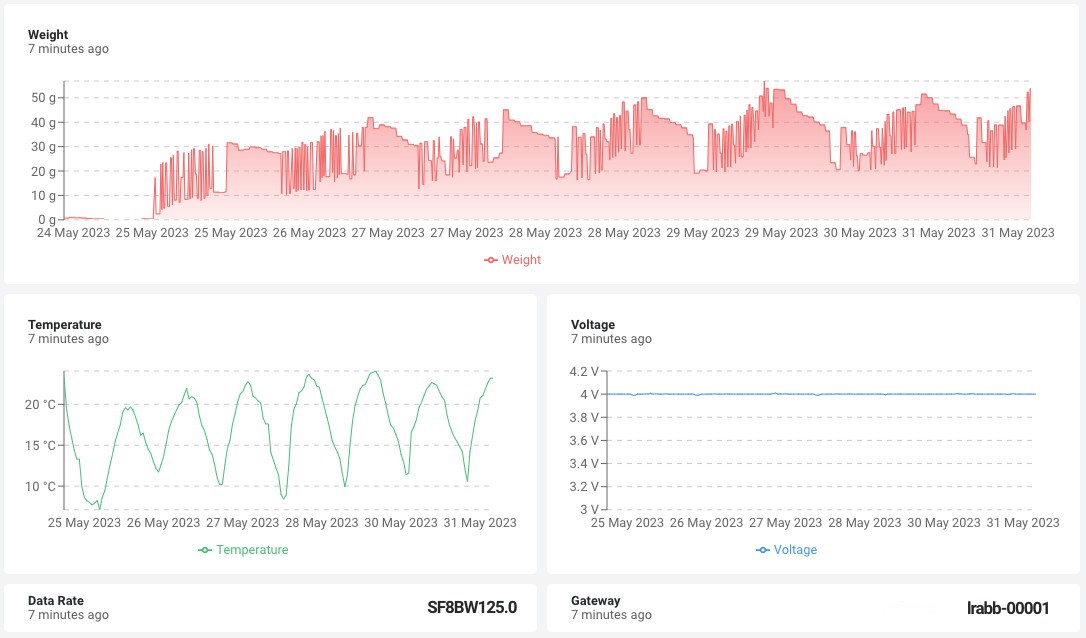
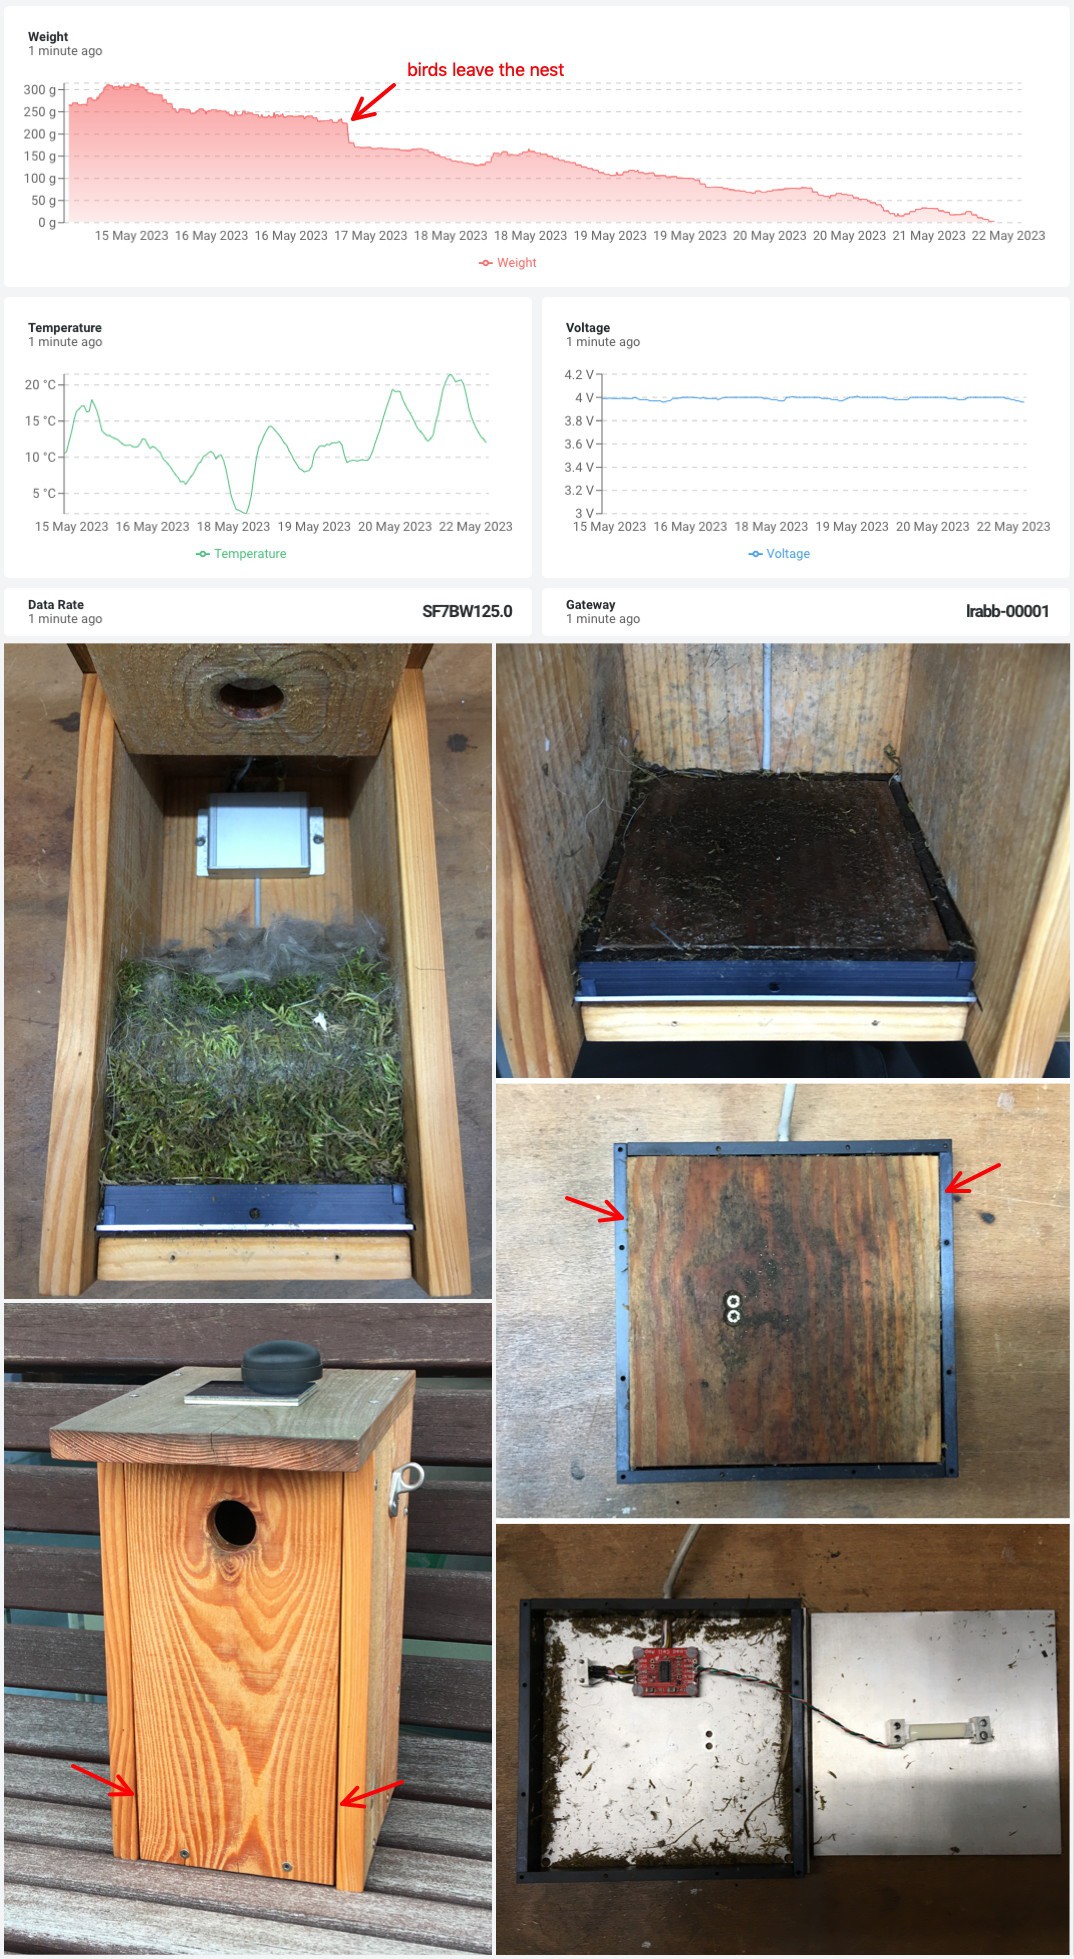
Moisture
05/24/2023 at 16:41 • 0 commentsYesterday morning I took down the birdhouse to investigate the high/drifting weight values (the birds have not returned since last week). There was a lot of mud and moisture underneath the nest built out of moos and down feathers (please see the image below). The moisture caused the veneer on the scale plate to swell and push against the sides. This is what caused the high/drifting weight values (the actual nest by the way only weighs about 80 g). Up until now I have treated the wood only with linseed oil. The oil is environmentally friendly for the birds (it's basically vegetable oil) but apparently doesn't work too well protecting the veneer. I also noticed the gaps between the front panel and the sides of the birdhouse getting bigger. For the next version of the birdhouse I will probably add two more screws to the front/sides of the birdhouse to prevent those gaps from growing. I might even try waterproofing the birdhouse more by using some form of insulation (e.g. foam tape/silicone) between the wood panels. Less moisture on the inside will be good for the veneer (and the birds :-) ).
![]()