Close
0%
0%

Dreamdrive64

Open source N64 rom cart based on PicoCart64 and using 2 rp2040 mcus

Similar projects worth following
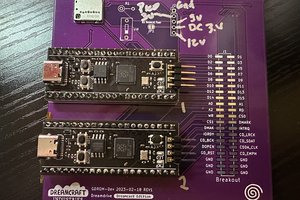
Open source n64 rom cart. Fork of the original PicoCart64 but with custom working board that uses 2 rp2040s, a bank of 8 64Mb PSRAM chips, a 16MB flash chip, and ESP32 for additional wireless capabilities.

Purchase Dreamdrive64 from my website here: https://dreamcraftindustries.com/products/dreamdrive64

The Adventure Begins 

The enthralling tale of Dreamdrive64 finds its origin in the PicoCart64 project. In the sun-soaked summer of 2022, I embarked on a thrilling new chapter, fueled by an abundance of free time and an unwavering passion for custom hardware projects. This venture promised an exciting opportunity to contribute, learn, and grow.

As autumn leaves began to fall in 2022, I emerged as the sole active member of the project. However, I was far from lonely, as the project's lively Discord community brimmed with inspiring individuals eager to share their knowledge and expertise. I am eternally grateful for their infinite patience and invaluable experience.

Driven by an aspiration to forge a unique creation, I decided to infuse the project with a dash of personal branding. Embracing its open-source roots, I envisioned this as the first genuine product that I could proudly build and sell. Thus, the Dreamdrive64 was born, ingeniously crafted upon the foundation of PicoCart64's "v2" hardware.

Project Background 

The PicoCart64 was a straightforward PCB that allowed users to solder a Raspberry Pico (or clone) and flash a small ROM onto it. While functional, its capabilities were limited, supporting only one small ROM at a time.

In contrast, the "v2" hardware featured a bank of eight PSRAM chips, providing 64MB of non-persistent storage for loading ROMs from an SD card. The design also included two RP2040 chips responsible for communication with the N64, the SD card, and the PSRAM. An ESP32 was integrated into the board, offering the potential for innovative wireless features or simply empowering developers to get creative.

The v2 branch was quite basic. Both RP2040 chips were booted from the same flash chip, and a rudimentary test setup enabled reading from the SD card, writing/reading to the PSRAM in SPI mode, and loading code from flash into RAM. While the foundation was set, significant work remained to transform it into a fully-fledged ROM cart.

Overview

The psram and flash, are connected via the rp2040's qspi lines. These lines are typically only used to communicate with flash. A demux is included on the board to address the individual psram chips. The two rp2040's we will call MCU1 and MCU2. The following is the broad overview of the connections:

MCU1 

  • N64 bus 
    • 16 address/data lines, 
    • 2 address [high,low] latches, 
    • 1 read line
    • 1 write line
    • 1 dat line (joybus)
    • 1 for the "cold reset" line
  • 2 gpio connected to MCU2 for inter-mcu comms
  • 3 pins to address the demux 
  • 1 input enable pin to control the demux ouput and toggle/disable the flash.
  • QSPI pins connected to flash and psram
    • CS line is connected as input to the demux

MCU2

  • 2 pins for CIC communication to the n64
  • 1 pin for the "cold reset" line
  • 1 pin connected to MCU1's 'RUN' pin
  • 2 pins for comms with MCU1
  • 6 pins for SD Card comms
  • 6 pins for comms with the ESP32
  • 3 demux address lines
  • 1 input enable pin to control demux ouput and toggle/disable flash.
  • QSPI pins connected to flash and psram
    • CS line is connected as input to the demux

MENU ROM

I wrote a menu using the open source n64 sdk, libdragon, that contains a simple file explorer to browse the contents of the SD card and load a selected rom file. 

The Dreamdrive64 has it's own address space with which a rom can interact with. In my case I added the ability for the rom to pass through filesystem commands to read from the sd card. 

These requests flow: ROM->N64->MCU1->Serial comms->MCU2->SD card->disk_read->MCU2->serial comms->MCU1->N64->ROM

BOOT

  • MCU2 is connected to the USB port and the wiring of the demux is setup such that it will always boot from flash
  • Program is copied from flash to MCU2's ram
  • MCU2 disables flash access and asserts MCU1's run pin
  • MCU2 starts CIC communication stalling until cold reset is asserted
  • MCU2 init's serial inter-mcu comms and await's MCU1's commands
  • MCU1 starts, loads the N64 bus while loop and await's the N64's requests.
  • MCU1 starts serial comms to MCU2. 

Challenges

The most significant...

Read more »

  • 2 × RP2040 RP2040 MCU
  • 8 × APS6404L_3SQR PSRAM

  • v1.0.0 Firmware Done!

    Kaili Hill04/11/2023 at 18:28 0 comments

    Yesterday I uploaded a stable firmware build to the github releases page. Running the rp2040s at 266MHz with a qspi clock divider of 4. This means the PSRAM can be accessed at 66MHz, which with all the testing I did with DMA and where to place the statements for fetching data, means I can comfortably hit N64 PI bus speeds of 0x2040, which is a bit away from the stock speed of 0x1240 but functions well enough for most games.

    Currently only EEPROM (both 4KB and 16KB) are saved/loaded from the SD card. FlashRAM support (1Mbit saves) aren't yet supported nor is SRAM. SRAM works while the the cart is powered but I'm still figuring out the best timing to send that data for save. I thought that the reset button on the N64 would give me some kind of alert so I could use that to dump saves before the user powered off. It might, but I haven't been able to figure that out yet. 

  • Now Shipping!

    Kaili Hill04/06/2023 at 18:49 0 comments

    It's Happening!

    I have all the parts needed to start producing the first batch of Dreamdrive64s!  If you want to pick one up you can do so here https://dreamcraftindustries.com/products/dreamdrive64

    Firmware v1.0 is ready and will be up on github before anyone receives their Dreamdrive64s. All units will ship with the latest firmware. All users need to do is unzip a folder into the root of their SD Card that contains some extra info for the cart to read to add eeprom save support as well as loading thumbnails for highlighted roms in the menu.

    There is still some process to figure out if I ever need to scale up. There is still a bit of manual work involved with getting the product together. Cutting of the cart shell to accommodate the SD Card and usb plugs. A small hole needs to be drilled through the back so the user can poke a button while plugging in the usb in order to update the firmware.

    Once I have shipped a few of these things I'll better understand some of the challenges that come from manufacturing something like this. I'm also still working on developing my own injection molds for the shells so I can manufacture those in the workshop without having to buy something off the shelf. Stay tuned for more updates about that process involving 3d printing molds and building a CNC mill.

  • Conquering Clocks and Gremlins

    Kaili Hill03/29/2023 at 21:05 0 comments

    PSRAM Challenges

    The PSRAM presented numerous challenges throughout development. One issue arose from the SSI clock divider, which could only be set to even integers. When the RP2040s were originally clocked at 266MHz to meet N64 SRAM timings and the divider was set to 2 (resulting in a 133MHz QSPI), games experienced erratic errors and often failed to boot.

    A 266/4 configuration (66MHz QSPI) was insufficient for achieving "stock" N64 bus speeds. On the PicoCart-Lite ("v1"), this wasn't a problem, as the 266/2 setting (133MHz QSPI) with short data lines to flash proved reliable and allowed for stock speeds.

    This project marked a turning point in my learning journey, as my background in software engineering had previously led me to treat hardware as a weekend project. In the past, I had the luxury of "ignoring air resistance," but this endeavor demanded a thorough consideration of such variables.

    Reflections, line impedance, terminating resistors, and topography all became familiar terms as a fellow Discord member and I grappled with hardware gremlins. This helpful individual even went so far as to reroute the PSRAM data lines, add terminating resistors, and assist me in resolving hardware issues over several months.

    After attempting to overclock the RP2040s to a 360/4 setting (90MHz QSPI), I achieved stock speeds with mostly stable data reliability. Another hardware revision incorporating termination resistors and the 360/4 configuration appeared to be the solution. However, when testing additional boards from my batch, I discovered that at least one of them failed to operate at these frequencies.

    The Quest For Data

    So some notes on how the n64 bus works. The n64 sends a 32 bit address: upper 16 bits sampled on the falling edge of ALEH (Address line high), then lower 16 bits sampled on the falling edge of the ALEL (address line low). There is then a delay before the read line goes low which is the cart's cue to fetch the data and have 16 bits of data ready on the data lines when read line is asserted.

    The time after ALEL -> low and read low depends on the n64 bus speed but is as quick as 1us. This gives us some time to "prefetch" a half-word of data in anticipation of the read line going low.

    Read line low and the pulse that follows to latch the read data are also affected by the n64 bus speed.

    • Stock speeds are 0x12 = 18 n64 cycles @ 62.5MHz.
      • The read line is low for roughly 300ns
      • The n64 fetches 32bits, the read line pulses for about 60ns then goes low again. 
      • Reads are finished once ALEH is asserted. 
      • So at the stock speeds, this should give us about 300ns to fetch and get data ready.
    • The qspi hardware fetches 32bits of data. 
      • For the psram chips this means 
        • 22 clocks to send, 8bit command, 24bit address, 6 wait cycles, 32 bits of data. 

    Once we have the address we have 1us to prefetch the first half-word. In that 1us time:

    • Set the right chip to access via the demux
    • Setup the DMA to read from the xip pointer address at the appropriate transformed location
    • Wait for the read to complete

    We then wait for the read line to go low:

    • Put the data from the dma buffer into the PIO tx fifo
    • Start the DMA read for the next address 
      • we assume there will be another read as the n64 can read up to 256 words before sending a new address, although it can also be less.

    Here is what that code looks like 

    if (last_addr >= 0x10000000 && last_addr <= 0x1FBFFFFF) {
        // Domain 1, Address 2 Cartridge ROM
    
        // Change the banked memory chip if needed
        tempChip = ((last_addr >> 23) & 0x7) + 1;// psram_addr_to_chip(last_addr);
        if (tempChip != g_currentMemoryArrayChip) {
            g_currentMemoryArrayChip = tempChip;
            // Set the new chip
            psram_set_cs(g_currentMemoryArrayChip);
        }
    
        // Set the correct read address
     (&dma_hw->ch[dma_chan])->al3_read_addr_trig = (uintptr_t)(ptr16 + (((last_addr - g_addressModifierTable[g_currentMemoryArrayChip]) & 0xFFFFFF)...
    Read more »

View all 3 project logs

  • 1
    Not for the faint of heart

    There are a LOT of components on this board. I'd not recommend attempting to assemble the board on your own unless you possess a lot of time or a lot of skill. I had my boards assembled from JLCPCB where I had them manufactured. 

    That being said, there aren't any real gotcha's to be had. The terminating resistors for the qspi lines (2 for each line next to each mcu) are 1k but can be adjusted if you want to troubleshoot getting the qspi bus to run at >90MHz (e.g. 133MHz). 


    When plugging in the pcb to your n64, the face with all the components should be facing AWAY from you. The board is also labeled with "front" and "back". With "back" being the side with the components.

View all instructions

Enjoy this project?

Share

Discussions

SP wrote 05/19/2023 at 14:08 point

Hello, I'm a dumb dumb, Is it more orientated towards developers and gamers shouldn't be concerned with choosing this over the PicoCart64? thanks!

  Are you sure? yes | no

Similar Projects

Does this project spark your interest?

Become a member to follow this project and never miss any updates