Gathering components.
The TCD1304AP has a good sensitivity in the wavelength range of 400 - 700nm, allowing to apply a 650nm laser. Such diode lasers are widely available and very cheap, I apply a Chinese one of less than €5.-. The prism comes from Hong Kong for just below €19.-, while I bought 2 CCD-chip’s in China for less than €23.- And 2 Blackpill MCU boards (STM32F401CCU) were ordered for less than €9.-, also in China.
First steps.
At first I tried to bypass the nasty details of the readout of the CCD-chip by ordering a small board with a programmed MCU. It should drive the CCD and deliver the data in bytes over its serial TTL output, followed by a small TTL to USB converter. The boards arrived, already connected by a short 4 wire Dupont cable, without any documentation or instruction (usual with AliExpress. I connected the USB-C and tried to collect the expected bytes. No success. After a short time I discovered the CCD chip and the voltage regulator on the MCU board were really hot. Further inspection learned there was a connection error: the pre-connected cable was swapping the V+ and Gnd, baking the various semiconductors. After some struggle and intervention of AliExpress, I got a full refund of the paid €34.37!
This adventure learned me to go the hard way: learn how to program the MCU myself. In the meantime I had read stories of other technical enthusiasts, and understood that the coding of STM MCU’s is a big difference from programming an Arduino. So I bought myself a Nucleo-476RE board and started to follow a lot of tutorials, introductions and other information to master the Nucleo board with the STM32CUBEIDE. I considered myself lucky to have gathered some experience with Arduino’s and followed an online C++ course, it helped me to understand the new stuff more easily.
However, in the beginning I got mad with all acronyms: as newbie in this area of programming, it is like hearing old Greek or Chinese, no idea what is meant. I made myself a list with all new abbreviations plus their meaning, that helped me learning. I also read regularly advises to skip the ‘bloatware’ of the STM IDE and program the registers directly, because that’s where after all the actions are defined. I considered that approach too difficult for me, in that stage I only had a vague idea of how registers control the actions of the MCU.
Getting started.
Via the Hackaday site I found some other guys who are/were working with TCD1304 CCD’s. The extensive explanation of ‘Curious Scientist’ of building an application for the readout of the photo-diode signals appeared also a hands-on introduction of the STMCUBEIDE, I learned a lot from him. Another guy, Esben Rossel, proved to be very interested and helpful, although he worked with such CCD years ago. He also sold me a small PCB with some SMD components mounted like proposed in the Toshiba Datasheet, so I didn’t have to make it myself.
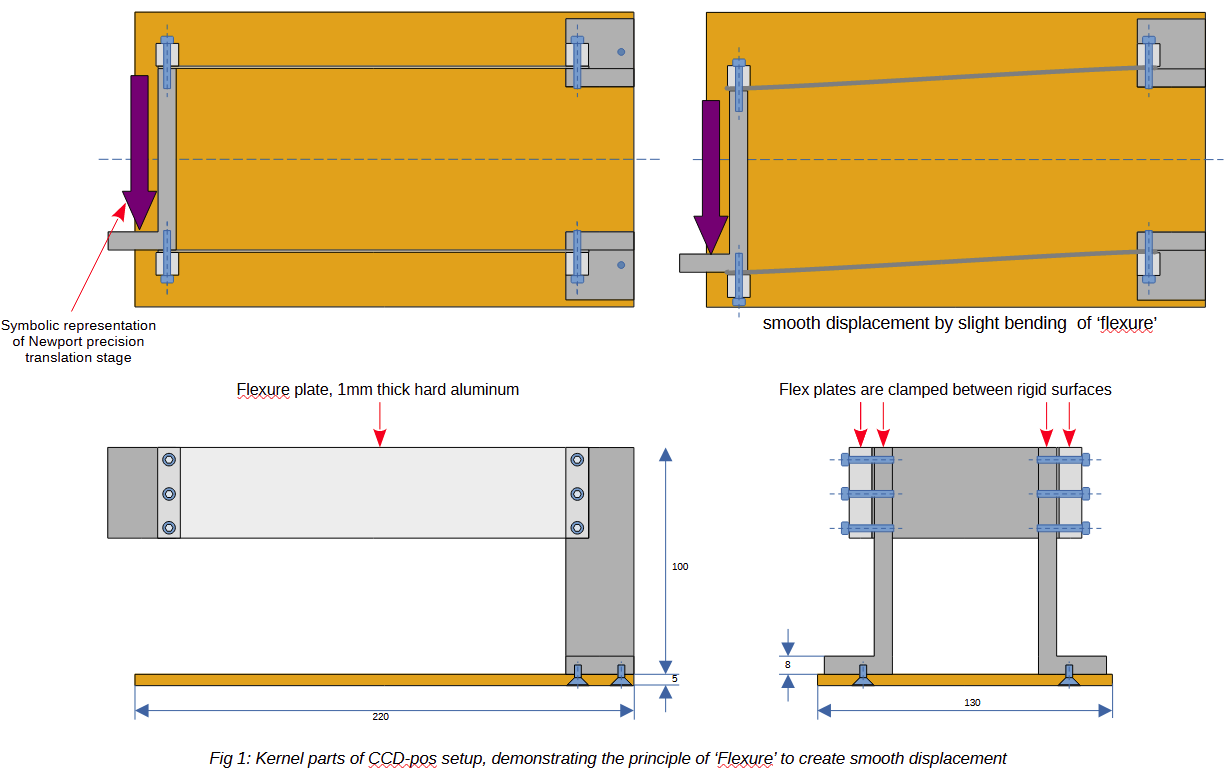 The mechanics were completed with the mounting bracket for a 5mW 650nm diode laser, including a simple but effective adjustment mechanism. The prism is glued with double sided tape to a small Aluminum strip with slits, bolted to a L profile to allow perpendicular positioning against the laser beam. The L profile has vertical slits to make horizontal...
 Kuldeep Singh Dhaka
 Roman
Roman
 MagicWolfi