Close
0%
0%

Hack Skellington

Add machine learning, AI, and automation to a Halloween skeleton to truly bring it to life!

Public Chat
Similar projects worth following
Tired of halloween skeletons that repeat the same 3 phrases over and over again? Using a few inexpensive hardware components plus modern technology, you can bring your skeleton to life in a truly customizable way. It might be the star of your neighborhood, or the most feared!


My family loves Halloween.  Every year, we add to our collection of Halloween decorations that we use both inside and out of our house.  In recent years, we've hosted an outdoor Halloween costume party for the neighborhood and friends - including a chili contest and movie.

This year, I bought a posable life-size skeleton, the first of this kind that we've owned.  Maybe it was the fact that we for many years had a non-posable sound-activated talking figure who we are excited to bring out of storage but soon tire of the same 3 phrases ("Ha!  I hope I didn't SCARE you")... It probably had something to do the fact that I work at a robotics software company called Viam... Regardless, I decided I had to automate this skeleton.

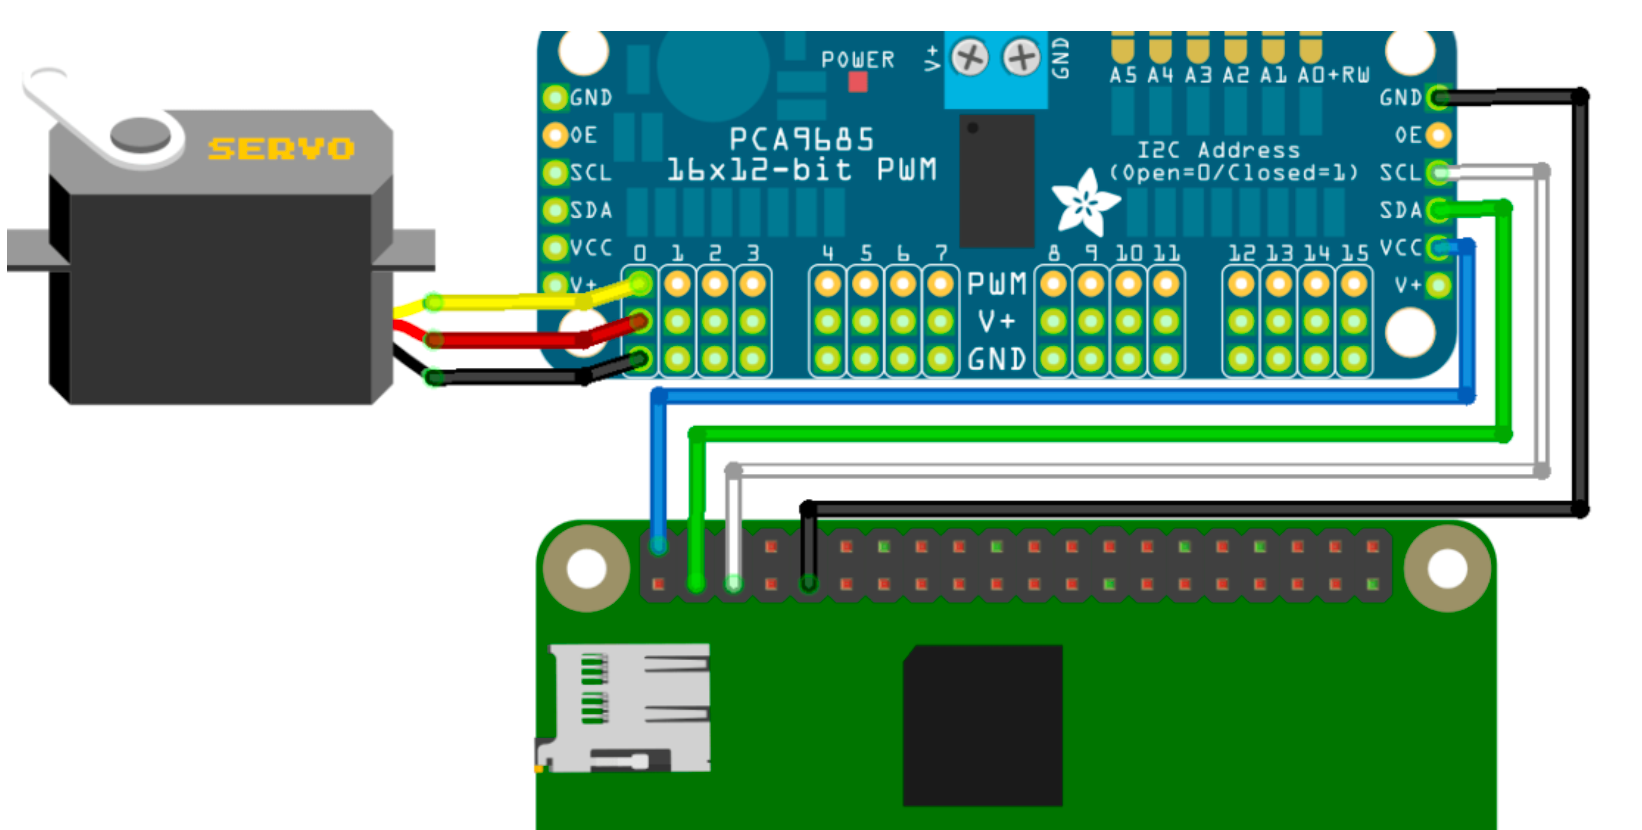
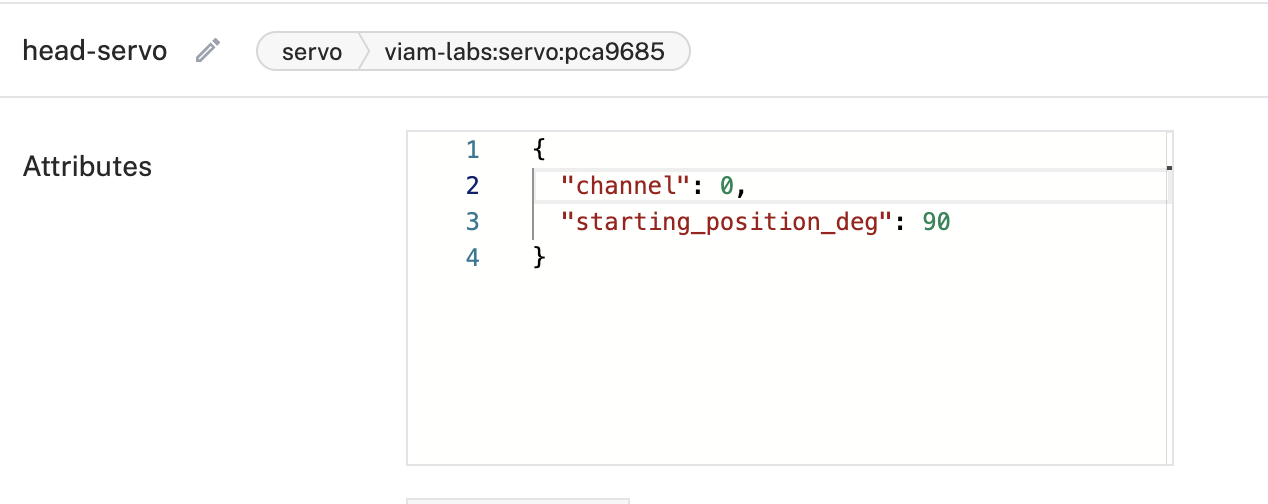
Spending less than $150 (half the cost being the skeleton), what could I do to add interesting and unique capabilities?  Adding head and arm motion with servos was a must.  Being able to program when this motion occurred by reacting to the environment was critical.  

Recently, I've created Viam modules for facial recognition and speech that can be used to add machine machine learning and AI capabilities to any robot.  With this software, a webcam, and a speaker - I could have Hack Skellington intelligently interact with his surroundings.  Recognize a face and welcome them to the party.  Move his head to look them in the eye when they look over.  Lift his arm up when they come close, giving them a good scare.  Use a creepy AI-generated voice to say various things generated by ChatGPT.

I'll show you how you can do this and more (customize the project to your desires) with less than a couple hundred lines of code!

  • 1 × Crazy Bonez Pos-N-Stay Skeleton Or other posable Halloween skeleton - I liked this one because the plastic is relatively thick and sturdy
  • 3 × MG995 Servo Or similar servos, I bought in a pack of 4
  • 1 × Portable 10000mAh or larger 5V power bank I used one from Enegon, most brands will do - you'll want dual isolated USB ports
  • 1 × Arducam Day & Night Vision USB Webcam Most USB webcams will work, I chose this because it has infrared night vision
  • 1 × Mini USB speaker I used one from HONKYOB that worked well

View all 12 components

  • 1
    Unscrew the front part of the skull

    What a fun-sounding title to start this project!

    Removing the front part of the skull
    Removing the front part of the skull

    You'll need a small philips-head screwdriver.  Remove the 5 screws holding the front portion of the skull to the back portion of the skull.  Your SBC (single board computer), servo driver (PCA9685), and servo to move the head and jaw will be housed here.

    Place it to the side, and keep the screws in a safe place.

  • 2
    Attach the head servo
    Remove the cap over the neck ball joint
    Remove the cap over the neck ball joint

    Use the same small screwdriver to remove the two small screws holding the plate above the ball joint of the neck. We'll need access to this ball joint to attach a servo horn and servo in order to allow the head to programmatically rotate side-to-side.

    I used the round servo horn that came with the servo. In order to figure out where to place the horn, first place the servo horn on the servo spline.  Then, "dry fit" the servo - meaning hold the servo horn on the ball joint and position the servo in the center of the back portion of the skull, noting where two machine screws could be used to mount the servo.  Also be sure to pay attention the the angle of the head - you don't want the skull to end up looking too far down or too far up.

    Positioning the head servo
    Positioning the head servo

    Once you have the servo lined up, use a pencil to mark where you want to drill holes for the machine screws to mount the servo.

    Go ahead and drill one hole, then attach one side of the servo with a machine screw, washer, and nut on the back of the skull. Again, line up the servo and neck, drill the second hole, and attach the second machine screw.

    Carefully holding the servo horn in place with the neck joint, detach it from the servo.  Now, take a screwdriver and screw two of the screws that came with the servo horn through the servo horn and into the neck joint.

    Servo attached to the back of the skull
                                                                 Servo attached to the back of the skull

    Fit the servo spline onto the horn and ensure the servo can allow the skill to rotate left and right.

  • 3
    Wire and test the head servo

    At this point, you'll want to test the head servo motion:

    • First, to make sure it works
    • Secondly, its fun to see half of a skeleton head move back and forth

    We'll use a small single board computer (SBC) as the "brain" of the operation, as well as a PCA9685 breakout board, which does a great job controlling multiple servos.  We used a Radxa Zero board with 2GB RAM and wireless connectivity because we liked the small form factor and relatively low energy usage.  You can use any single board computer that runs 64 bit Linux (like a Raspberry Pi), but you'll definitely want one with built-in wireless, and at least 2GB RAM is a good idea since you'll be running machine learning on-board.

    We are going to use the Viam platform to configure all component drivers and services, which will give us a streamlined configuration experience, simple way to test components, and an API we will later use to program and control our machine.  Follow these instructions to install Armbian OS to your SBC, and then install viam-server on the board.

    Now, power down your board and let's wire up the PCA9685 and head servo.

    The PCA9685 has 16 channels that can be used for controlling 16 servos.  We'll wire our head servo to the first channel, which is actually channel zero (0).  Most servos have 3 wire leads attached to them, with the black wire for ground (GND), the red wire for positive (V+) and the yellow (or orange) wire for PWM.

    Next, wire the PCA9685 to the SBC with four (4) jumper wires as pictured.  Note that many SBC including the Radxa Zero we are using follow the similar pin patterns, but if you are using a different board please verify you are connecting to proper positive, ground and I2C (SDA, SDL) pins.

    Finally, we'll want to power the PCA9685 with its own 5V power supply, otherwise we could pull too much power from the SBC and things could randomly stop working due to lack of power.  We'll use the USB to two bare wire adaptor, and attach the red wire to the V+ at the top of the PCA board, the black wire to GND at the top of the PCA board.  We can plug this into one side of the 5V battery pack.

    Now, we can power on the SBC again, and go to the Viam app to configure and test the servo.

    From your machine's Config tab, click "Create Component" at the bottom of the screen, choose "servo", then choose model "pca9685".  Now name it "head-servo" and configure the attributes as shown.  We'll choose the servo starting position of 90 degrees so the head can start centered and from there move left or right freely.  Be sure to "Save config" when done.

    We can now test that the servo is connected and configured properly.  Go to the "Control" tab.  You should see a card for the servo, and from there you can try moving the skeleton's skull from side to side.  If 90 degrees is not in the center, detach the servo from the horn, re-center, and re-attach.  If things are not working, look in the "Logs" tab for any errors.  If you get stuck, you can always ask for help in the Viam Discord community.

View all 11 instructions

Enjoy this project?

Share

Discussions

Similar Projects

Does this project spark your interest?

Become a member to follow this project and never miss any updates