 electronicsworkshops
Background
Floods pose a significant threat to communities, infrastructure, and the environment. Timely and accurate flood monitoring is crucial for early warning and effective disaster management. In this context, Internet of Things (IoT) technologies offer a promising solution. This project introduces an IoT-based flood monitoring system using ESP32 and Ultrasonic Sensor to provide real-time data for flood detection and management.
FOR FULL PROJECT :
https://electronicsworkshops.com/2024/01/28/iot-based-flood-monitoring-system-using-esp-32-and-ultrasonic-sensor/
Objectives
The primary objectives of this project are:
- Develop a cost-effective and efficient flood monitoring system.
- Utilize IoT technologies to enable remote monitoring and data collection.
- Implement real-time data transmission to a central server or cloud platform.
- Integrate ultrasonic sensors for accurate water level measurements.
Components Required
Creating an IoT-based flood monitoring system using an ESP32 and ultrasonic sensor involves combining hardware and software components. Below is a basic outline of the steps you can follow to build such a system:
Hardware Components:
- ESP32 Board:
- Choose a suitable ESP32 development board. Common options include NodeMCU ESP-32 or ESP-WROOM-32.
- Ultrasonic Sensor:
- Use an ultrasonic sensor like the HC-SR04. This sensor measures distance by emitting ultrasonic waves and calculating the time it takes for the waves to bounce back.
- Power Supply:
- Provide power to the ESP32 board. This can be done using a USB cable or a battery depending on your deployment scenario.
- Connecting Wires:
- Use jumper wires to connect the ESP32 pins to the ultrasonic sensor according to the datasheets.
Working Principle
- Mounting the Ultrasonic Sensor: The ultrasonic sensor is mounted at a specific location where you want to monitor the water level. It should be positioned in such a way that it doesn’t get submerged during normal conditions but can measure the distance to the water surface when flooding occurs.
- Distance Measurement: The ultrasonic sensor emits an ultrasonic pulse, and the time taken for the pulse to return is used to calculate the distance between the sensor and the water surface. This distance is directly related to the water level.
- ESP32 Data Processing: The ESP32 reads the distance data from the ultrasonic sensor and processes it. It might filter out noise, apply calibration factors, or perform other necessary computations.
- Data Transmission: Once the water level data is processed, the ESP32 uses its Wi-Fi capability to connect to the internet. It sends the water level information to a central server or a cloud platform.
- Cloud Server: The central server or cloud platform collects and stores the incoming data. This server can be accessed remotely for real-time monitoring or historical analysis.
- Alerts and Notifications: The system can be configured to send alerts or notifications if the water level exceeds a predefined threshold. This could be done through emails, SMS, or other communication channels.
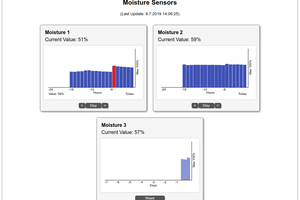
- Visualization and Analysis: The data collected over time can be visualized on a dashboard for monitoring purposes. Historical data can be analyzed to identify patterns or trends in water level changes.
By combining the ESP32, ultrasonic sensor, and internet connectivity, this IoT-based flood monitoring system provides a cost-effective and efficient way to monitor water levels in real-time and take appropriate actions in the event of a flood
Wiring:
Here’s a basic wiring setup:
- Connect VCC and GND of the ultrasonic sensor to the 3.3V and GND pins of the ESP32.
- Connect the Trig pin of the ultrasonic sensor to a GPIO pin on the ESP32 .
- Connect the Echo pin of the ultrasonic sensor to another GPIO pin on the ESP32 .
Software Development:
- Arduino IDE Setup:
- Install the Arduino IDE on your computer.
- ESP32 Board Support:
- Add support for the ESP32 board in the Arduino IDE.
- Open Arduino IDE.
- Go to File ->...
- Add support for the ESP32 board in the Arduino IDE.
 Botorabi
 tiefpunkt
 Reinier van der Lee
 Octavian Cservid