Close
0%
0%

T. Chordstrum

USB MIDI chord strummer kit for Teensy 3.2 (MIDI and built in audio output) or Teensy LC (MIDI only).

Similar projects worth following
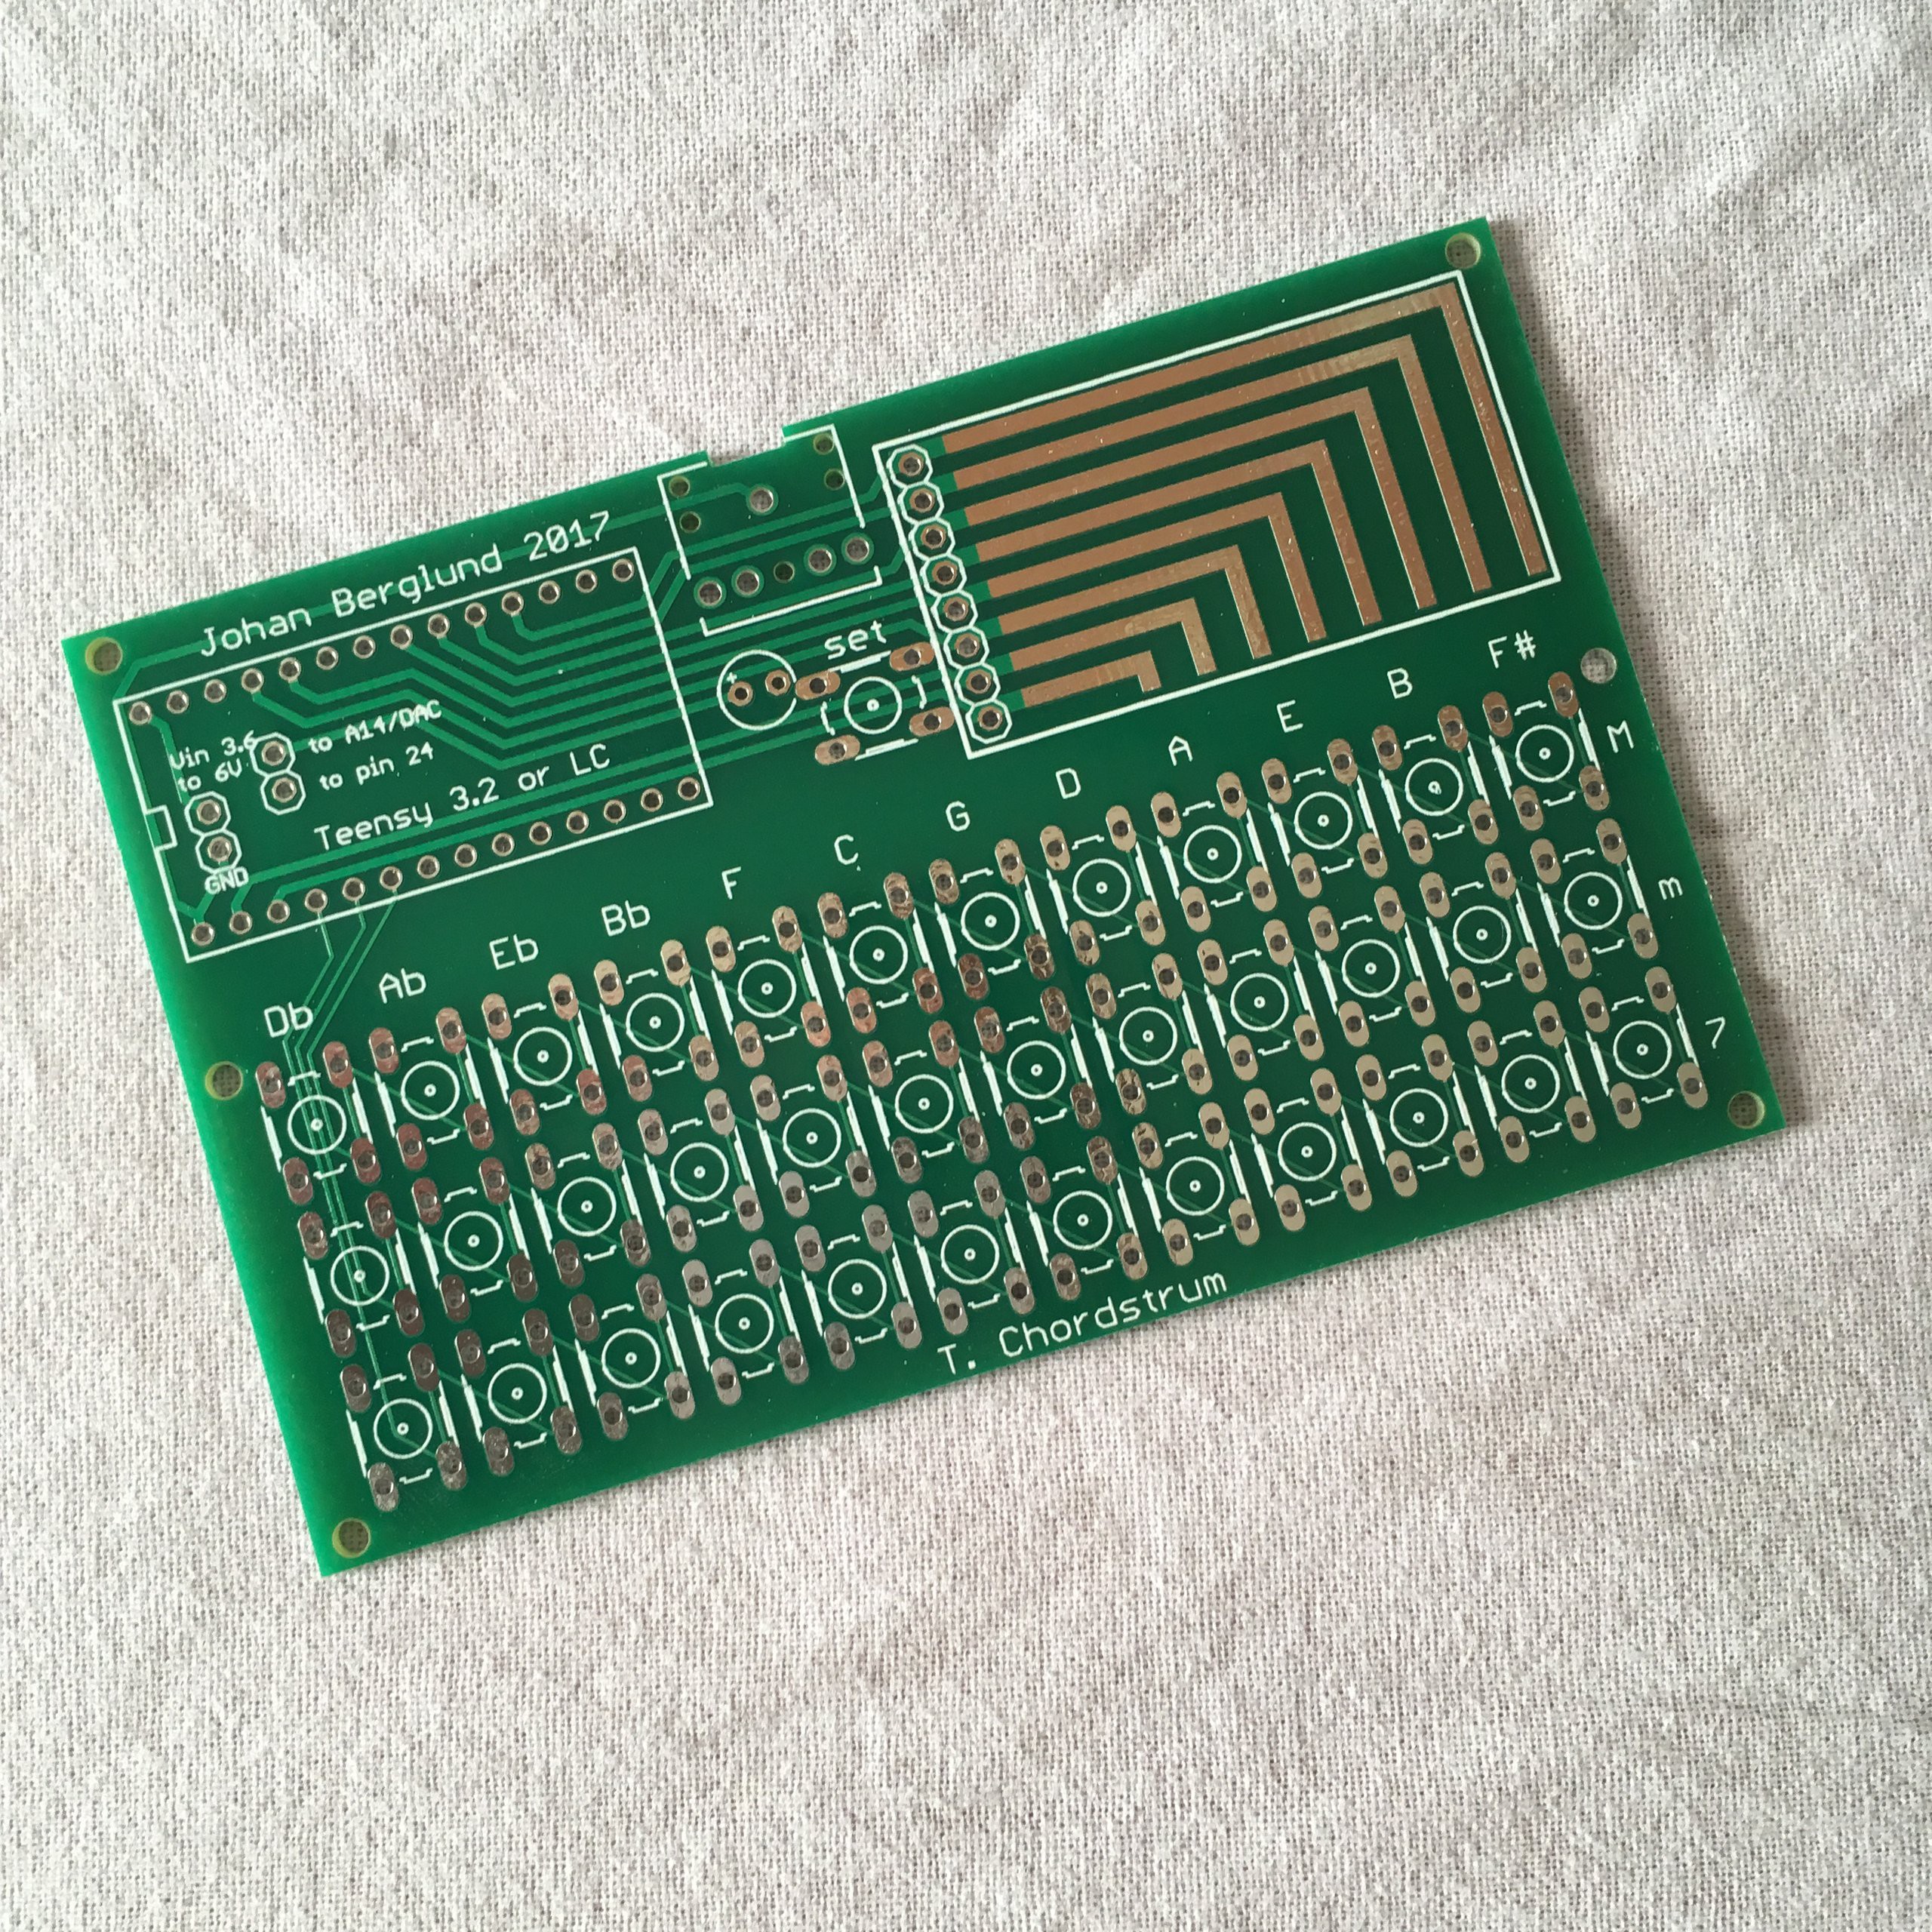
T. Chordstrum is a pocket size USB MIDI chord strummer similar in function to the Suzuki Omnichord. It is made as a kit for assembly and pairing with a PJRC Teensy microcontroller board that is not included in the kit. The kit can be put together in two different ways, either with a Teensy LC for brains giving it USB MIDI capability only, or with a Teensy 3.2 giving it built in audio through a 3.5mm line level jack (in addition to the USB MIDI).

The strumming area consists of eight touch pads (or “strings”) that play notes of the chord selected.

The chord to be played is selected using the buttons of the chord keyboard. The keyboard is setup in Circle of Fifths order, putting chords most frequently used together next to eachother. The top row selects Major chord, mid row selects minor chord and bottom row selects 7th chord. You can use combinations of these to select other chords (see chart).

Short demo video of the T. Chordstrum built in audio output:

Audio capabilities of the Teensy 3.2 version (may change in later versions):

  • Strummed sound, Omnichord like sinewave sound or Autoharp like plucked string sound (Karplus-Strong algorithm). Adjustable volume. Press and hold a chord key, strum with a finger over the touch pads of the strumming area to play.
  • Backing chord sound. Default off. Plays when a chord button is pressed and held. This is also played when rhythm is activated, but in a gated pattern, with a separate control for switching on and off. It is on by default. Volume for the backing chord can also be adjusted.
  • Rhythm. The Chordstrum uses samples from the Keio (Korg) Minipops 7 for a nice retro vibe. You can adjust tempo and volume, and choose between 16 different rhythm patterns (bass and gated backing chord patterns follow this selection).
  • Bass sound. This follows the rhythm pattern, can be switched off/on and adjusted in volume.

t32-strummer.ino.hex

Updated November 2019. New Teensy 3.2 version for T. Chordstrum. Added USB audio and some more stuff.

hex - 418.51 kB - 11/26/2019 at 06:38

Download

chordstrum-t32.hex

Firmware for Teensy 3.2 version of T. Chordstrum

hex - 404.76 kB - 05/30/2017 at 16:25

Download

chordstrum-tlc.hex

Firmware for Teensy LC version of T. Chordstrum

hex - 35.81 kB - 11/05/2017 at 16:17

Download

t32-strummer-mpr121.hex

For using the chordstrum with an MPR121 connected for up to 12 "strings".

hex - 406.39 kB - 10/21/2017 at 11:32

Download

chordstrum-chords.png

Chord button combination chart for T. Chordstrum

Portable Network Graphics (PNG) - 20.73 kB - 05/30/2017 at 16:55

Preview

View all 6 files

View all 10 components

  • A nice and informative review

    Johan Berglund12/28/2017 at 16:32 0 comments

    A very thorough review/demo/walkthrough of the T. Chordstrum was uploaded to YouTube a while ago. Check it out!

  • How-to videos

    Johan Berglund07/18/2017 at 09:46 0 comments

    I made videos showing how to get the Teensy snug against the socket and how to solder the Dupont connector wires to the Teensy 3.2. Note that you don't have to mount the pin headers this way if you think it looks hard. It will just look better than soldering the pin headers in the usual way.

  • Kits now available on Tindie

    Johan Berglund07/14/2017 at 13:51 0 comments

    Finally got enough stuff on hand to start selling the kits! You will find them at https://www.tindie.com/products/yoe/t-chordstrum/

  • Now on Tindie

    Johan Berglund06/23/2017 at 06:06 0 comments

    I'm still waiting for the tact switches intended for the kits, so I haven't been able to start selling those. If you can't wait to start building one of these fun litte things, I've made the PCB's available on their own. You can get them here!


  • Uploading the firmware to your Teensy

    Johan Berglund05/30/2017 at 13:36 0 comments

    1. Download and install the Teensy loader application. https://www.pjrc.com/teensy/loader.html
    2. Download the chordstrum-t32.hex (Teensy 3.2) or chordstrum-tlc.hex (Teensy LC) file.
    3. Run the Teensy loader application. Click the “Open HEX File” toolbar button. Navigate to the downloaded chordstrum hex file and click “Open”. (If there is a message saying file is to o big, just ignore it.)
    4. Connect your Teensy to the computer using a micro USB cable.
    5. Press the button on the Teensy. The Teensy picture in the app should go from dim to bright.
    6. Click the “Auto” toolbar button if automatic mode is not already selected. The auto button should be bright green, and the hex file should start uploading.
    7. When upload is complete, you may disconnect the USB cable.

    For a more elaborate description on how to use the Teensy loader, there are platform specific guides on the PJRC website.

  • Using the T. Chordstrum

    Johan Berglund05/30/2017 at 13:33 0 comments

    1. As a USB MIDI controller

    • Connect the T. Chordstrum via micro USB cable to a computer or other host device with a midi synth software installed and running.
    • Select "Teensy MIDI" as MIDI input in synth software if necessary.
    • Press and hold chord buttons and strum with a finger over the touch pads to play.


    2. With built in audio

    • Connect micro USB port of Teensy to a 5V USB power source like a power bank, USB charger or a computer. You may also power the Cordstrum using a 3.6V to 6V DC power source (like a 3xAAA battery holder with switch) soldered to the dedicated input pin holes located under the Teensy on the T. Cordstrum pcb. If using this alternate way for power, do not connect USB power at the same time, unless Vin is separated from Vusb on the Teensy pcb (see Teensy documentation).
    • Connect the T. Chordstrum 3.5mm line level audio output to powered computer speakers, mixer line input, or other amplification device with line level input. The line level output of the Teensy is not able to directly power headphones or speakers.
    • Mind that the instrument emits a short burst of noise when powering up. If possible, connect the audio cable or switch the amplifier on after the power on LED blinks of the Teensy.
    • The default setting of the audio is playing the Omnichord style strummed sound, with no backing chord or rhythm activated. To change these settings, refer to the settings chart. You press and hold the “set” button of the Chordstrum, and then momentarily press the button corresponding to the setting you want. Release the “set” key when you are done changing settings.
    • There are 16 rhytm patterns available. They may or may not be accurate to their descriptions :) They are named as follows: Hard rock (default), Disco, Reggae, Rock, Samba, Rumba, Cha-Cha, Swing, Bossa Nova, Beguine, Synthpop, Boogie, Waltz, Jazz rock, Slow rock and Oxygene.

View all 6 project logs

  • 1
    Step 1

    Stuff you need aside from the kit is a PJRC Teensy 3.2 (or LC if you just want the USB MIDI strumming function and no built in sounds), small but sharp sidecutters, a soldering station and some solder for electronics. Also recommended is a plastic tool (aka nylon probe or black stick) for safe and easy prying.

  • 2
    Step 2

    Place the capacitor. Watch the polarity. Positive side towards the Teensy, negative side (with stripe) towards the strumming area. Fold the capacitor over towards the chord switches to keep the profile low. Solder it in place. Cut excess off legs.

  • 3
    Step 3

    Place the tact switches. To make the back of the board as smooth as possible after soldering, fold the legs inwards over the solder pads. Use your plastic tool, if you’ve got it, to get them as flat as possible against the pcb. An alternative to folding them over is to cut them all after soldering. This method makes the switches align better as the flex in the legs is still there to keep it in position.

View all 11 instructions

Enjoy this project?

Share

Discussions

dosuserx ross wrote 08/04/2023 at 02:42 point

yeah I've been looking all over for this product and its been offered in a few different flavors by a few different sellers. all sold out or like 75 bucks. i just need the board, man. have you considered a circuit board print on demand site? i would buy it.

  Are you sure? yes | no

Daniel wrote 04/06/2022 at 15:01 point

I'm sad I discovered this after it's sold out! Very interested.

  Are you sure? yes | no

elecpepper wrote 05/08/2019 at 20:53 point

I found a 3d printable cover on Thingiverse if anyone's interested—

https://www.thingiverse.com/thing:2853928

I did not create it and have no affiliation with whoever did. 

  Are you sure? yes | no

AlexC wrote 11/02/2018 at 15:44 point

I enjoyed a great deal playing with the TC in stand-alone mode and with my MIDIPLUS midiEngine USB box. The quality of the sounds was quite surprising. The only set-back is that the keys are a bit too close to each other for using the TC in a hand-held performance; my thumbs are too big. But the TC being a hackable platform, the controls can be rearranged more ergonomically in DIY instrument incorporating the TC.

  Are you sure? yes | no

AlexC wrote 11/01/2018 at 16:43 point

It was not immediately obvious how to upload the hex file into the TC after building the hardware. After some searching on the web, I found that PJRC has an app called Teensy.exe which does the job of moving the hex file from a PC into the Teensy. (I have no experience with the Teensy, so I thought it would programmed the usual way as any arduino-compatible). Johan, I suggest that this important step be made easy to find in your instructions.

  Are you sure? yes | no

Thijs Baselmans wrote 05/02/2018 at 19:46 point

I would really like to have one of these! Will they be made available again? This is such a cool little project.

  Are you sure? yes | no

AlexC wrote 03/07/2018 at 15:34 point

I am definitely ordering a kit when the storefront reopens. Exciting.
I'm unable to find the schematic and source codes. Is this project not open source?

  Are you sure? yes | no

Taper Wickel wrote 02/28/2018 at 22:33 point

I just built mine and I'm loving it.  Thanks for designing this and making it available. 

  Are you sure? yes | no

Master Yoda wrote 08/23/2017 at 08:45 point

got it!

great product! best part of him is his size, which you can create small case and bring him with you in pocket, just plug in headphones and that`s it! :)

Sound is great also!

  Are you sure? yes | no

Similar Projects

Does this project spark your interest?

Become a member to follow this project and never miss any updates