Close
0%
0%

Garden Fountain

A first attempt at a garden fountain

Similar projects worth following
This is a garden fountain that will be solar powered. It is my first attempt at building any kind of fountain. Planning on this has been very thin, as I don't know what I don't know yet. The mechanical part of the project is complete, with water cascading down 5 aluminum pans to a ceramic catch pot at the bottom. The pump is a surplus 12VDC pump. The controller is the next part of the project.
The central support is 3.5" aluminum tube, the pans were folded out of 5054 0.060" aluminum and the support arms are 1" square aluminum tube. 1/4" 6061 is used for the base of the fountain. It is mostly welded construction, but the pans are screwed to the support arms with sheet metal screws. The finish is powder coat. A 1/4" copper tube runs up the inside of the tube to deliver water from the pump to the top bowl.
I am going to build a timer, charge controller and regulator to set the pump speed.

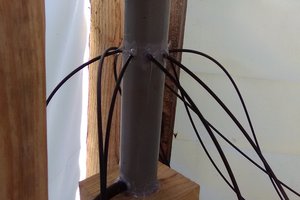
Building the mechanical part of the fountain involved some experimentation. Initially, I thought that I would use ceramic bowls for the cascade pans, but all of the bowls that I could find had a hole in the bottom to drain water. I got some shallow bowls that did not have the hole in the bottom and assumed that I would put the bowl at a slight angle to get the water to spill out in a sort of controlled area. As soon as I tried this, it was apparent that this was a bad idea. With a reasonable tilt on the bowl. the water ran randomly down the side of the bowl, rather than separating cleanly to drop to the next bowl. I looked around locally for bowls with a pour spout on them and could not find anything suitable, so the round bowls became fabricated pans with spouts. When I tested the new pans (as seen in the photos) I realized that I should have installed the spouts lower on the side of the pans. The water level in the pan rises very close to the top edge of the pans as they are made now. Incidentally, the big catch pot shown had a drain hole in the bottom, and I filled it with fiberglass and epoxy.

When I started the project, I was not sure what kind of pump I was going to use. A low voltage DC pump would be much easier to power and control than a 120VAC pump, but most of the inexpensive small pumps I have messed with, would have a hard time lifting water the 3.3' to the top pan. The Surplus Center (a favorite place for mechanical bits) has some 12V brushless DC pumps that looked like they might work, so I ordered a couple.

Testing this morning showed that the pump works great for this application. The pump pulls about 850mA at 12.2V which is a little bit inconvenient, as most solar panels in that size range put out about 12V. My plan is to put 2 12V 10W panels in series to get 24V @ 20W, and use a buck regulator to drop the pump voltage down to the 9.0 - 12.0V range for some adjustability on the pump output. I would like to have the fountain run a little bit after dark, so I am going to put a gel cell battery in to provide power after the sun goes down. Gel Cells work fine with float charging to a fixed voltage, so the charging controller will not be complex. The design on the timer is still evolving. Implementing the whole controller as an analog project has a lot of appeal to me right now.

  • Thoughts after 4 months of use

    Bharbour10/28/2017 at 22:45 0 comments

    This fountain has been running for 4 months now. Some parts work better than others. All told, I am pretty happy with it for a first attempt at something completely new to me.

    What works:

    Overall, I like this fountain. It sounds good and looks interesting.

    The lowest bowl is a big ceramic pot that holds most of the water in the system and the pump sits in the bottom of it. Most of the sound comes from the water falling into this bowl.

    The mains powered timer setup limits where the fountain can be placed (needs to be close enough to a power outlet), but works reliably. I am probably going to stick with this approach for the life of this fountain.

    What needs work:

    The water level in the pans that allows the water to spill out is too close to the top of the pans. The result of this is that a lot of water splashes out. When I put the pour off spouts on the pans, I should have made them 1/2 an inch lower with respect to the rim of the pans.

    Algae is a problem, as is the mineral deposits from the evaporating water. The algae gets down in the corners of the pans and is hard to get out. I have been using an old tooth brush about once a month to clean out the algae. The last time I cleaned it, I let it sit dry for a week while we took a road trip. Letting it get really dry made it a lot easier to clean off the mineral deposits. The powdercoating seems to not let it adhere very well. In the old days, people used copper sulfate to control algae, but I have not been able to find it locally. It must have turned out to be some eco-hazard or drug precursor or something. Pool chlorine might work, but it seems likely to attack the aluminum that the pans are made from.

    The square pans are a pain to clean and because there are welded tabs on the bottoms to mount it to the fountain, it is damaging the powdercoat in the pans. My original plan for the pans was to use round, ceramic bowls tipped at a shallow angle. The bowls that I got did not have pour spouts, so the water just ran over the edge over a wide and unpredictable arc on the bowls. If I were to do this again, I would find or get someone to make some shallow bowls with spouts. The round bowls would be easier to clean (no sharp corners) and could be removed without dragging the whole fountain out.

    The pump needs some kind of an input screen to keep junk out of it.

  • Built a temporary Mains power supply

    Bharbour06/24/2017 at 19:35 0 comments

    I need to finish the software for my WIFI project, so the solar controller for this project is going to go on the back burner for a while. In order to enjoy the fountain until I get back to the solar controller, I built a weatherproof mains power supply with a simple timer to run the fountain automatically every day to keep insects from taking over.

View all 2 project logs

Enjoy this project?

Share

Discussions

phillicom wrote 06/16/2017 at 01:41 point

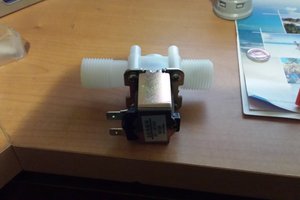
It can be difficult to get pumps to start during periods of marginal sunlight due to starting current being greater than running current.   There are circuits on the 'net for "solar engines" that are supposed to overcome this problem but most of them are for lower voltages.  I have experimented with 6 Volt pumps with and without "solar engines" and find little difference if the solar panel is generously rated.

Many solar panels are rated for wattage by muitiplying the open-circuit voltage by the short-circuit current but this is not how panels operate in real situations.  Also some panels have reducing current as their temperature rises.  Any panel needs to be tested under working conditions to establish its true performance.  I normally derate panels to 70% of their advertised wattage before splashing my hard-earned.

I would recommend that you put your two panels in parallel and connect them directly to the pump.    The two in parallel will give you double the available current to get more reliable starting and operation during times of marginal light

To control water flow, it might be better to use an adjustable valve in the output pipe and control the water directly rather than by varying the voltage.

Adding a battery to get some night operation adds complexity.  A gel cell will need some sort of low-voltage cut-off  to ensure that it is not fully discharged because gel cells don't like being discharged too deeply.  Nicad's, NI-Mh's can be fully discharged but will demand high charge currents when the sun reappears and this reduces the current available for the pump.  Li-ion batteries have charge-discharge rules if they are not to self-destruct.  Of course charge controllers can be designed to charge the battery of choice but is the after-dark capability worth the extra complexity?  And is there enough surplus current from your panels to fully charge the battery?  Only real-life testing will show.

A mains plug-in timer with a 12 Volt wall wart and blocking diode could provide your after-dark capability.   I know it's not "pure" but it works and does not have all the hassles of batteries and charge controllers - not to mention cheap.

One of the purposes for my solar pump is to provide the sound of fallng water.  I cheated with the sound after dark.  At night a PIR sensor detects any human presence and plays a recording of the falling water (LDR, PIR sensor, Arduino Nano, DFPlayer Mini+SD card).

  Are you sure? yes | no

Bharbour wrote 06/16/2017 at 14:33 point

Thanks for your comments! 

After I did the initial project write-up, I went down to the place that that sells panels here in town. The information on the back of the panel tells a lot more about how the panel is going to behave than just the voltage and wattage. It has the maximum open circuit voltage (22V), short circuit current (0.65A) listed, but it lists the maximum power (10W) and the voltage at pmax(17.xV) and current at pmax (0.56A). I had not realized that the open circuit voltage or the Vpmax were going to be that high. You are right about paralleling the two 10W panels, otherwise the OC voltage will be too high to run the buck regulator chips that I am familiar
with.


The 70% value on panel output sounds like a good place to start. Seeing the wide difference in OC and Vpmax leads me to believe that I am going to need to study panel characteristics a lot more. I don't want to go on Yak Shaving expedition on this, but this is going to take more information to do correctly. Knowing about how to design solar powered equipment seems like useful knowledge in the current
world.

The low battery voltage cutoff, I was expecting. Some kind of sequencing and charge current throttling seems like a good path. When the panel voltage rises to  a certain point, start the charging at a low current, and hold off starting the pump. Manage the battery charging current to keep the panel at maximum power until there is enough power to start the pump. The battery would also help with the pump starting current.

Your question about the value of after dark operation being worth the effort is good. I think that what I am going to do is design for having the battery, and if it turns out to be too much effort, jumper out that part of the board.

I thought about using a valve to restrict the flow, but it seems like that is going to
push the operating current up and be prone to getting clogged. The water flow seems good with an input voltage of about 10.2V on a 12V pump. That does not seem like too low to push the voltage. My desire to run the pump from a regulated voltage is partly to avoid problems from a marginal fountain implementation... If the pump speed goes up much from the 12V value, the fountain will spill water from the tops of some of the pans.

The reason that I want to use solar power in the first place is that it will be a pain to get AC out to where I want to put the fountain. I seriously considered just using a timer with AC power for the whole project.


The sound of the falling water is one of the main interests in the fountain, that is a good idea about using a recorded sound. In the dark, how would you know the difference?

  Are you sure? yes | no

Similar Projects

Does this project spark your interest?

Become a member to follow this project and never miss any updates