Components Required
Hardware:
Software or online services:
- Arduino IDE
Setting up the ThingSpeak

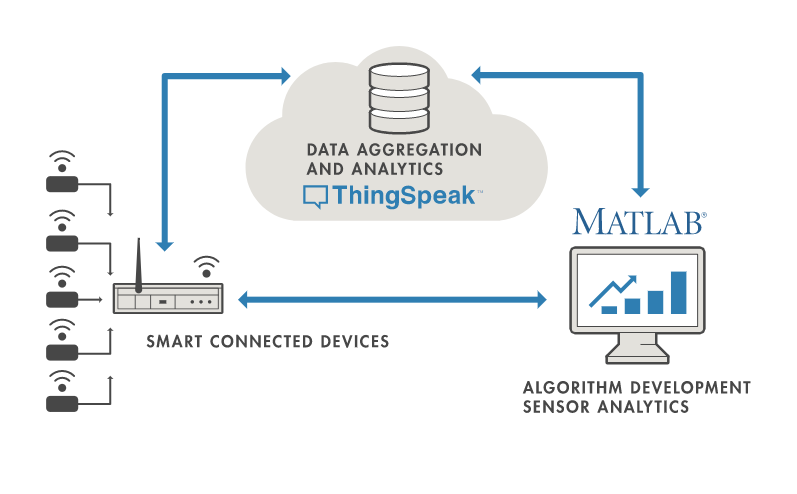
ThingSpeak provides very good tool for IoT based projects. By using ThingSpeak site, we can monitor our data and control our system over the Internet, using the Channels and webpages provided by ThingSpeak. ThingSpeak ‘Collects’ the data from the sensors, ‘Analyze and Visualize’ the data and ‘Acts’ by triggering a reaction. We have previously used ThingSpeak in Weather station project using Raspberry Pi and using Arduino, check them to learn more about ThingSpeak. Here we are briefly explaining to use ThingSpeak for this Beat Detection and Monitoring System. The ThingSpeak service is operated by MathWorks.
- First of all, user needs to Create a Account on ThingSpeak.com, then Sign In and click on Get Started.
- After creating an account, go to channels and create a new channel. Now write the name of the Channel and name of the Fields. Also tick the check box for ‘Make Public’ option below in the form and finally Save the Channel. Now your new channel has been created.

Creating the channel.
- After this go to API keys and copy your Write API key. You will need this in the code. Check the Full Code at the end.

Note the API Key of the channel.
Circuit and Explanation
ESP8266 WiFi Bee
Wifi Bee-ESP8266 is a Serial-to-WIFI module using XBEE design in a compact size, compatible with XBEE slot, applicable to a variety of 3.3V single-chip system. It can be used for Arduino, wireless data transfer, remote control. On-board switch can be used to easily select the Startup module or Upgrade firmware. ESP8266 arduino module has a powerful on-chip processing and storage capacity, built-in 32-bit processor, built-in Lwip protocol stack. Support AP+STA mode co-exist.
Heart Rate Sensor Module
The DFRobot heart rate sensor is a thumb-sized heart rate monitor designed for Arduino microcontrollers.
This heart rate monitor sensor is a pulse sensor which is developed based on PPG techniques. This is a simple and low-cost optical technique that can be used to detect blood volume changing in the microvascular bed of tissues. It is relatively easy to detect the pulsatile component of the cardiac cycle according to this theory.

The sensor has two holes that you can use to attach to your belt. You can wrap on your finger, wrist, earlobe or other areas where it has contact with your skin.
I/O Expansion Shield
To connect these components with the Arduino, we need the expansion shield which can connect them with the microcontroller with ease.
The ESP8266 will communicate with the Arduino and will send the data to ThingSpeak. The ESP8266 will connect the network of your router that you will provide in the code and will send the data of the sensor online. This data on the ThingSpeak will be shown in a Graph form showing the past readings too and can be accessed from anywhere over internet.
NOTE:
1. This product is NOT a professional medical device and should not be used to diagnose or treat medical conditions.
2. This sensor is designed to work when the user is not moving. If used while moving it will give inaccurate results.
 Sagar 001
Hi, im getting an error when I try to run it. How can i fix this?
error: avr/interrupt.h: No such file or directory
compilation terminated.