Close
0%
0%

KAPCOM

Yet another hardware controller for Kerbal Space Program. Leveraging Telemachus, Python and Arduino to drive joysticks, buttons and displays

Similar projects worth following
Yet another hardware controller for Kerbal Space Program. Leveraging Telemachus, Python and Arduino to drive joysticks, buttons and displays for input of fly-by-wire controls and output of telemetry data. The idea is to make things modular and reusable so that others may reuse the components for their own purposes without having to reinvent the wheel. However, this is a single purpose controller for KSP only. I don't foresee reworking this easily to a general use controller.

Demo: https://www.youtube.com/watch?v=8netBhx9yzQ
Intro: https://www.youtube.com/watch?v=hdV6y_QB6h0

More information:
on imgur: https://imgur.com/gallery/6lury
on GitHub:

Status: Enclosure in production

I am creating a console/simpit for controlling Kerbal Space Program. As much as possible, I want this to be a full replacement for the keyboard and mouse controls. Although this project is for me, I am trying to make this as modular and configurable as possible for other DIYers to follow in my footsteps.

Rather than a simple keyboard emulator, I am going to use the fly-by-wire controls available via the Telemachus API. I am using a heavily modified version of thearn's Python-Arduino-Command-API to send read/write requests over serial to transfer telemetry and fly-by-wire data from the Arduino to a Python script and 602p's pyksp module for communicating from Python into Kerbal Space Program.

I am using an Arduino Mega 2560 as my controller due to the larger quantity of IO pins it has. This frees me from needing daughter boards for multiplexing. I've created a basic shield which provides convenient pins for connecting dupont cables which will run to each component. One of the photos shows a 6 pin connector running from this board to the joystick. This provides 4 signal pins as well as +5v and GND.

I started out using a protoboard with conductive paint, but that was very unreliable. I eventually moved to soldered traces, and finally to a fabricated PCB. I used Fritzing to design the board and have uploaded it to my Github repo. I ordered my PCB from Seeed Studio Fusion. This is the first time I've designed and ordered a PCB, but it was simple enough that it came out well.


Here's an overview of what's working and what's planned:

Complete:

  • Communication between Arduino and Kerbal Space Program
  • Protected input for Staging and Abort
  • API Buttons
  • Dual Joysticks
  • Non-API Buttons
    • Trigger a keypress
  • Throttle
  • Indicator LEDs
  • Configuration from a file
    • Can read JSON from a file
    • Uses this data to create objects for hardware
  • 7-segment Displays
    • Python class complete and tested
    • Hardware tested
  • LED Bargraph Displays
    • Python class complete and tested
    • Backpacks assembled
    • Hardware tested
  • Full hardware test
    • Replaced LEDs and resistors in buttons
    • Soldered all wire harnesses to buttons
    • Fixed bad traces on protoboard
    • Mounted all controls and displays in a new shoebox
    • Tested and working
  • Setup script that checks for dependencies
  • Printed PCB
    • Arrived and Assembled
    • Installed and tested
  • Onboard Raspberry Pi + Wifi + Battery
  • Trackball for mouse control via Synergy
  • Multiple Arduino support
    • One computer to handle multiple devices
    • Each identified by a UUID
  • Multiple mode support
    • Remap controls and displays for rovers, EVA, etc
  • Configuration wizard to create JSON configuration file
  • Display for showing configuration
    • SpaceX Dragon-like on a touchscreen?
      • Use touchscreen to display options in SpaceX style
      • Fits better with overall aesthetic than going with Apollo-era tech
    • Options:
      • Selecting displayed data
      • Selecting display formatting
      • Changing modes
    • Interface is web based using Flask
    • Possibly use smartphone as display

In progress (v.0.9.1):

  • Code cleanup and optimizations
    • Fix issues found by code analysis
    • Fix (most) PEP8 compliance issues
  • Officially test on Raspberry Pi
  • Automate build and testing
  • Investigate packaging as .pex
  • Enclosure
    • Modeled all components in SketchUp
    • Trying out different layouts
    • Planning materials and assembly
  • Throttle handle
    • I want something like this.
    • Modeling in SketchUp
    • Trying to have my library 3D print it, but it's not going well...

Planned for Final Version (v1.0.0):

  • Enclosure
  • Documentation
  • Improve UI to look more like Dragon 2 interface

Ideas for the future (v2.0.0):

  • Display for showing the Navball (a la Sli/MkON)
    • Navball needs more research and investigation
  • Dynamic Trackball Backlighting
    • Alarm/Environmental display styles
    • Altitude based default color
  • Backlit Detailing
    • Mask off section dividers and paint plexiglass with translucent paint
    • Backlight dividers for glowing panel look of Dragon capsule

View all 21 components

  • I told you I'd be back

    lawnmowerlatte12/12/2017 at 20:40 1 comment

    This project is not dead. A lot has happened since I last posted (most notably a new baby!), but I've recently obtained access to a 3D printer. I've wanted to print the throttle for my controller, so that seemed like an obvious choice to print it. After a couple of prototypes and a couple of redesigns, it's coming along nicely. It's a 7 part build that includes a chassis, a cover, two control arms, a handle and two end caps. The Vex potentiometer fits right onto struts I built into the chassis, so it's mostly tool-less.

    I'm still waiting on one part and I have to re-print the handle with a bit more spacing. After that I might take a crack at printing  the body panels for the console rather than trying to cut plexiglass.

    Many thanks to Josh who provided access to the 3D printer, help with fixing my models, advice on printing and the idea to use two arms.

  • Still not dead

    lawnmowerlatte03/10/2016 at 16:17 0 comments

    It's been a long time since I've updated, so you could be forgiven for thinking this project is dead. It is not. My personal life has been demanding and I haven't had the time or inclination to work on this. Part of that was hitting a wall with the enclosure. I felt I lacked the skills to pull off an adequate DIY enclosure and I lacked the funds to buy a pre-fab one. I really liked the Retex Abox series, even though they are a bit small. I considered splitting the project into a controller and display, but the cost of buying the boxes would be absolutely prohibitive.

    In all honesty, I was feeling quite down about the whole thing, until I found another project's blog. I really liked the design, modular layout and rather simple construction. I finally felt like I had a path forward. I reverse engineered his design and mocked it up in SketchUp. I really like it and I think I can do it, wish me luck.

  • Not dead

    lawnmowerlatte08/29/2015 at 05:14 0 comments

    Hey, just a brief update that neither myself nor this project is dead. Summertime's busy and I've been having very little time to work on this or play KSP at all. I have some ideas for how I'm going to construct the console which is the next major step. Hopefully as fall sets in I'll have a bit more time to work with.

  • Code Cleanup

    lawnmowerlatte06/13/2015 at 06:45 0 comments

    I've been putting forth a pretty major effort to clean up the code and eliminate latent issues. I've integrated Travis-CI and Coveralls and started creating tests with py.test. So far I've hit 20% coverage, even if those tests are fairly "light" on actual testing. I've also integrated with QuantifiedCode for some code analysis, so I've been fixing those issue as well as making the repository PEP8 compliant (at least as much as possible, there are a few issues PyCharm is picking up that are non-issues).

    I'm still investigating PEX and Pants as possible delivery mechanisms. I'm a little saddened that they don't seem to support Windows. Especially since Windows users are less likely to have CLI experience and a self-contained file would really be nice.

    I'm getting close to final testing for 0.9.1. I want to do a bit more work with PEX before making a decision. Then it'll be testing and bug fixing time. If I do decide to add PEX packaging I'll probably release 0.9.1 without it and wait for 0.9.2.

  • v0.9.0 and beyond

    lawnmowerlatte06/11/2015 at 21:30 0 comments

    I just tagged and released v0.9.0 on GitHub. This correlates to the video series I did earlier this month. Once that was done, I merged in my active development branch into the master and geared up for v0.9.1

    Next release will mostly cover the stuff I've done since those videos. The landmark feature here is the web UI. There's also a lot of under the hood changes and improvements. I'm aiming for the end of the month. A busy work schedule and home hasn't really given me much opportunity to work on this recently. I'd like to test what I've worked on a significant bit more before releasing.

  • Flask, API, AJAX, jQuery

    lawnmowerlatte05/28/2015 at 05:58 0 comments

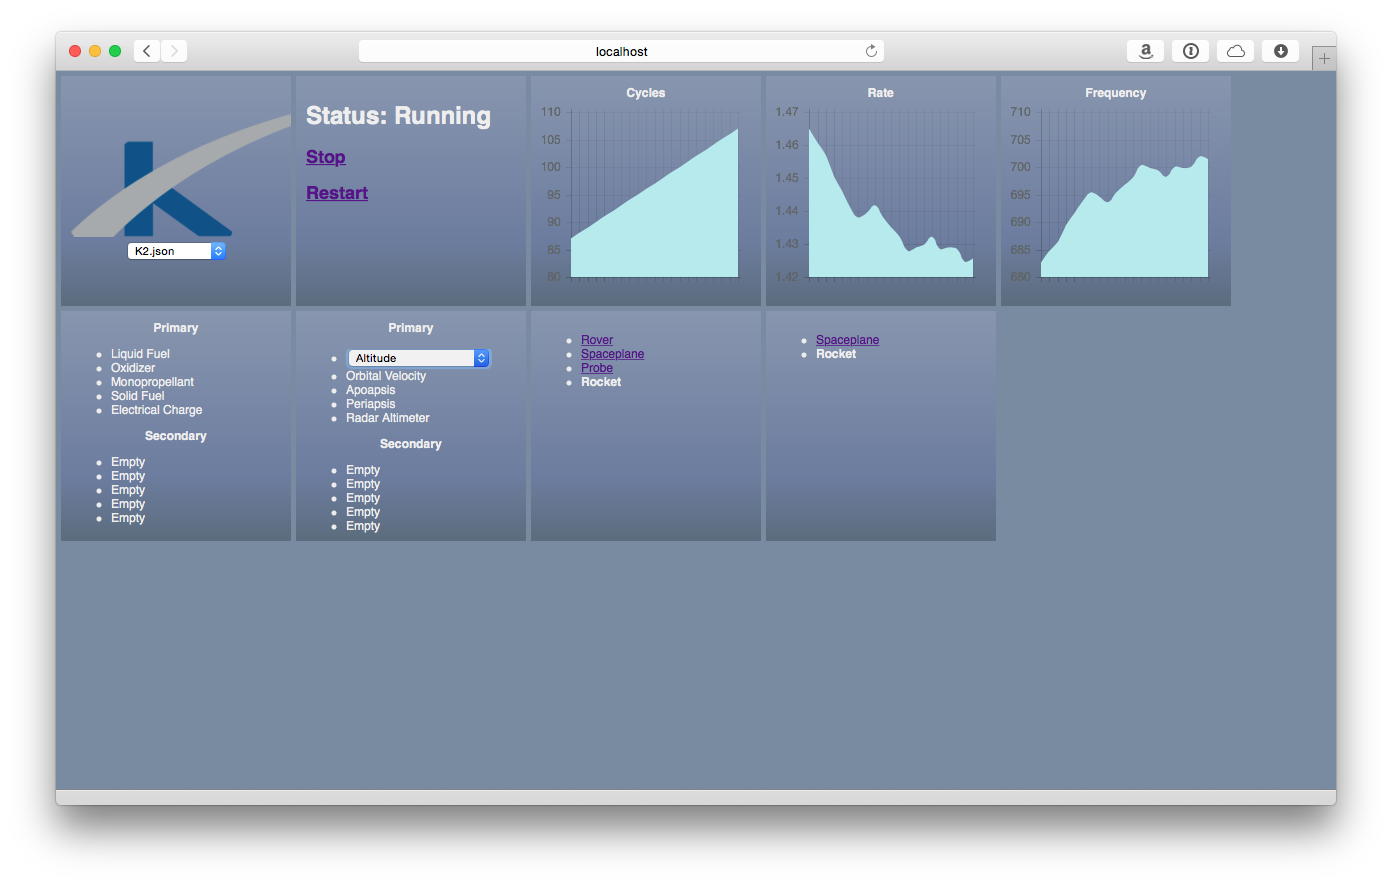
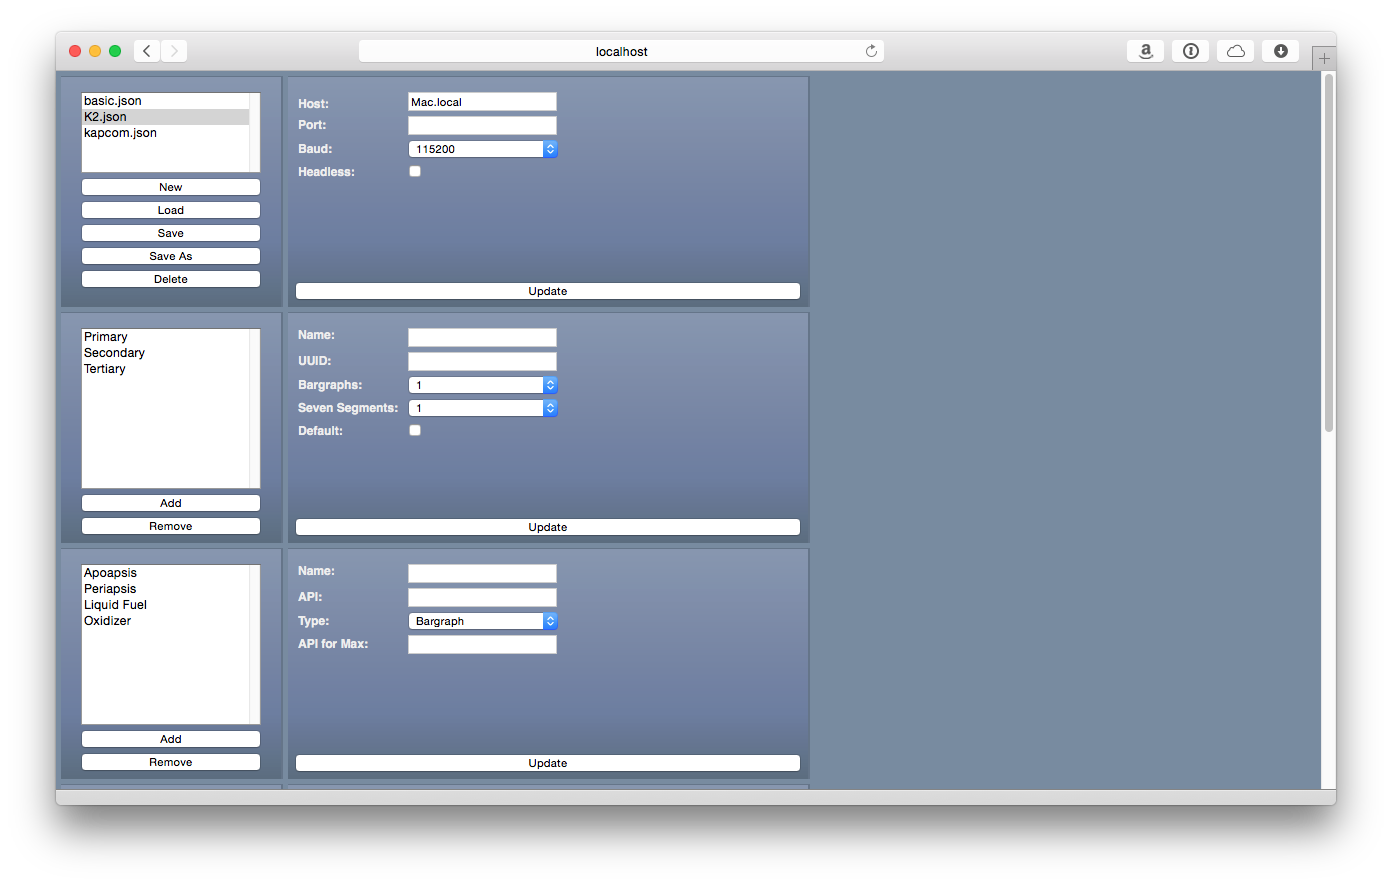
    I've been solidly hacking away at the web UI for KAPCOM. This will provide a dashboard for switching between configuration modes as well as reconfiguring displays on the fly. So far, I have a fully functional, but not very nice looking dashboard and I have an in progress configuration editor.

    I've opted to do this using Flask to serve up a static page which leverages jQuery to send AJAX requests back to Flask over an API which then queries the data from the KAPCOM object. I also threw in some charts

    It sounds complicated, but it's really not so bad. It makes the whole thing very dynamic and loads without page refreshes. Behind the scenes, I had to do some work to make KAPCOM threaded and provide a way of interacting with it so the web UI would work at all. My AJAX and jQuery are definitely rough around the edges, but I'm getting more familiar as I go.

    Overall, I'm pretty happy with how it's coming out. I should be able to finish the configuration editor over the next day or so. Once that's done I'll spend some time polishing up the dashboard and get it looking really close to the SpaceX interface.

    Dashboard:

    Configuration Editor:


  • Wireless Complete + Modes

    lawnmowerlatte05/17/2015 at 07:23 0 comments

    I got everything working to support multiple Arduinos and multiple control modes tonight. Probably the hardest thing I've worked on, just because of how complicated the data structures have gotten. It's all working now. Definitely needs a lot of testing with multiple configuration modes, but that will come with time.

    In any event, I got it all working with the Raspberry PI so I now have a functional wireless controller!

    Next up I'll probably take a look at creating a web based configurator/viewer.

  • Wireless

    lawnmowerlatte05/15/2015 at 14:13 0 comments

    My Raspberry Pi came yesterday, so went ahead and set that up. I had a few hiccups setting up KAPCOM, but it worked once I figured those out. I ended up needing some additional software packages:

    sudo apt-get install python-pip
    sudo apt-get install python-dev
    sudo apt-get install python-xlib

    With those installed, http://setup.py happily ran and installed the other Python modules. I also set up Synergy for sharing my trackball to my KSP machine. The instructions on Adafruit were mostly correct, but I also had to run the following commands:

    sudo apt-get install libcurl4-openssl-dev
    sudo unzip ext/gmock-1.6.0.zip -d ext/gmock-1.6.0/
    sudo unzip ext/gtest-1.6.0.zip -d ext/gtest-1.6.0/
    After this, Synergy built correctly. I configured it so the mouse leaves the Raspberry Pi and never comes back unless you press F1:
    section: screens
    	KAPCOM-Pi:
    	Mac:
    		meta = alt
    end
    
    section: links
    	KAPCOM-Pi:
    		right(0,100) = Mac
    		left(0,100) = Mac
    		up(0,100) = Mac
    		down(0,100) = Mac
    	Mac:
    		# left(0,100) = KAPCOM-Pi
    end
    
    section: aliases
    	Mac:
    		Mac.local
    	KAPCOM-Pi:
    		KAPCOM-Pi.local
    end
    
    section: options
    	keystroke(F1) = switchToScreen(KAPCOM-Pi)
    end
    
    I also added a startup script to start Synergy and run KAPCOM. I tested it all out and the trackball worked great. KAPCOM is currently in a broken state because I'm still working on the configuration changes for adding multiple modes and Arduinos.

    Very happy with the progress I'm making. I'm going to spend some time at lunch working on the mode and Arduino code. Once I get that done, I can go back to working on the enclosure.


  • Restructuring

    lawnmowerlatte05/14/2015 at 05:04 0 comments

    I've been working on changing the configuration and Python to accept support multiple modes and multiple devices. It's still a work in progress, but it's getting there.

    Meanwhile my changes to Telemachus were just pulled into the latest build, so simple joystick mapping is easily doable even without my custom build.

  • setAttitude and setTranslation

    lawnmowerlatte05/11/2015 at 06:00 0 comments

    So last night I was brainstorming how best to accomplish multiple configuration modes and I was sorta struggling with how I implemented the joysticks. While it works, it is far from elegant. Each `Joy.toString()` returns a comma separated list of the axes: i.e. -1,-1,-1 or 0,0,0 or 1,1,1 or something in between. Because the Telemachus API only has `setYawPitchRollXYZ`, I have to aggregate both responses into a single API call.

    It's not bad, but it makes `Joy0` and `Joy1` special snowflakes and not as easily interchangeable as the rest of the system. If I wanted to implement separate controls for spaceplanes, it'd have to be very specific code and not just reuse what I'm using for all the other devices.

    So that got me thinking: maybe I should put in a feature request for this? Unfortunately, the author hasn't been really active recently. I decided to search the repository and see if I couldn't reverse engineer what I needed. It turned out to be a single place in the repository, so I added two separate methods `setAttitude[yaw, pitch, roll]` and `setTranslation[x, y, z]` and submitted a pull request.

    This was probably not the right thing to do since I hadn't tested it at all, but I put it out there in the hopes that it might be someday pulled in. This morning I woke up and decided to try my hand at building a mod. Seeing as I had zero experience with this and no environment setup, I started with the Telemachus docs. I did hit some snags.

    • Being on a Mac, Visual Studio is out. I opted for Xamarin
    • You need to download and install Unity 4.6.5
      • Don't use MonoDevelop, I couldn't get it to build properly
    • You need a Windows install of KSP for the KSP_Data (cf. step 2 from Telemachus wiki)
      • You might be able to get it from KSP.app/Contents/Data, but it wasn't a 100% match.
    • The post-build script is Windows only.
    • I'll say it again, check the timestamps of the .dll's. I spent far too long combing the code for what went wrong when the solution was I was still using the old version.

    Anyway, all that said and done, I was able to successfully build Telemachus from source with my new contributions. I'll be using this build from now on and it'll make life MUCH simpler for the planned modal inputs.

View all 49 project logs

Enjoy this project?

Share

Discussions

Jonas B. P. P. wrote 07/03/2017 at 23:48 point

Me and my uncle are trying to do something similar, using kRPC (KSP -> Python) and python-arduino (Python -> Arduino).

I am, however, having trouble importing the Arduino module in to my Python script. Running "from arduino import Arduino" simply gives me the error: "ModuleNotFoundError: No module named 'arduino'".

I know this is very specific, but you wouldn't have some ideas as to why this happens? I'm on the programming part of this project, but I've never worked with Python. Am I missing something?

To clearify, I did of course install the module correctly, along with the required modules (using pip). Python 3.6.

Best Regards

-FP

  Are you sure? yes | no

lawnmowerlatte wrote 08/16/2017 at 01:34 point

Hey, it sounds like you don't have the arduino library correctly installed. Are you using virtual environments at all?

  Are you sure? yes | no

Jonas B. P. P. wrote 08/16/2017 at 09:07 point

Thanks for the reply. I did a classic "make a support inquiry before properly sleeping on the problem" and figured out the problem the next day. It has nothing to do with your code, just my sloppy understanding of python :P

We got a prototype working using kRPC and your Py-Arduino library, and are now waiting for more parts to arrive for the real deal.

I have no idea what we would have done without your Arduino serial lib, so thank you so much!

Btw, may I ask: Are you still working on the project? And thus, are you planning on moving to kRPC any time? I feel kRPC with it's features and ease of use will become the new Telemachus, so a solution like yours - just updated to 1.3 with kRPC instead of Telemachus - would be amazing for non-coder-expert control panel makers out there!

-FP


  Are you sure? yes | no

John wrote 04/10/2015 at 05:43 point

This looks pretty neat. How do you intend to address the navball probem?

  Are you sure? yes | no

lawnmowerlatte wrote 04/10/2015 at 14:34 point

For the moment, it's out of scope. Aside from neomorph's attempt (http://forum.kerbalspaceprogram.com/threads/50308), I haven't seen any physical ones at all. I have seen some web based ones that interface with Telemachus. I would love to run one on a small display connected to the Raspberry Pi I plan to incorporate, but so far I haven't found one I'm in love with and/or works well

sli's (http://forum.kerbalspaceprogram.com/threads/24594?p=909193#post909193) looks the best, but he hasn't posted his code for it anywhere.

technicalfool's (http://forum.kerbalspaceprogram.com/threads/46431) looks similar, but again, I can't find any source code.

Glass Cockpit (https://github.com/creshal/telemachus-glass-cockpit) seems similar to Sli's but with a different skin. I haven't tried it yet, but I plan to.

rob3110's (http://forum.kerbalspaceprogram.com/threads/94850) is cool looking and I've tried it out, but it lags way too much on my phone, which doesn't bode well for running it on a Raspberry Pi.

If I've missed any, please let me know!

  Are you sure? yes | no

John wrote 04/10/2015 at 17:26 point

Interesting, I didn't realize there were so many separate attempts being made. I myself am just starting to poke about with using a POV ring (see: https://www.youtube.com/watch?v=TqsKX1AVPak) , although I don't know much and am basically starting from scratch. apparently it is also somewhat easy, if a little expensive, to make orb displays. ( http://hackaday.com/2011/08/08/diy-orb-display-puts-the-earth-in-your-hands/) Neither of these are aimed directly at being KSP navballs, but I can definitely see similar projects being made pretty easily. Do either of these seem like things you would put into your design? so far yours looks to be the most polished one here, and I'm interested in seeing it finished. 

  Are you sure? yes | no

lawnmowerlatte wrote 04/10/2015 at 18:11 point

Wow, both very cool projects. I especially like the projection one, I think that'd be the way to go if you want something spherical. At the moment, I'd have to say this would be something I'd add later on, if at all. Even the LCD version I mentioned earlier is something I'm planning for later.

You should check out the projects on the Kerbal Space Program Forums (http://forum.kerbalspaceprogram.com/threads/66763) if your interested. There are lots of projects that are further along than mine using a variety of techniques.

  Are you sure? yes | no

John wrote 04/10/2015 at 18:42 point

Those are some pretty cool rigs. I'll keep exploring my two ideas, and maybe I'll just let you know when they're good enough to consider for yours.

  Are you sure? yes | no

lawnmowerlatte wrote 04/10/2015 at 18:56 point

Definitely let me know when you get them working!

  Are you sure? yes | no

Similar Projects

Does this project spark your interest?

Become a member to follow this project and never miss any updates