Close
0%
0%

Tracksoar

A tiny APRS tracker meant for airborne applications, and especially weather balloons.

Similar projects worth following
The tracksoar is a tiny Arduino based APRS tracker, inspired and built around the trackuino. It has an ATMEGA328P running the show, a Ublox MAZ-m8q GPS, pressure/ tempurature/ humidty sensors, and two meter transmitter. It is designed to be as compact and lightweight as possible, measuring 2" x .75" x .5" and weighing 45 grams (weight includes batteries) while still being full featured. It can be customized with add on shields to add new sensors and IO. The add on shields have access to SPI / I2C /GPIO pins to make adding features easy.

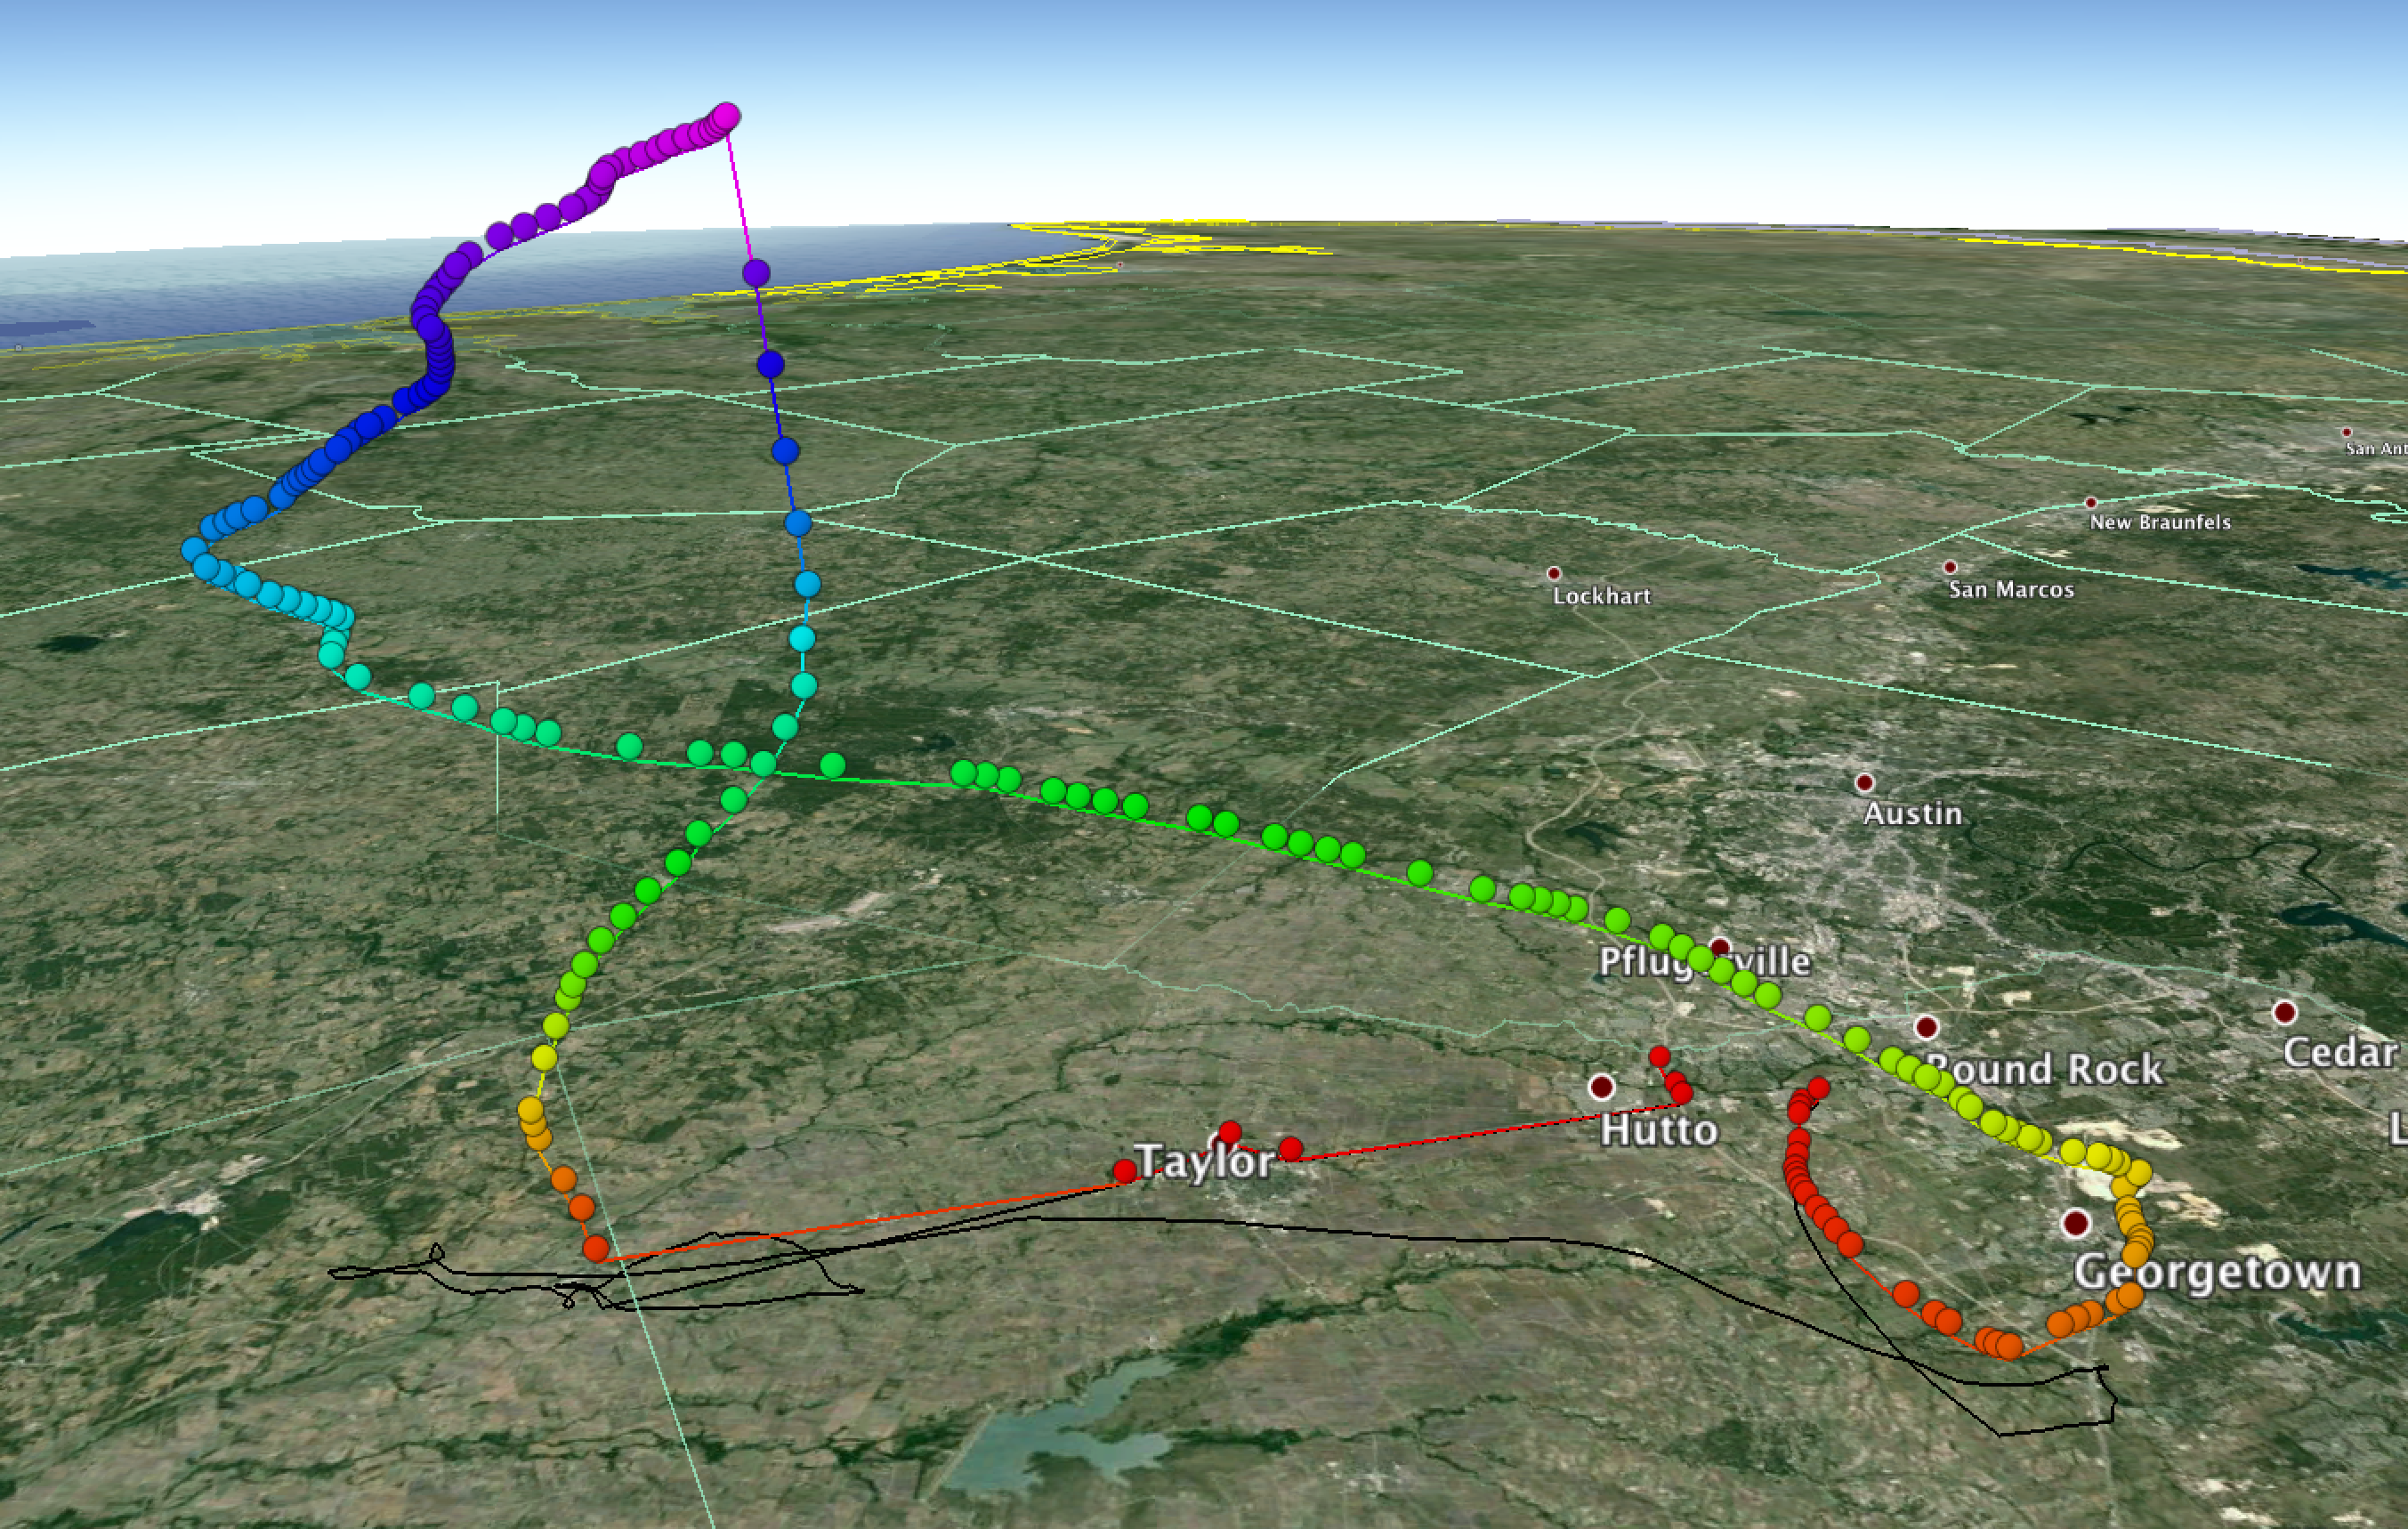
Tracksoar is the smallest lightest open source APRS tracker available. It makes tracking weather balloons, model rockets, RC aircraft, and anything else that flies as easy as possible. It is able to report location, altitude, temperature pressure and humidity to the internet once a minute for twelve hours with 2xAA batteries. Because Tracksoar is open source you can also add your own modules to accommodate custom sensors to meet your specific requirements. No other APRS solution offers this level of integration, compact size, and customization.

All source files are available at: tracksoar.com

  • 1 × ATmega 328P 8 bit microcontroller running at 16mhz
  • 1 × uBlox MAX-M8Q GPS receiver
  • 1 × Radiometrix hx1 2 meter radio transmitter
  • 1 × SHT21 Humidity Sensor
  • 1 × BMP180 Pressure Sensor

View all 12 components

  • Weather Ballooning Guide

    sbhackerspace10/25/2015 at 04:19 0 comments

    I have written a guide to launching your first weather balloon, details are available here: https://www.tracksoar.com/a-tutorial-for-launching-your-first-balloon/

  • Test Flight Gallery

    sbhackerspace10/22/2015 at 06:58 0 comments

    Here is a gallery from our second of many test flights: http://imgur.com/a/jRnO7

  • Tracksoar Independent Test Flight

    sbhackerspace10/21/2015 at 04:45 0 comments


    We sent a Tracksoar to a team out in Texas who were putting together their first ever high altitude balloon launch for a contest. They had only a week to put it together so we sent them one of demo boards. Within just a few minutes of receiving it they had programmed their callsign in, had GPS lock, and were transmitting. With the test out of the way they were ready to launch.

    They launched this morning at 6 AM and Tracksoar dutifully started reporting to aprs.fi shortly after lift off. Due to heavy fog at launch their payload (primarily a foam pumpkin) weighed more than they were anticipating due to absorbing water, leading to a slower ascent than was planned, but after a short time in the Texas sun that was fixed.

    The flight lasted a little over 3.5 hours and reached a maximum altitude of 107,000 feet before bursting. After burst the payload tumbled for a half hour before the atmosphere was thick enough to inflate their parachute and slow it down to a walking pace. The payload landed safely behind an electric fence in a corral with a couple of bulls in an empty field where it was gingerly recovered and found intact. We’ll be posting video from the setup and flight soon.

    Tracksoar performed perfectly reporting 159 times over the course of the 4 hour flight, reporting location, altitude, temperature, pressure and humidity. check tracksoar.com/blog for a copy of the file to view the flight path and data in google earth.

    Congratulations to the Texas team on their first ever flight, it was a huge success.

  • First entry

    sbhackerspace10/19/2015 at 23:24 0 comments

    Checkout our blog for a mostly complete log of test flights and news.

View all 4 project logs

  • 1
    Step 1

    To build a Tracksoar I highly suggest ordering the boards from osh park and a solder stencil from osh stencils, this will make your life much easier. With those to items in hand order your BOM, most of which can be purchase from mouser. The only exceptions are the radiometrix transmitter, GPS receiver, and LTC3426 boost regulator. You will also need some solder paste to make life easy.

    Supplies in hand squeegee on your solder paste using the stencil and place components. You'll need a decent set of tweezers and some sort of magnification. Once the parts are placed either put it in a solder oven, use a hot air gun, or skillet to reflow your solder. THis board has SMT parts on both sides so the back will have to be done by hand as it has the easiest components. Once the board is assembled we can flash the bootloader.

    You'll need an AVR programmer such as the AVR ISP mkii or dragon to burn the bootloader. The ICSP headers are broken out on the Tracksoar and a programming shield is available to make life easier. Select your bootloader and burn it and you're ready to program your Tracksoar using the Arduino IDE.

View all instructions

Enjoy this project?

Share

Discussions

Similar Projects

Does this project spark your interest?

Become a member to follow this project and never miss any updates