Amal Mathew
What you will Need:

I used this because I want my device to be small .You can use any boards which uses ATmega32U4 such as Leonardo,Leonardo ETH etc.These board are having built-in usb which makes the micro recognizable as a mouse or Keyboard.
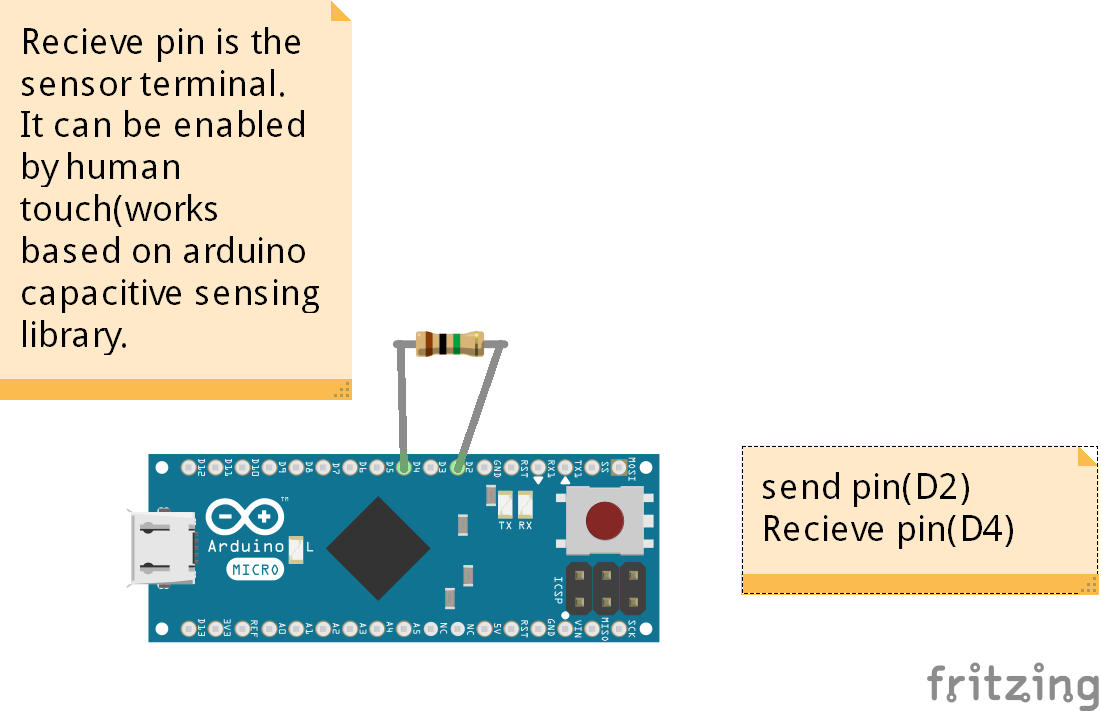
- 1 Mega Ohm Resistor
- Jumper wires
- PCB
- Soldering Iron
Circuit Diagram:
How It Works:
The Micro is based on the ATmega32U4 microcontroller featuring a built-in USB which makes the Micro recognisable as a mouse or keyboard.
Instead of switches/buttons I decided to add some cool feature to my project, So I used arduino capacitive sensing library to use any metalic object as touch sensor.
The capacitiveSensor library turns two or more Arduino pins into a capacitive sensor, which can sense the electrical capacitance of the human body. All the sensor setup requires is a medium to high value resistor and a piece of wire and a small (to large) piece of aluminum foil on the end. To know more about how capacitive touch works follow the below link:
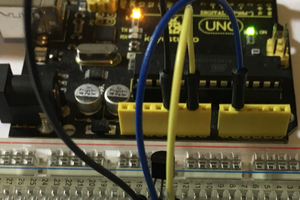
The Hardware Part :
I have soldered 1 mega ohm resistor along with 2 jumper wires into a PCB as per the given image .

Mount the Arduino micro to the PCB and and attach the jumper wire as per the circuit.

That's all,now just plug it into the computer and we are ready to upload the code.
Pre-requirements:
You need to install capacitive sensing library if you have not installed yet.
You can download this library from here.
If you don't know how to install new library to Arduino IDE follow these instructions
Arduino Code:
#include <CapacitiveSensor.h>
#include <Keyboard.h>

CapacitiveSensor   cs_2_4 = CapacitiveSensor(2,4); // 1M resistor between pins 2 & 4, pin 4 is sensor pin, add any metallic object such as foil ,coin etc..


void setup()
{
   cs_2_4.set_CS_AutocaL_Millis(0xFFFFFFFF);// turn off autocalibrate on channel 1 - just as an example
   Serial.begin(9600);
    Keyboard.begin();

}

void loop()
  {
 long sensor1 =  cs_2_4.capacitiveSensor(50);

   if(sensor1 >= 1000)
   {
  // the below code can be used to simplify your login
  Keyboard.print("p@ssW0rD");      //Enter your password here
    Keyboard.press(KEY_RETURN); //Enter key
    delay(150);
    Keyboard.releaseAll();
    }
  }
Uploading Your Code:
- Launch Arduino IDE
- Select board

- Select port

- Upload your code

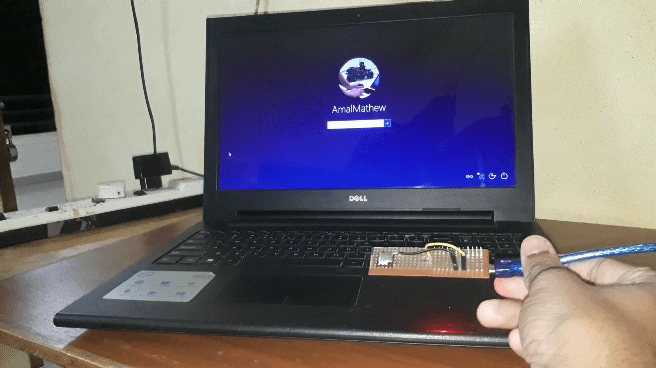
The project is in action:
What else you can do with it:
The code which I have given in the description(to simplify your sign in) is an example that you can do with it.
You can do more keyboard functions with small modification in the code.
Refer below links to add more keyboard functions
- https://www.arduino.cc/en/Reference/ASCIIchart //to use ASCII characters use
Keyboard.write(ASCII character);
for example to perform space bar operation use following code
Keyboard.write(32); //performs space bar operation

Thank youso much for reading if you need any more information feel free to ask in comments,and I'll do my best answer you.

 Poltorak Serguei