Dan Royer
-
MakeHartford previews Evil Minion
09/29/2015 at 23:03 • 0 commentshttps://instagram.com/p/8N8xAfofDe/?taken-by=imakerobots
Lacie was able to successfully pick up, move, and drop a chess piece with a few seconds training. If it's easy enough for a 6 year old, I'm sure you can do it, too.
Several people at MakerFair NYC asked "can I get the hardware plans online?" To that I have only one question: How do I pay my bills if I give my work away for free?
Seriously. Tell me. I'd love to do that. Please.
-
Maker fair prep
09/22/2015 at 20:17 • 0 commentsPacked and ready to ship! I'm glad I'm only gone a few days because there's not a lot of room left for clothing around the 18lbs of robot goodness!
Spent the morning taking 3D renders of every part for the BOM list, 2x checking the COGs and MSRP.
I'm really proud of Luke, Jen, and the rest of the team. This robot is exactly the best we can do and we are damn proud of it. A couple of days from now we're going to knock everybody's socks off when they see how great it is, and I'm looking forward to directing people to the Marginally Clever website for early access developer orders.
By my calculations we can get the first orders out the door Nov 7 and ship up to Dec 12 for Christmas delivery, or Nov 31 for Hanukkah.
We're going to offer free shipping anywhere in Canada, the continental USA, Hawaii, or Alaska on the first 100 units and we'll be actively seeking distributors at the NY Maker Fair.
Stay tuned for the price and the order URL this weekend.
-
Evil Minion Hackaday Semifinal Video
09/19/2015 at 18:10 • 0 comments -
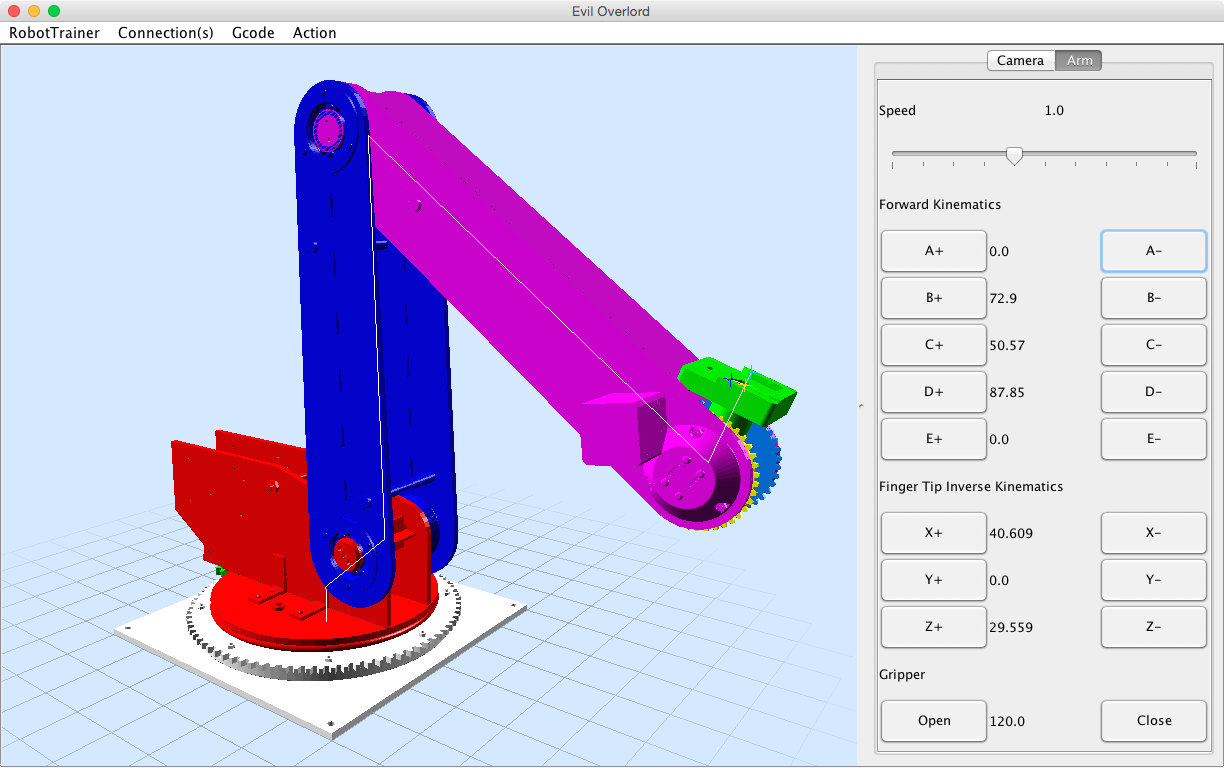
Added Gripper to Evil Overlord GUI
09/15/2015 at 19:29 • 0 commentsHere's a video of the claw waving open and closed.
https://instagram.com/p/7qSqWYIfC6/
Here's a screenshot of the UI. Note the Inverse Kinematic controls and the servo manipulator in the bottom right. I call it "Evil Overlord" because... who else would control Evil Minions?
![]()
I'd love some help with the code. I'm trying to
- build a record/playback system.
- support the various tools on the wrist. plugins for each tool type?
- support multiple arms in the same instance of Overlord. That means ray picking, moving arms, interacting/colliding arms, world file structure, and more
- support non-robot objects in the world. Load an object, place it, give it physical properties, let the arm interact.
- add a Raspberry PI for web/mobile interfaces
- add camera support. Ideally projecting the camera view into the 3d world. Point clouds from 3D scanners, too. OpenCV?
Graphics wise,
- replace the skybox with a cube that has textures to indicate which way is X, which is Y, and which is Z. The textures are made, it's the loading and display that needs to be finished. EDIT: DONE.
- improve the gfx so the arm can cast shadows on itself.
- texture the robot so the colors match the real arm.
- remove faces from the interior of the models that are invisible.
You can see the latest version of the code at https://github.com/i-make-robots/Evil-Overlord
-
Reddit AMA on Now
09/14/2015 at 17:42 • 0 comments -
Kinematics working
09/14/2015 at 06:12 • 0 commentsForward and Inverse kinematics are now being correctly calculated.
Until now I could tell the motors to move to a given angle. The closed feedback loop and a PID controller would drive the motors to their destination. There were two things missing to make this great.
Forward kinematics says "take the angles of the joints and the measurements of the parts and find the XYZ coordinates of the tool tip." I got that in a few hours by hacking the graphics code to give me visual representations of my math as I stumbled through the problem.
Inverse kinematics says "I want the tool tip at XYZ. What angles do I need at each joint?" Now this is especially tricky, because there are lots of XYZs that are simply not valid - further than the arm can reach is a good example. Inside itself might be another. Again, using the graphics system to help me see what I was doing wrong let me work the problem out one step at a time.
Now I will be able to say "drive the finger tip to XYZ, then drive in a straight line to a different XYZ." From there I can drive in arcs and implement the rest of the normal GCODE you may have seen in 3D printers and other CNC machines.
-
Evil Minion @ Vancouver Science World
09/13/2015 at 17:09 • 0 commentsFirst time taking the 5 axis arm "Evil Minion" outside. Nice!
-
Tool adapter dimension diagram
09/08/2015 at 19:34 • 0 commentshttps://www.marginallyclever.com/blog/2015/09/robot-arm-adapter-dimension-diagram/
Now you, too, can develop tools for the arm. Bring it to the 2015 World Maker Faire in NYC and SHOW ME WHAT YOU GOT.
-
Firmware and circuit schematic now on Github
09/07/2015 at 17:30 • 0 comments -
Electronics mounted, firmware upgrades
09/06/2015 at 16:56 • 0 commentshttps://instagram.com/p/7RRwAnIfK1
This is a first attempt to mount the electronics. Only the base is actually on the table, for much greater range of motion at the anchor. There are already plans to deal with the USB and power cables that remain.
The firmware now has a calibration system. When I put a magnet into a sensor I have no idea which way the magnet is pointing. So when I build the machine I have to move it to a known location, read the sensor values, and then write into the Arduino's EEPROM "actually, the angle you should report to the world is now THIS." Like the Marlin 3D printer code, there is a command to change the calibration and another to save it, so one can experiment with settings before committing. This way the calibrations all take place at the firmware level. The PC software will work the same for every arm right out of the box.
With the angle values corrected it is now possible to add software limits. If you ask the robot to move to an angle outside it's defined range of motion it will stop at the edge. Less chance of robot damage is good.
5+ Axis Robot Arm
Building an open source robot arm for makers and small businesses