For the 2016 Hackaday Prize, I've decided to incorporate this project into a much larger set of projects that altogether I call my Lego Optics Lab. The following are all the various parts an projects that are included:
This project (the one you're looking at right now), of course.
Lego Optics Lab: Mirror/Filter Holder
Lego Optics Lab: Small Lens Holder
Lego Optics Lab: Large Lens Holder
Lego Optics Lab: Panoramic Mount
Lego Optics Lab: Simple Pan/Tilt Mount
Lego Optics Lab: Worm Drive Pan/Tilt Mount
Lego Optics Lab: Mobile Phone/iPod Mount
Lego Optics Lab: Laser Interferometer
Lego VR Goggles: Lego Optics Lab DIY Stereoscope

Follow me on Twitter: @SteveSchuler20 and right here on Hackaday: KRA5H.
When working with an optics lab, on occasion you might need a mechanism to rotate filters such as a polarized filter. I built a filter rotator for my Lego optics lab and set up a polariscope. A polariscope is a simple and fun way to view the rainbow colors in clear plastic objects such as flatware, tape dispensers, etc.
You can actually make your own polariscope by wearing a pair of 3D cinema spectacles or ordinary polarized sunglasses and sitting in front of an LCD monitor for your computer. Open MS paint (or other drawing program such as gimp). If your default image (the white background) is too small simply drag the lower right corner all the to the lower right of your editor window so that the white background fills most of your screen. Hold a clear plastic tape dispenser between the white area of your LCD screen and your polarized spectacles.
You can usually just tilt your head to the right or to the left about 45 degrees until the white background on your LCD screen goes dark and you can see rainbows of color in the tape dispenser. If you don't see the effect by tilting your head, take the glasses off and look through one of the lenses while rotating the spectacles until you see the effect.
I’ll demonstrate how I built a polariscope for my Lego Optics lab. NOTE: I used the Lego Technic turntable gear from worm drive pan/tilt mount to build my polariscope. The polarized filter came from a handheld electronic game that the batteries leaked and ruined (I try to salvage what I can from broken things before recycling them) and cut it to fit on the turntable gear. Instead of an LCD screen I used my iPod running a flashlight app for my white background.
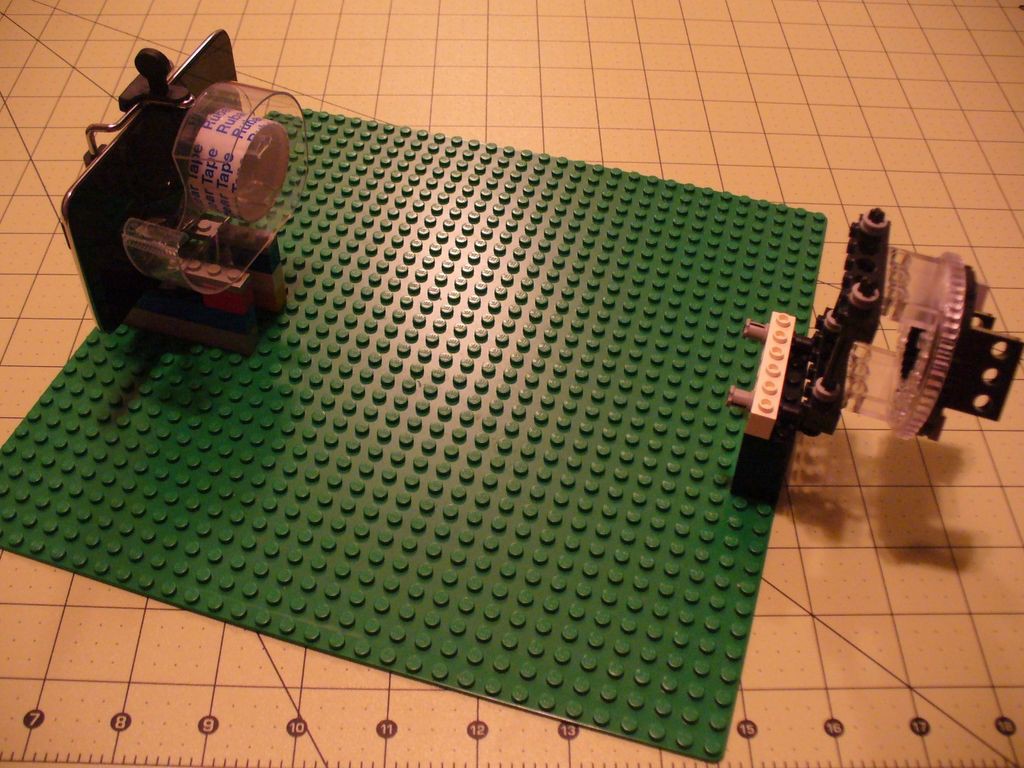

Here's the iPod with the flashlight app running and the polarized filter rotated to show the white background:

Here's the iPod with the flashlight app running and the polarized filter rotated to show the white background AND a tape dispenser in front of the iPod:

Here's the iPod with the flashlight app running and the polarized filter rotated to show the dark background AND the tape dispenser in front of the iPod with the rainbow effect (unfortunately I couldn't adjust the brightness enough on my consumer camera to do the image justice):

Here's a slightly better image that I was able to capture with my old smart phone:

Lego Optics Lab, previous article: Lego Virtual Reality (VR) Goggles
Lego Optics Lab, previous article: Mobile Phone/iPod Mount
 Steve Schuler


 Quinn
Quinn
Great stuff! Using Lego for an optics bench is a fine idea. Would be cool to add a (stepper?) motor to the pan and tilt, so that you can rotate the polarizer. Images with 90° difference in polarization give a lot of information.