Sergey Royz
Motivation
Several years ago I build an inverted pendulum on a cart, I spent about a year trying to balance the rod with stepper motors with no success, however, I saw a lot of balancing robots build with stepper motors, so I decided to give it a try once again.
Choice of components
The idea was to use cheap and popular components so that in the future I can turn this project into a DIY kit with instructions for a broad audience.
This is what I ended up with:
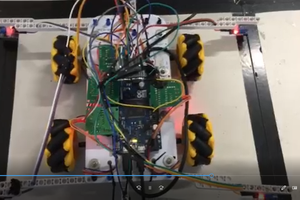
- IMU: MPU6050 - used to measure the angle of the robot, has great code support, I tried MPU9250 which is more advanced but not very common and more expensive.
- Mechanics: Nema17 + A4988 - very common and affordable combination. Why stepper vs DC-motors? Stepper allows to produce acceleration directly as calculated (if programmed properly), no need to include the model of a DC motor in the overall mathematical model, also stepper motor maintains holding torque (can standstill if the robot is balanced). DC motors require encoders with another feedback loop, which will load our slow Arduino Nano CPU even more.
- Controller: Arduino Nano - first I tried with ESP32 Wroom, overclocked to 240Mhz, but thought it was too easy :) and the controller is not as affordable as Nano. The challenge was to squeeze the most out of the 16MHz controller.
Mathematical model and simulation
Assuming we are using stepper motors, we can control torque directly. I wrote a post on Kaggle with equations and simulations of the robot. For stabilizing the robot I used 2 PID control loops:
- inner PD-loop for holding upright position
- outer PI-loop for bringing velocity to zero
I assume there is a need for the third loop to control the position (comments of experienced users are welcome :) )
Frequencies
This is the most frustrating part when it comes to the implementation, if you choose frequencies wrong tuning PID coefficients will not help. What frequencies am I talking about?
- Stepper pulse frequency
Assume we want to allow maximum wheel velocity 5 rotation per second, having D = 72mm wheels from roller skate means linear speed is about 5 * 72/1000 * PI ~ 1.13 m/s which is more than enough. Using 1/8th micro-stepping mode we need 5 * 1600 = 8000 pulses per second, in fact, we need at least twice that for triggering step pin from LOW to HIGH and back, so we need to run stepper control routine at least at 16kHz.
Pulse frequency also gives us "velocity resolution", e.i. the higher the frequency the closer velocities if we change a number of pulses per second which is what we need to produce a smooth force, otherwise the robot will experience a kick when the velocity changes which not what our controller is trying to predict.
In my current implementation, I ended up with 40kHz. Also, this routine should be timely precise, so we should use timer interrupts here.
- Velocity update frequency
In order to balance the robot the motor needs to produce a force, so it should accelerate between measurements, ideally, the velocity should change after each step of the stepper motor, meaning that step delay should be recalculated after each step. But it requires floating-point operations in the timer ISR which is too heavy. So I just put in the main loop and run as fast as possible.
- Measurement frequency
The frequency at which we obtain the new position of the robot, should be 10-100Hz, consider that i2c communication and filtering take unavoidable constant time, so we can't waste CPU time at the expense of the velocity update.
Intuitively the velocity update cycle should be faster than the measurement so that the force produced has the time to act on the robot after the measurement.
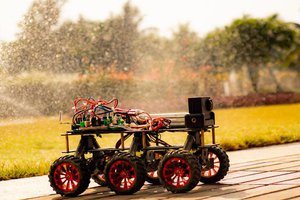
Working video
To be continued...
This is still an ongoing project, next steps would be the following:
- try to use DMP on MPU6050 to save more CPU time and increase frequencies
- try faster controller
- implement position control
- add remote control with ESP32
- turn the robot into a multi-purpose platform with an API...
 Jithin Sanal

 Miguel Wisintainer