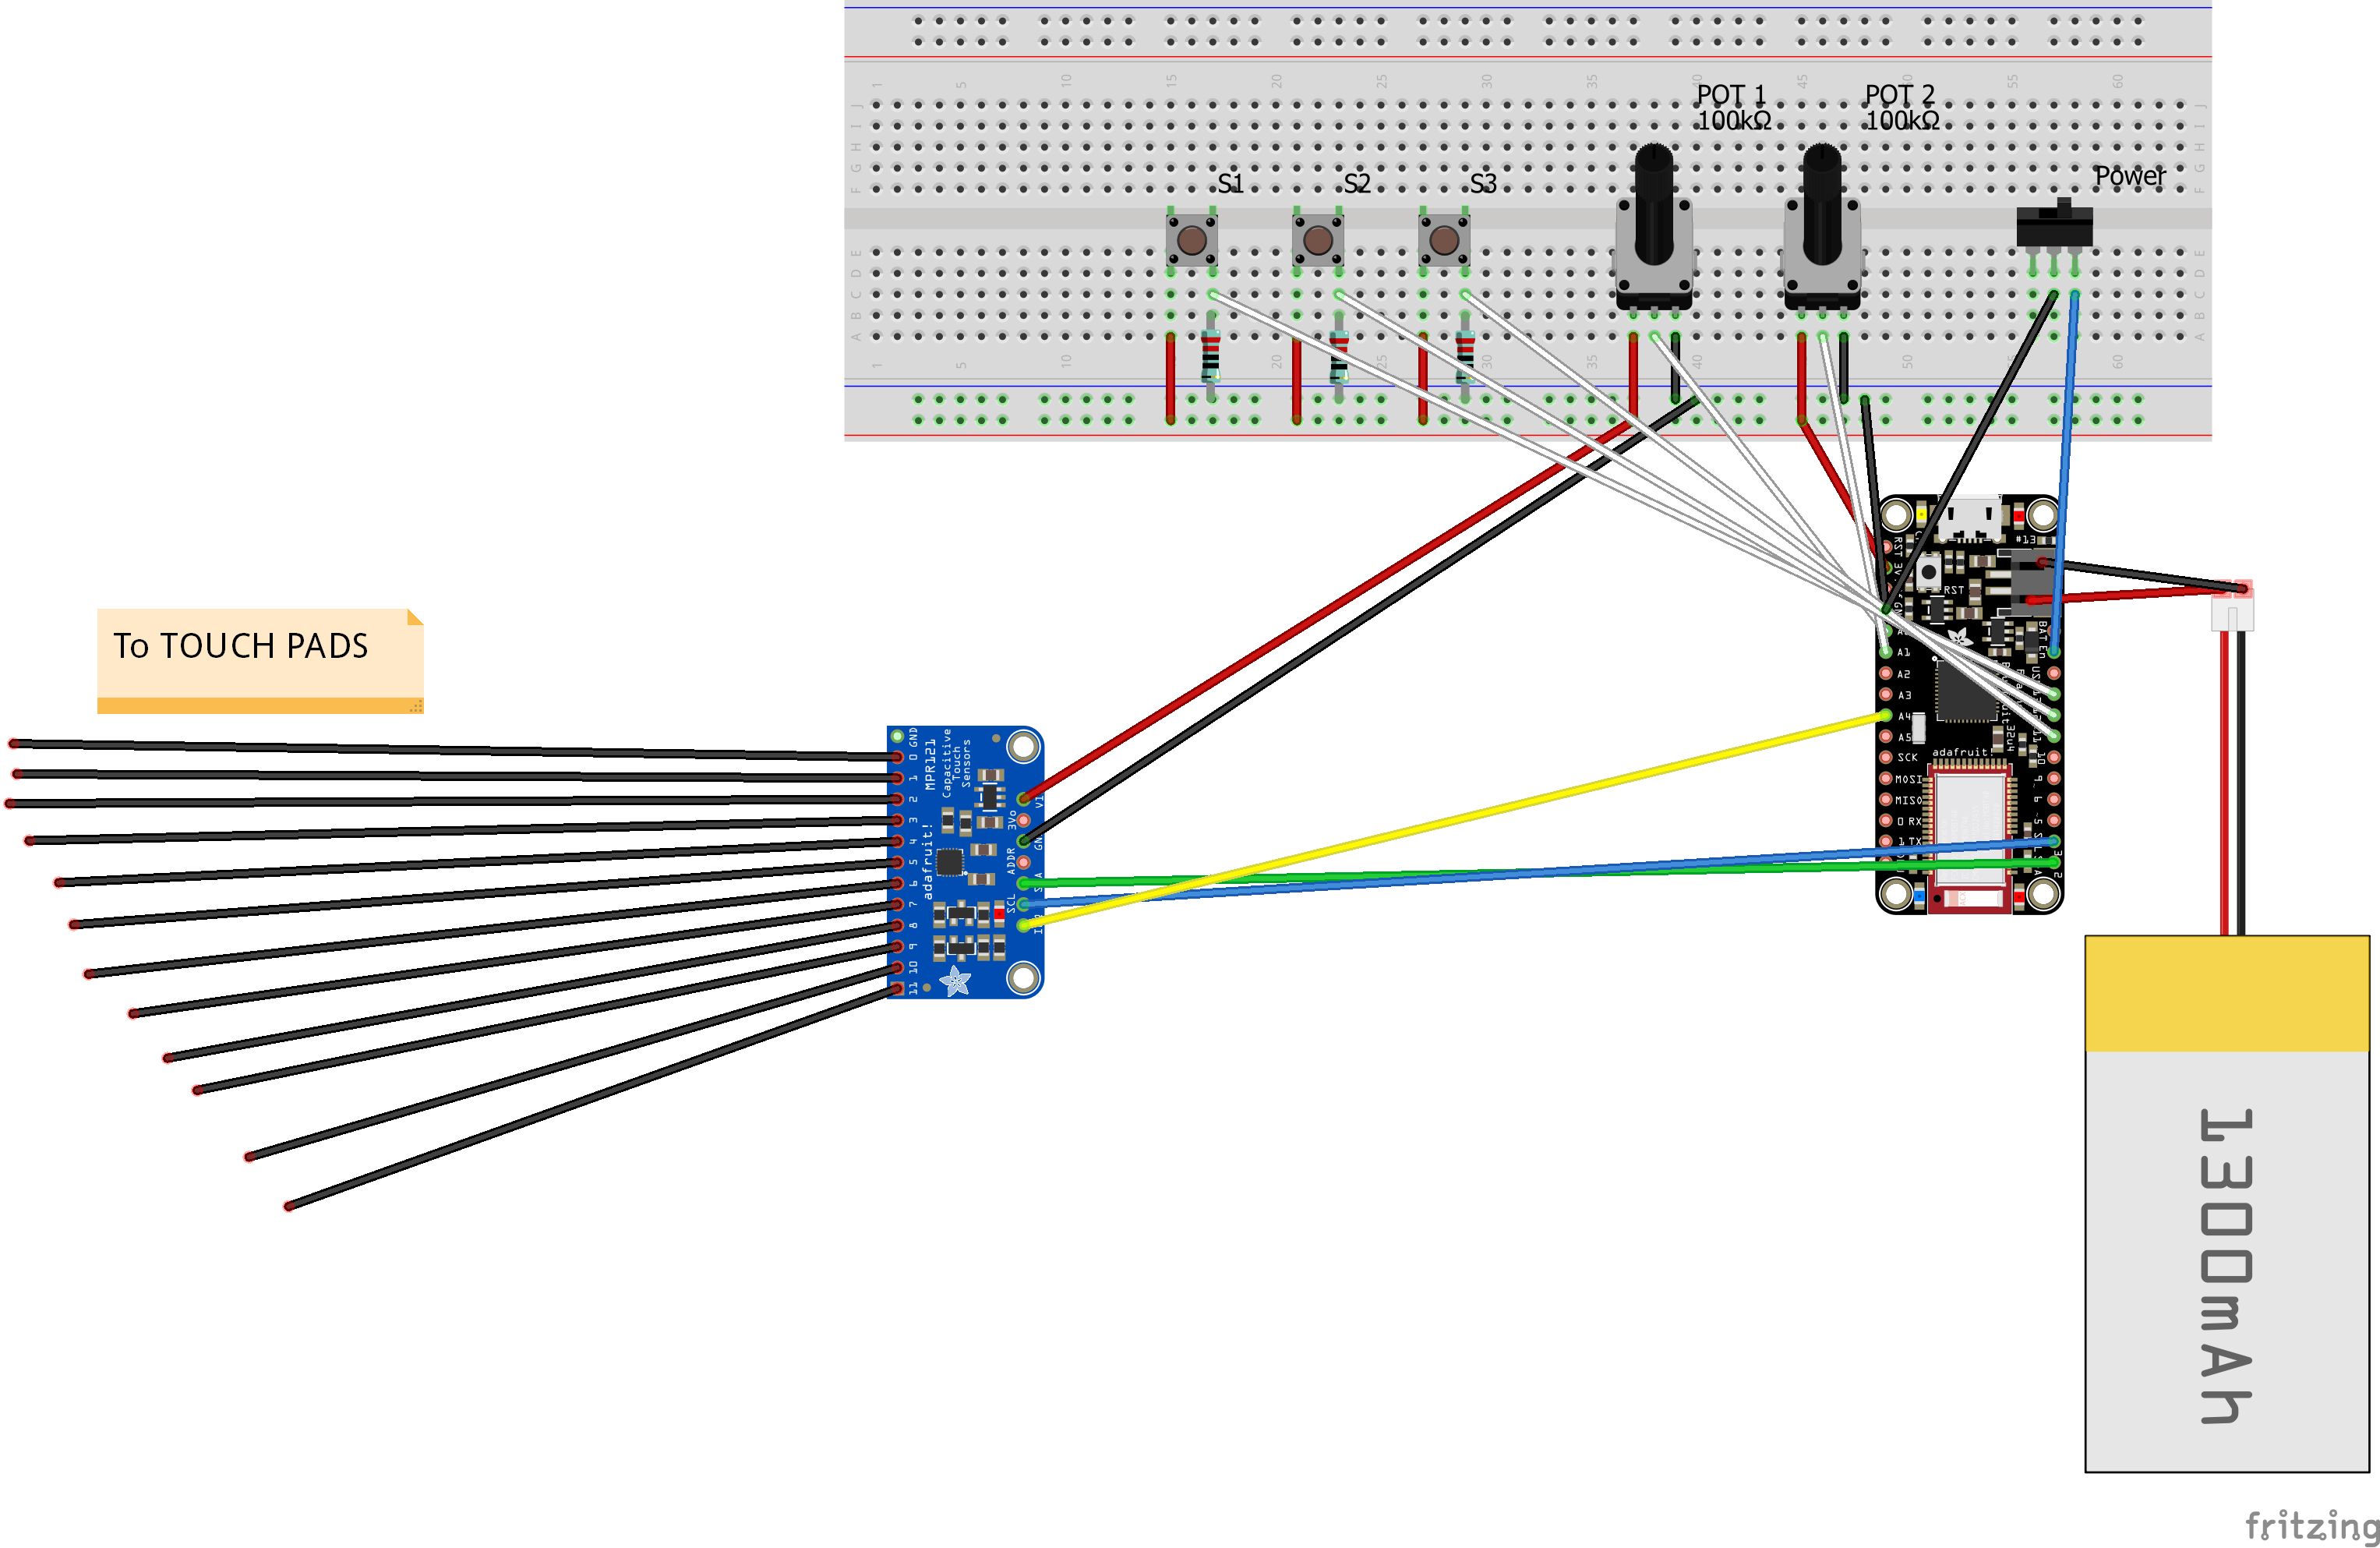
Close
0%
0%

Guitar Pickguard Wireless MIDI Controller

A wireless MIDI controller for an acoustic guitar's pickguard that detects note presses via capacitive touch sensing.

Similar projects worth following
551 views
0 followers
I perform and record fingerstyle guitar music and wanted a way to control a software synthesizer during live performances. This would allow me to perform more complex arrangements and diversify my sound.

The simplest way I could think of doing this was by adding a MIDI controller to the pickguard (known as a scratchplate in the UK) of my guitar. This is in a convenient place for fingerstyle players as the picking hand rests close to this region of the guitar in most fingerstyle techniques. Capacitive touch sensing was used as it allows larger contact areas to detect note presses.

For a microcontroller, I decided to use an Adafruit Feather 32u4 Bluefruit as it allows you to send MIDI using low energy bluetooth. Conveniently, it also has a JST port to enable charging via a Lipo battery. This makes it an ideal microcontroller to make a portable MIDI device with.


How the controller works

Twelve capacitive touch pads are used, corresponding to the twelve notes in the chromatic scale. These pads are wired to an Adafruit MPR121 capacitive touch sensor breakout, which provides a convenient way to send capacitive sensing information to the microcontroller through I2C communication. The breakout board and associated library also handle the analog data from the touch pads making this part of the project easier to code.

Three push buttons, two potentiometers and a toggle switch are also wired to the microcontroller. Their functions are defined below:

Push Button 1 (Octave Up): Increases the pitch of the capacitive touch pads by one octave.

Push Button 2 (Octave Down): Decreases the pitch of the capacitive touch pads by one octave.

Push Button 3 (Sustain): Switches the MIDI controller to/from sustain mode. In sustain mode the controller can only play one note at a time. A note is played when a pad is pressed and stopped when the pad is pressed again or a different pad is pressed. In contrast, default behavior allows multiple notes to be played at once, and notes are only played when a pad is pressed.

Potentiometer 1 (Volume): Determines the value of the volume knob (CC 7). Maps to a value between 0 and 127.

Potentiometer 2 (Mod Wheel): Determines the value of the mod wheel (CC 1). Maps to a value between 0 and 127.

Note: using MIDI Learn it is usually possible to make these CC values control other parameters on your software synth.

Toggle Switch (Power): Turns the board on and off.

See the tutorial tab for full build instructions!

WIRING.fzz

Fritzing wiring

fzz - 164.29 kB - 11/28/2021 at 14:29

Download

ino - 6.90 kB - 11/28/2021 at 14:28

Download

  • 3 × Push Switch
  • 2 × 10K Potentiometer
  • 1 × SPDT Toggle Switch
  • 1 × Adafruit Feather 32u4 Bluefruit LE
  • 1 × Adafruit Capacitive Touch Sensor Breakout - MPR121

  • 1
    Wiring

    The wiring is shown in the breadboard diagram below. Before soldering, I recommend first creating a prototype device on a breadboard to ensure you have wired the circuit diagram properly. When creating a device that will be soldered and mounted to a guitar ensure you measure wire lengths to the necessary lengths. This requires measuring the wire length from the MPR121 to the microcontroller, and the touch pads to the MPR121 respectively. In my case this was 40 cm and 20 cm respectively.

    For a battery, I used a 2000mAh LiPo battery which can connect directly to the feather via a JST-PH connector. When buying a LiPo battery: the important thing is that your battery has a JST-PH connector with the wires in the correct orientation.

    In the prototype example shown here I use the exposed ends of single-core wires as touch pads. You could also make actual touch pads by sticking the ends of the wires to the scratchplate with conductive tape.

  • 2
    Software

    The Arduino IDE code is given in the files tab. You will first need to configure the Arduino IDE to detect the Adafruit feather. You will also need to install the following libraries:

    • Adafruit MPR121
    • Adafruit BluefruitLE nRF51

    Start by opening the BluefruitConfig.h tab (available from the nRF51 example sketches) and then open and upload the MIDI scratchplate sketch.

    Acknowledgements: I adapted my code from ble_neopixel_mpr121.ino example by Todd Treece, copyright of Adafruit.

  • 3
    Testing

    Before mounting the controller, it's worth testing that it works.

    Once the controller is wired (either to a breadboard or protoboard) and the code is uploaded, it can be connected directly to a software synth on a platform that supports Bluetooth LE. I connected my controller to the free Audiokit Synth One app on an iPhone SE. The controller was visible as a Bluetooth MIDI Device (named 'Adafruit Bluefruit LE') and can be connected to directly via the app. It's then ready to make music and you can mount it to your guitar.

View all 4 instructions

Enjoy this project?

Share

Discussions

Similar Projects

Does this project spark your interest?

Become a member to follow this project and never miss any updates