Close
0%
0%

Smart classic AC doorbell

Assimilating my classic RRRRRRING!! doorbell into the hive.

Similar projects worth following
I have this classic AC doorbell in my house from 1937. I want to get notified when someone's at the door.

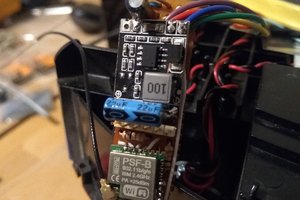
It all started when I got a new "smart" energy meter installed. (https://www.netbeheernederland.nl/dossiers/slimme-meter-15) In my previous house I already had a setup to interface with it. So this would get the same treatment. 

I still had to install a power outlet in the meter / fuse cabinet to power the Pi. But when I was looking for a source of power, I noticed my doorbell.

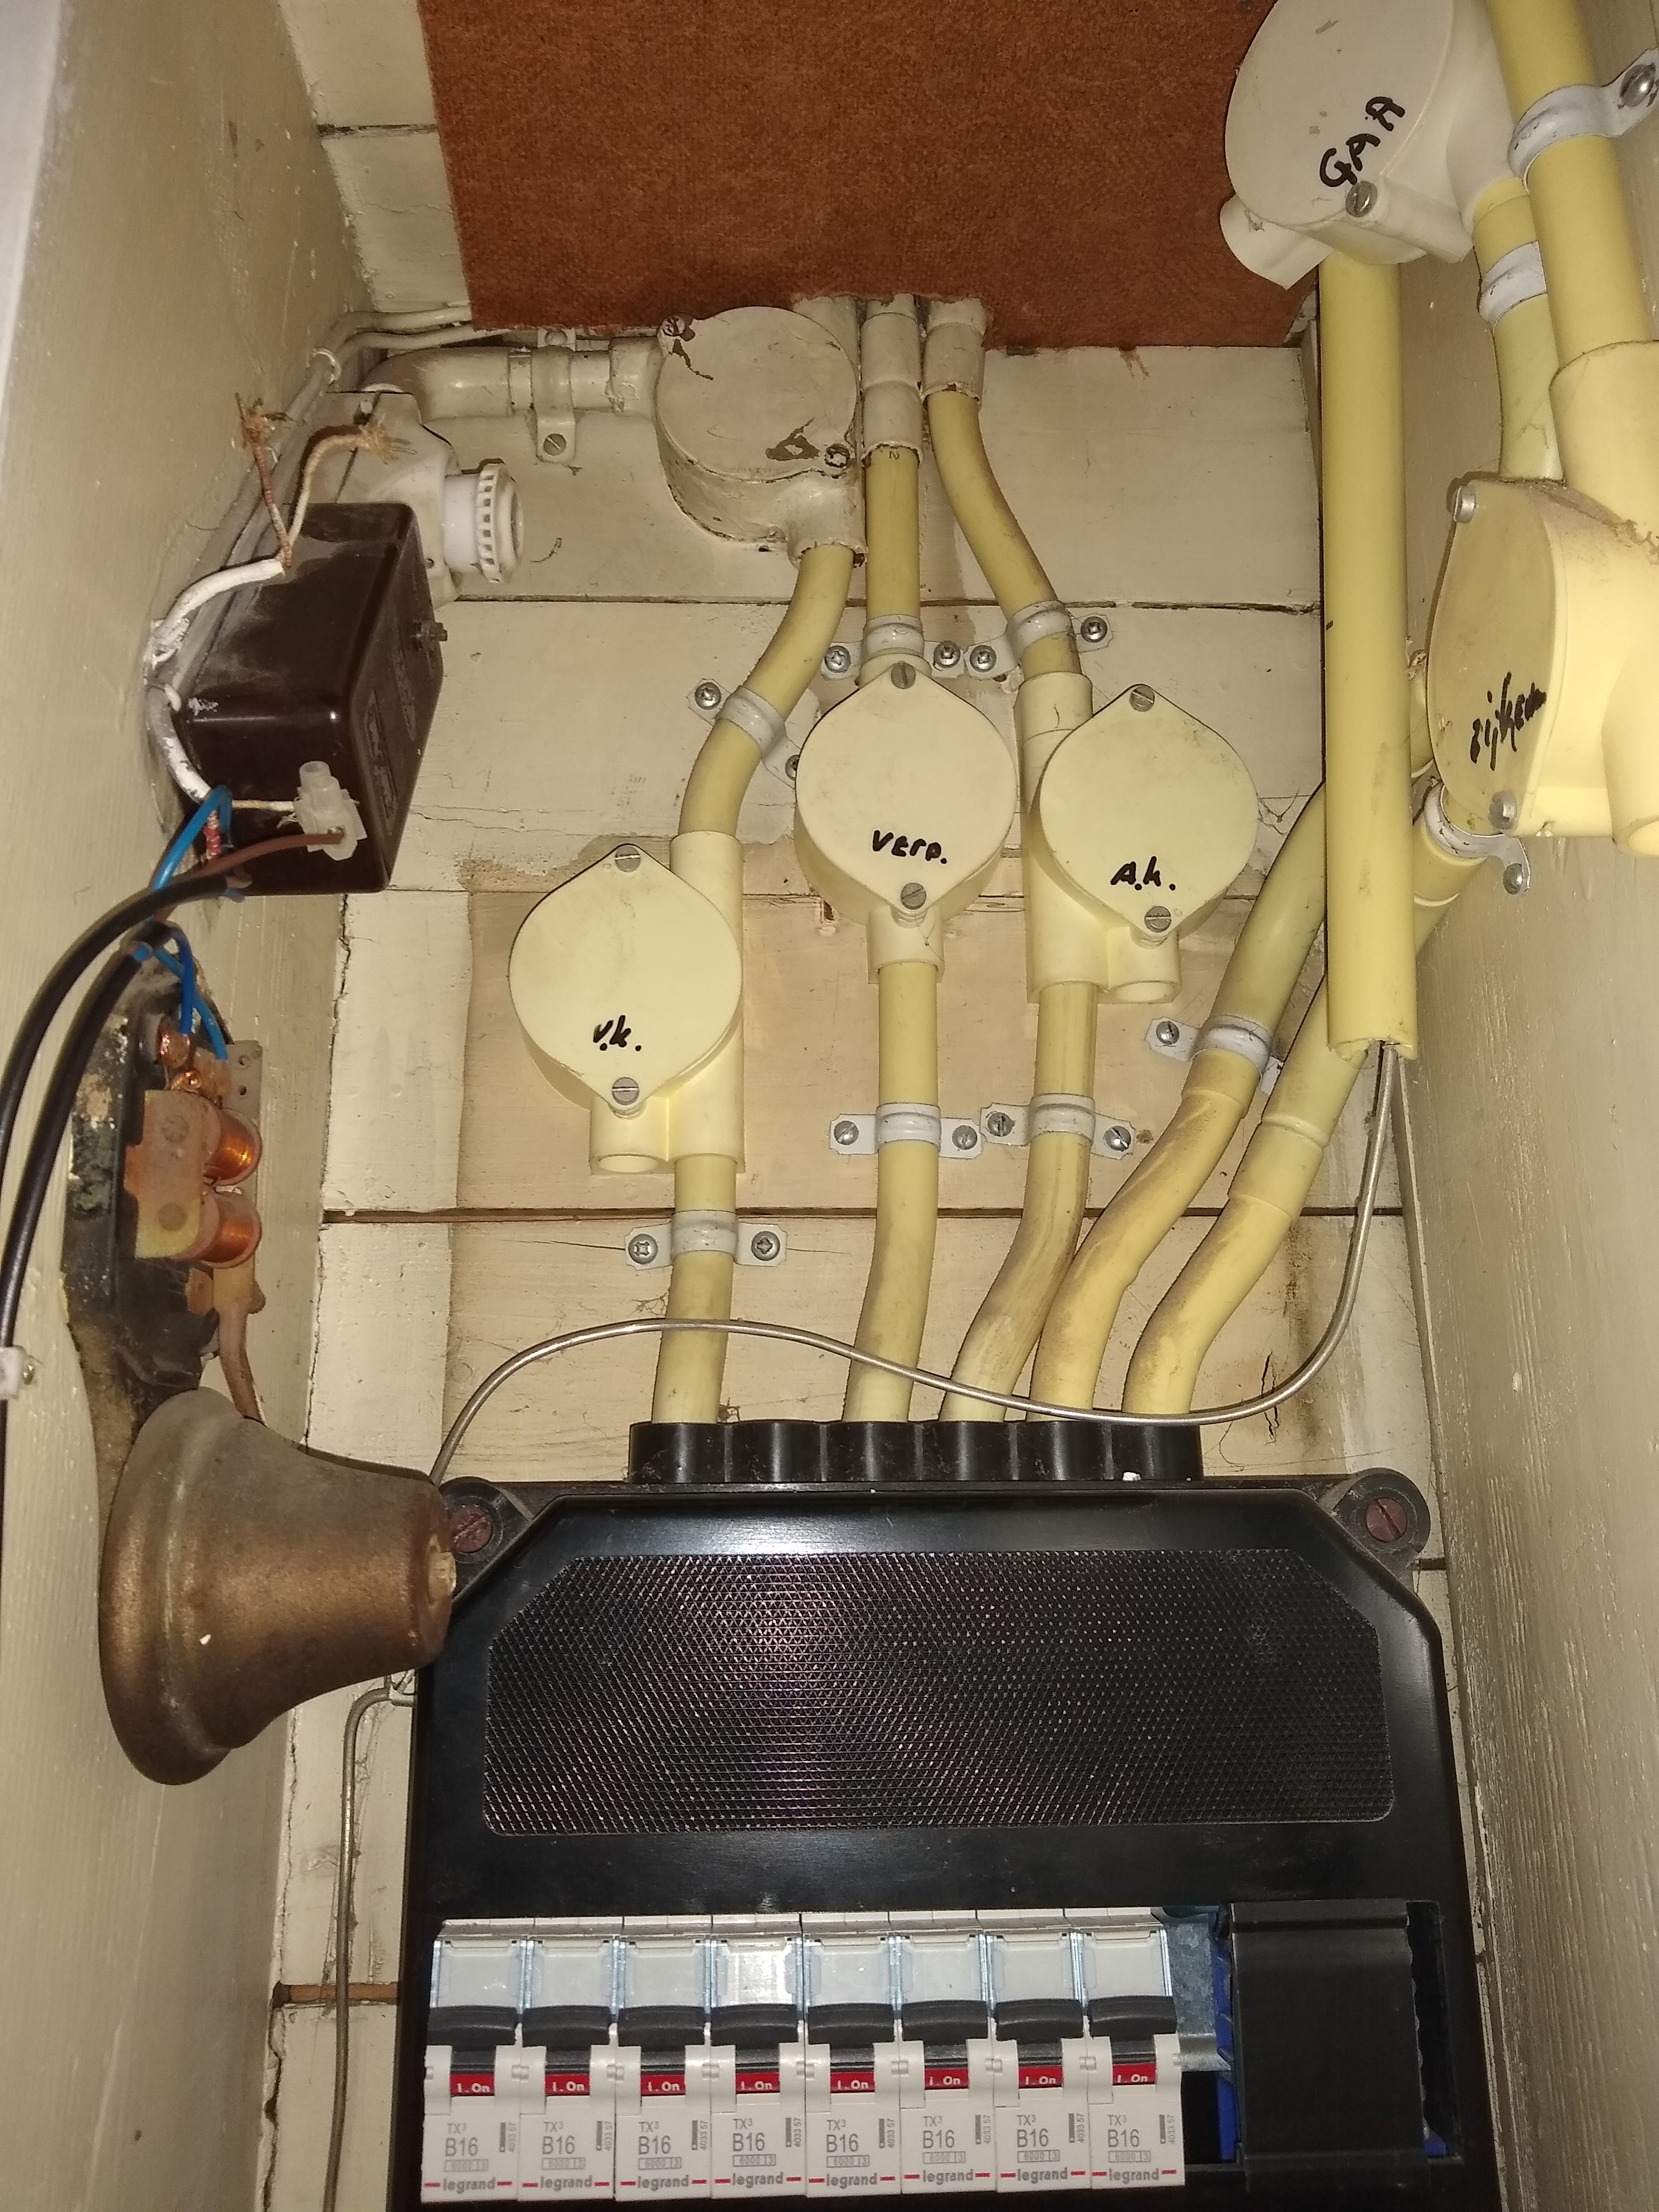
It's an old style classic AC-powered unit. With a separate transformer to supply 8V AC. It's pretty loud, but when I'm working in the garage or in the back of the yard, I don't always hear it ring. With the small use case of this scenario, you can see my justification to spend a week on this. 

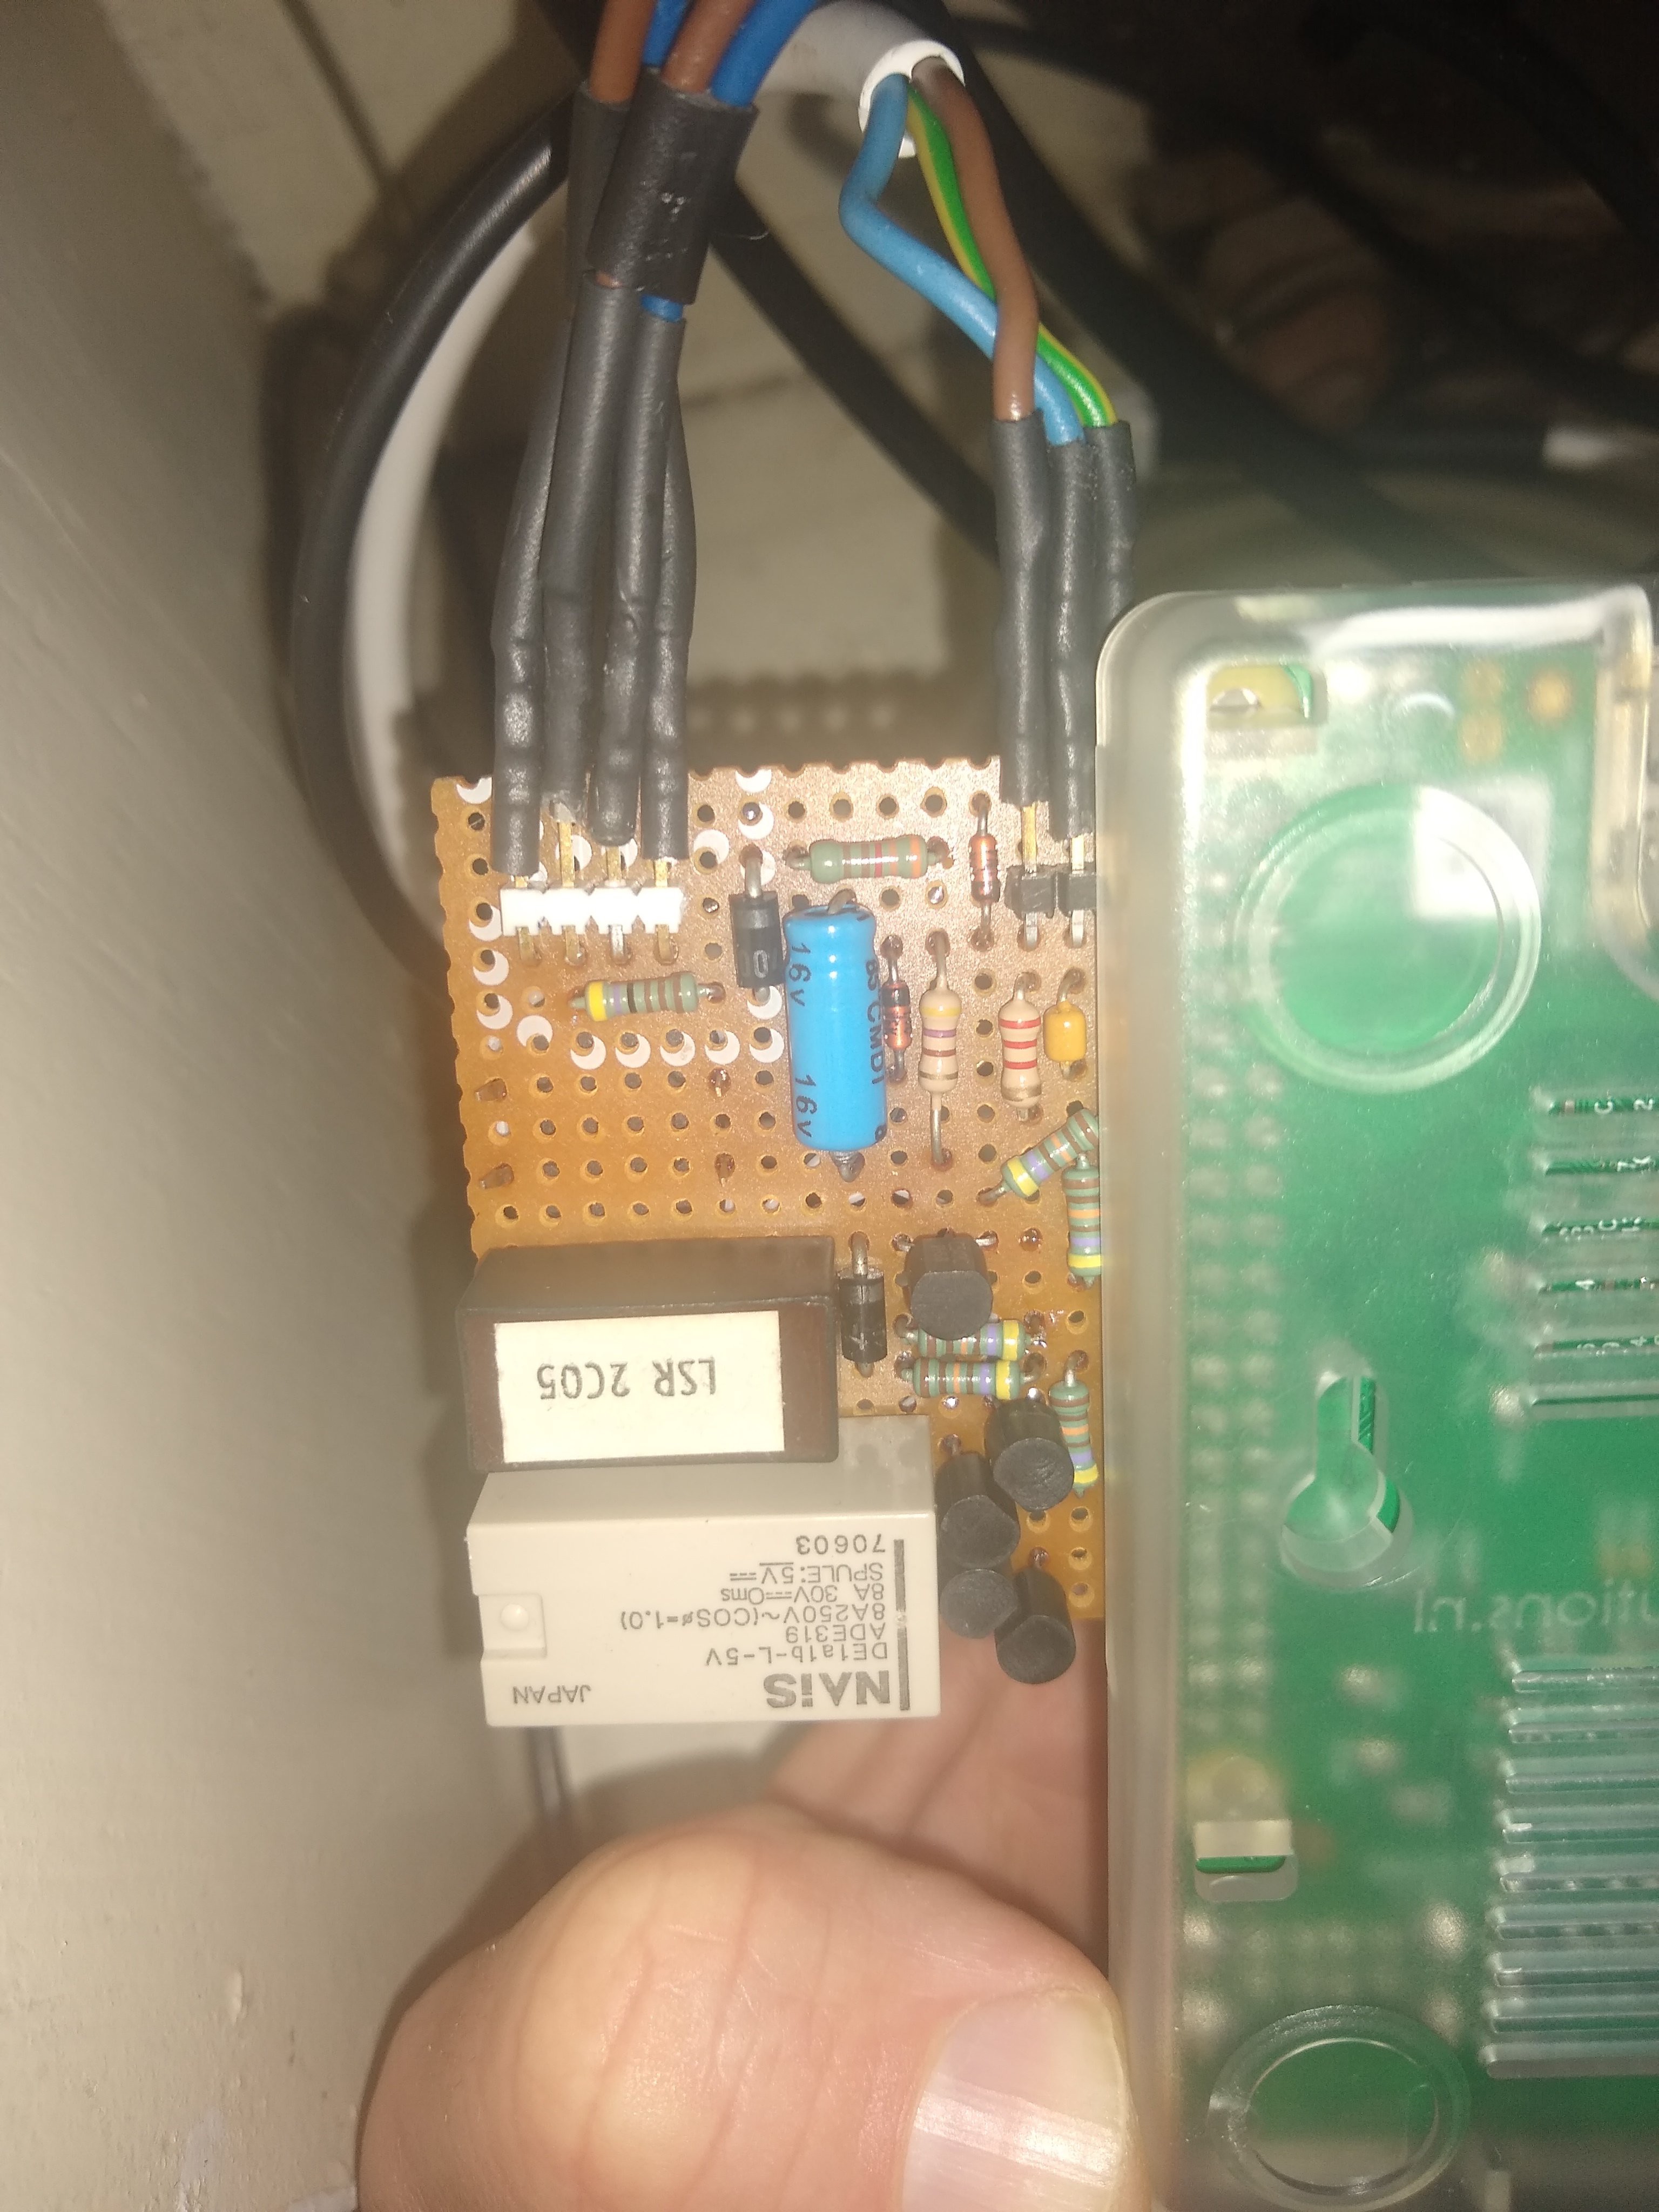
So why not over-complicate things and build a sensing circuit? Further on in the build, I thought of a MUCH simpler way of achieving the original goals without messing around with AC. But hey! What's the fun in that?

Project main goals:

  • Keep the original doorbell;
  • Notify me on my phone when the bell rings;

Secondary goals:

  • Ability to mute the doorbell;
  • Ability to remotely ring the doorbell;
  • Ability to replace my device with a "jumper" to the connections that restores normal operation (when I want to do more augmentations or move house);

Concept:

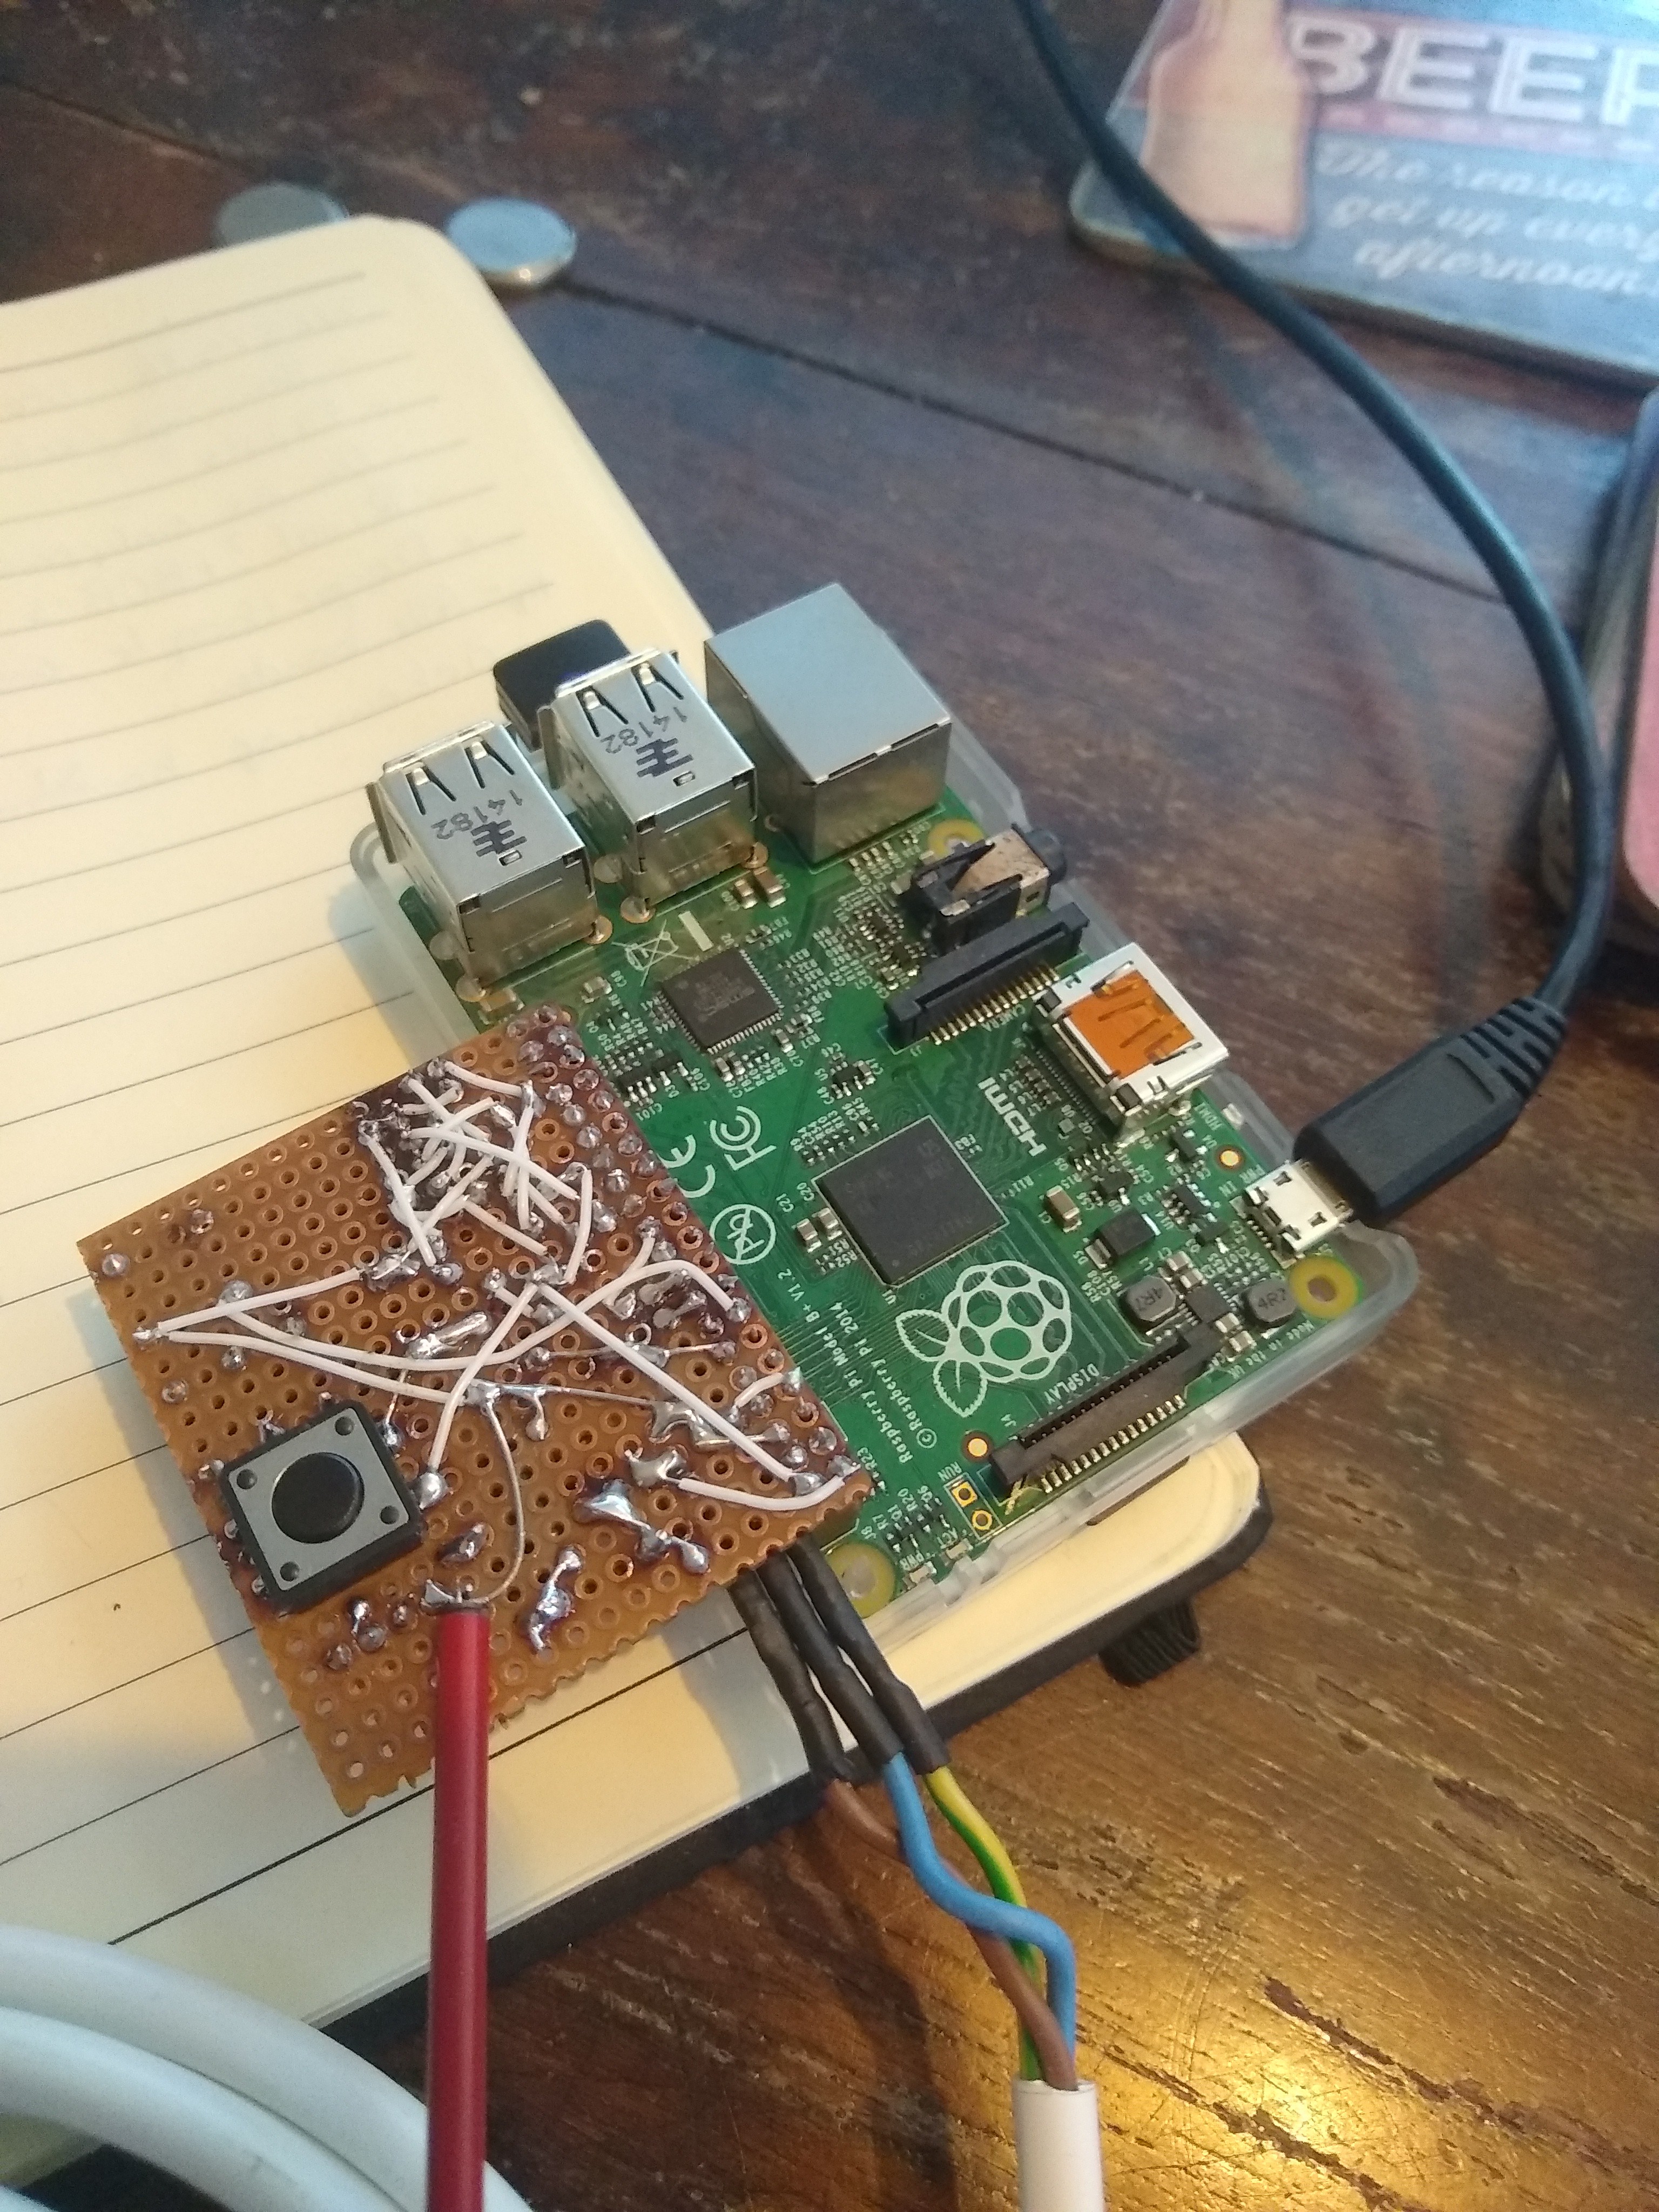
Use a Raspberry Pi for the smarts as I already have one in the cabinet. It should have the standard OS without desktop so I know my way around and I can hook up more stuf (DHT22 temp sensor, DSMR-monitoring, maybe entry lighting / camera). 

Communication with Home Assistant using the MQTT-protocol. Automatic MQTT discovery on Home Assistant. Using a python script as a daemon/service. 

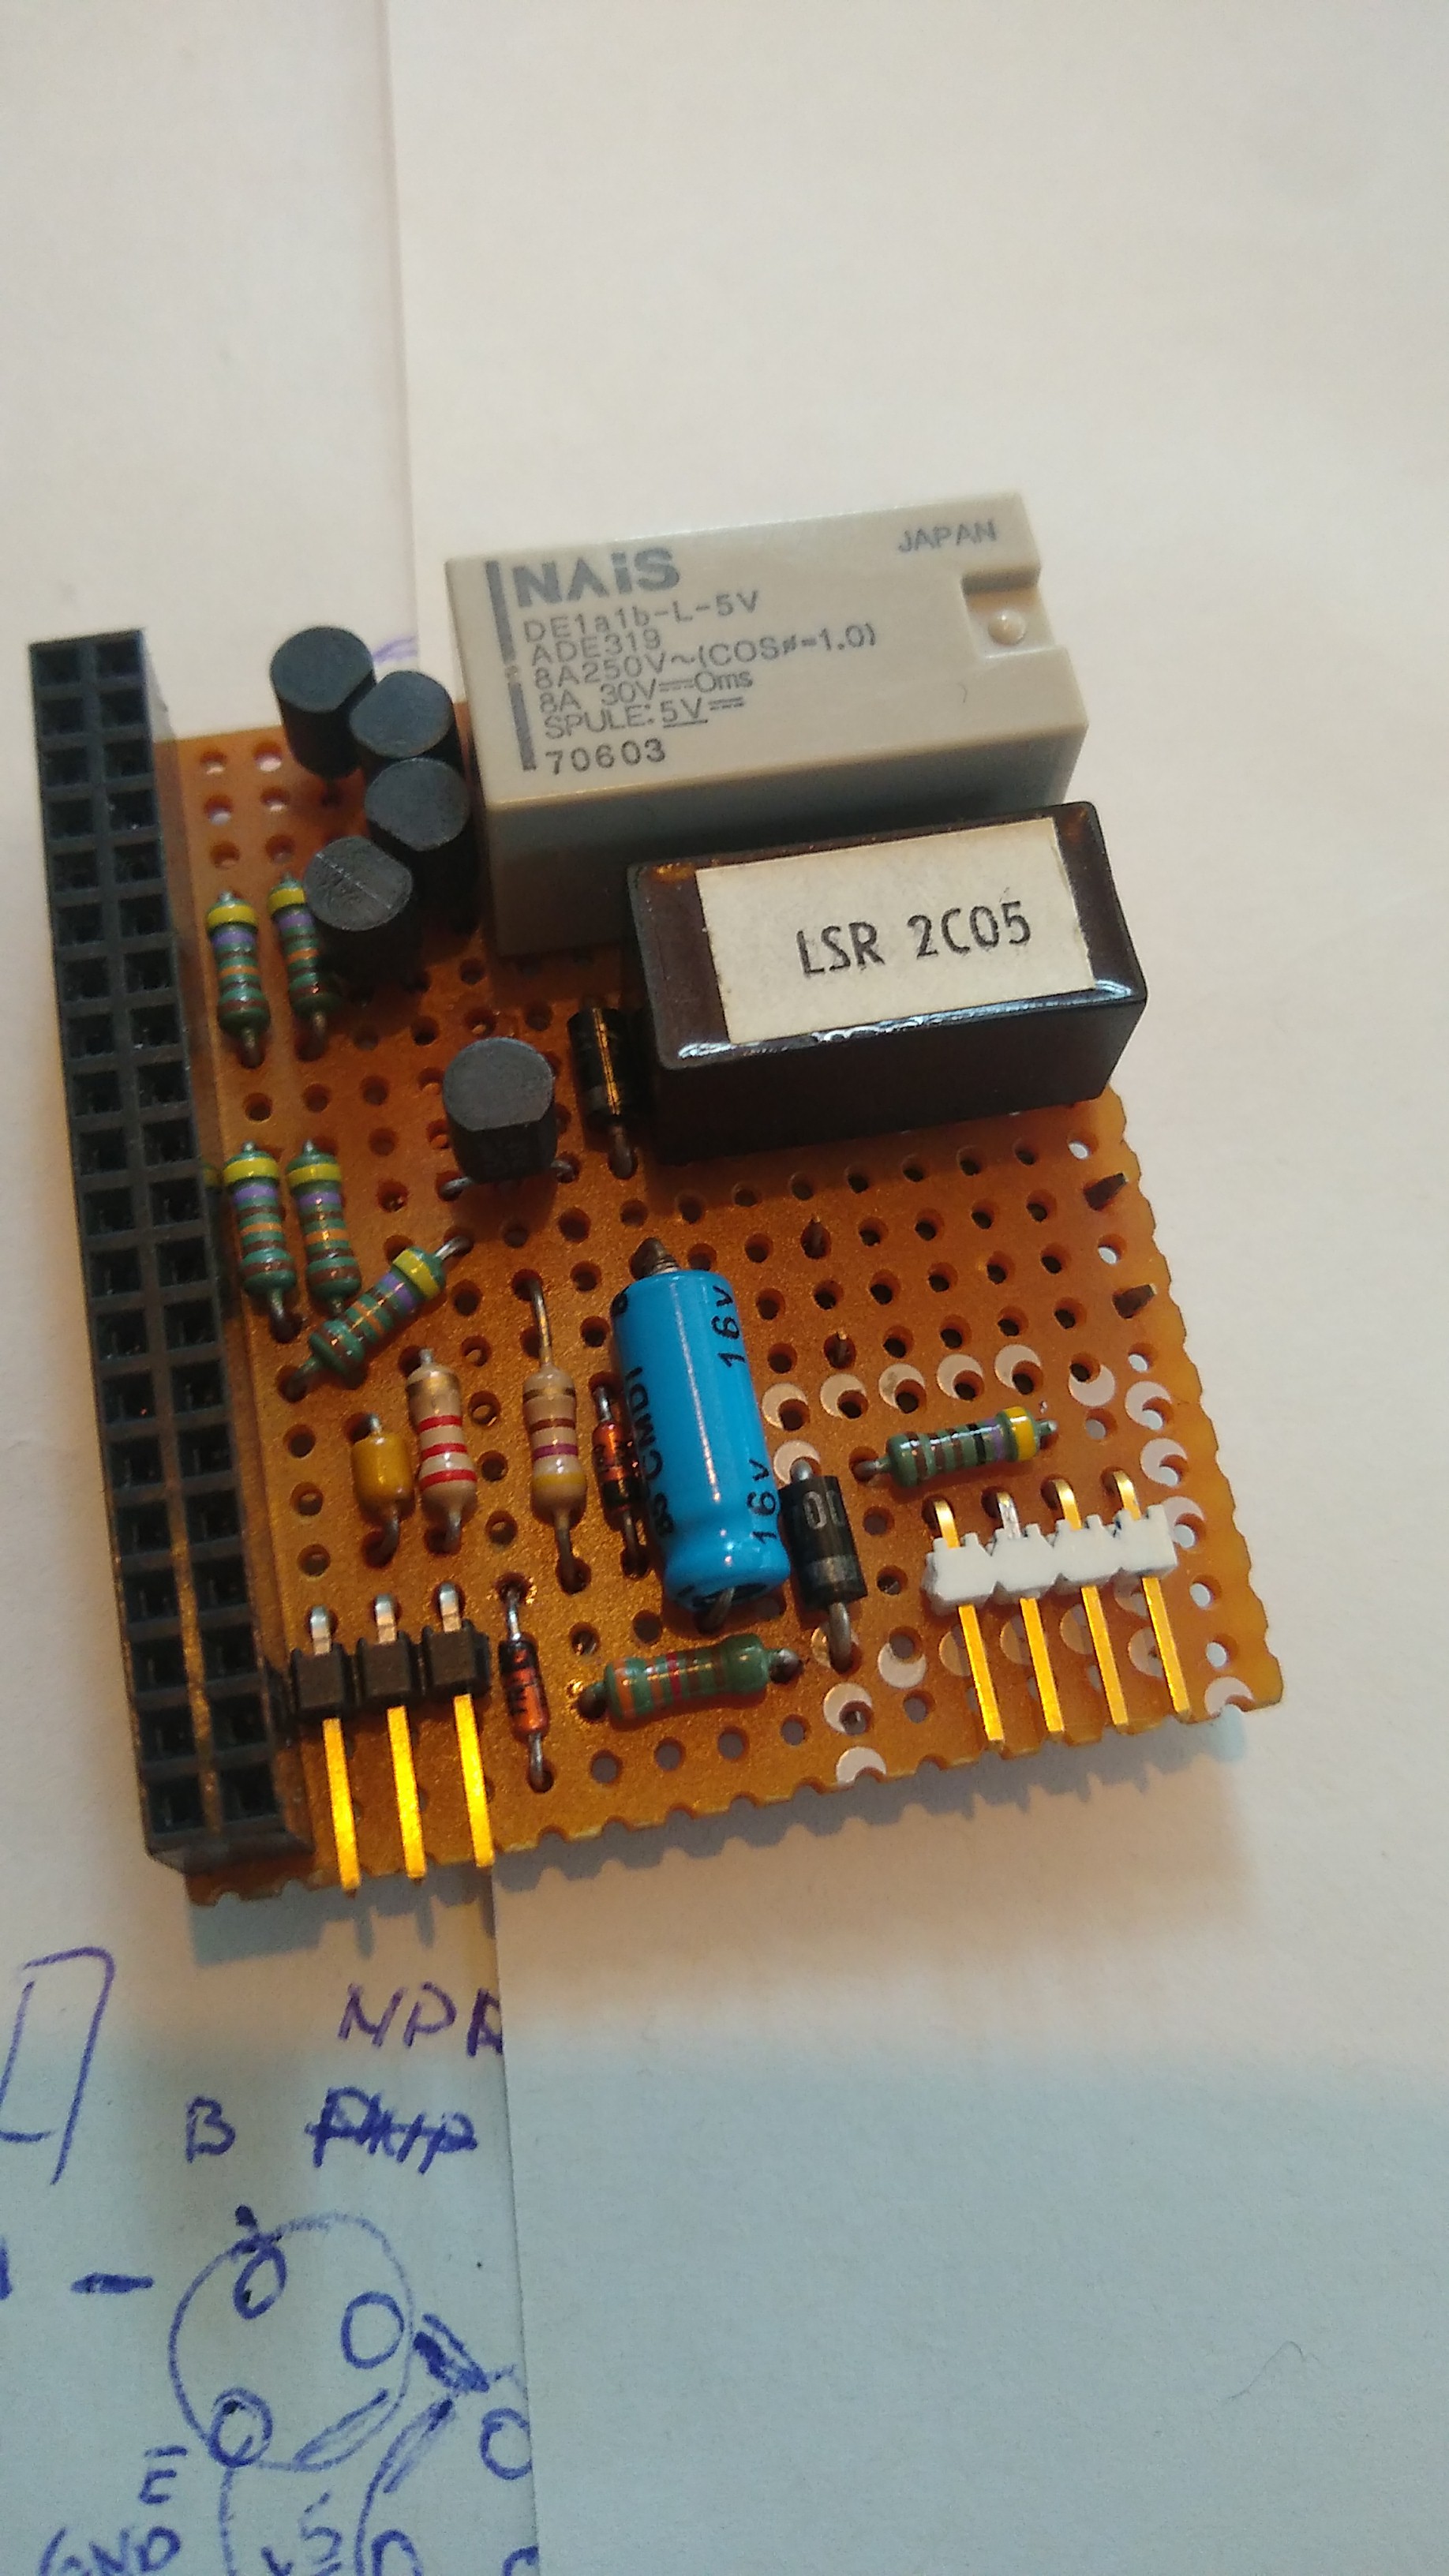
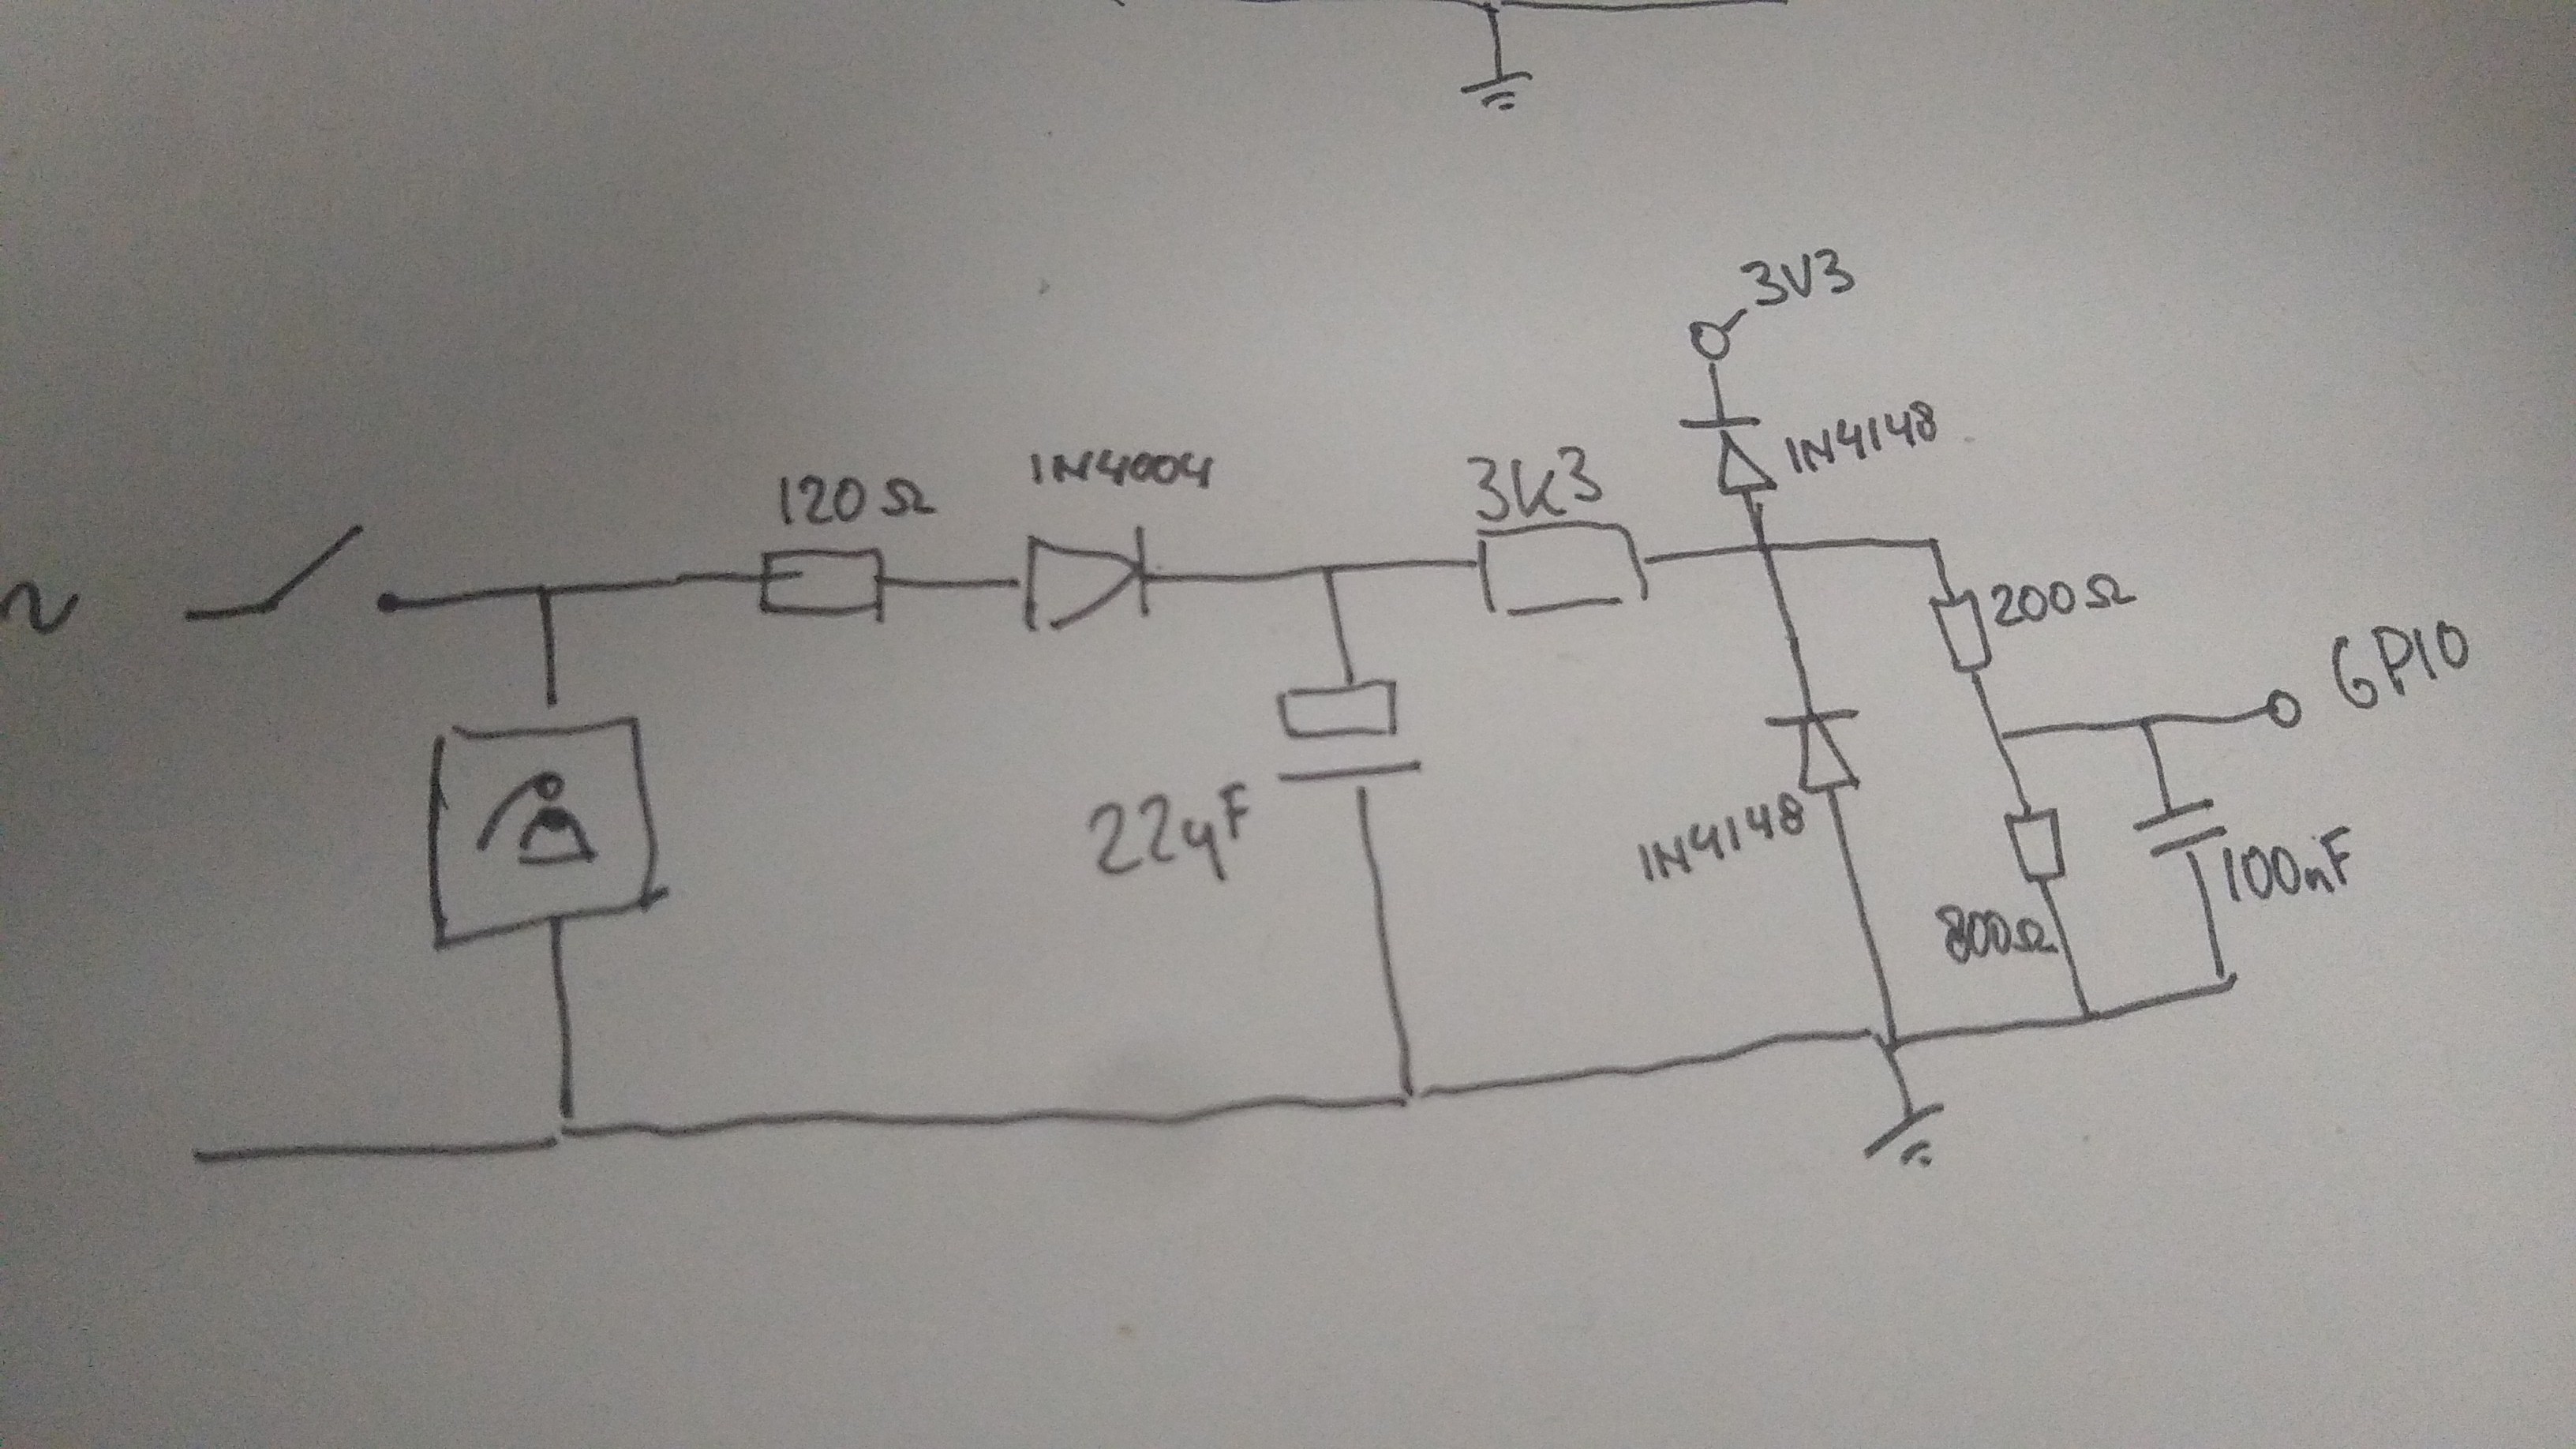
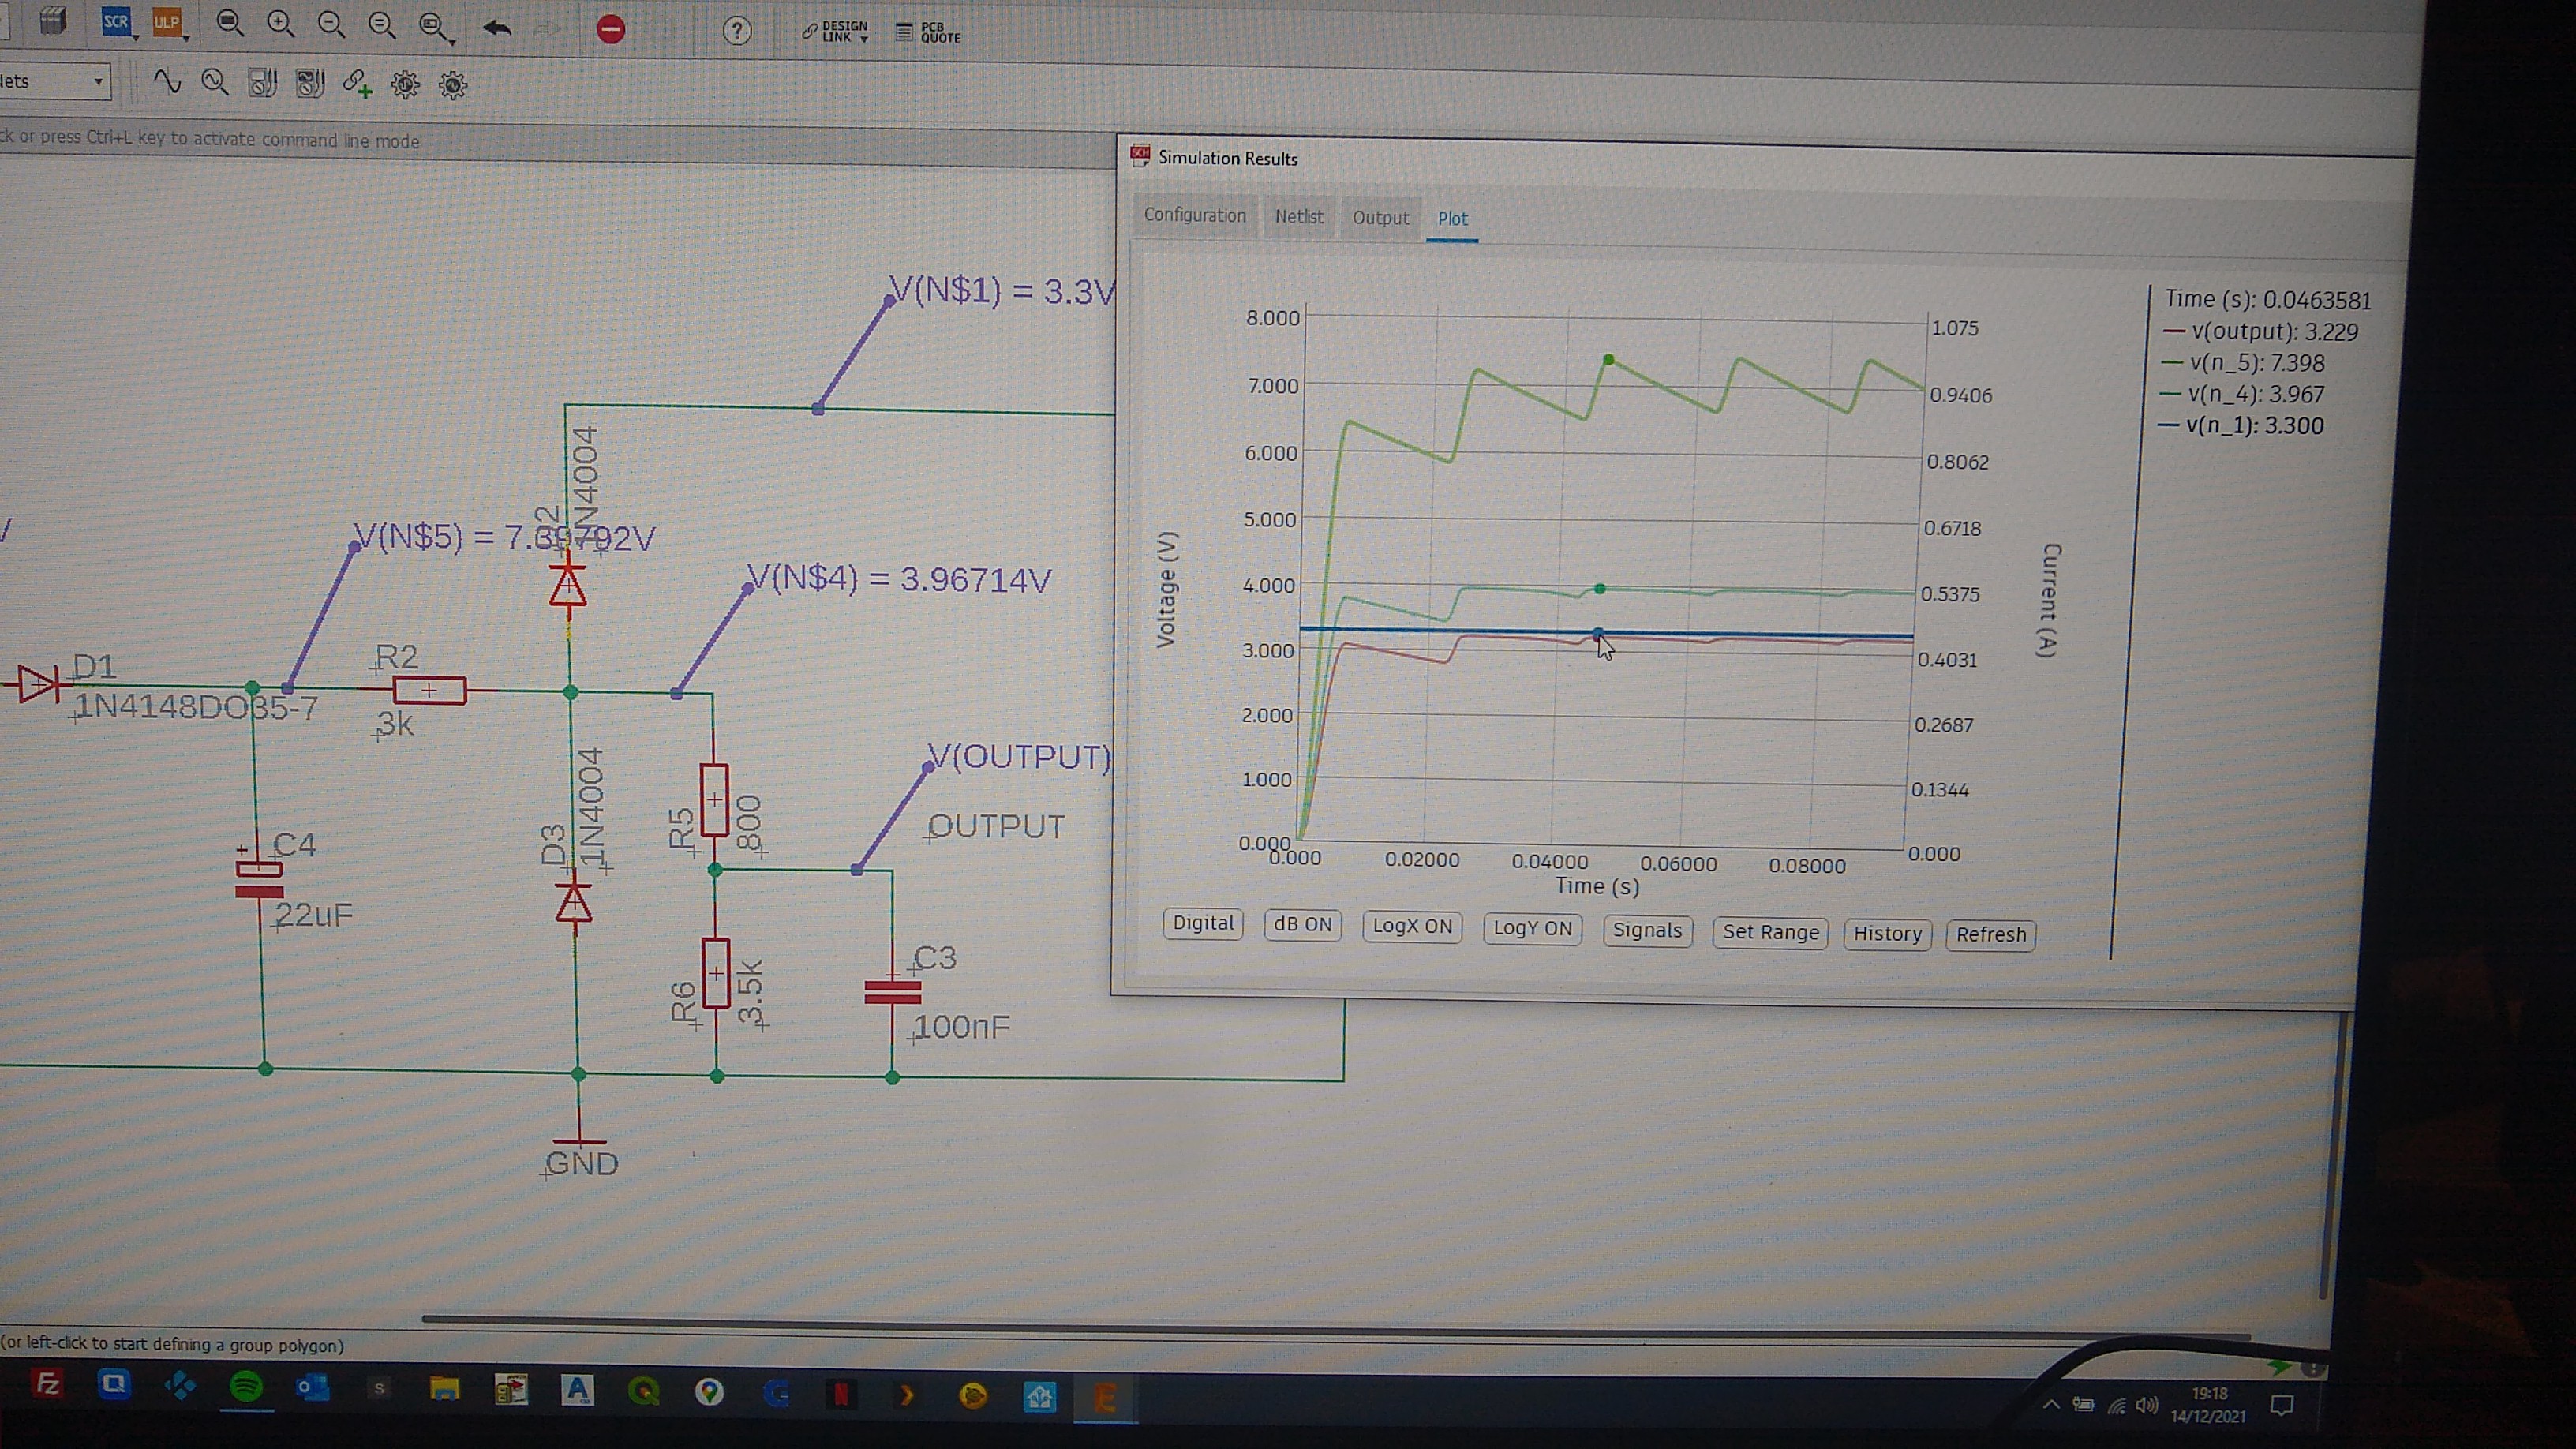
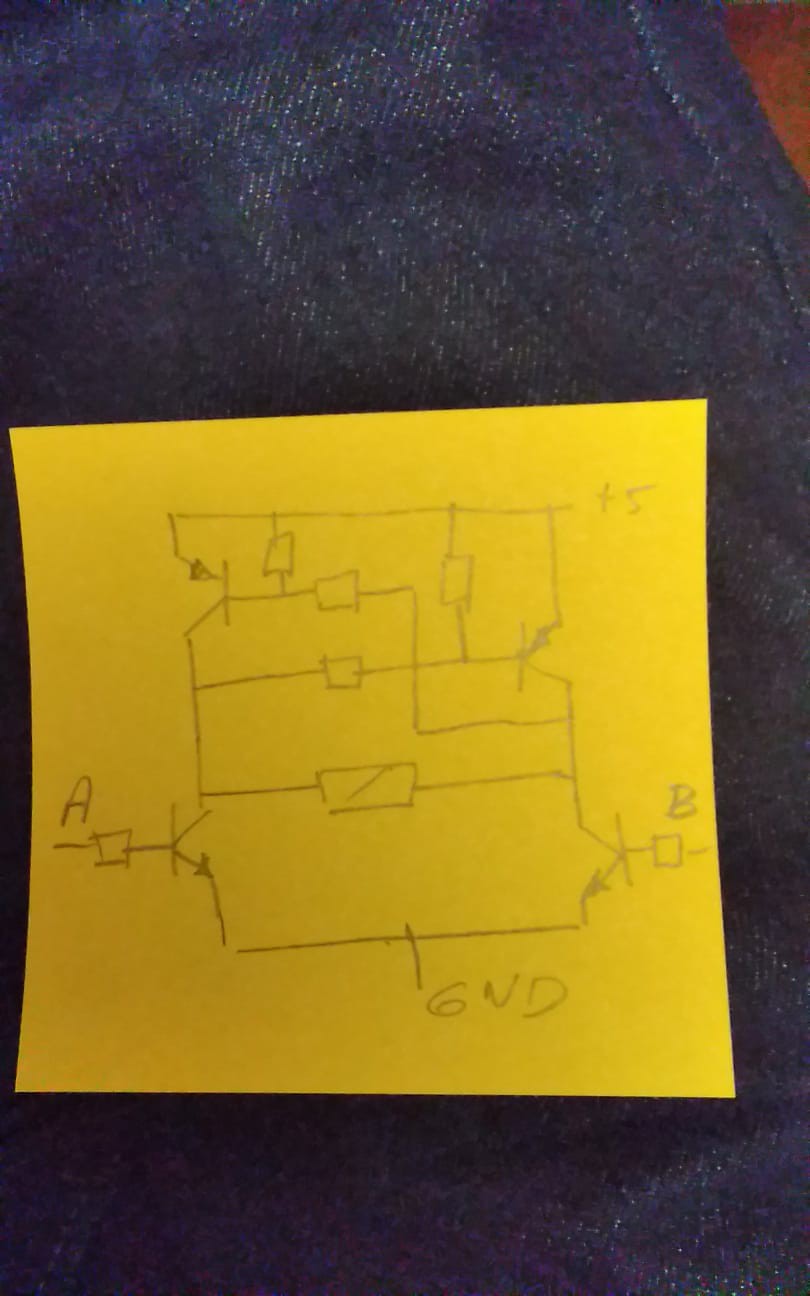
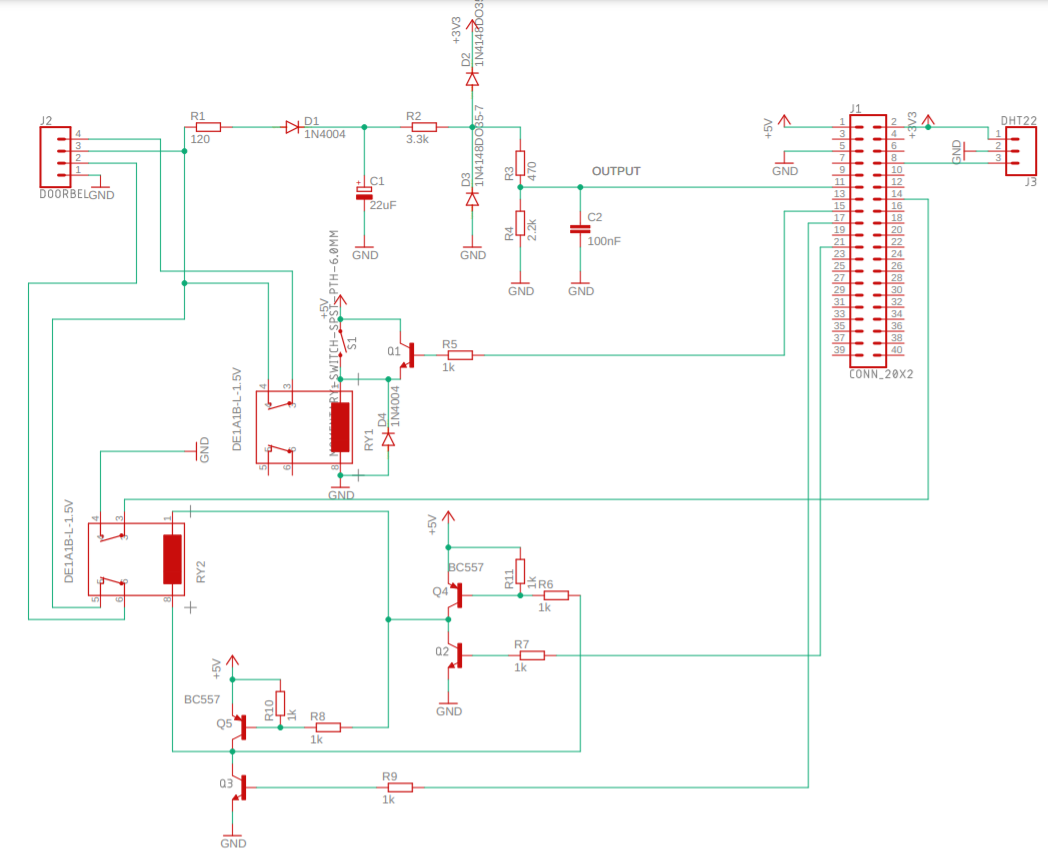
Sense the AC "signal" on the doorbell, rectify it and make sure it has the appropriate level for input on the Pi's GPIO-pins.

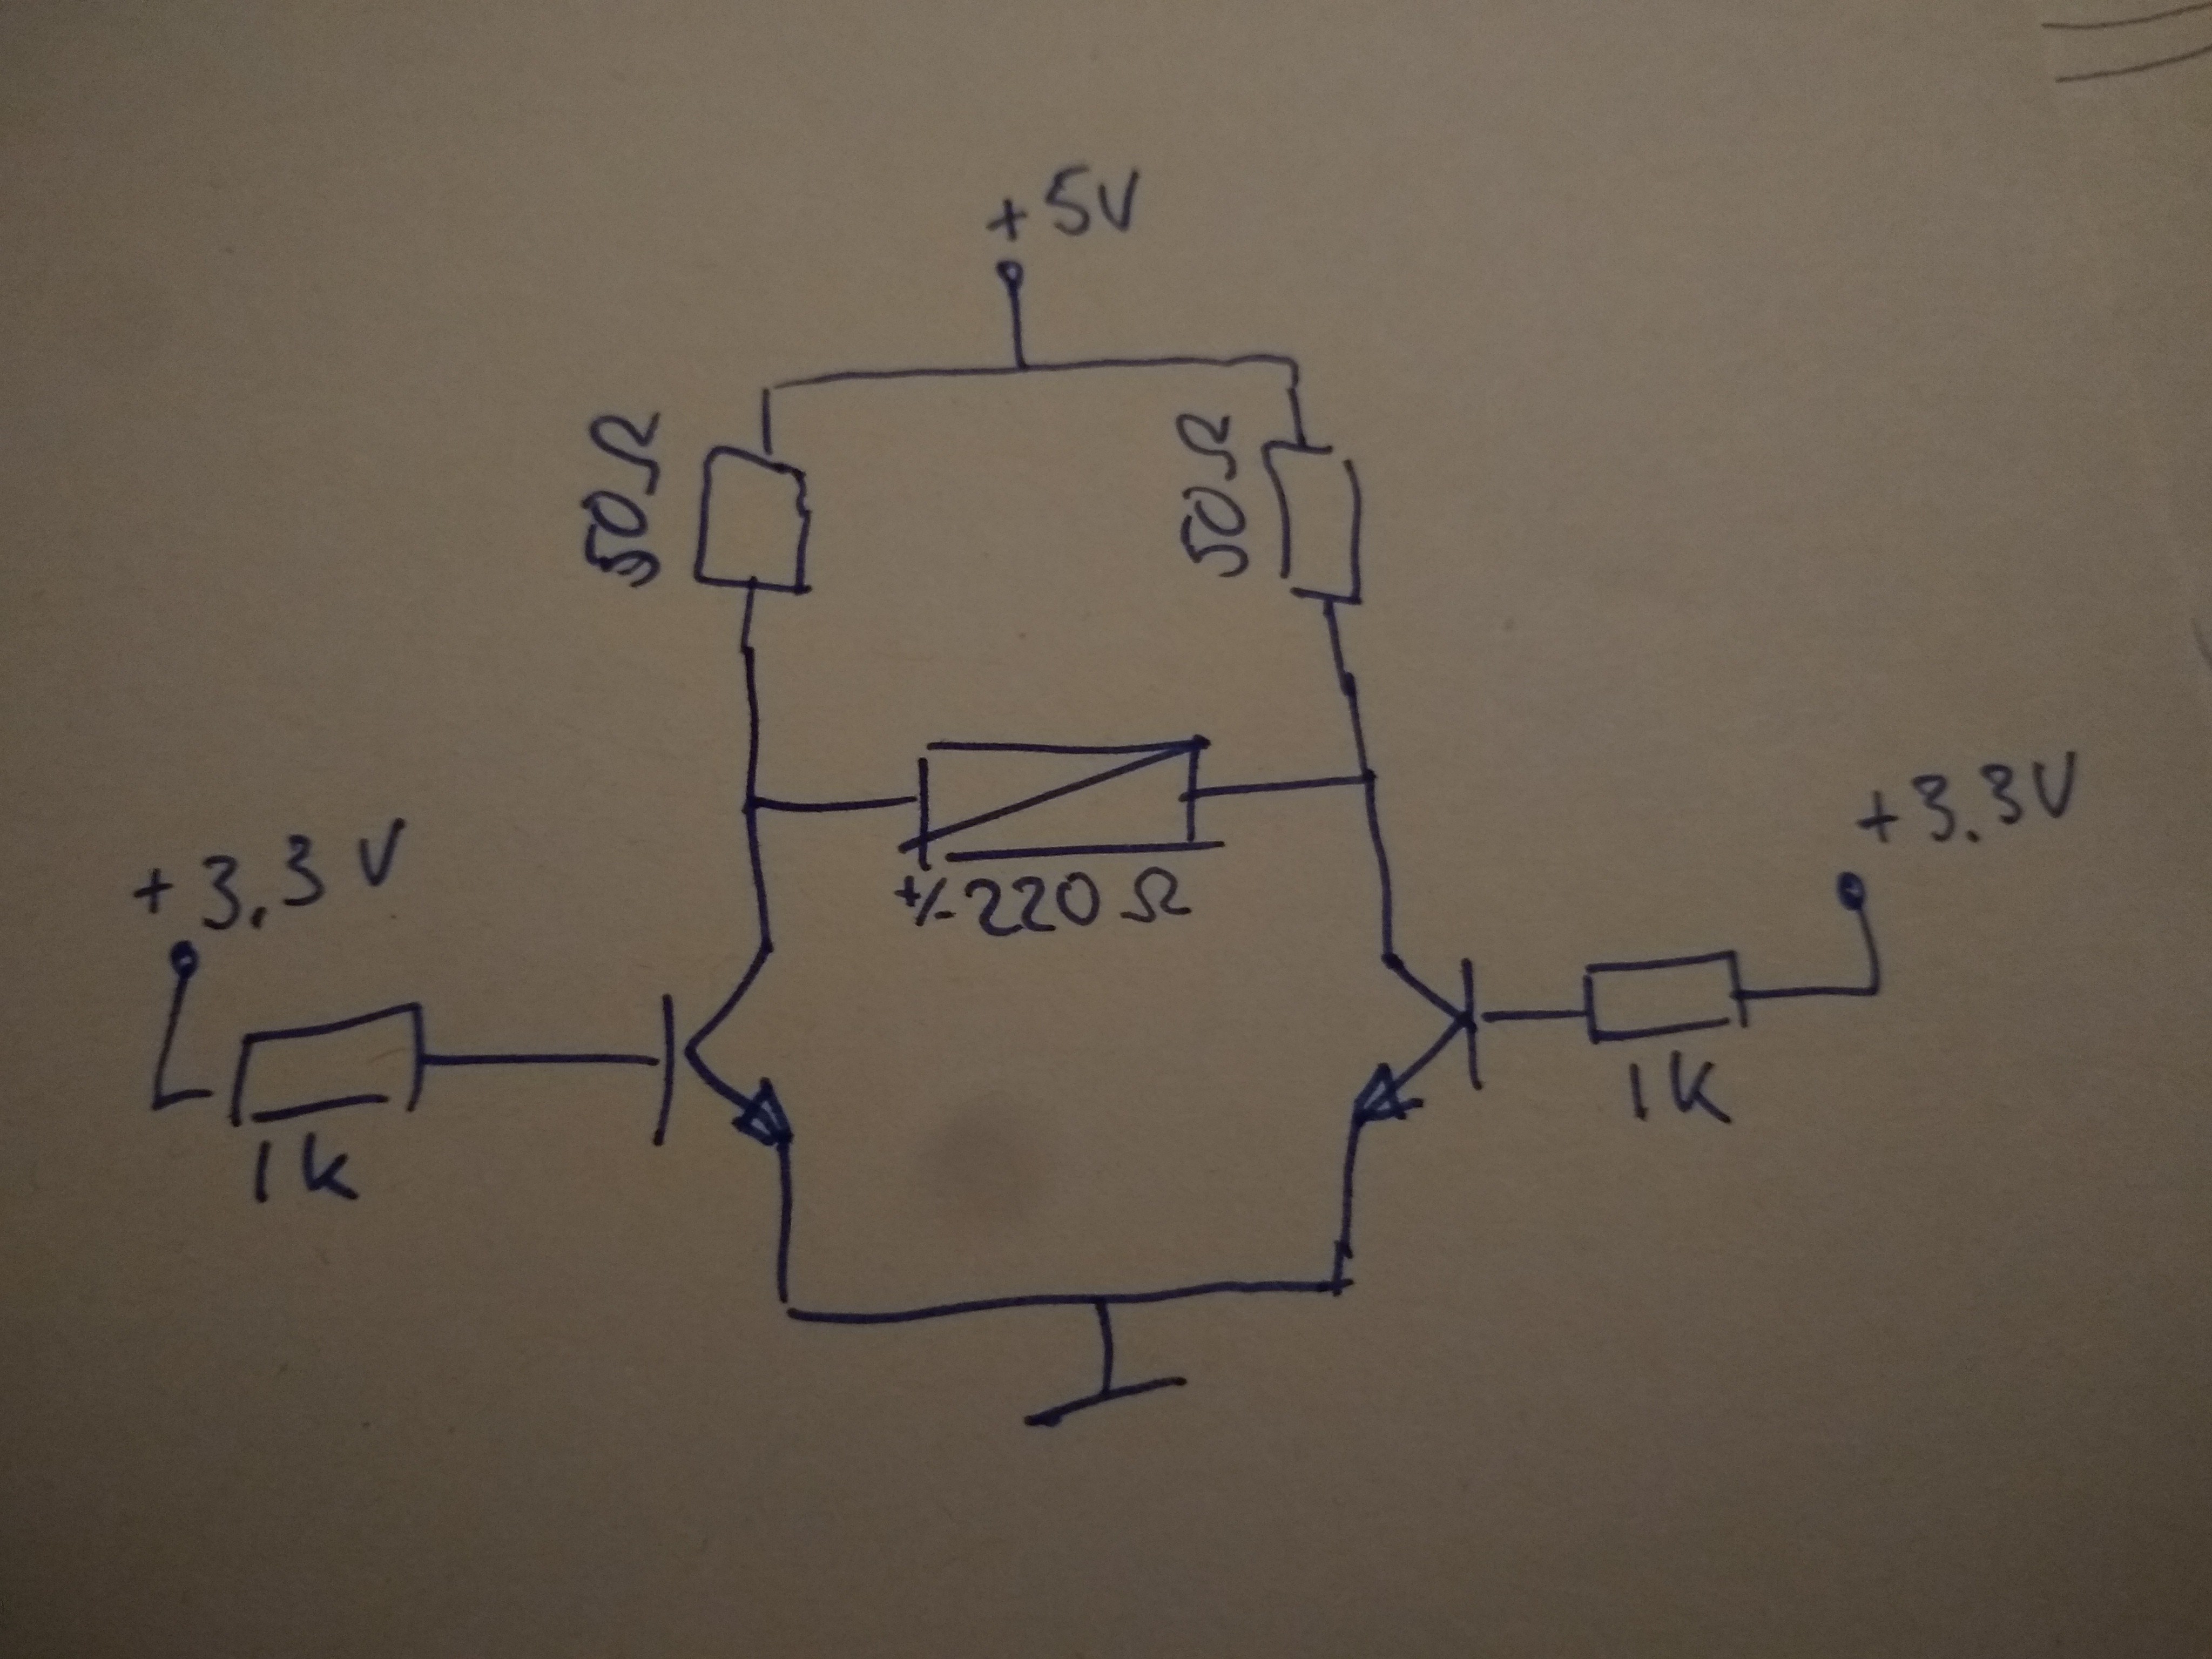
Use some relays for the mute and ring functions.

Adobe Portable Document Format - 35.24 kB - 11/08/2022 at 13:47

Preview
Download

Adobe Portable Document Format - 35.15 kB - 11/08/2022 at 13:47

Preview
Download

MQTT_Autodiscover_boot.py

Autodiscover script for Home Assistant MQTT. Can be run once. Config message is retained.

x-python - 4.29 kB - 04/24/2022 at 17:06

Download

MQTT_Config.py

MQTT credentials

text/x-python - 97.00 bytes - 01/12/2022 at 21:41

Download

GPIO_Config.py

Pinouts and MQTT names it can use for autodiscover topics

text/x-python - 127.00 bytes - 01/12/2022 at 21:39

Download

View all 9 files

  • 1 × Raspberry Pi Model 3B (can be anything connected, including a ESP8266, depending on what other stuff you want it to do)
  • 1 × 5V single coil latching relay
  • 1 × 5V non-latching relay
  • 3 × NPN transistor BC547
  • 2 × PNP transistor BC557

View all 11 components

  • Autodiscover MQTT in Home Assistant

    Simon Jansen04/24/2022 at 17:00 0 comments

    Because I spent so much time on this, doesn't mean we all have to. This python script configures a "doorbell" device in Home Assistant via MQTT.

    This device has:

    • A switch / toggle for the mute state. This also updates its own state;
    • A button to ring your own doorbell "cuzz ya can";
    • A trigger event as a "short button press" that you can use in automations;
      #!/usr/bin/env python
      # (c) 2022-04-24 S.E.Jansen.
      
      # Copyright (c) 2014 Adafruit Industries
      # Author: Tony DiCola
      
      #versie = "1.0"
      import time
      import paho.mqtt.client as paho
      import subprocess
      import MQTT_Config
      import GPIO_Config
      import json
      
      #call back function
      def on_connect(client, userdata, flags, rc):
          if rc==0:
              client.connected_flag=True #set flag
              print("connected OK")
          else:
              print("Bad connection Returned code=",rc)
              client.bad_connection_flag=True
      
      #Make connection with MQTT broker and
      paho.Client.connected_flag=False #Create flag in class
      paho.Client.bad_connection_flag=False #another flag
      
      client= paho.Client()                    #create client object
      client.username_pw_set(MQTT_Config.user,MQTT_Config.password)
      client.on_connect=on_connect #bind call back function
      print("Connecting to broker ",MQTT_Config.broker)
      client.connect(MQTT_Config.broker,MQTT_Config.port)	#establish connection
      client.loop_start() #start network loop
      
      while not client.connected_flag and not client.bad_connection_flag: #wait in loop
          print("In wait loop")
          time.sleep(1)
      if client.bad_connection_flag:
          client.loop_stop()    #Stop loop
          sys.exit()
      
      #the main loop starts here
      print("in Main Loop")
      
      print("Adding Doorbell " + GPIO_Config.ID + " action trigger")
      #Add doorbell button; as an action trigger
      topic = MQTT_Config.HA_name + "/device_automation/Doorbell_Button_" + GPIO_Config.ID + "/action_pressed"
      config_payload = {"automation_type":"trigger",
                        "payload": "visitor",
                        "value_template": "{{value_json.value}}",
                        "unique_id": "Doorbell_Button_" + GPIO_Config.ID,
                        "topic":topic + "/action",
                        "type":"action",
                        "subtype":"button_short_press",
                        "icon": "mdi:doorbell",
                        "device":
                            {"identifiers":[("Doorbell_" + GPIO_Config.ID)],
                             "name":("Doorbell_" + GPIO_Config.ID),
                             "manufacturer": "X",
                             "model": "001",
                             "suggested_area": GPIO_Config.location}}
      client.publish(topic + "/config",json.dumps(config_payload),0,True)
      
      time.sleep(1)
      
      print("Adding Doorbell_" + GPIO_Config.ID + " button")
      #Add doorbell; as output
      topic = MQTT_Config.HA_name + "/button/Doorbell_" + GPIO_Config.ID
      config_payload = {"name": GPIO_Config.location + " doorbell",
                     "unique_id": "Doorbell_" + GPIO_Config.ID + "_ring",
                     "name": "Doorbell_" + GPIO_Config.ID + "_ring",
                     "command_topic": topic + "/set",
                     "payload_press": "ring_short",
                     "icon": "mdi:alarm-bell",
                     "device":
                            {"identifiers":[("Doorbell_" + GPIO_Config.ID)],
                             "name":("Doorbell_" + GPIO_Config.ID),
                             "manufacturer": "X",
                             "model": "001",
                             "suggested_area": GPIO_Config.location}}
      client.publish(topic + "/config",json.dumps(config_payload),0,True)
      
      time.sleep(1)
      
      print("Adding Doorbell_" + GPIO_Config.ID + " mute switch")
      #Add doorbell; As switch. With state and command topic
      topic = MQTT_Config.HA_name + "/switch/Doorbell_" + GPIO_Config.ID
      config_payload = {
                     "unique_id": GPIO_Config.location + " mute switch " + GPIO_Config.ID,
                     "name": GPIO_Config.location + " mute switch",
                     "state_topic": topic + "/state",
                     "command_topic": topic + "/set",
                     #"payload_on": "{\"mute_set\":\"ON\"}",
                     #"playload_off": "{\"mute_set\":\"OFF\"}",
                     "state_on": "1",
                     "state_off": "0",
                     "value_template": "{{value_json.mute_state}}",
                     "retain": True,
                     "icon": "mdi:alarm-bell",
                     "device":
                            {"identifiers":[("Doorbell_" + GPIO_Config.ID)],
                             "name":("Doorbell_" + GPIO_Config.ID),
                             "manufacturer": "X",
                             "model": "001",
                             "suggested_area": GPIO_Config.location}
                     }
      client.publish(topic + "/config",json.dumps(config_payload),0,True)
      
      time.sleep(1)
      
      client.loop_stop()	#stop connection loop
      client.disconnect()	#gracefully disconnect
      client.connected_flag=False #reset flag 

     I updated the python daemon accordingly. It has to...

    Read more »

  • Software and integration into the hive

    Simon Jansen01/12/2022 at 22:00 0 comments

    Now with everything connected it's time to setup the software side.

    I wrote a python script that can be run as a service. This way it has automatic startup at boot and if it fails.

    It subscribes to a "set" MQTT-topic for commands. It sends the actual state of the mute relay to a "state" topic. And when it senses the doorbell being rung, it sends a message to a "trigger" topic.

    This gives me full controll in Home Assistant.

  • Assembly

    Simon Jansen01/12/2022 at 21:59 0 comments

    Ok, design is done. Now for the actual build. The Eagle board layout feature helped me to set up the components in a logical way with easy wiring. Trying to use single sided wiring as much as possible means the least crossing wires (in theory)

    Which translates to the following:

    And after one burned out transistor replacement (which was a pain to diagnose), I'm up and running!

  • Figuring out schematic and components

    Simon Jansen01/12/2022 at 21:58 0 comments

    Ok. So the raspberry Pi GPIO's can only handle 3.3V max. I found some solutions that use a full rectifier and then pass the result through a linear voltage regulator. I bet this works, but it feels wrong somehow.

    I chose to go with only a single diode and a capacitor to rectify and dampen the signal.

    Some clamping diodes to VDD and GND will make sure I'm within GND - 0,7V and VDD + 0,7V. (I don't have any schottky's laying around). And a last voltage divider with two resistors to really make sure I don't go above VDD.

    First draft:

    This gave me the chance to (re)learn how to do schematics and simulation. So (quite) a few evenings later:

    Then I noticed the relays I had are double latching single coil (I had to google this too). It means they get stuck in ON or OFF position and need a reverse voltage to switch where they also get stuck.

    This turns out to be exactly what I want for the mute function that runs in series with the bell-actuator. It just means I have to learn how to do a proper H-bridge. The relays also switch on 5V and the Pi's GPIO-pins give me 3.3V. This means PNP's (I never liked PNP's, they seem upside down somehow and give me headaches)

    This also seems to work, but now I'm committed to learn something new...

    So another full day of research, and an eventual help-line to someone who knows what they are talking about:

    And the full schematic:

    I ended up using one double latching single coil relay for the mute function. The relay has two "sides". One inverted to the other. This gives me an input for the actual status, so I can check this on start-up and check if setting or resetting has worked. 

    The other relays is parallel to the doorbell button to ring it. It is a "normal" active to close 5V relay that I can operate with a transistor or a button on the board. 

    This all means the following functionality: I can ring the doorbell with a button on the board or with a GPIO-pin output. This is handy for testing and making my neighbours think I have loads of visitors. 

    I can mute my doorbell and still get a signal when the doorbell button is pressed (or when I operate the ring-relay. Using the on board button OR a GPIO-pin output).

    I also added connections for a DHT22 temperature and humidity sensor. Because, why not?

  • Getting the idea

    Simon Jansen01/12/2022 at 21:51 0 comments

View all 5 project logs

Enjoy this project?

Share

Discussions

Similar Projects

Does this project spark your interest?

Become a member to follow this project and never miss any updates