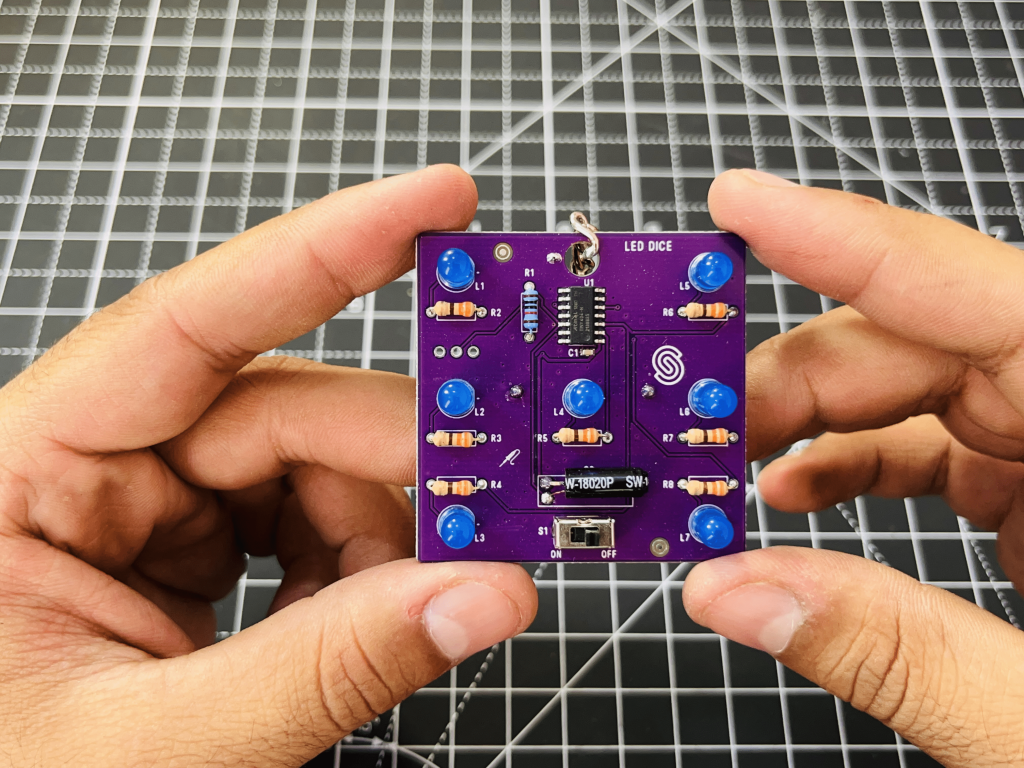
ElectroBoy
Playing different games are the best part of childhood. We all remember the Ludo and snake ladder game. Which is a multiplayer dice game. It is most popular indoor games among children. The dice number help to move the cap from one position to another and it is totally random. No one can’t predict the next move or what will be the next number on dice. Keeping that in mind I searched an electronic dice kit on internet and I found the one. It contains a random number generator program and finally display the output on LEDs.

If you are looking for an easy way to get started with soldering or simply want to make a small portable gadget, this set is a great opportunity. “LED cube” is an educational set for learning the soldering skill, with which you get a small electronic game at the end. After you turn on and shake this board, certain LEDs will light up randomly and symbolize the number, as if a real die had been thrown.
How random number generator works:
Usually by own a microcontroller cannot generate the exact random number. We have to give an initial position or hint which can be any type of analog signal, noise or may be the time input. Which microcontroller then process and convert into numbers, manipulate the data and arrange the numbers within the given range. Then display on the LED or LCD.
Kit components:

- PCB
- Attiny404 microcontroller
- 7 LEDs
- 7 330ohm resistors
- 1 10kohm resistor
- Battery holder
- CR2032 battery
- Switch
- Vibration sensor SW-18020P
- Keychain ring
Buy link: https://soldered.com/product/led-dice-solder-kit/
Microcontroller used:

It is based on the Attiny404 microcontroller, programmed in Arduino, and there is a battery on the back which makes this gadget portable. Attiny404 is 8-bit microcontroller unit comes with internal 16Mhz clock and 32.768 low power mode. It has 4KB flash, 256B SRAM and comes in 14 pin DIP SMD package. There is also a keychain so you can always carry your new game with you! Soldering is easy according to the markings on the board. Get more info about the microcontroller and interfacing protocols from here.
Working:
Here the input is taken in the form of noise from vibration sensor then it is given to the microcontroller for further processing and noise value is always different every time that’s why it works always in random manner.

This kit comes with already programmed microcontroller so no need to change any settings like burning bootloader, flashing etc. This is a standalone project, you may consider my own made Led based E-dice shared below using Arduino.
Soldering guide:
Soldering the PCB is very simple just place the given component as given in the soldering guide. And solder them properly make sure that every connection is made properly because anu dry connection may produce undesirable output behaviour. You may consider this soldering guide before making connections.
You can order your Custom PCB from JLCPCB, 5pcs of 2-layer PCB in just $2. You can explore the more services like PCBA, SMT assembly, high precision PCB, Flex PCB, 3D printing, RF PCB, Stencil and CNC machine parts.
My homemade dice:

You can make the same with simple piece of Pref-board or using breadboard using Arduino and LEDs. The code is very simple, you have to press a tactile button connected to Arduino. Which randomly will light up the LEDs. The code and schematics for this is given below.
Code and Schematics:

//SAGAR SAINI
// set to 1 if we're debugging
#define DEBUG 0

// 6 consecutive digital pins for the LEDs
int first = 2;
int second = 3;
int third = 4;
int fourth = 5;
int fifth = 6;
int sixth = 7;

// pin for the button switch
int button = 12;
// value to check state of button switch
int pressed = 0;

void setup() {
  // set all LED pins to OUTPUT USING FOR LOOP HERE INSTEAD DECLARING Each PIN AS OUTPUT
  for (int i=first; i<=sixth; i++) {
    pinMode(i, OUTPUT);
  }
  // set buttin pin to INPUT
  pinMode(button, INPUT);

  // initialize random seed by noise...
Read more »
 Lithium ION
 Jithin Sanal
 Kirschner Christoph