Close
0%
0%

SNOWBYTE

Open-Source RC Snowplow that can remove snow from your driveway or sidewalks and can be customized for other tasks around your home.

Public Chat
Similar projects worth following
This project came up as a necessity for myself, due to not being able to shovel snow myself for medical reasons. All the solutions I could find were too expensive or too big for storing in a corner of my single-car garage. Another requirement of mine was that I didn’t want to use batteries, because I didn’t want to have to worry about charging them or battery life. So I design my own RC snowplow that can be modified or customized using its code and supporting documentation. My goal was to put together a simple open-source Snowplow machine that people could build upon. I included 3D-printed files for easily converting the SnowByte into an RC platform for anything else, like for example an RC Lawnmower. This project is my attempt at an RC snowplow that is not as expensive or as bulky as the other commercial RC snowplows on the market today. It has about .4 horsepower and can be powered from any 120v outlet.

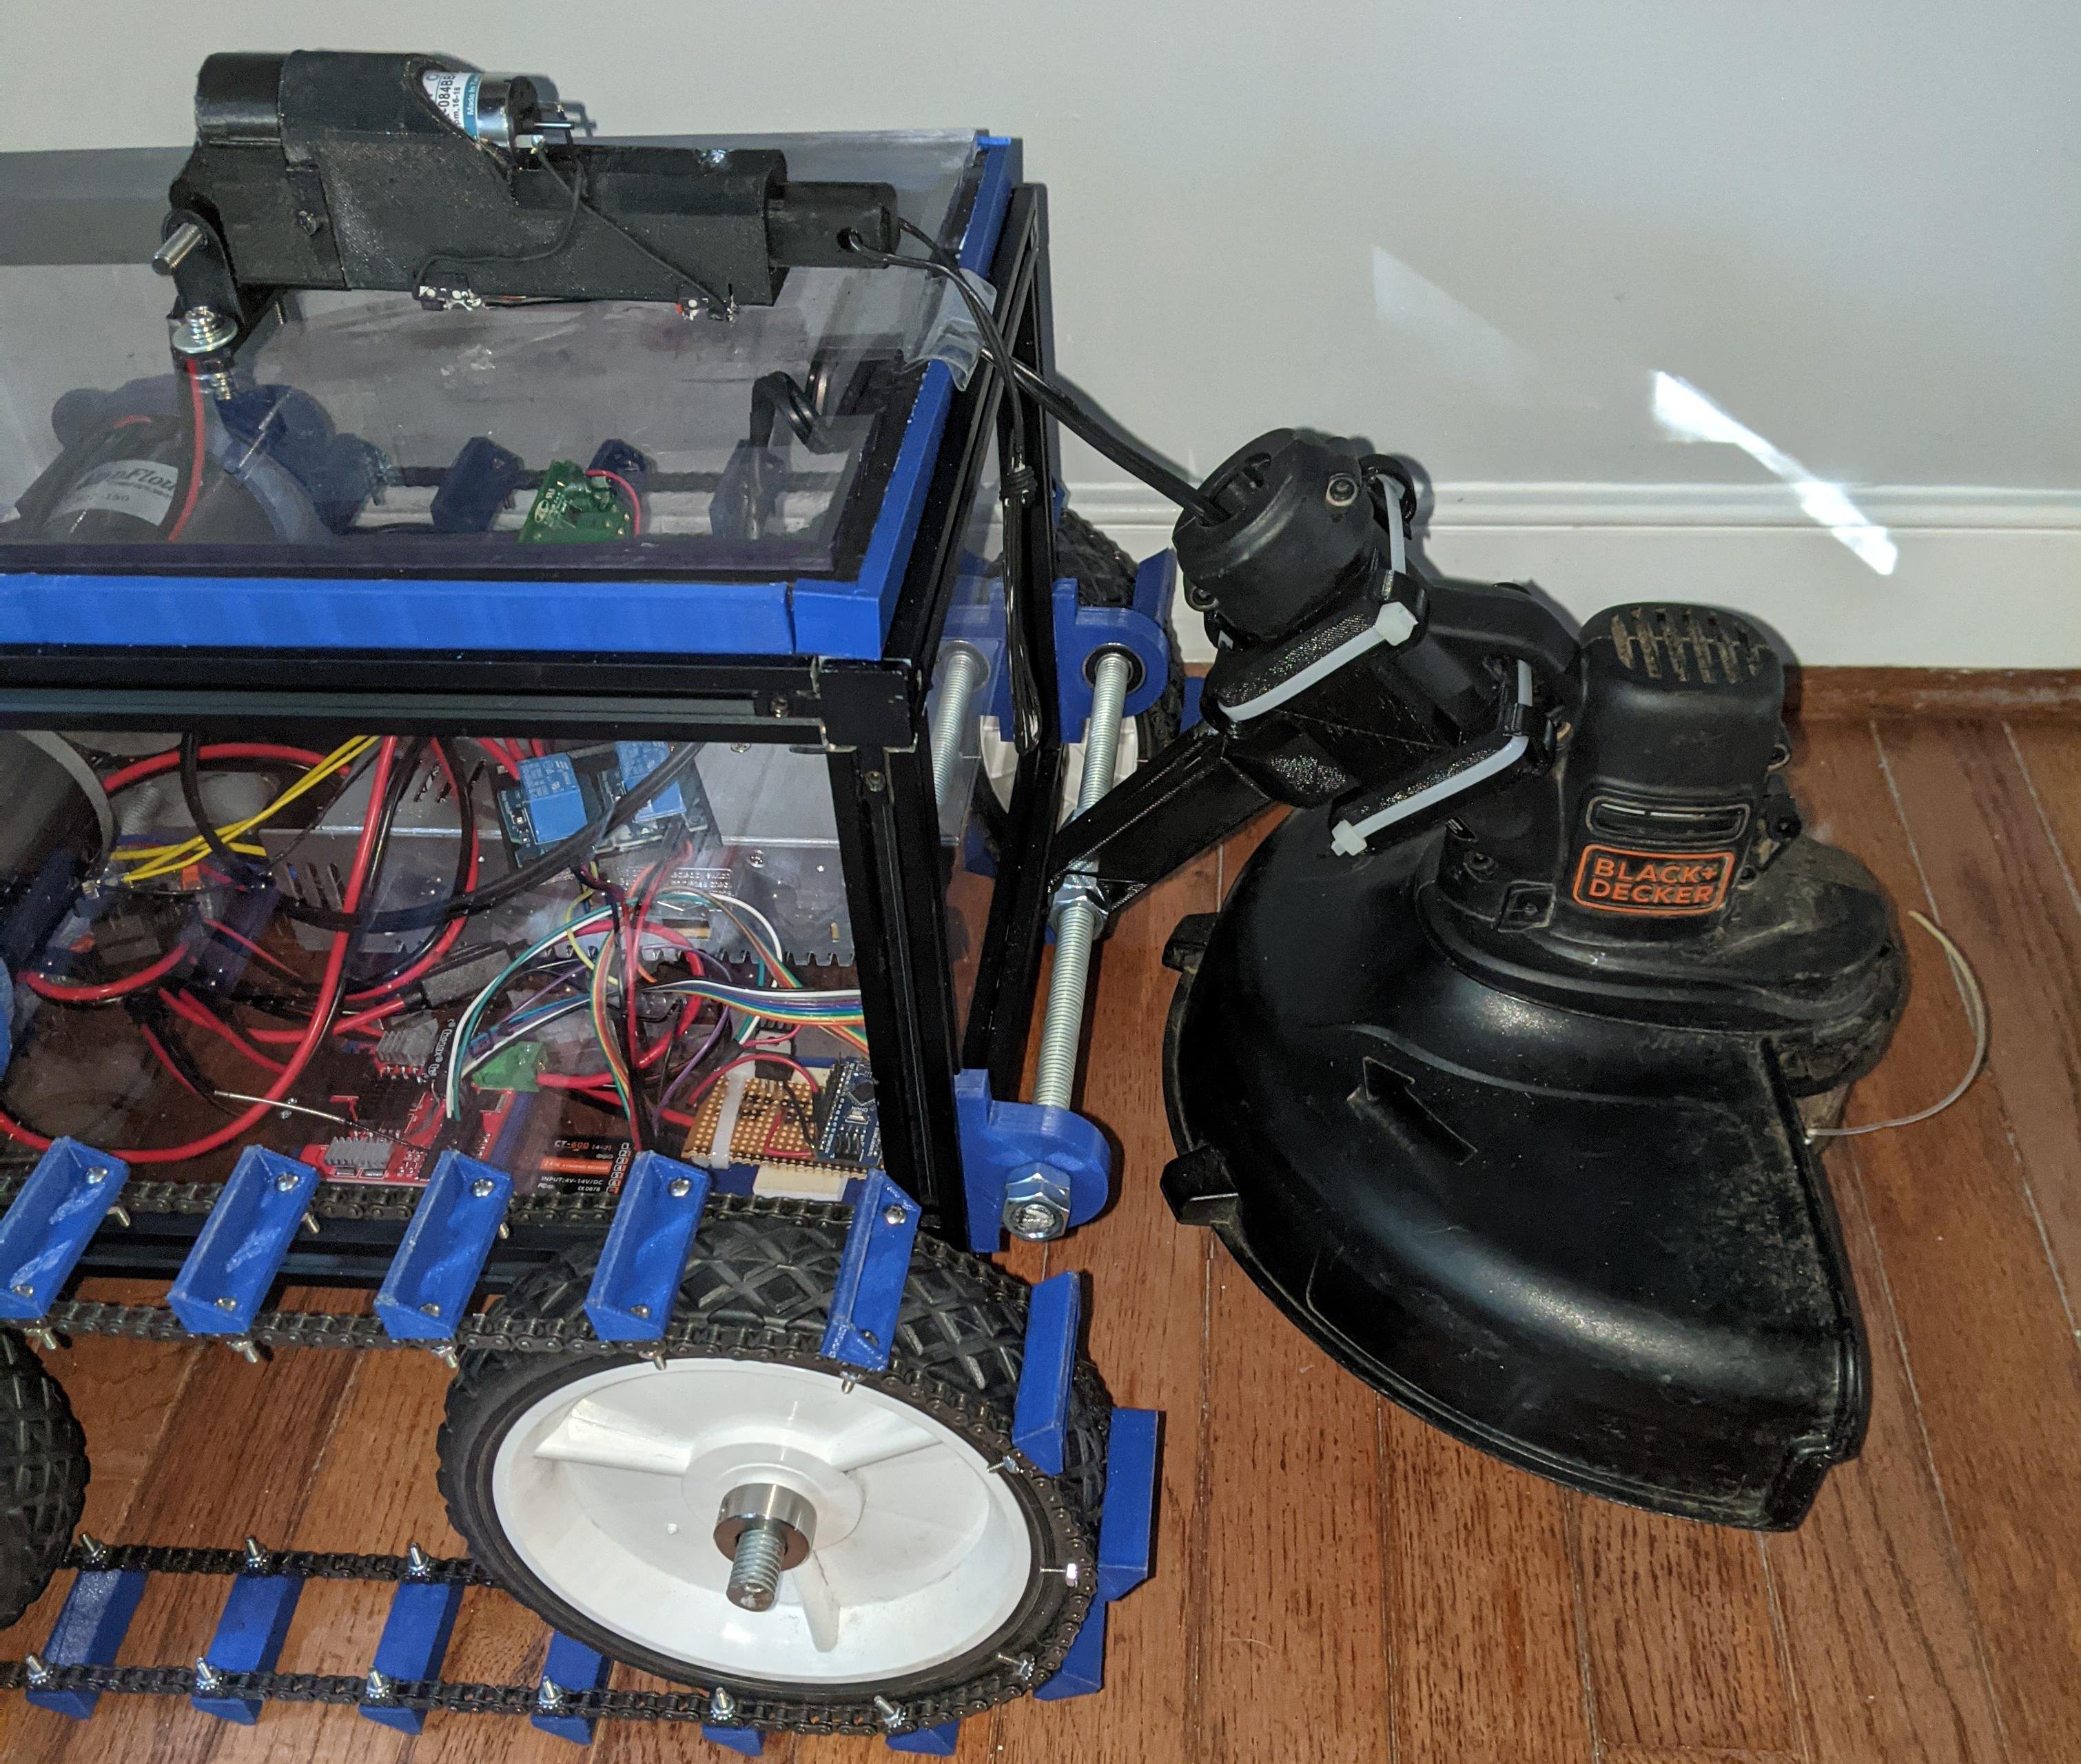
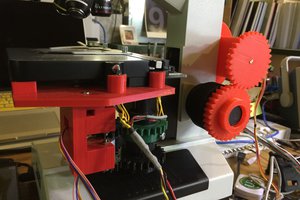
As I mentioned in the description I needed a simple RC Snowplow that:

  • Doesn't cost too much to make
  • Could be stored in a corner of my garage
  • Powered by wall outlet
  • Shovels the snow from my driveway via remote control

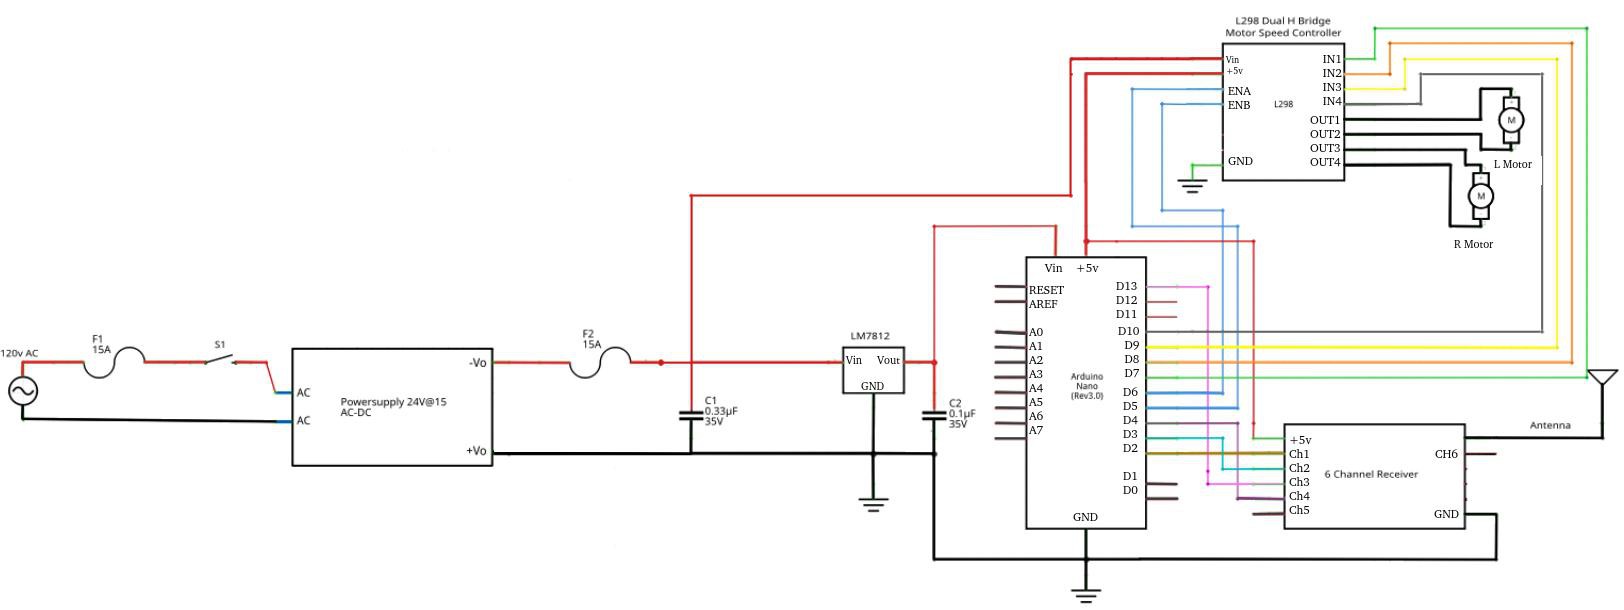
After lots of research, the closest things I found were mostly products or home made ones that used batteries and were too bulky or heavy. So I started on this journey to build my own RC Snowplow called the SnowByte (https://github.com/cele9999/RCSnowplow).

Thanks to Scott for all of his help and feedback! I would not have been able to build my version without his help.

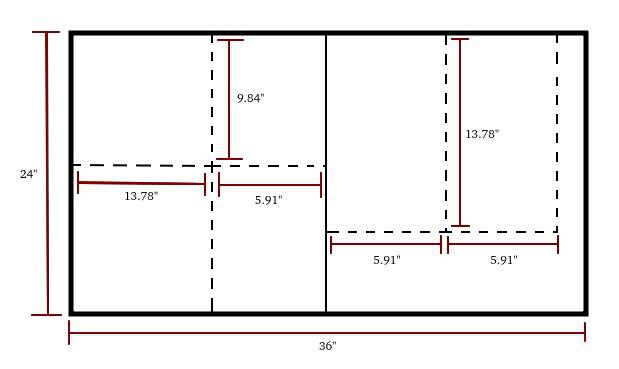
ASSEMBLY INSTRUCTIONS:

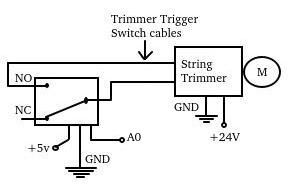
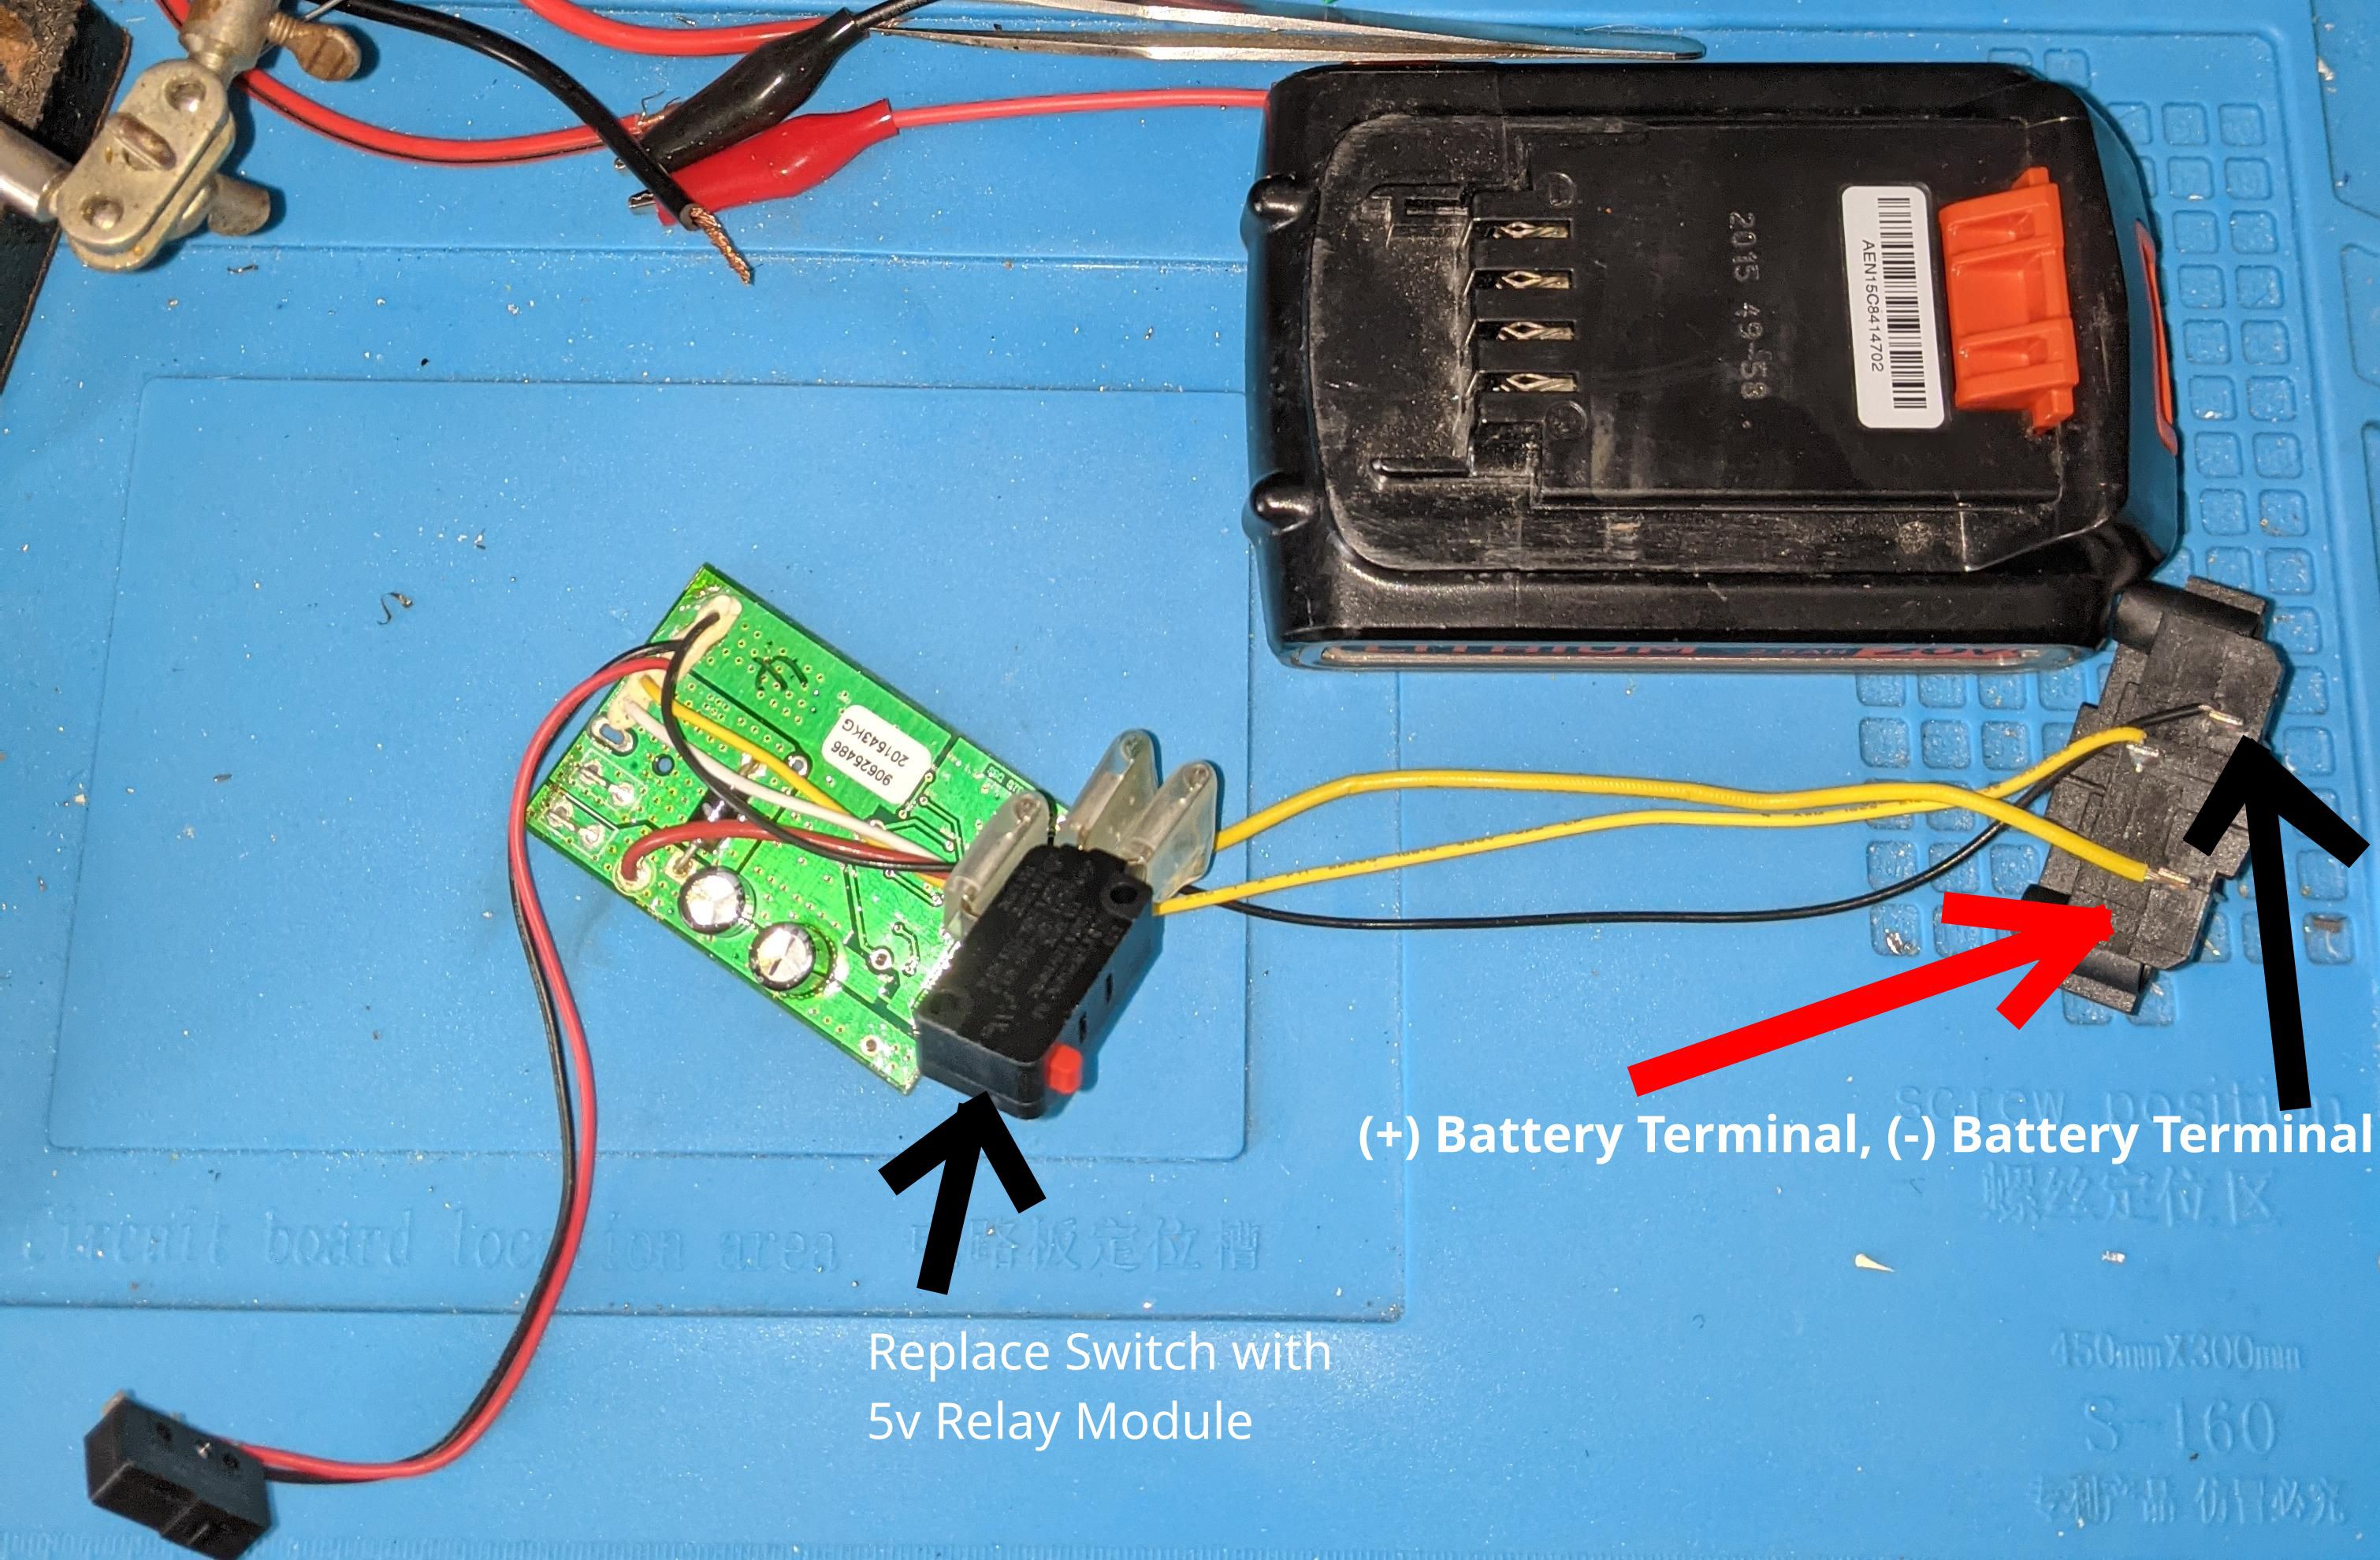
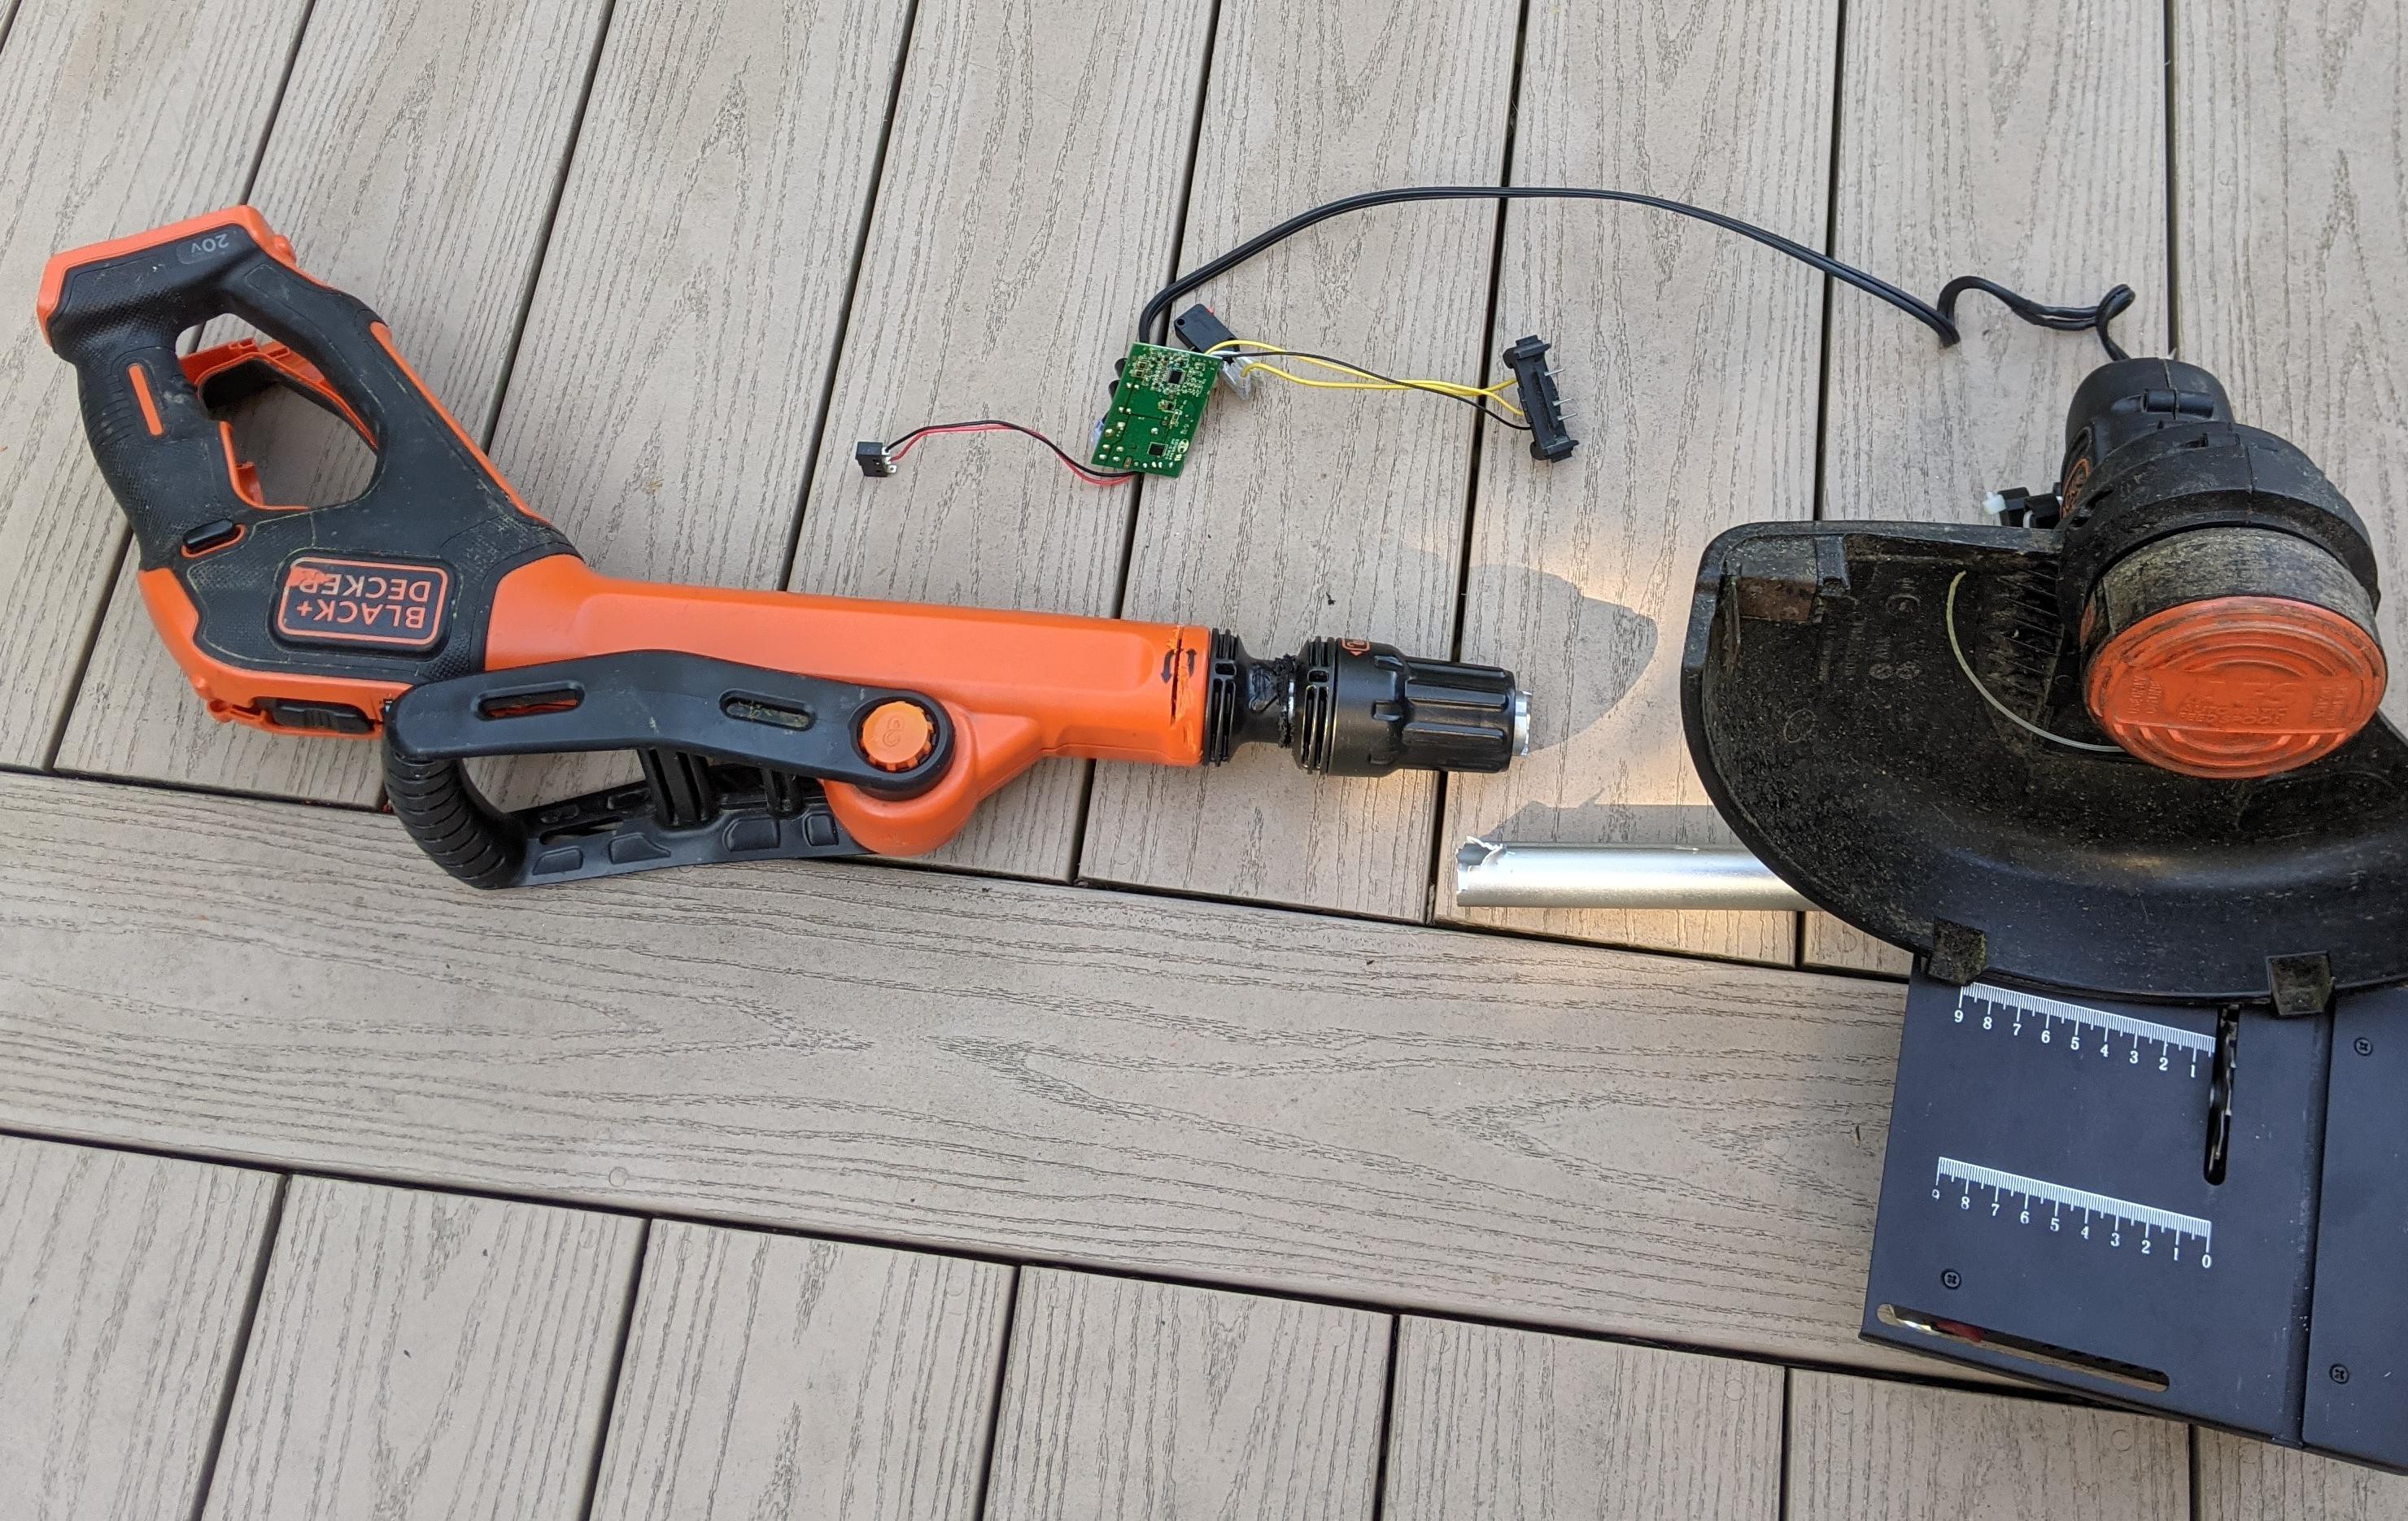
Please see the INSTRUCTIONS.pdf in the 'Files' section of this page and visit the Github page for the latest version of the code.

Instructions.pdf

Full instructions to get you from parts, components and 3D printer filament to a working RC Snowplow.

application/pdf - 10.73 MB - 08/09/2023 at 23:57

Preview
Download

snowbyte.ino

Arduino code for the SnowByte. The code is also available at https://github.com/cele9999/RCSnowplow/ .

ino - 6.04 kB - 09/07/2023 at 20:33

Download

Standard Tesselated Geometry - 46.47 kB - 08/24/2023 at 23:18

Download

Standard Tesselated Geometry - 1.27 MB - 08/09/2023 at 22:00

Download

Standard Tesselated Geometry - 305.45 kB - 08/09/2023 at 22:00

Download

View all 21 files

View all 33 components

  • SnowByte

    cele999910/07/2023 at 20:14 0 comments

  • Final Bill Of Materials

    cele999910/07/2023 at 20:06 0 comments

    BOM:

    PartNumberCost of each part
    Power Supply1$22
    Linear Rails1$60
    Linear Actuator1$50
    Bracket Connectors (12 PCS)1$16
    Motor Driver1$16
    15A Fuse Holder (10 PCS)1$8
    15A Car Fuse (20 PCS)1$5
    Power Socket1$8
    DC Motor (with sprocket)2$44
    #25 Bicycle Chain2$17
    Roller Chain Detacher1$10
    Gauge 14 wire (200ft)1$15
    #25 Chain Sprocket2$13
    Polycarbonate Sheet (1/4”Thick x 24”Wide x 36”Long)1$47
    6 Channel RC Transmitter and Receiver1$37
    1/2" Bore Shaft Collars (4 PCS)3$10
    #25 Chain Connector Link (10 PCS)1$10
    #4-40 Hex Nuts (100 PCS)1$2
    #4-40 x 3/4" Phillips Screws (100 PCS)1$9
    Snow Shovel1$12
    Perf Board (10 PCS)1$5
    12V Regulator (20 PCS)1$7
    1/2" x 3' All threaded rod (5 PCS)1$30
    1/4" x 1' All threaded rod1$10
    1/2" Hex Nuts (50 PCS)1$10
    1/4" Hex Nuts (50 PCS)1$8
    Lawnmower Wheels (2 PCS)2$14
    Arduino Nano1$6
    Jumper Wires Female-Female (120 PCS)1$7
    Male Header Pins (20 PCS)1$5
    Insulation Tape1$7
    Assortment Kit (200 PCS)1$7
    Loctite1$10

    Final Price for the entire project=$645

  • Ice Melter Version

    cele999909/09/2023 at 00:08 0 comments

    In the first few pictures of the project I showed the version of the SnowByte that my friend Scott build. It is composed of 2x 14oz propane tanks, along with 2x propane wands. He installed them and simply build an angled bracket to hold the wands and can be adjusted for lining the wands at an angle. He opted to not use tank threads in his version and he sent me a video of him testing this setup.

  • (Optional) Part 3: Making a Lawn Trimmer Attachment

    cele999909/07/2023 at 20:00 0 comments

    Finally installed the 3D printed arms for the trimmer attachment and added the Arduino code to control the trimmer motor. Updated on Build 'Instructions.pdf' in the Github project. The 3D printed parts are holding the trimmer motor with zip ties and are locked into place with hex nuts on both sides of the all threaded rod.

    The linear actuator attaches to the trimmer motor by using a velcro wrap and the height can then be adjusted with the actuator.

    Plus, it makes the trimmer attachment easily interchangeable with the snow plow attachment. As for the wiring I'm using this schematic with a 3rd relay to control the trimmer motor. I also used pin 'A0' on the Arduino for activating the 3rd relay and connected Channel 3 signal cable to D13 on the Arduino. 

    So on the "Trimmer Trigger Switch cables" I used  lever connectors, so the trimmer attachment can be switch by only disconnecting 2 cables. I will post another video showing the trimmer attachment working next.

  • (Optional) Part 2: Making a Lawn Trimmer Attachment

    cele999909/04/2023 at 18:30 0 comments

    After taking the trimmer apart, I observed the circuit to come up with a way to control it via the Arduino and the 6 channel RF Receiver. Here is the PCB inside the trimmer.

    I only need to get another 5v relay module to replace the trigger switch of the trimmer and program the Arduino to detect the signal to Channel 3 of the Remote control and activate the relay that will turn on the trimmer motor. The other switch on the bottom left of the picture is for adjusting the motor speed between slow or fast. Which the default is fast so I will leave it as is. Next I'll add the Arduino code changes and mount the trimmer motor attachment to the RC SnowByte.

  • (Optional) Making a Lawn Trimmer Attachment

    cele999909/04/2023 at 01:55 0 comments

    As mentioned before in the instructions, the SnowByte can be customized to have other attachments like a lawn trimmer. I want an easy and quick solution to simply be able to switch attachments on my SnowByte. Since a friend gave me an electric lawn trimmer, I decided to extract the motor with its housing and use it to make it into an inter-changeable attachment for the SnowByte. Using a handy table saw I was able to cut the housing apart and I will 3D-Print a lawn trimmer holder arm.

    After this I need to modify the circuit of the trimmer motor to control it with another 5v relay module and the Arduino like the linear actuator motor. Now the real decision is whether or not I should use the battery that came with the trimmer?

    This will give me more uses for my RC SnowByte thru the year when there is no snow. I will attempt to use the power supply to feed the trimmer motor also, but if it turns out to consume too much power I will have to use the battery. Stay tune for the next update, to find out if 15A will be enough to power everything in the SnowByte plus the lawn trimmer.

  • SnowByte Test Run

    cele999908/21/2023 at 22:20 0 comments


    This was after putting everything together and attaching the linear actuator. The speed was also adjusted in the code, it automatically increases the speed as it moves forward. It was done for the purpose of increasing the power to push snow. This can always be adjusted in the code if necessary. By changing the speed variable in the "var setup" section of the code.

  • Poorman's H-Bridge (Relays)

    cele999908/12/2023 at 16:01 0 comments

    I made a circuit that provided the H-Bridge functionality to the linear actuator, by using 2 relay modules. I connected the together using the following schematic and connected their signal pins to the Arduino's IO pins. 

    Programmed the Arduino to interpret Channel 4's inputs as the signal for moving the snowplow arm by sending the D11 or D12 digital IO signal to the relay modules. I hope that a circuit like this one is able to help anyone else having the same design problems in the future.

  • Schematics

    cele999908/12/2023 at 15:53 0 comments

    In order to control the SnowByte I needed to have the 24v DC powersupply feed both the motors and the control circuit that uses the Arduino Nano interpret the signals from the Remote Control.

    Since the original snowplow attachment did not contain any linear actuator I simply left the digital IOs unpopulated in this schematic. I did not have a good idea of how to control the raising/lowering of the linear actuator without having to use an H-bridge board... yet.  

  • Panels

    cele999908/12/2023 at 15:48 0 comments

    Each panels that covers the frame of the SnowByte is made from polycarbonate. Using a 2'x3' panel of polycarbonate I made the following cuts:

    After cutting the panels, there was still material left for other future projects that could use it.

View all 11 project logs

View all instructions

Enjoy this project?

Share

Discussions

Similar Projects

Does this project spark your interest?

Become a member to follow this project and never miss any updates