Close
0%
0%

Inkycal - Your own E-Paper Dashboard

Create awesome e-paper dashboards within minutes! Modularity? Check! Python3? Check? Works on Raspberry Pi Zero W? Check!

aceAce
Similar projects worth following
Inkycal is a software written in python for selected E-Paper displays. It converts these displays into useful information dashboards. It's open-source, free for personal use, fully modular and user-friendly. Despite all this, Inkycal can run well even on the Raspberry Pi Zero. Oh, and it's open for third-party modules! Hooray!

Inkycal is python3 software you can run on even the most budget-friendly computer like the Raspberry Pi Zero W to make awesome dashboards with E-Paper displays!

E-Paper displays are ultra-low-power displays which resemble the look and feel of paper in the form of a display. Ranging from display sizes starting from as small as 1" and going to sizes up to 30", not requiring any backlight and being semi-stable means these ultra-thin displays (<2mm) pack quite a punch for their size. In short, they draw no power to retain an image, but only to change the image. This makes it ideal for applications where the content does not need to change very often, like a dashboard! 

Supporting a variety of serial and parallel e-paper displays ranging from sizes between 4.2" and 10.3", Inkycal uses Python to generate images tailored to look good on e-paper, which is quite a challenge. Despite this, it does not require heavy CPU lifting as it runs well even on the Raspberry Pi Zero W!

Modularity! Inkycal is actually like a library with several modules. You can mix-and-match modules you want to see on your e-paper display from a growing number of modules to create your own e-paper dashboard:

  • Weather (openweathermap)
  • Calendar with Google-Calendar sync
  • Agenda with Google-Calendar sync
  • RSS/ATOM
  • Stocks
  • Images/Slideshows
  • Jokes
  • Screenshots from Websites
  • XKCD (developer jokes)
  • Todoist

The build instructions are clear (see the one-minute video below) and unittests ensure nothing breaks with each commit so there aren't surprises with the installation. And for those who want to skip the rather slow installation procedure or simply want a working solution, there is also the option of a pre-configured OS file 

Creating something which is easy enough to use for beginners while also allowing developers to tweak modules to their liking is much easier said than done. Fortunately, Inkycal can be fully configured via a single web-UI: https://aceinnolab.com/inkycal/ui . The initial configuration of Inkycal doesn't take more than a few minutes and is easy enough even for those with zero programming knowledge! You simply need to insert your details and press on download to download your settings.json file and copy it to the Raspberry Pi Zero W. 

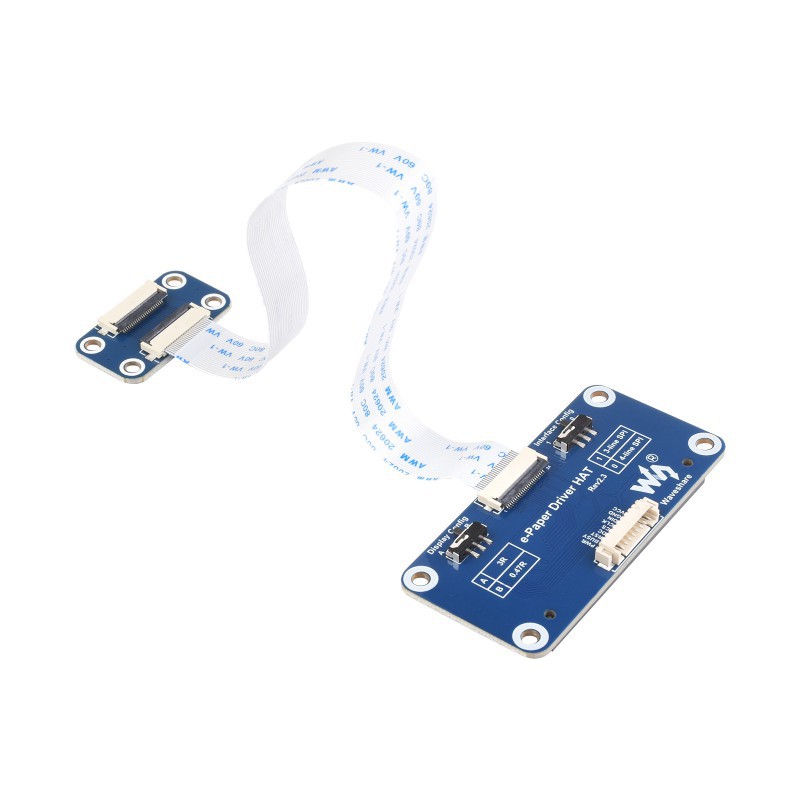
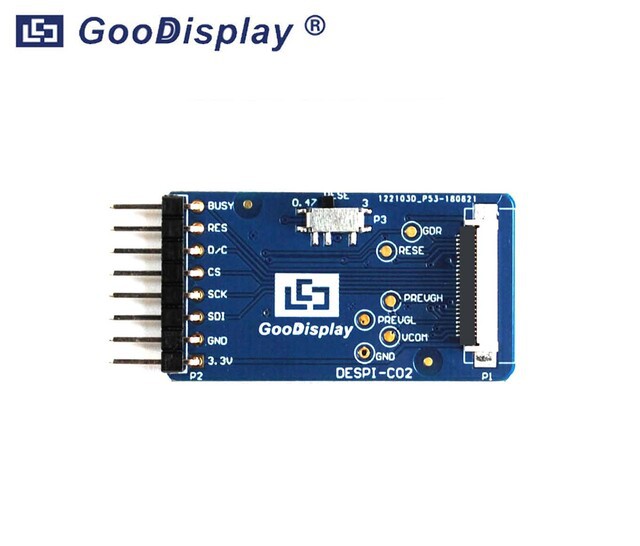
Last but not least, it's time to assemble the hardware:

  1. Place your display so that the front side faces up
  2. Insert the flex-cable from the connector into the driver board
  3. Plug in the driver board into the Raspberry Pi Zero W (or any other Raspberry Pi with 40 pin GPIO header)
  4. Set the switches on the driver board to 0.47 Ohm and 4-line SPI
  5. Insert the microSD card and power on the Raspberry Pi

On the first boot, Inkycal will automatically start thanks to a cron-job and you should see your dashboard, voila!

IMG_6255.jpg

Inkycal front view

JPEG Image - 23.52 MB - 12/06/2023 at 13:22

Preview
Download

IMG_6259.jpg

Bird eye view

JPEG Image - 15.37 MB - 12/06/2023 at 13:22

Preview
Download

5.jpg

Back view

JPEG Image - 6.54 MB - 12/06/2023 at 13:22

Preview
Download

4-small.jpg

Inkycal alternate layout

JPEG Image - 1.90 MB - 12/06/2023 at 13:22

Preview
Download

Graphics Interchange Format - 4.81 MB - 12/06/2023 at 13:22

Preview
Download

  • 1 × Raspberry Pi Zero W Raspberry Pi Zero W
  • 1 × 7.5" E-Paper (black-white-red) 7.5" E-Paper (black-white-red)
  • 1 × Waveshare e-paper driver board Waveshare e-paper driver board

  • The driver board

    Ace01/24/2024 at 12:25 0 comments

    E-Papers are little odd. The bi-stable nature, which basically means these displays only needs power to change the content of the display, but no power is needed to retain it. Therefore, you can display an image, remove the power plug or battery, but the image on the display wouldn't change. Over time, in the wrong conditions (e.g. sunlight exposure, storing vertically), the contents may fade, however, that is a side-effect of using these displays. However, to even get an image on the e-paper itself, a e-paper specific driver board is required:

    Thankfully, e-Paper displays use SPI for communication, meaning many boards and chips already support this feature. But it's not as easy to simply connect the SPI pins to the board, as these displays, apart from data, also require a higher voltage e.g. 15V in certain pins, while the SPI-pins require 3.3V. There must be a reason why the current non-official "golden standard" of SPI e-paper displays uses 24 pins instead of 6 (4 for SPI, + GND + 3.3V). Many of these pins basically require the additional voltage boosters, hence the need for a driver board.

    It turns out, e-Paper displays require 2 additional pins (busy and reset), summing a total of 8 pins from the driver board to the board. The 24-pin flex-cable with 0.5mm pitch coming from the display may have contacts facing up or down, depending on the display, but a good driver board is still compatible with the flex-cable facing up. There seems to be a pattern: Placing the display with the display side facing up and connecting the flex-cable to the driver board will work in most, if not all cases. 

    Furthermore, even 24-pin 0.5mm pitch spi e-paper displays may use either 4-line SPI or 3-line SPI, depending on the integrated COG (chip on glass). Fortunately, most e-paper displays now use the 4-line SPI mode, so that can be simplified. 

    Last but not least, some displays require a certain resistance on one of the pins (0.47 Ohms) while others require a different resistance (3 Ohms) in order to work. 

    Now that we know that we need a driver board, we can look for it. Fortunately for us, there are many driver boards already available e.g. from Waveshare or Gooddisplay, even Adafruit. 

    Let's summarise what a good driver board should be able to do:

    • drive the e-paper display
    • Support both resistance versions of 24-pin SPI displays (0.47 Ohm and 3 Ohm)
    • be small enough to fit inside most frames (max. height should not exceed 5mm)
    • Not have any additional components to reduce power usage
    • Should be available for a long time
    • ideally components should only be on one side (top or bottom)

    Let's start with the most famous one, from Waveshare:

    You can see two slide switches responsible for each of the config (3-line SPI or 4-line SPI), 0.47Ohm or 3 Ohm. However, as this is made into the hat form factor, it is simply too big as a driver board for any product you want to hide the electronics inside. Furthermore, even when used as intended on a Raspberry Pi, the placement of the connector on this driver board makes it difficult to even connect a larger display directly. As a result, they added an extension flex-cable and an additional pcb. Large flex-cables should generally be avoided as the buildup of forces inside them, without adequate shielding (e.g. metal foil), can affect the resulting image on the e-paper. That makes this board not so ideal.

    The next candidate is the Gooddisplay driver board. It is definitely small enough and contains only one slide switch instead of two, because most e-paper displays nowadays require setting only the resistance, not the SPI mode. This has been my favourite for a long time, however there was a catch. Most of the circuitry is on the bottom side while the connector, slide-switch and headers are on the top side, meaning it cannot be firmly glued to any surface. Also, with the headers already pre-soldered, it makes it a little difficult to deal with since you now have an elongated driver board, making placement...

    Read more »

  • I : The beginning

    Ace12/06/2023 at 22:58 0 comments

    Back in 2018 when I started university, our university expected us to check the website of each department for updates, homework and news, daily. Having to login each time on each website daily while also looking up the agenda for any changes turned out to be quite a chore. Problems give rise to creative ideas. That's when I thought to myself: Wouldn't it be great if you had all the info you needed for today right in front of you every day without the hassle?

    It started when a good friend of mine showed me this image:  

    futuristic calendar

    futuristic calendar 

    I absolutely liked the design and function of this gadget! An automatic scrolling calendar, the time and date and a few other icons barely visible. At the same time, E-Paper displays supporting 3-colours (black white red) were a revolution. Since most of the display can be represented in three colours, implementing this sort of design wouldn't be too hard. Of course, it lacked the functionality I wanted to add about actually showing what's on my agenda for today, but nonetheless, this design was just awesome!

    How difficult can be to create such a gadget right?

    Me, after nearly 5 years of working with e-paper display on nearly daily basis: Very hard!
    At that time, I had absolutely no clue about Python, let alone programming, but a passion to create this gadget for myself. 


    After learning Python by trial-and-error through the Raspberry Pi and testing out various sensors, I wanted to give the idea a try. Little did I know that there are way more professional tools used by developers apart from IDLE. I was getting used to deep-diving into source codes and documentations as IDLE did not support auto-completion and most of the fancy features of a modern and powerful IDE. However, when there's a will, there's a way. In fact, most of the development of Inkycal until about 2 years ago has never been done on a proper IDE, but exclusively on the Raspberry Pi. This meant a lot of failures and breaking code due the fact that I had no clue about git or unit-tests. However, even though it was in early alpha stage, my friend gave me the suggestion to publish it to Github anyway. And I did!


    Soon, the project was getting more and more interest, stars and forks. It turned out that the concept of combining a nearly alien E-Paper technology with something widespread as the Raspberry Pi to create something from which people can benefit in their daily lives without breaking the bank was indeed a brilliant idea!


    As I was a beginner myself and often struggled to follow instructions from other projects, I wanted to create a project, good enough for beginners even if you had zero programming knowledge with crystal clear instructions. However, I soon realised the limitations of my programming skills.
    Python isn't pre-installed on all computers and phones, so while it may be good for one task, it does lack in another. After all, there is no such thing as an ideal programming language. To make it easy, I would need something that can run on nearly any device, and it's called the web. Yep, the thing you're using right now to read this! Nearly any device that has a browser can show HTML CSS and Javascript! Hence, if you could leverage a web-page for the complicated stuff, it would be easy enough for beginners while Python would allow more advanced users to customise their Inkycal further.
    It's another thing there wasn't much to customise as I had no clue about classes and properties etc. at this point so there would only be one single layout. Easy to maintain right? At least, that's what I thought..

View all 2 project logs

  • 1
    How to build your Inkycal

    To keep things very easy, this one-minute video will help you with the installation of Inkycal:

View all instructions

Enjoy this project?

Share

Discussions

Similar Projects

Does this project spark your interest?

Become a member to follow this project and never miss any updates