Close
0%
0%

The Tile Job

Adventures of a software guy doing his first bathroom tile re-do.

Public Chat
Similar projects worth following
We've been in our house over 20 years. The tile surrounding the tub in the main bathroom needs to be redone. It's not one of those aesthetic things, where we want to replace the pink or avocado choices of yesteryear. It's that leaks have developed.

I saw a commercial for something or other recently that included the message "you're never too old to learn something new", and I am learning to do tiling. I've already watched about a hundred thousand videos on the subject. How hard could it be?

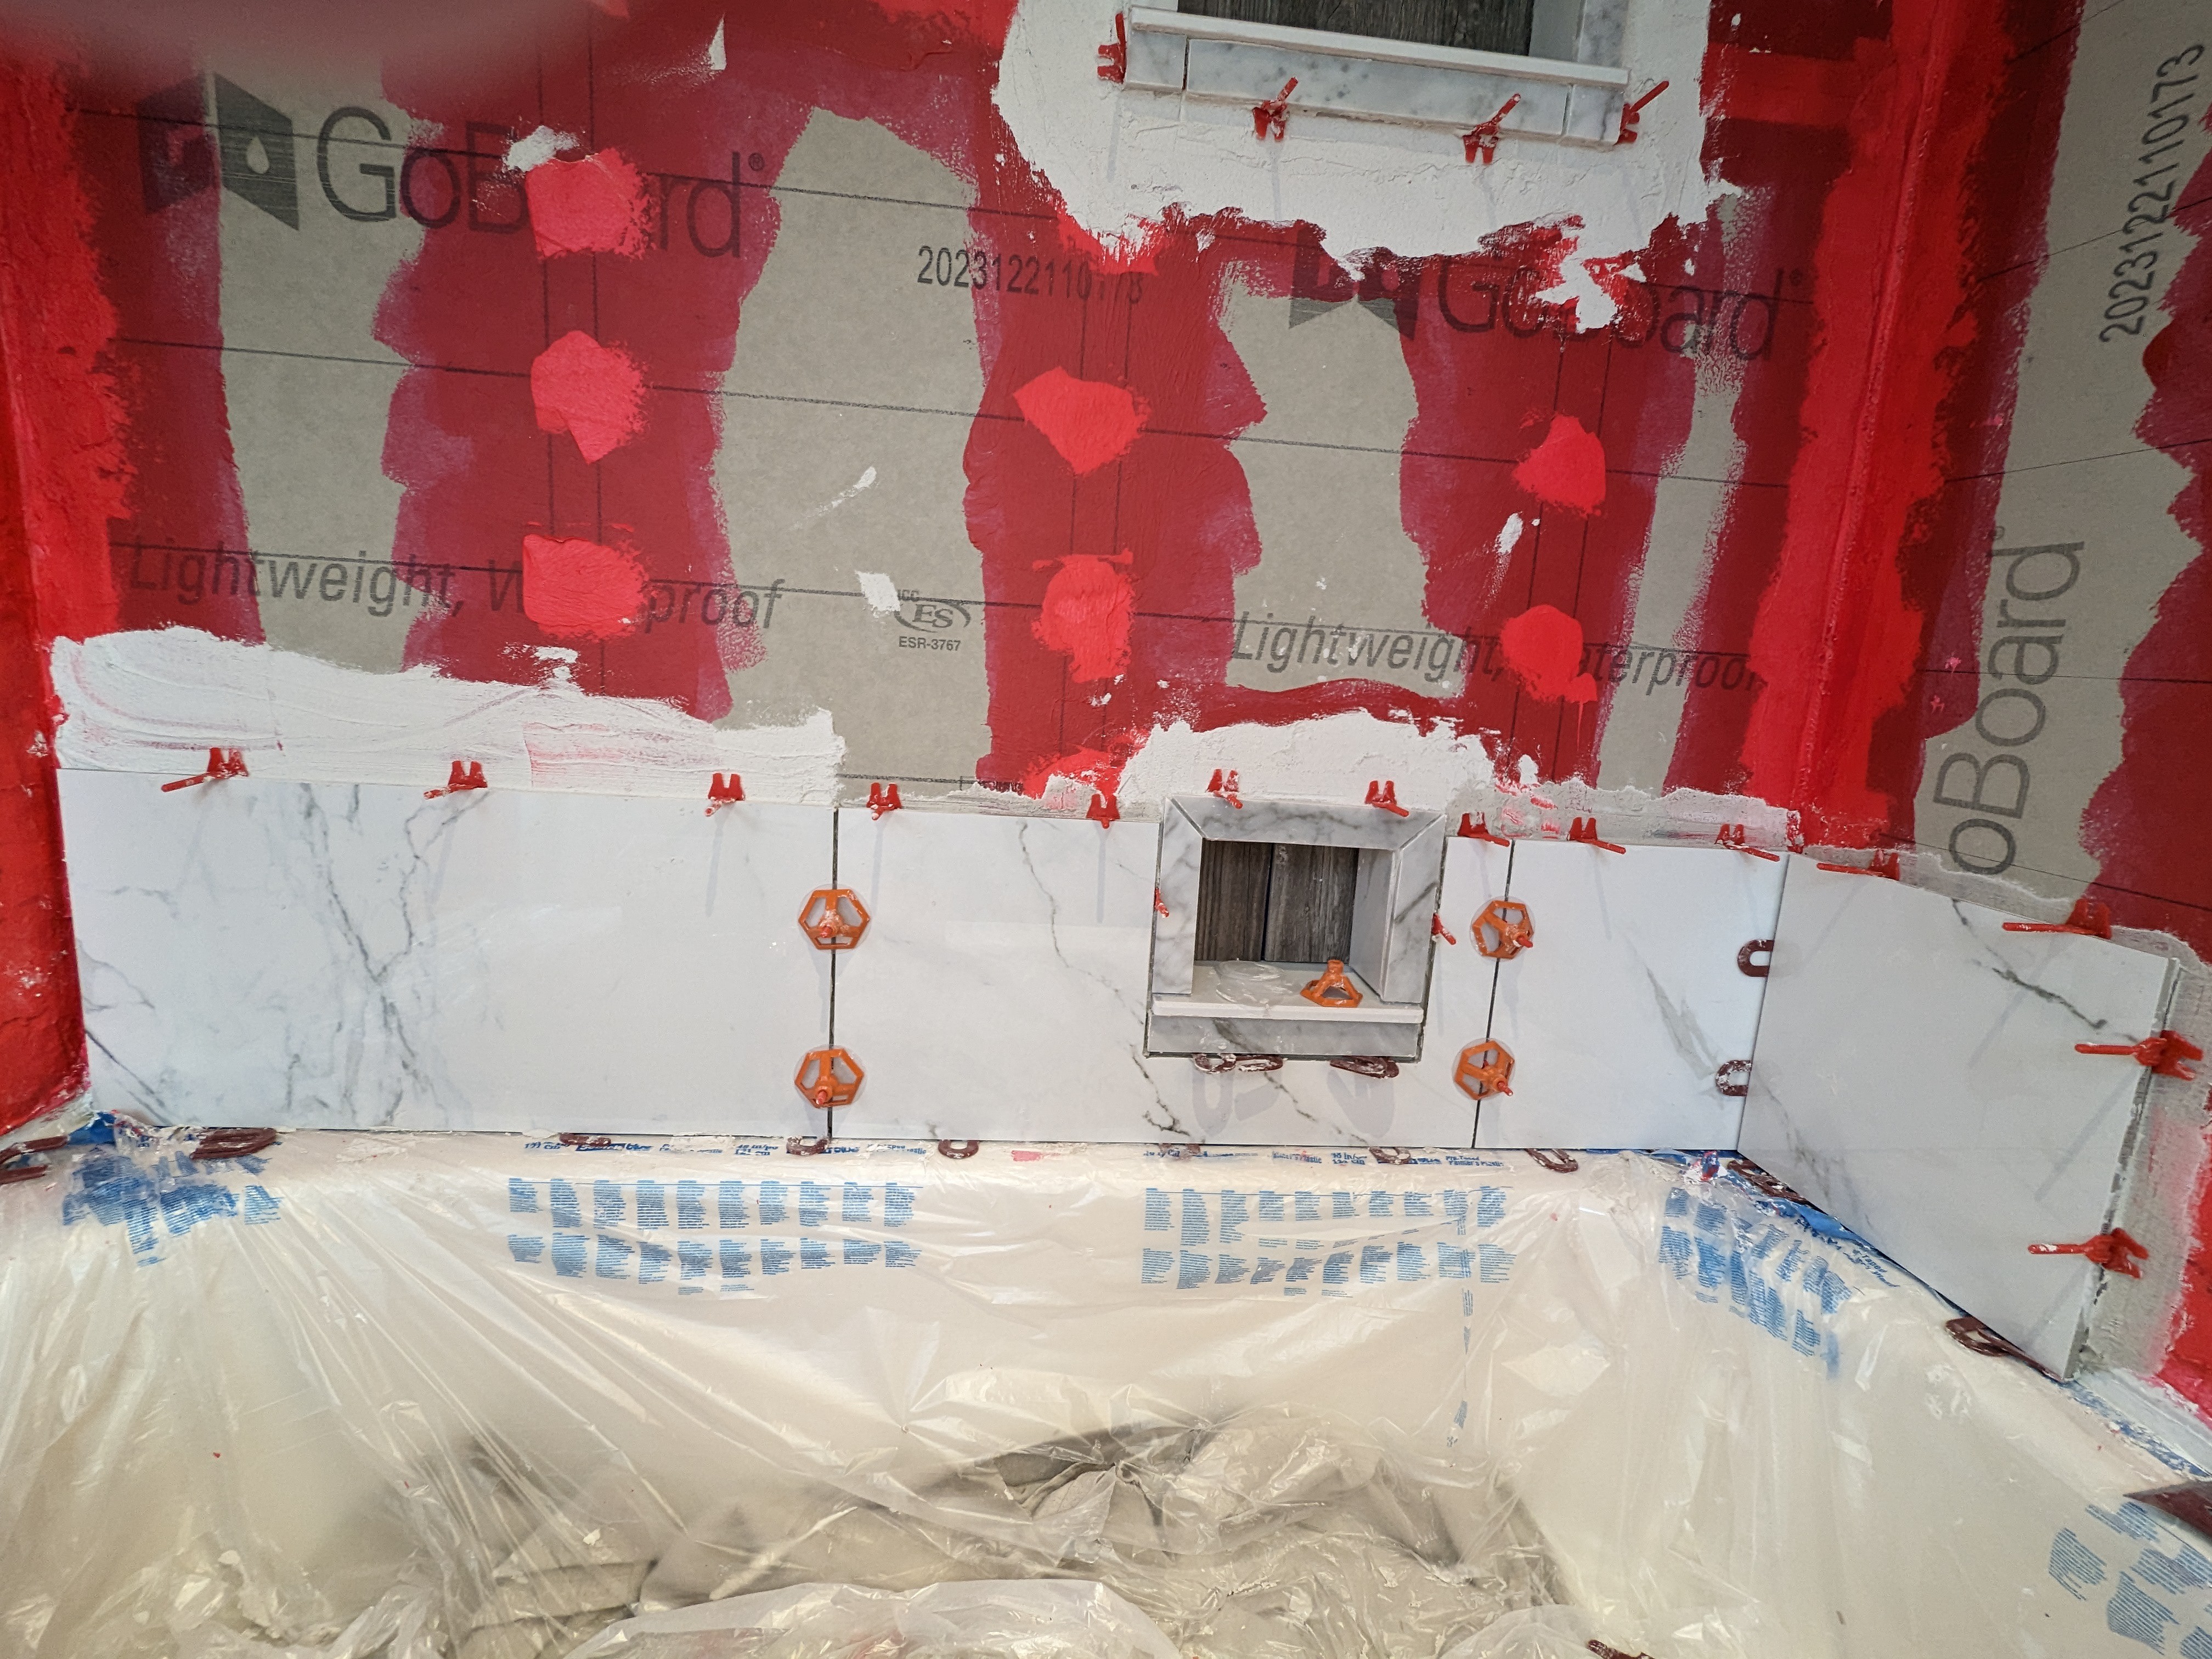
This project log will be used to describe my progress. Please excuse the mixture of tenses in the project logs. Some parts were "I'm planning to do this" and other parts are "I did that". I could've gone back and revised everything for grammatical consistency, but I'm busy re-tiling my tub surround. The log is mostly chronological, but for some entries that were for particular topics, I sometimes went back and added things as I progressed (marked with "Update:"). Some logs got updated many times.
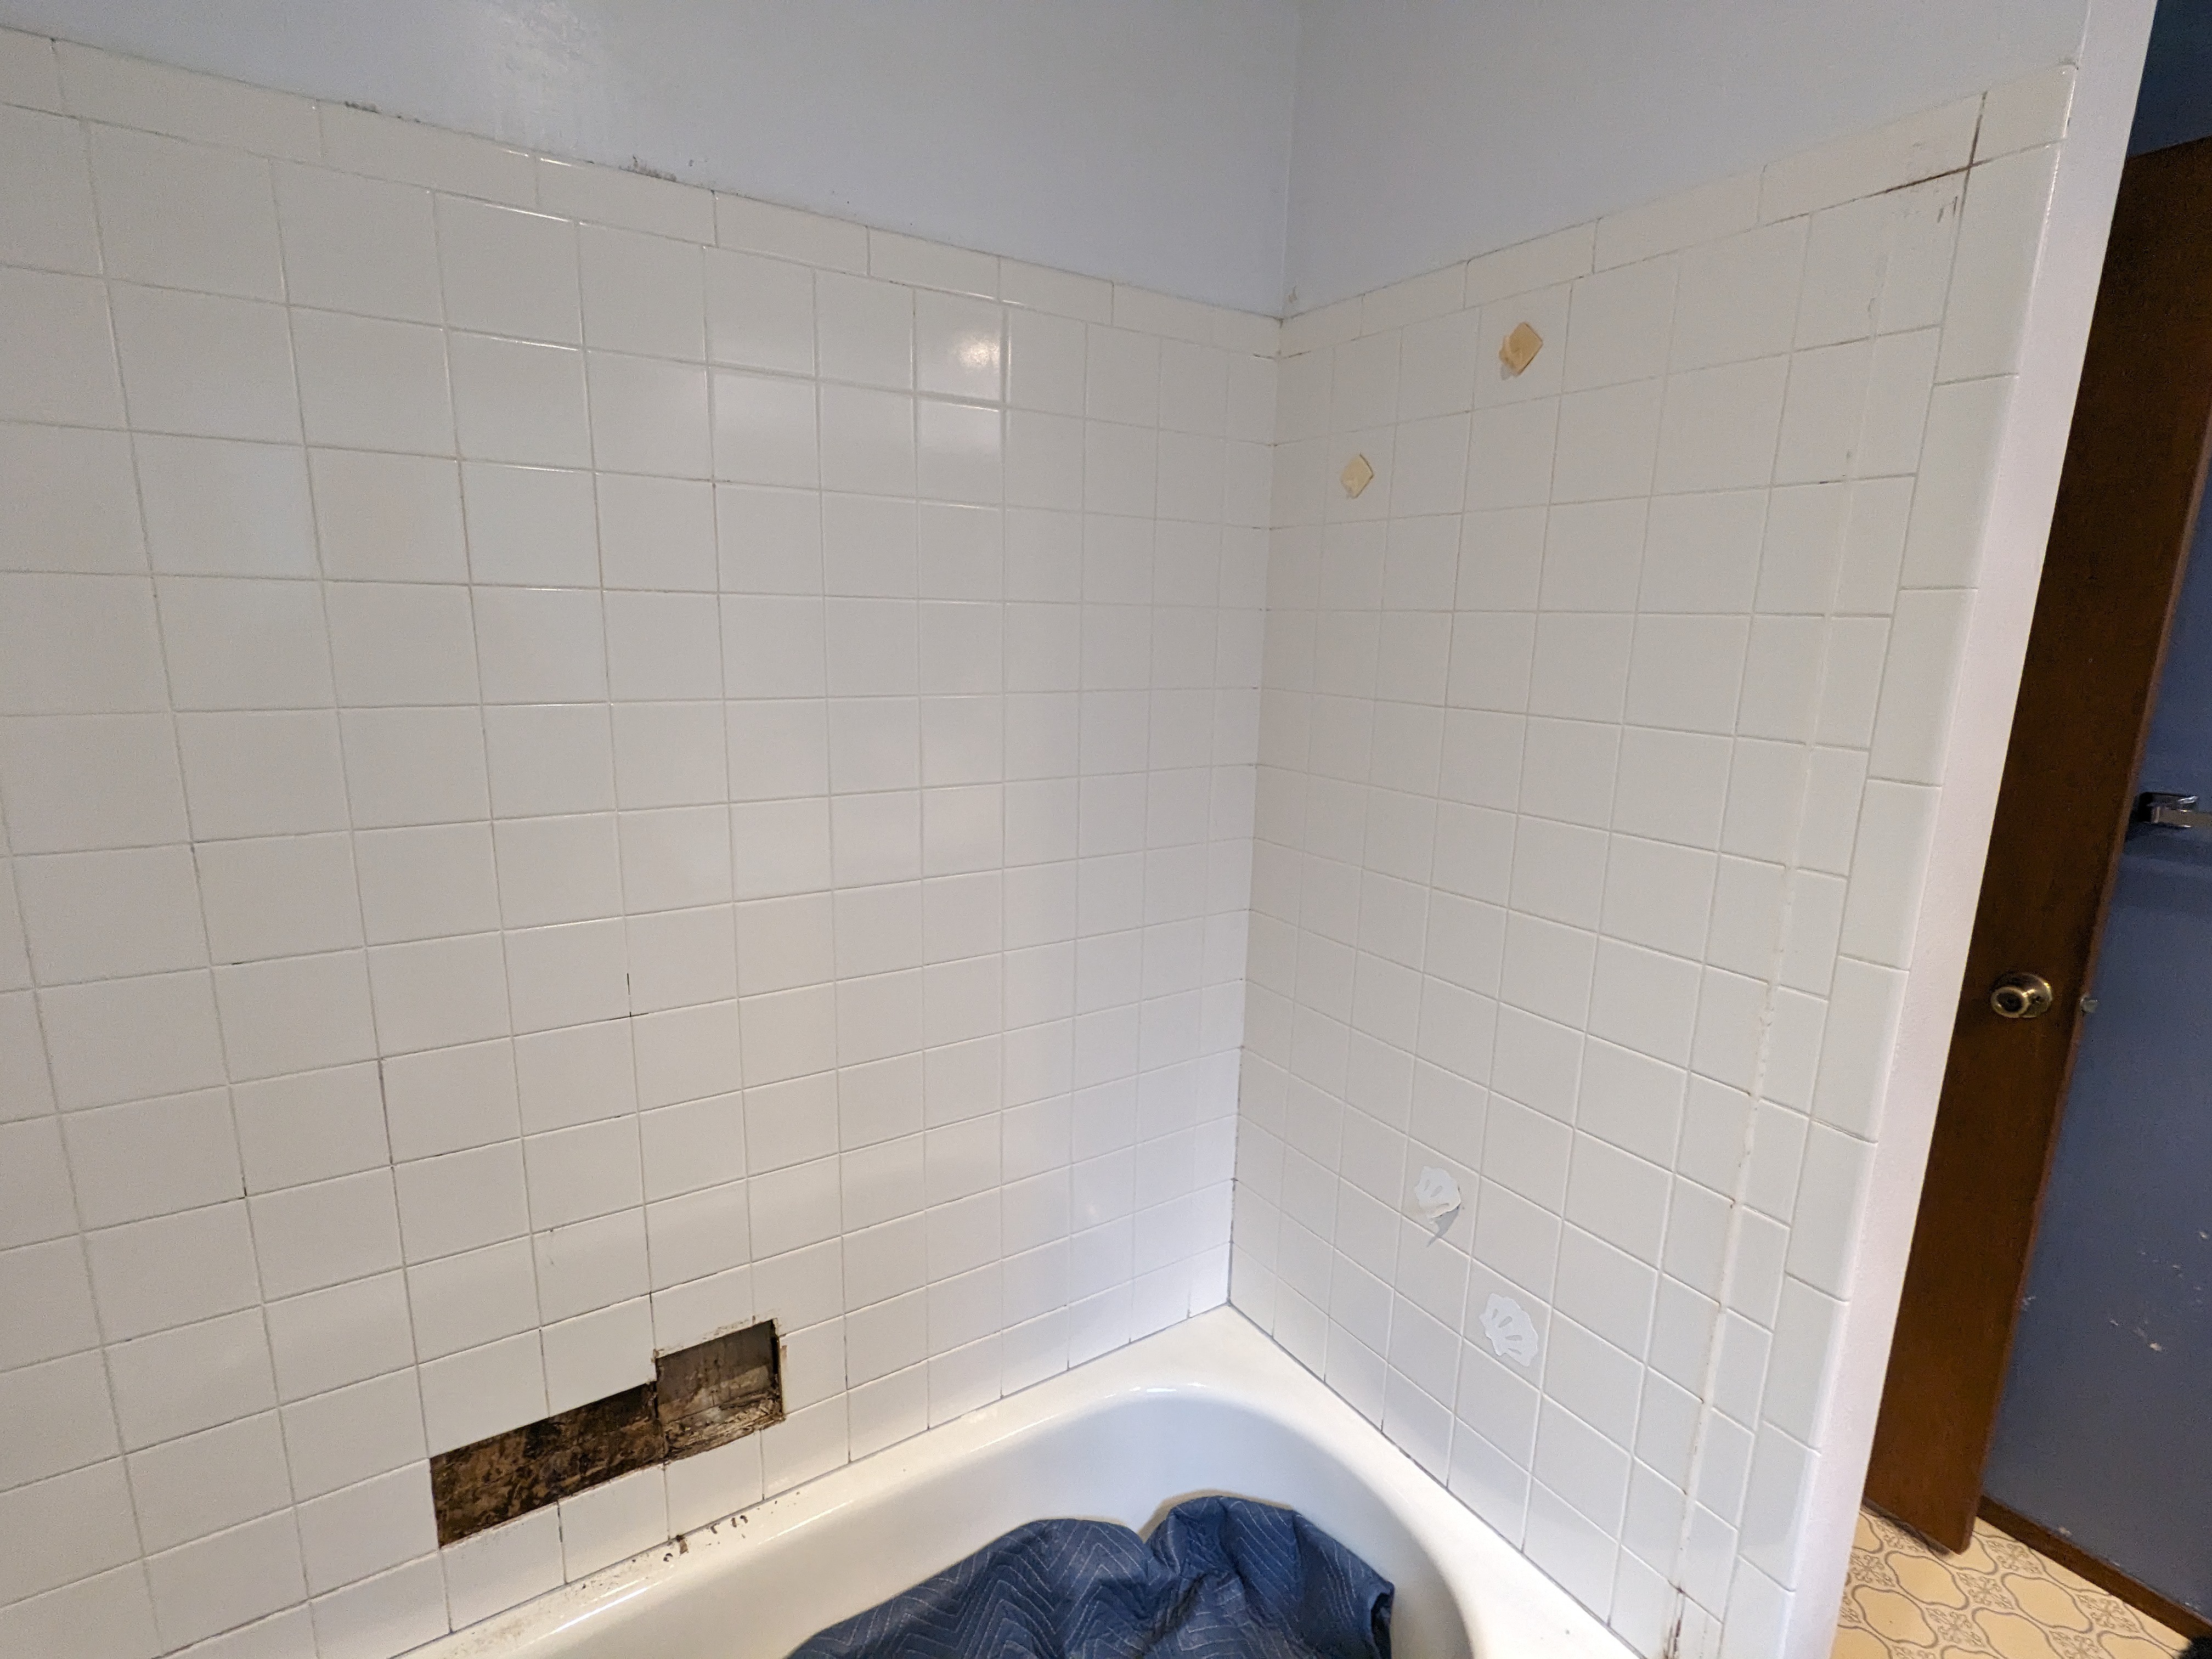
Before:

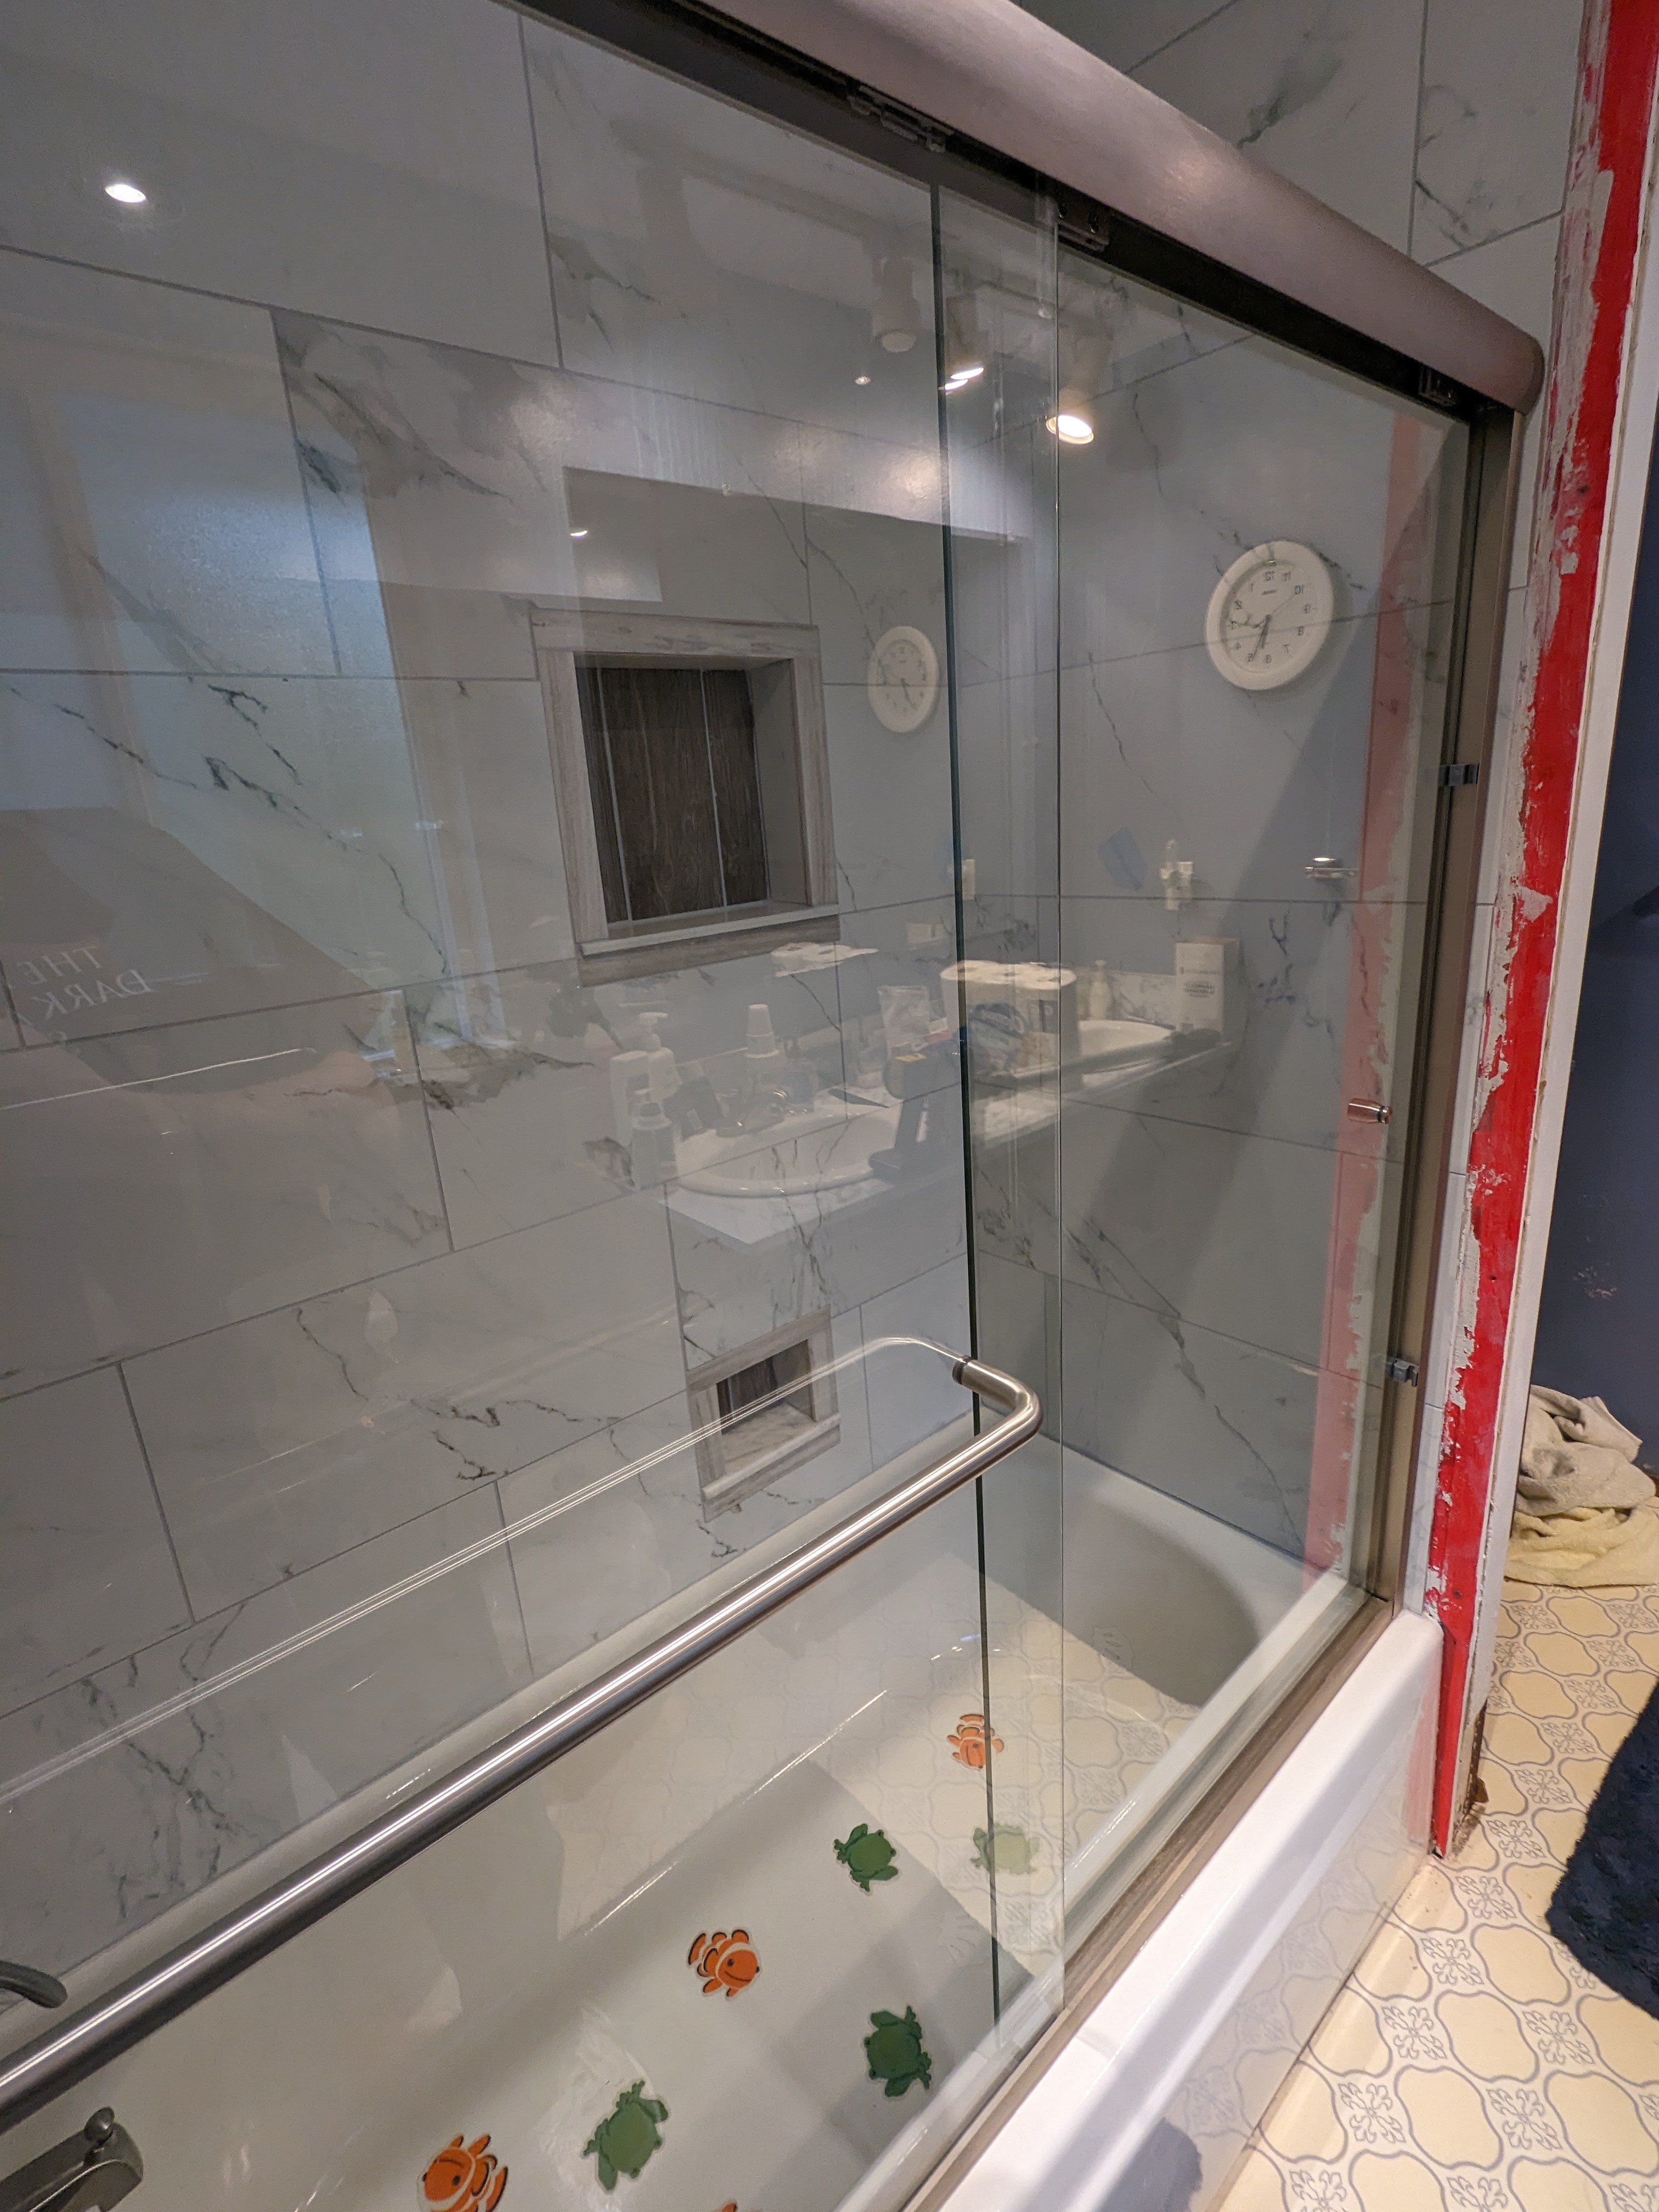
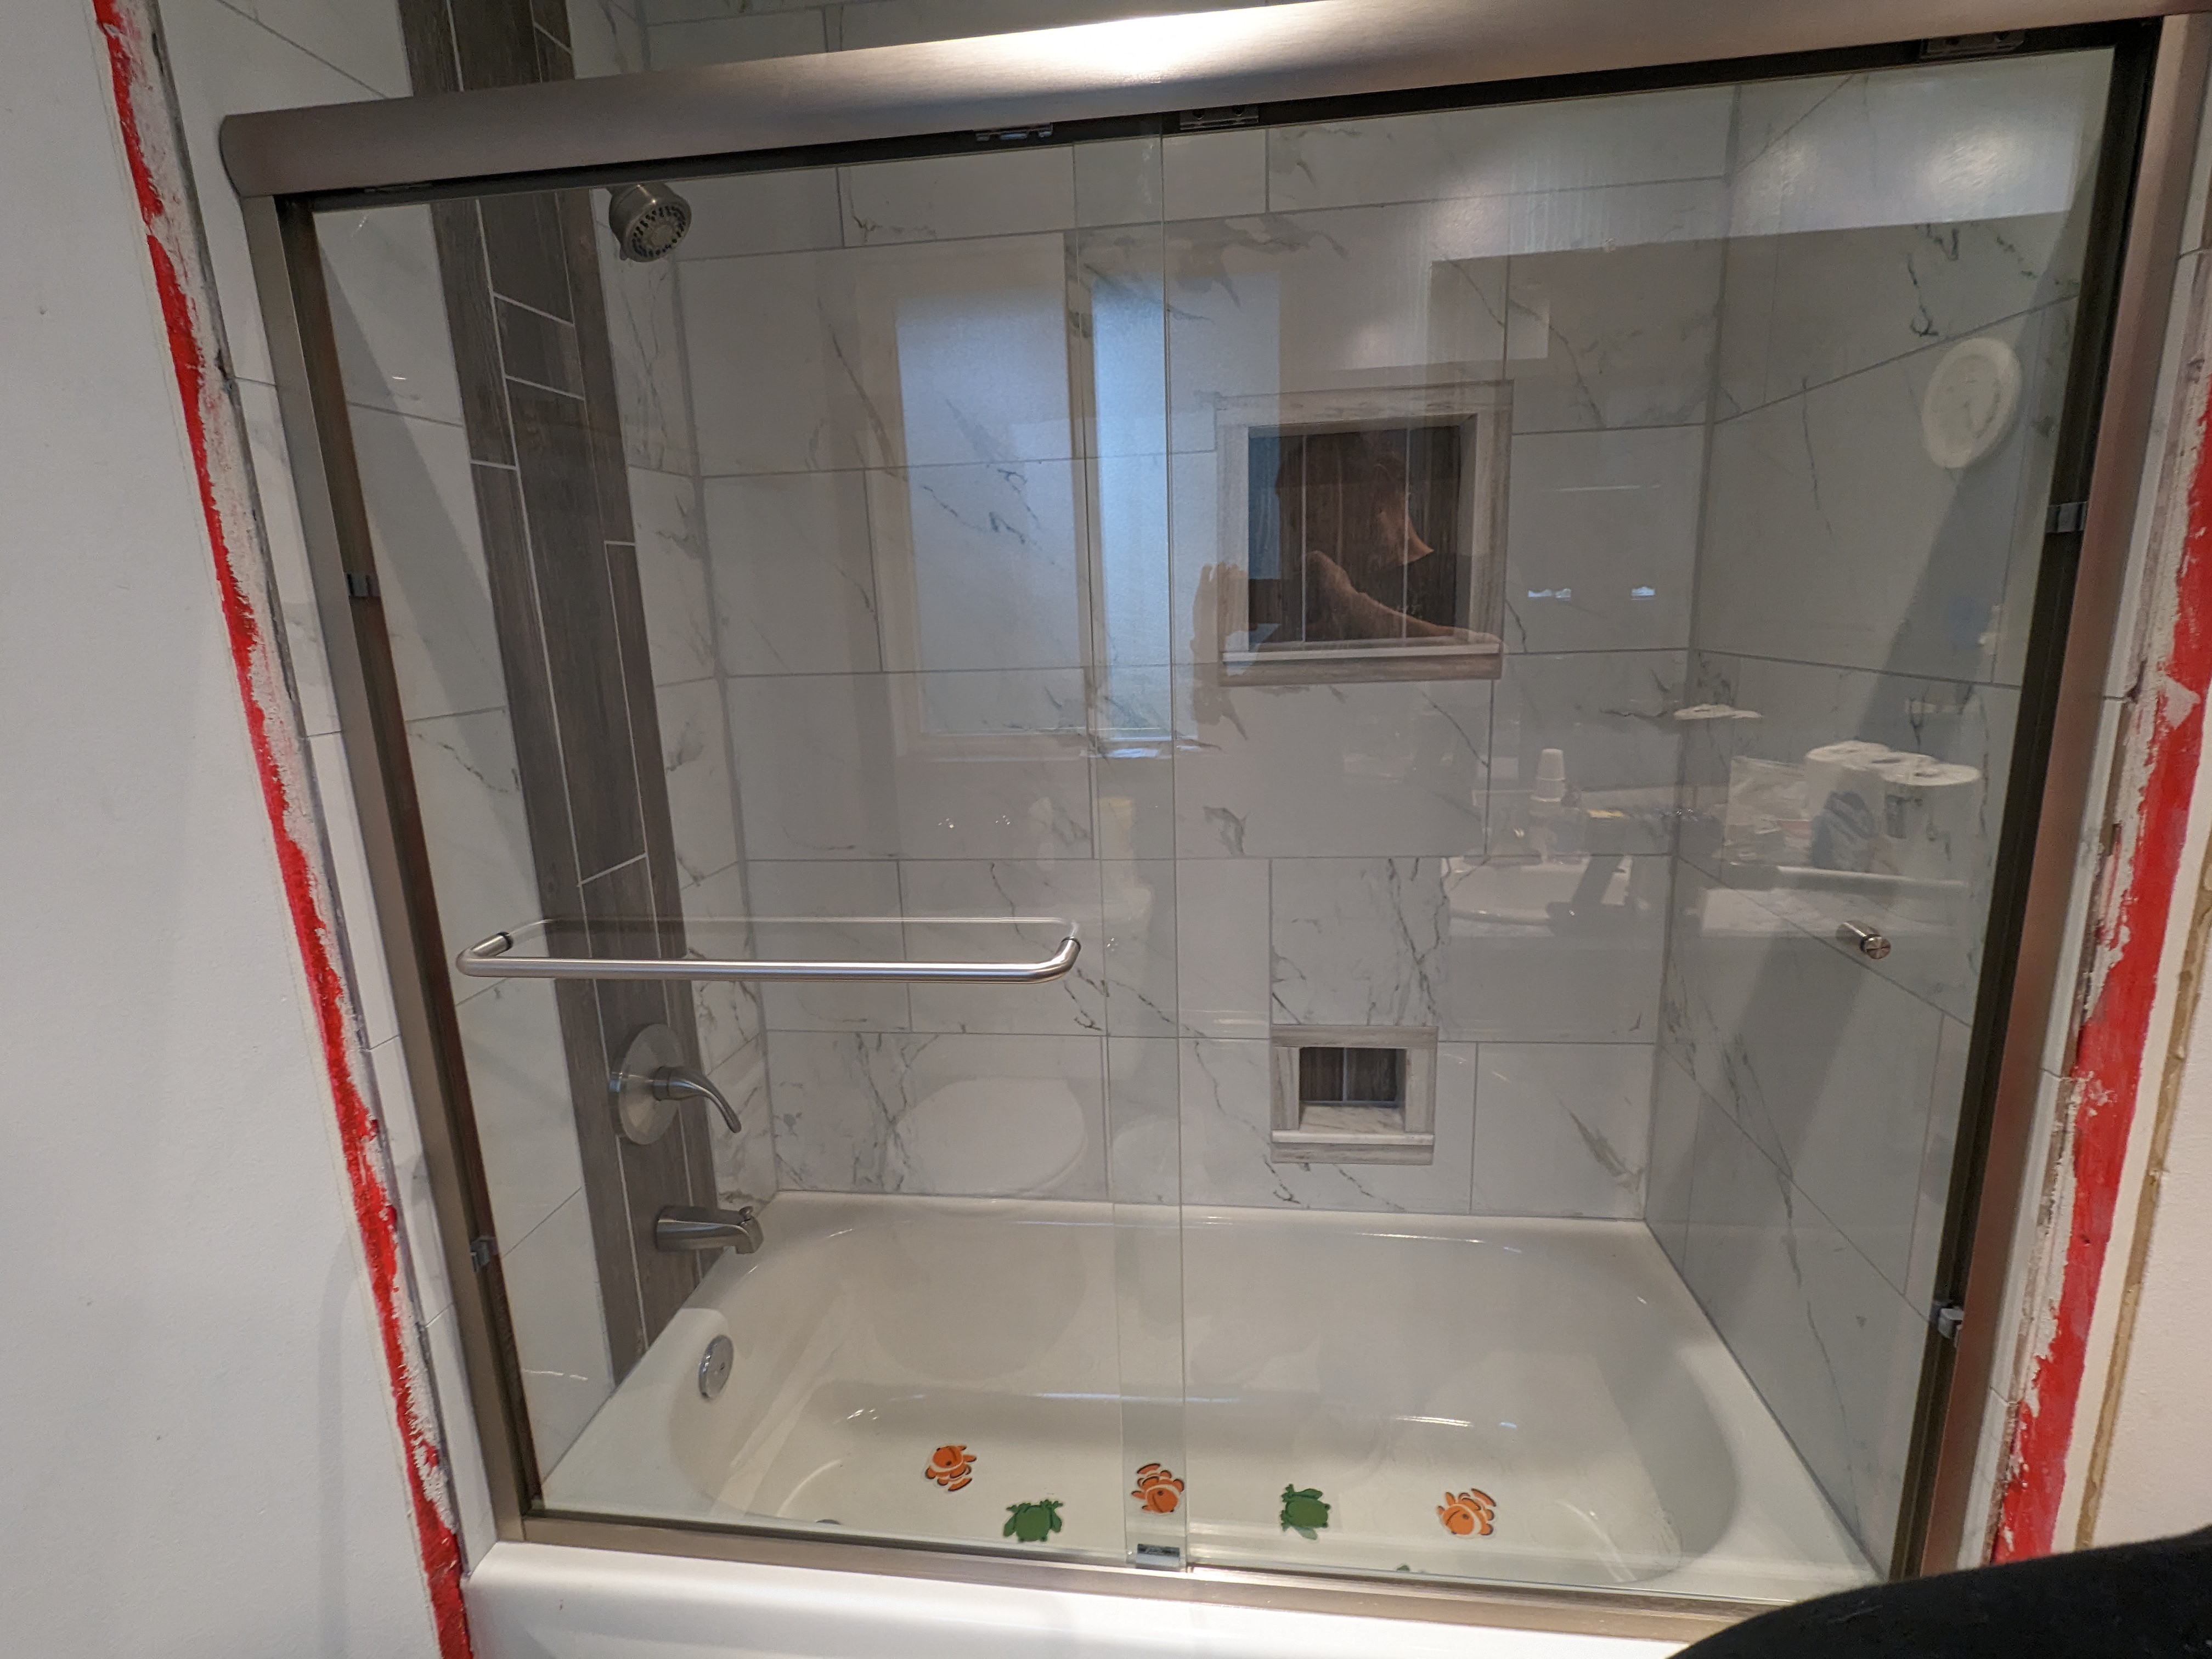
After: (no, the clock is not inside the shower)

  • Retrospective

    WJCarpenter04/07/2024 at 23:34 0 comments

    You know from the earlier project log that this project took twice as along and cost four times as much as I imagined. I don't feel too back about this, considering that I had no experience with tiling before.

    One of the things I considered but rejected was a pre-made tub surround made of acrylic or similar material that looks like tile. I thought that was too expensive to risk in case it didn't go well. When I got done with the demolition down to the bare studs, it probably would have been pretty simple to use one of those, and there would have been little risk. The overall cost would have been lower. I still don't know how it would look, but it would probably look OK. I probably wouldn't have the two niches, and the tile pattern would be uniform on all three walls. I could not have reasonably gone all the way up to the ceiling with the pre-made surround.

    I see lots of little flaws and mistakes in my work, but I expected that. If I don't look too closely, I'm happy with the outcome. It's also one of those deals where I got better as things progressed. If I ever do another tile job, it will probably have fewer rough edges. In fact, by the time I got to the third wall, it went pretty well.

    Probably the biggest mistake I made was my practice of doing just a bit of the work at a time. Especially on the back wall, by only doing a row or two each day, the tops of the tiles didn't have anything to keep them pressed flat against the wall. While the overall wall is pretty flat, it leans out a bit as it goes up. It's definitely not plumb. That impacted the details on the two side walls.

    The advice I got several times, from videos and from people with tiling experience, was to be sure that everything was level, flat, and plumb before starting the tiling. I listened to that advice, but with a "yeah, that's pretty close" attitude. I could probably have saved myself some finagling if I had worked at little harder at that aspect of things at the beginning.

    I had a staging area in a nearby bedroom for tools and supplies, but I didn't have a nearby area where I could make a mess with my power tools (miter saw, angle grinder, wet tile saw). Instead, those things had to be in my unfinished basement. I don't know how many trips I made up and down those two sets of stairs, but on some days it really wore me out. Lugging bags of thinset mix or stacks of large format tiles was a pain in the neck.

    Would I do it again? Well, I wouldn't want to repeat this much effort and achieve exactly the same results. On the other hand, I'm more experienced now, so I think the effort would be less and the results better. It definitely scratched my itch of wanting to do a tile project. There is no natural "next tile project" in this house, except maybe kitchen backsplashes. I'll have to think about it.

  • How much did it cost?

    WJCarpenter04/07/2024 at 23:12 0 comments

    Before I started, I SWAGged this at being under US$500 and taking me about 3 weeks to do it. Let's see how we did.

    My time and labor were free. The opportunity cost was only delay in other DIY and hobby projects. The time was between 5 and 6 weeks, but that is mostly because I only worked an hour or two a day. I had to spend a lot of think time for things that experienced people would have just taken in stride. Part of the time was spent on things that were not tiling, per se: the plumbing and the sliding glass doors.

    There are a couple of mitigations on the cost of tools and materials. My main shopping was at Home Depot, Lowes, and Floor and Decor. At Home Depot and Lowes, I get a 10% discount on almost everything. They are confident in making it back on things I screw up or otherwise need to re-do. In the cost figures below, I am mostly ignoring things I had to buy more than once due to goofs or poor workmanship. I have a separate accounting for tools and supplies that could be used for future projects. But, on the other hand, I'm also not counting things I returned, either because I decided to not use them or because I bought too much. Figures are appoximate.

    ItemCostNotes
    Carrara tiles (12x24), 5 cases150Includes most of a case for the test wall
    marble trim tiles (4x16), 4 pieces20niche trim pieces
    Edge trim (2x36), 6 pieces60manufactured stone sills
    Wood look tiles (6x24), 8 pieces16shower tower and niche back walls
    Lumber25grab bar backing and niche framing
    Wood screws10
    GoBoard (36x60x0.5), 4 sheets100
    Marble penetrating sealant18For niche trim. Had to buy a pint and only used about half an ounce.
    Backerboard screws12
    Backerboard washers20
    GoBoard sealant, 2 tubes25
    other sealant, 5 tubes55temp local shortage of GoBoard sealant
    RedGard, 1 gallon701/3 to 1/2 left over
    Pre-mixed grout (1 gallon)601/3 to 1/2 left over
    Thinset mortar (50 pounds), 4 bags160Most of a bag left over
    Scotch Blue pre-taped film12painter's tape with 48 inch plastic film attached
    Grout haze remover15most of the pint left over
    Horseshoe spacers, 1/8 inch13re-usable
    Horseshoe spacers, 1/16 inch13re-usable
    Drywall shim (cardboard)12pack of 100, used about 10
    Drywall corner bead12
    Tile leveling spacers, 1/16 inch14didn't really use these except on the test wall
    Tile leveling spacers, 1/8 inch37used about 3/4 of these
    Tile leveling shields26re-usable
    Tile leveling spin things25re-usable
    Diamond cutting wheel for dremel11many left over
    Diamond grit sanding blocks15didn't really use these
    Diamond hole saw, 1 3/8 inch20
    Pre-formed niches100
    Silicone caulk, 2 tubes40most of second tube left over

    Things in the table above total about US$1400, which is slightly above my SWAG of US$500. Add to that maybe US$100 of miscellaneous small items (rags, plastic putty knives, drop-cloths, nitrile gloves, etc) and maybe US$500 for tools (which can mostly be re-used, if only for tile projects that might never happen). That brings the grand total to the neighborhood of US$2000. Yikes.

  • Oh, when the paint goes marching in

    WJCarpenter04/06/2024 at 01:40 0 comments

    It'll be a little while before I get around to fixing the drywall and painting the walls. This project log is reserved for an "after" photo of that.

  • New doors for old

    WJCarpenter04/05/2024 at 01:30 0 comments

    Soon after we moved into this house, 20+ years ago, I replaced the shower curtain arrangement with a sliding glass door. For my money, the benefits far outweigh the minor drawback. (If your shower curtain gets all funky, you can just toss it out and get a new one.) In my early pictures for this project, that door was already removed, though you can see the caulk traces in some shots. During disassembly, some parts of the metal framework were a little grody, and I also did a bit of mechanical damage through carelessness.

    It's not part of the tile project, per se, but I decided to replace the sliding glass door. I found a nice one with a brushed nickel finish for a reasonable price at Wayfair. The price was helped even more because I opted for a "like new" refurbished item, and the FedEx shipping was free. The box with everything weighs about 90 pounds, and it's been standing on my porch unopened for about a month. I was finally brave enough to cut through the massive amount of not-from-the-factory packing tape and inventory things. Even though I had refurb anxiety, all of the contents were present and undamaged. Most of the parts were still in interior factory wrapping. If this was a customer return, I don't know what they didn't like about it, though I suspect they either didn't like the looks or it wouldn't fit their opening. When I got about 90% done installing it, I found that a couple of fairly minor pieces were missing (supposed to receive 4 but only received 2). I called Wayfair to get replacements, thinking I'd have to wait a few days for them to arrive. To my surprise, their policy was that the support rep didn't have a way to send replacement parts for something that had already been returned once. Her only option was to give me a complete refund. I was able to work around the problem of the missing parts with local MacGyver technology.

    Installing these things is pretty straightforward as long as you're starting with a level and plumb opening. This particular model wants two holes drilled for anchors on each side piece. Drilling into porcelain tile is something of an ordeal, and I didn't want to screw up the tiles I had just laid. I considered mounting the side pieces with construction adhesive instead of screws, but I'm not sure what would happen at some future point where the door frame has to come back out. I bought a 1/4 inch diamond bit hole saw and went to town. It took about an hour to drill the four holes with a cordless drill.

    As I've mentioned before, the red areas on both sides will receive trim pieces after the walls have been painted.

  • Half a grout, half a grout, half a grout on!

    WJCarpenter03/29/2024 at 23:41 0 comments

    I started grouting today. It was a lot of elbow work to push the grout into the joints, so I only did the two end walls. The back wall, which is the other half of the job, comes tomorrow.

    The grout that I am using is Custom Building Products Fusion Pro Single Component Grout. I'm using the platinum color because I read some reviews that said it looked great with the tile I'm using. I had already used it on my test wall, so I did know what it would look like. This is a pre-mixed all-in-one grout. The advantage of that kind of grout is color consistency and no need for sealant later. The disadvantage is that the working time is only a few minutes. So, you apply the grout in a little section and then come back pretty much immediately to clean it up with a sponge and microfiber cloth. It wasn't too bad once I got into the swing of things, though there were lots of little grout blobs on my drop cloth.

    The only thing I'm worried about is how I'm going to grout inside the niches. The space is too tight for the most part for my grout float. I may swing by the hardware store and pick up a margin float. It seems a shame to buy the tool for that small job, but it may be handy for the main grouting on the back wall. I have only been using the short edge of my full sized grout float.

    Update: I grouted the rear wall, including both niches, today. The margin float wasn't much help for grouting the niches. Instead, I resorted to pushing it in with my fingertip, as if I were smoothing caulk. I did use the margin float for the main part of the wall though. For large format tiles, where you are just doing the edges instead of covering the whole tile, the margin float works well, especially if you are the sort like me who only uses the short edge of the full sized grout float anyhow.

    There is some residue on all of the tiles. It's hard to see due to the Carrara pattern on the tiles, but it's obvious to the touch. I'm going to let things sit for a while and try some clearn-up tomorrow.

  • Finally, a productive day

    WJCarpenter03/24/2024 at 00:41 0 comments

    I completed the right end wall all in one session today. It helped that it was just a big empty wall with no tricky cuts to figure out. I know that an experienced tiler would probably have been able to do all three walls in a single day, or two days at most, but I am not that tiler.

    The red strip on the end is where the edge trim will go later. For the pattern, I decided to use full tiles plus a shorter piece on each row, alternating. It's not the same as the back wall pattern, but I think it looks OK. As it turns out, by coincidence, it's closer to the 33% that most guidance recommends. The full tiles on the right end wall are in the corner matching full tiles from the back wall.

    In my tile pile for the Carrara tiles, I've got one full tile and a zillion little pieces of various sizes. I've also got about 40 pounds of a 50 pound sack of thinset left over.

    Left to do:

    • Deal with niche trim and the small niche sill.
    • Clean up thinset from tiles and grout lines.
    • Carve left and right edge trim to the tub contour.
    • Grout
    • Caulk.

    Update: Because of poor craftsmanship on the back wall, I needed to slightly taper the right end wall. I didn't forget to do that, but I wasn't careful enough. A couple of tile rows at the top were further into that red area than I wanted them to be, by 1/8 to 1/4 inch. As a result, the 2x36 trim pieces didn't have enough room. I trimmed those tiles with my angle grinder diamond blade. That worked reasonably considering that that seam will get caulked. However, I couldn't get all the way to the ceiling with that round grinder blade, so there is an inch or so that still needs trimming. I'm going to try diamond blades for my oscillating multi-tool and my Dremel rotary tool. I don't yet have either of those blades.

    Update: Well, what do I know? I figured the diamond blade for the multi-tool would be sort of OK for this and the diamond wheels for the Dremel would be worthless. Porcelain is tough stuff. It turned out to be almost the opposite. I ground away for quite a while with the multi-tool with only very slow progress. I think I might have been able to get all the way to the end, but it was going to take a while. On a sort of a break, I fired up the Dremel. On a smaller scale, it cut more or less like the diamond blade on my grinder. Even with the smaller radius, I couldn't get to the ceiling, and the body of the Dremel also got in the way. I was able to cut close enough that I could chip out the remaining pieces without seriously affecting the main part of the tile. The tiny diamond wheel also worked reasonably as a fine-grained grinder, which might come in handy as I sculpt the edge trim around the outside of the tub.

    (The small brown triangle at the top is a sliver of porcelain that I chipped away after taking the photo.)

  • Going around the bend

    WJCarpenter03/19/2024 at 22:32 0 comments

    At long last, I finished the back wall. As a bonus, I also finished one of the two vertical stacks on the left end wall.

    What's left of laying tiles? The other vertical stack on the left end wall, and (almost) all of the right end wall. Add to that fixing the sill for the small niche and putting up trim for both niches. 

    Before I do the left and right end walls, I have to make some final decisions and measurements for edge trim and then some arithmetic to make the most efficient use of 12x24 tiles. The width of the stack on the left end wall will be between 12 and 12.5 inches wide. Since the tiles are actually a bit short of 24 inches, and also because of the kerf from the tile saw blade, I won't be able to just use tiles cut exactly in half. Drat. On the right end wall, the one piece that I placed is about 12.5 inches wide, and there is about 17 inches of width to the right of that. I'm not opposed to removing that lone tile if it leads to a better plan for tile usage. I am able to buy the tiles either as a case of 8 tiles or as individual tiles. I don't mind having a few whole tiles left over in case of future repairs or whatever.

    The most likely plan is that I will remove that lone tile on the right wall and instead use something that is the width left over after I make the cut for the tiles on the left wall. That will add up to 12 tiles for both end walls together, plus something for the half-rows at the ceiling. I might be able to get some of those half-row pieces from scraps I already have.

    I mentioned earlier that my plan for the edge trim is to use 2x36 engineered stone sills. They are 5/8 inches thick and will extend out from the walls somewhat beyond the main field tiles. My experience so far is that I'm no good at getting precise enough cuts of the field tiles to make the edges line up vertically. So far, those are hidden in corners where caulking will literally cover my sins. It's not required functionally, but I plan to caulk the seam between the field tiles and the edge trim for the same cosmetic reason.

    The floor to ceiling height is 7 feet 8 inches, so it will need a bit more than 2.5 pieces of the sill material for each side, meaning I'll have to use 6 pieces instead of 5. On the other hand, that will give me a couple of scrap pieces to practice my cutting and grinding skills to make a decent fit where the end trim meets the front of the tub.

    Update: I finished the left end wall. To get the right horizontal distance, I figured out where I will put the edge trim and then put a scrap as a straight-edge where the inner boundary will be. The edge trim will wait until after the non-tiled walls have been painted.

    Here's the finished left wall except for that edge trim.

    The shower tower is off-center with reference to the tiles, but I think it will be fine once the sliding glass door is installed.

  • Second row, still slow

    WJCarpenter03/14/2024 at 23:44 0 comments

    I had planned to make a lot more progress today, but it didn't go as fast as I wanted. I did get up most of the second row, including those two pieces on the left end wall.

    Through some kind of miscalculation that I still don't quite understand, I ended up with these two adjacent tiles at different vertical positions.

    I noticed it while the mortar was still pretty wet, so I was able to nudge things into better position.

    It played some havoc with some of the grout lines. That worried me a bit until I reviewed my test wall. Since the grout is pretty white, it blends in reasonably with the tiles, and I don't think it will attract the eye like a dark grout would.

    Update: The next day, Row 3 and the beginning of Row 4. I used a 15 pound batch of thinset and only had a little bit left over. Also, of course, made a huge mess. (Ignore that finger that photobombed me.) 

    From this distance, I think the lines look decent. The trim on that top niche looks almost as bad as the bottom niche, so they will both have to have the trim re-done in some way that I can pass off as an aesthetic design choice and not a mistake being fixed.

    Update: I had some other things to do on the next day, so I only planned to do a 10 pound batch of thinset. There was a lot of up and down the stairs to shave an eighth of an inch here and there. I had planned to lay the first full-sized tile in row 5, but after I applied all the remaining thinset it still wasn't enough and the tile leaned backwards significantly. You can tell from the photo that I removed that tile and re-purposed thinset to lay another tile on the left end wall.

    I've only got two fiddly measure-and-cut operations left, for the upper part of the larger niche. After that, it's just full tiles and single straight cuts.

    Update: I did pretty well today on rows 5 and 6. I didn't do the partial tile on row 6 because I ran short of thinset at that point. I also ran out of gas, so I called it a day. Row 7 takes me to the ceiling. It's a vertically short row of about 8 inches or so. In my next session, I can cut the remaining four partial tiles, and then the back wall will be done (modulo re-doing the niche trims), which I'm saving for the end).

  • First row up!

    WJCarpenter03/14/2024 at 00:13 0 comments

    Today, I set the first row of the back wall. I even did that thing where I used the trimmed off piece to go around the corner to the next wall.

    This row took extra time because I had to make that U-shaped cut-out in the middle piece of the back wall to go around the smaller niche. That's not a big deal for experienced tile folks, but it was a first time thing for me. It came out OK. My change of plan for how I trimmed the niches blew up my plan for ending on a grout line, so I will have to make a smaller U-shaped cut in the tile that goes on the top side of that niche. Oh, well. Also, while I was adjusting the spacers and fitting the large tile, I was too aggressive and pulled off the trim piece under the sill on that small niche. As it turned out, that made it easier to set the large tile, and it was easy to place the trim piece after that.

    Obviously, setting 3 or 4 tiles in a day is not going to cut it for any kind of sane timeline. I have been mixing thinset in five pound batches. By the second batch, I had achieved the often-mentioned peanut butter consistency. Using up that small bucket of thinset presented a natural stopping point. I'm going to double my recipe and create ten pound batches, which will at least give me more progress before my laziness kicks in. It also helps out with running out of thinset just slightly before having enough for a big tile. That still might happen, but not more than half as often.

    The tile on the right end wall is slightly more than half a tile. On the next row, both tiles in that corner will be full tiles. I'll also be able to work my way up the half of the left-end that is nearer the back wall.

  • Thinset is messy for me

    WJCarpenter03/11/2024 at 00:18 0 comments

    People who have been doing this for a long time don't make a big mess like me, but my fingers and even the bottoms of my shoes get smothered in the stuff every day. Mordor ... mortar; get it?

    BTW, the mortar I am using for this project is Custom Building Products Natural Stone and Large Tile 50 lb. White Premium Thinset Mortar. When it dries white, it blends in very well with the Carrara tiles I'm using, so less to worry about if any of it sneaks out and stays visible. It's what's known as a polymer-modified mortar, which is specified for use over RedGard and one of two types of mortar specified for GoBoard.

    I am using a lot of thinset. Certainly more than any pro would use, and maybe even more than is healthy. I'll have to check with the Surgeon General on that point. My theory was that using a thick layer of thinset would let me correct lippage by squeezing out the excess with my leveling system. That would probably work if i moved at the speed of an experienced tiler. But at my rate, I have a lot of tile row tops exposed overnight. If the next row of tiles needs to squash down for lippage, it won't really work since the previous row's mortar is already pretty well set up by then.

    I think I will have used at least 4 bags of thinset my the time it's done. It's an open question whether it will stretch to a fifth bag. To any professional tile setter, that probably sounds like a heck of a lot for a tub surround, even granting that I'm going all the way up to the ceiling.

View all 28 project logs

Enjoy this project?

Share

Discussions

Similar Projects

Does this project spark your interest?

Become a member to follow this project and never miss any updates