Close
0%
0%

laptop2pi

Frankentop (noun): A laptop created by combining parts from disparate computers, e.g. an HP 1101 combined with a Pi Zero.

Similar projects worth following

I needed a Pi laptop to work on my projects while commuting on mass transit. Unfortunately, I can't afford one at this time. But with a little creativity, and an old laptop I had on hand, I managed to bodge together something that does the job for only a few dollars. You can too!

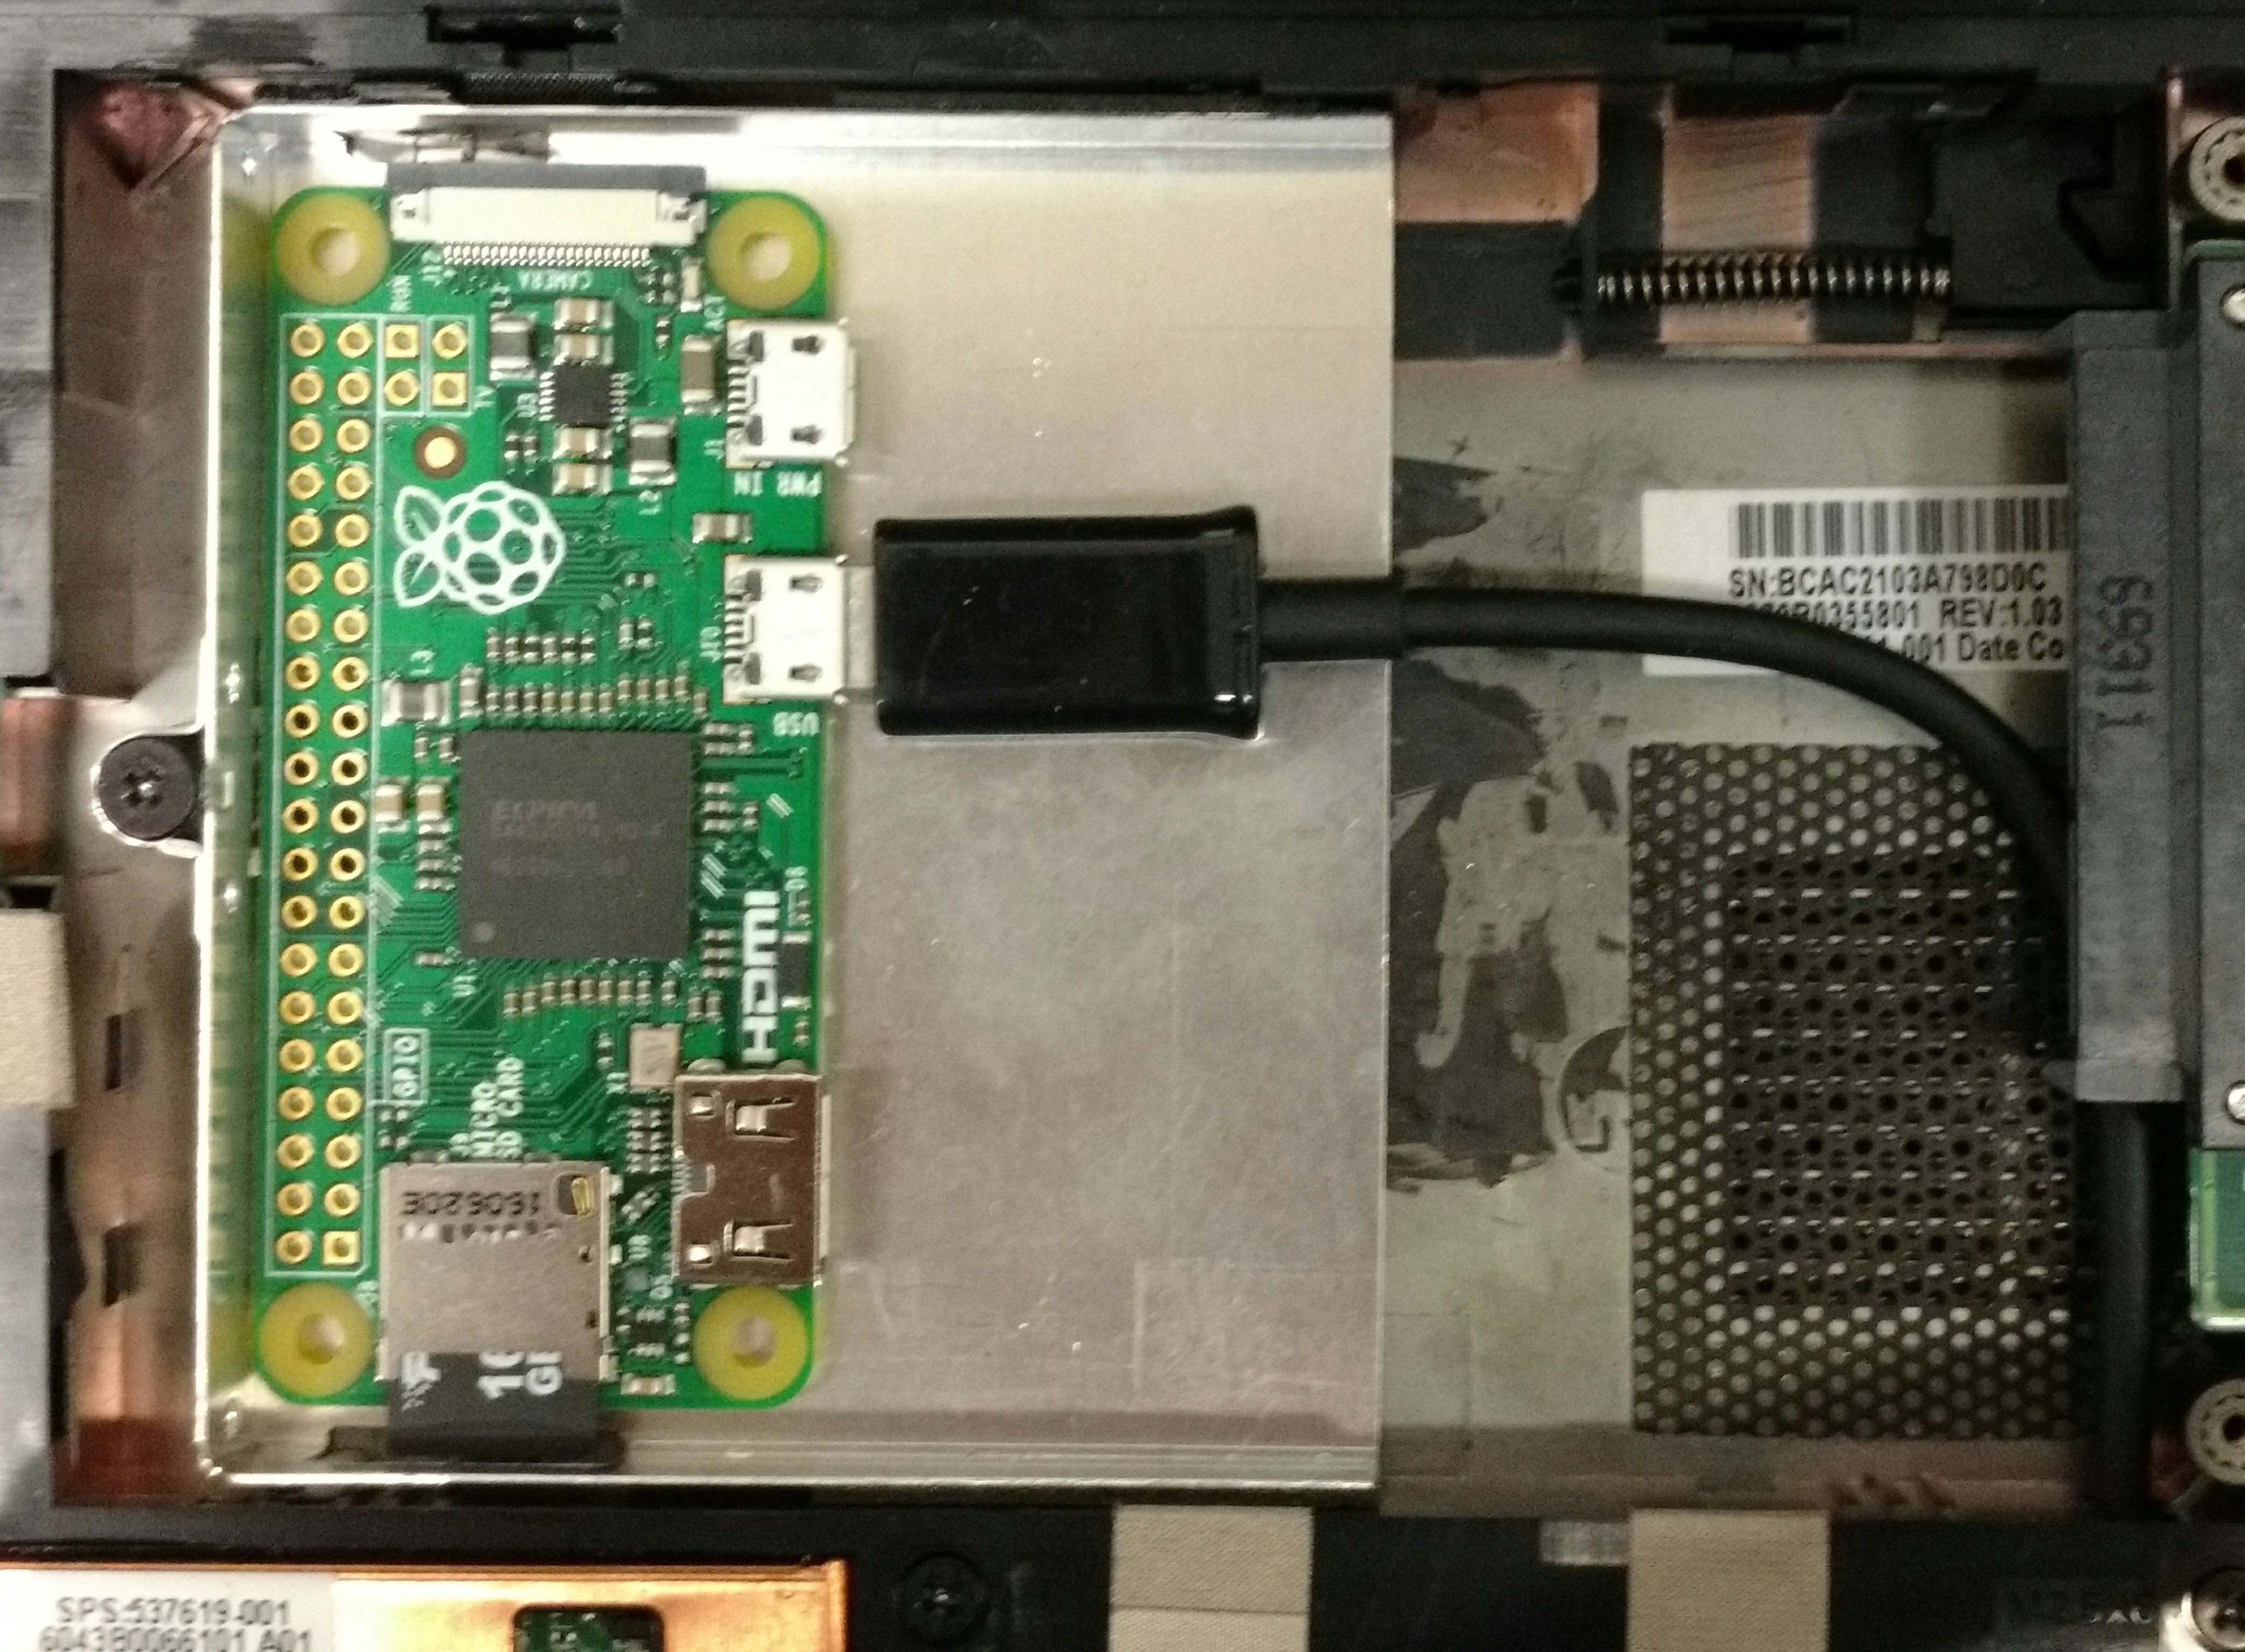
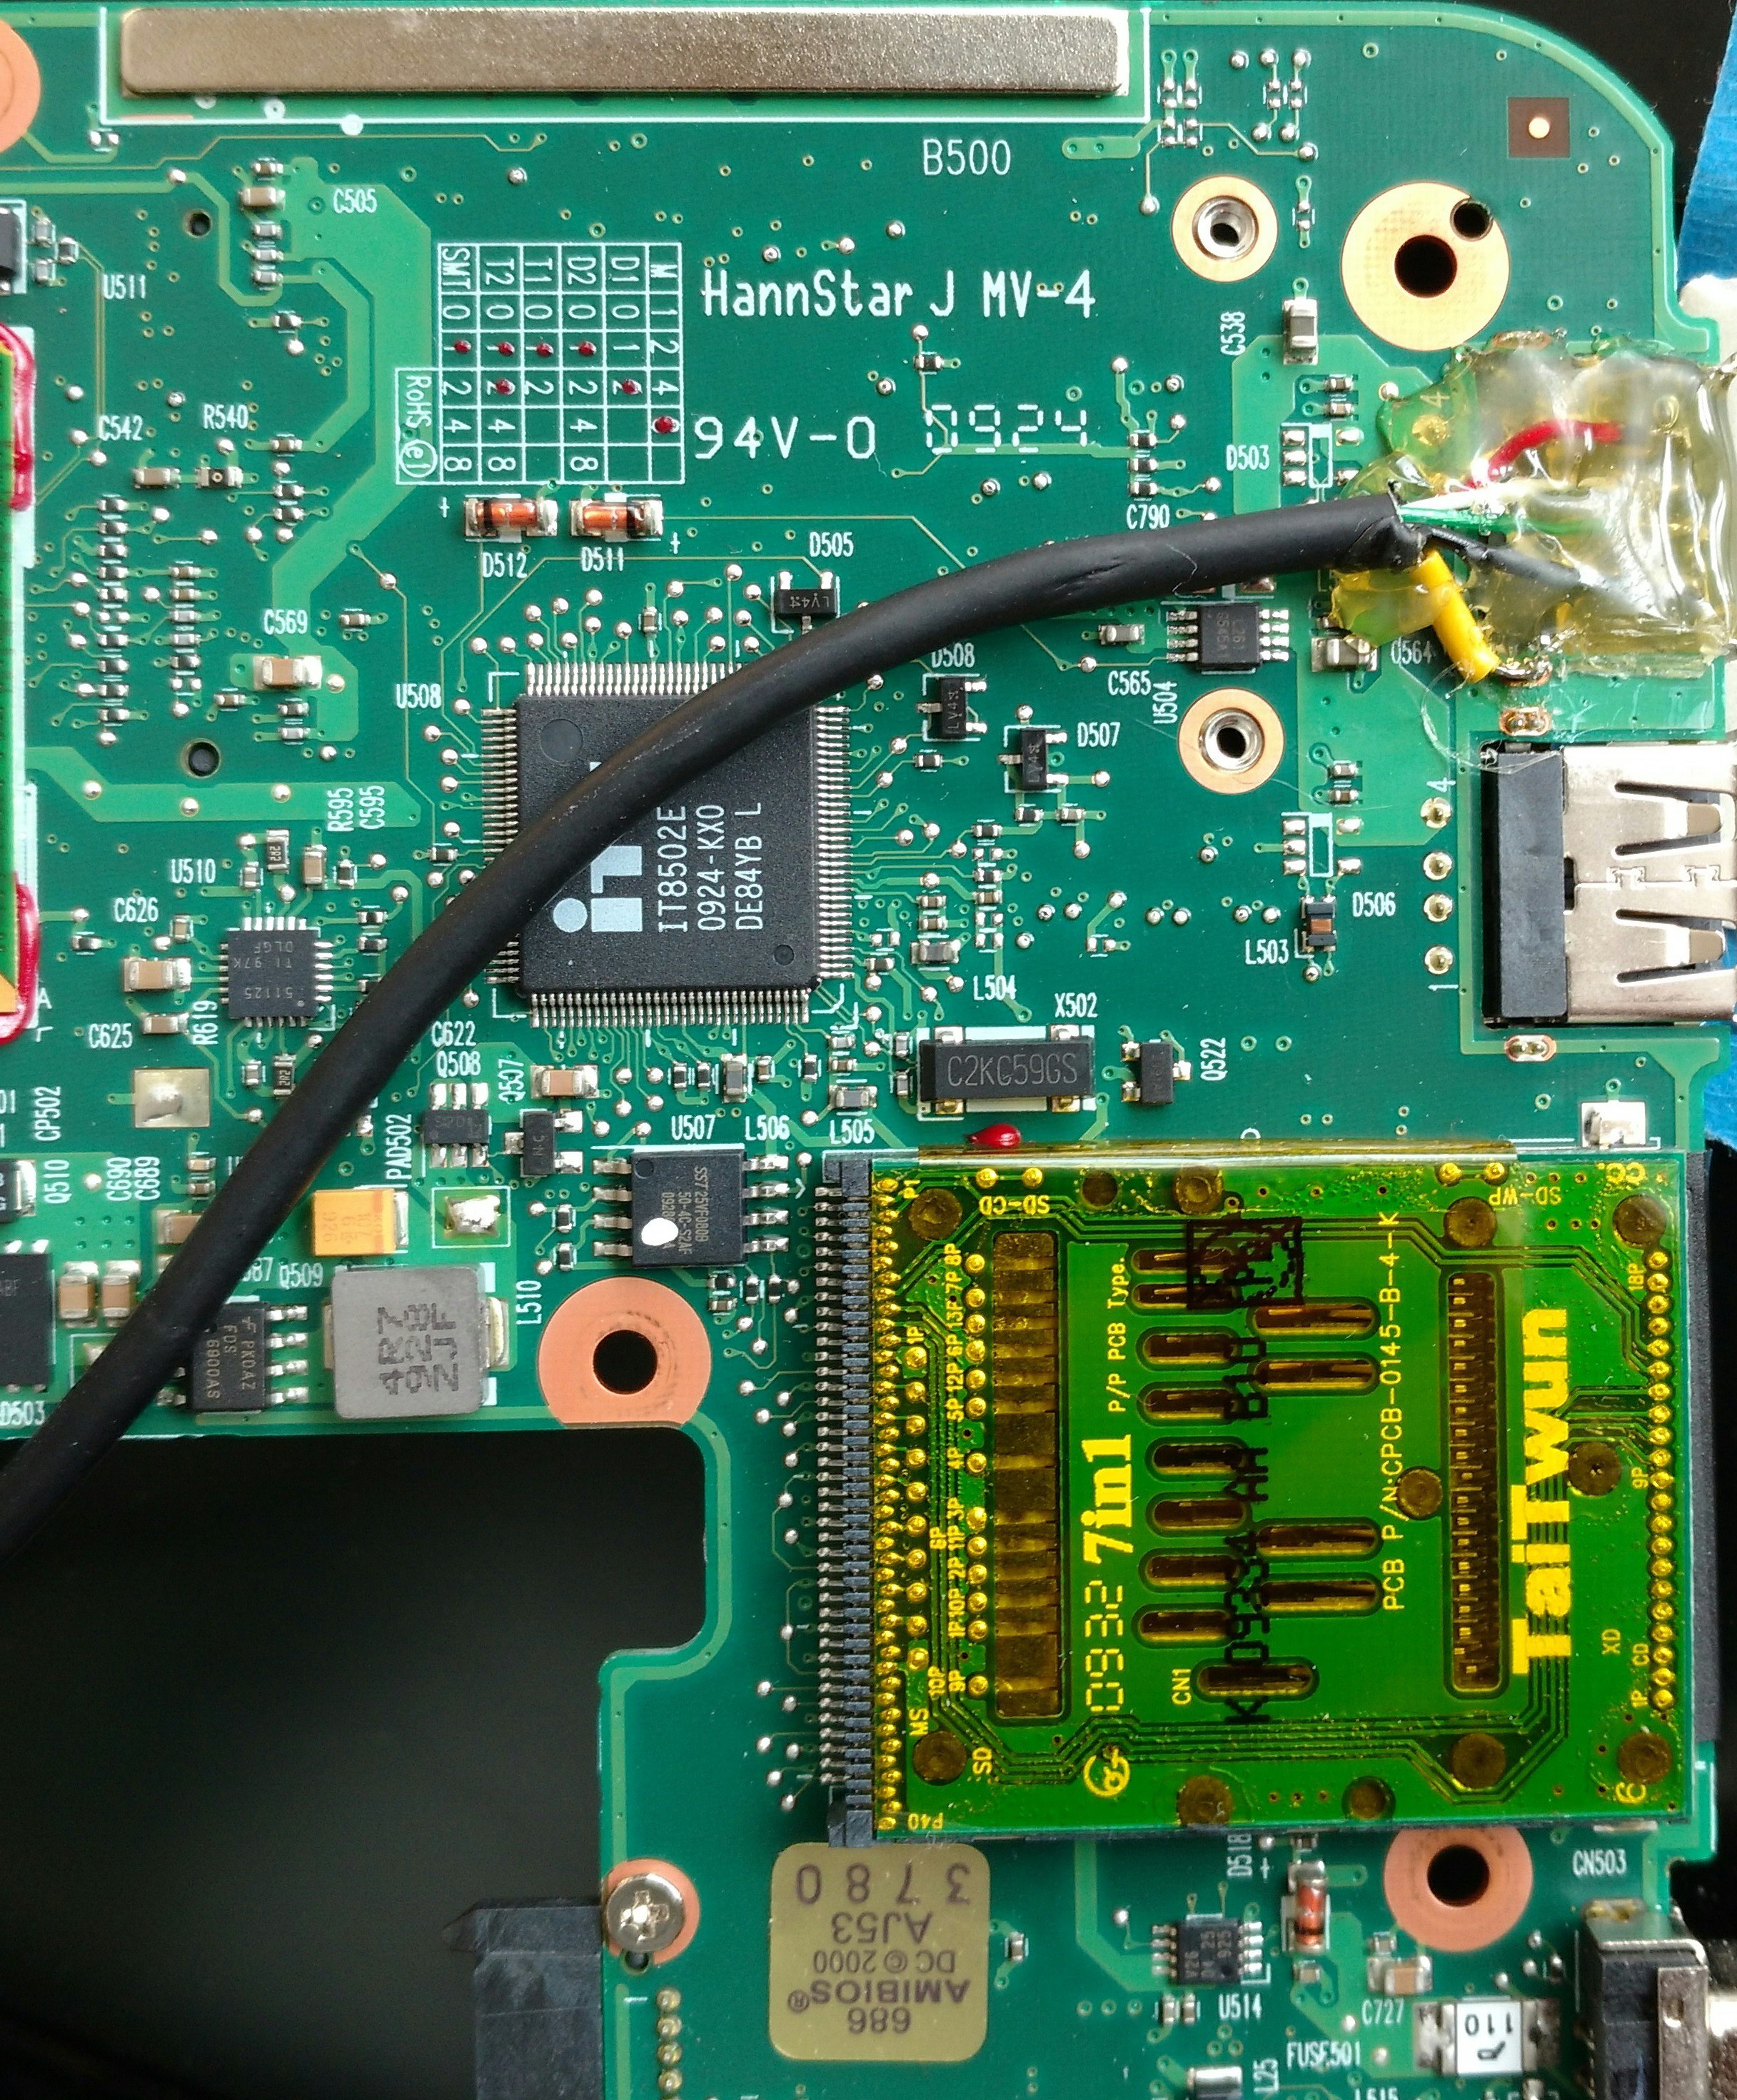
If you're of a certain vintage you'll remember the coprocessor boards that were all the rage in the 80s. The most famous was the Microsoft Z-80 SoftCard: once installed, it allowed you to run CP/M programs on the Apple II. This project is a lot like that - it's a Pi Zero, installed inside an x86 laptop as a co-processor, that lets you run Pi software natively. Note that it's installed INSIDE the laptop: remotely accessing a Zero via Ethernet emulation and a USB cable is nothing new, but to my knowledge this is the first installed inside the laptop case.

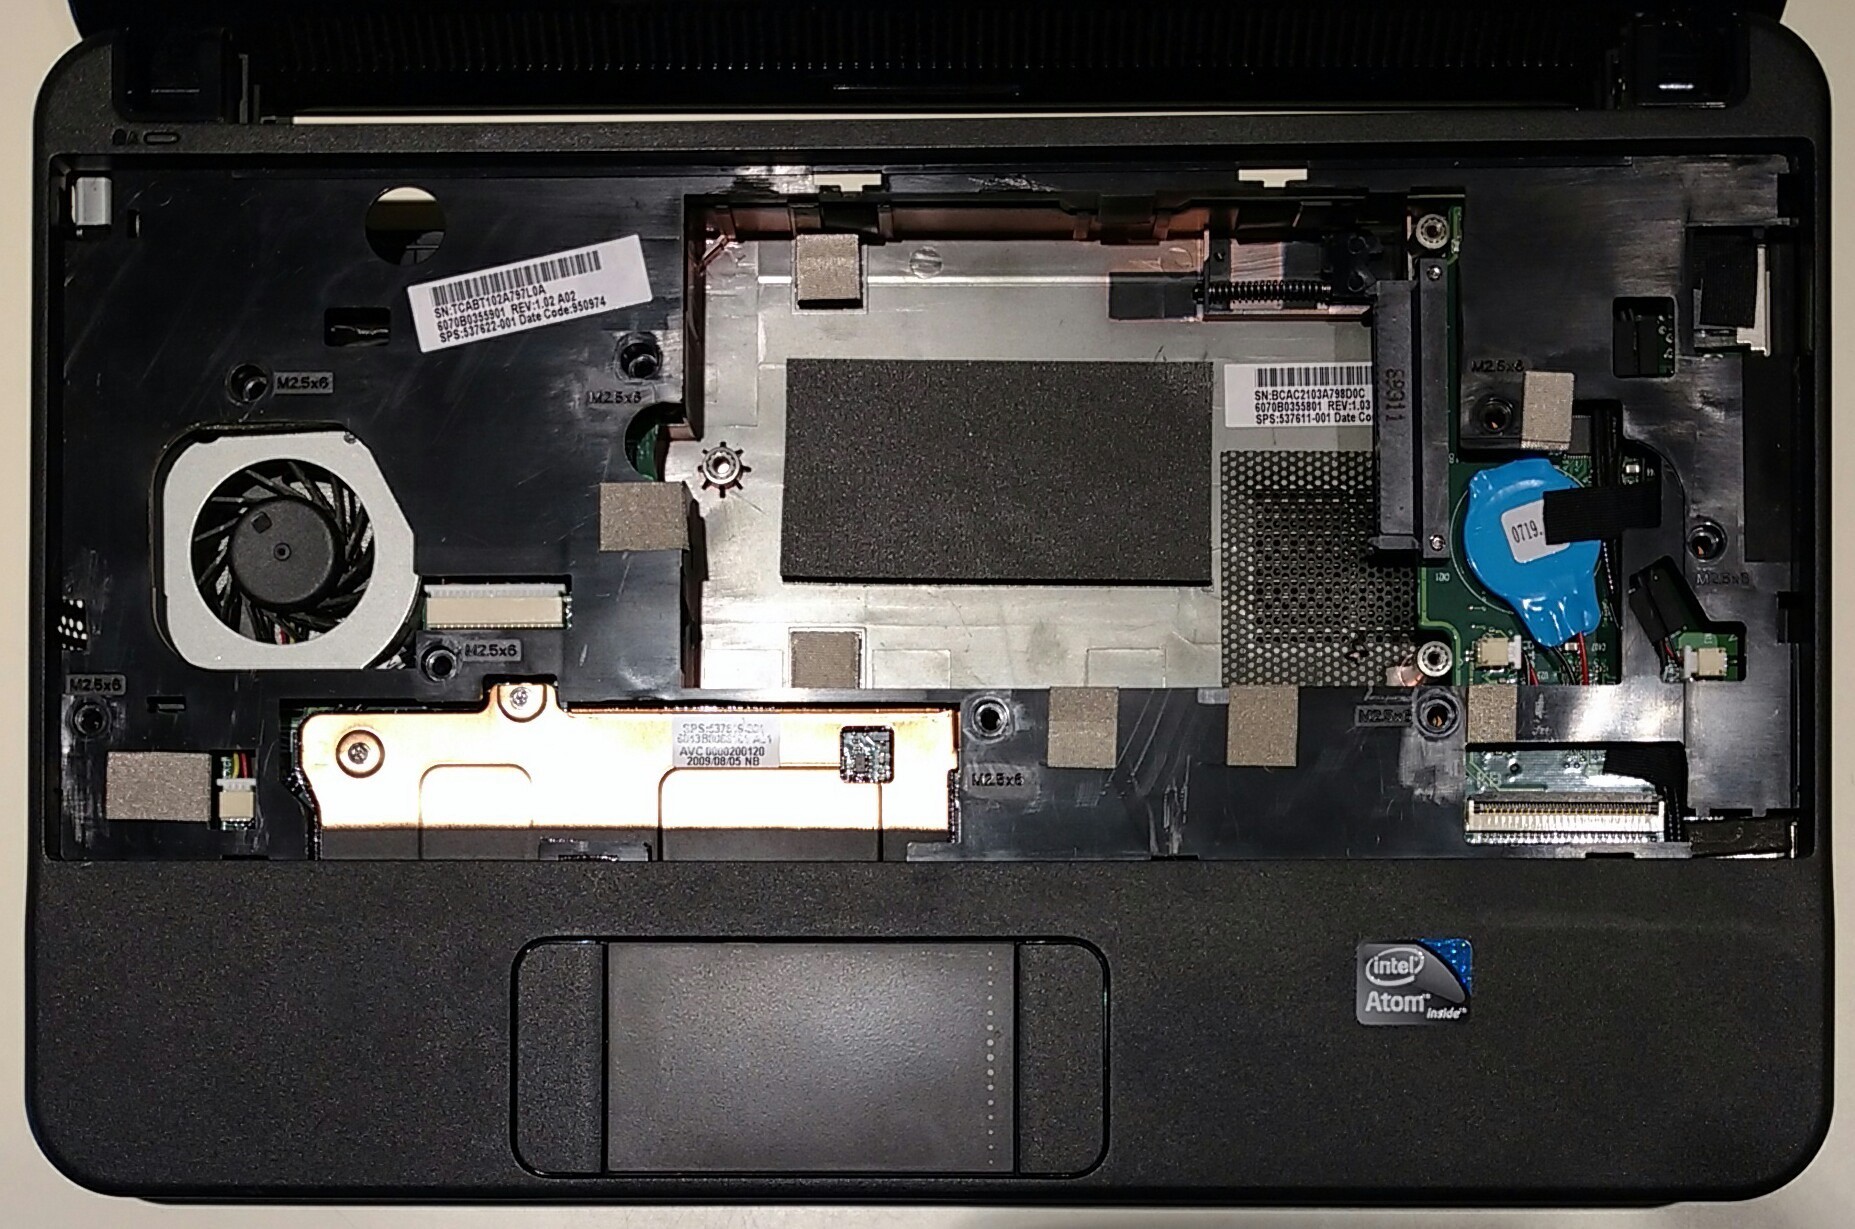
This project has another unique twist to it - the Zero also emulates a mass storage device. This allows the laptop to boot from the emulated drive into Linux, for e.g. Pixel for PC and Mac. Therefore the hard disk can be removed, which creates a nice place to mount the Zero! Yes, I know that I could boot from a flash drive, and there are several that are really tiny, but it's just cooler (and a little less expensive) to have the Zero do everything, right?

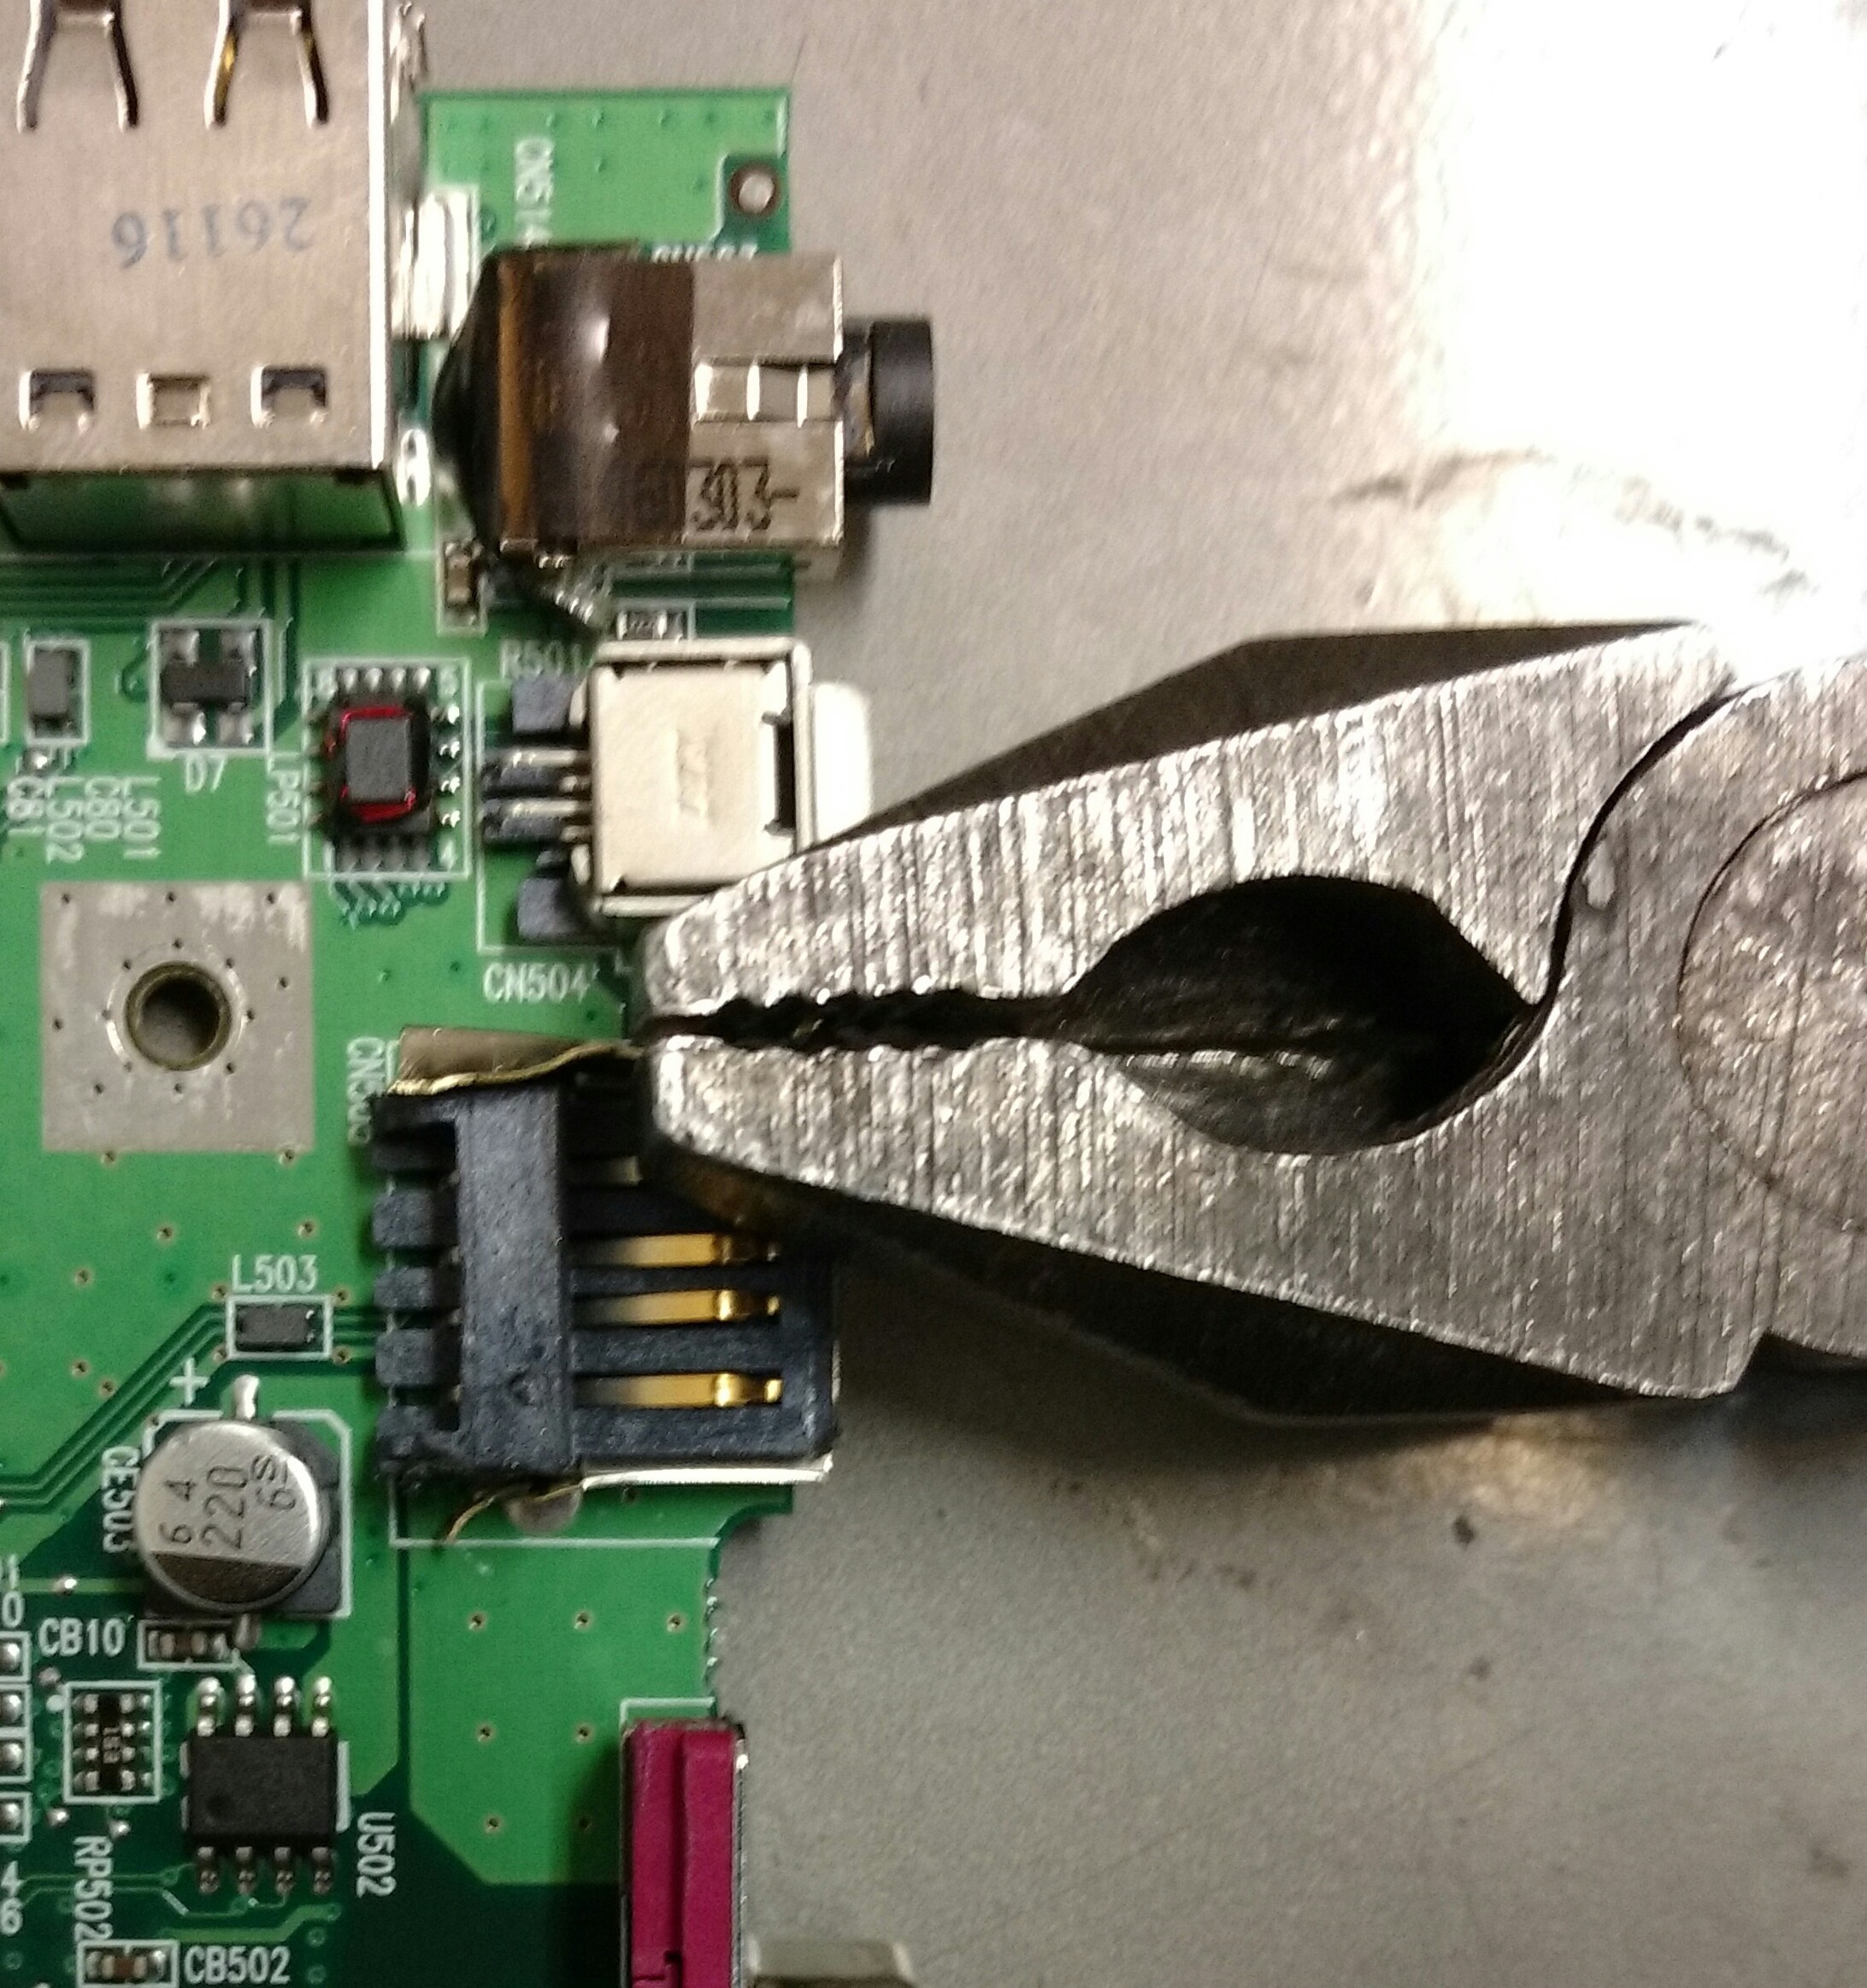
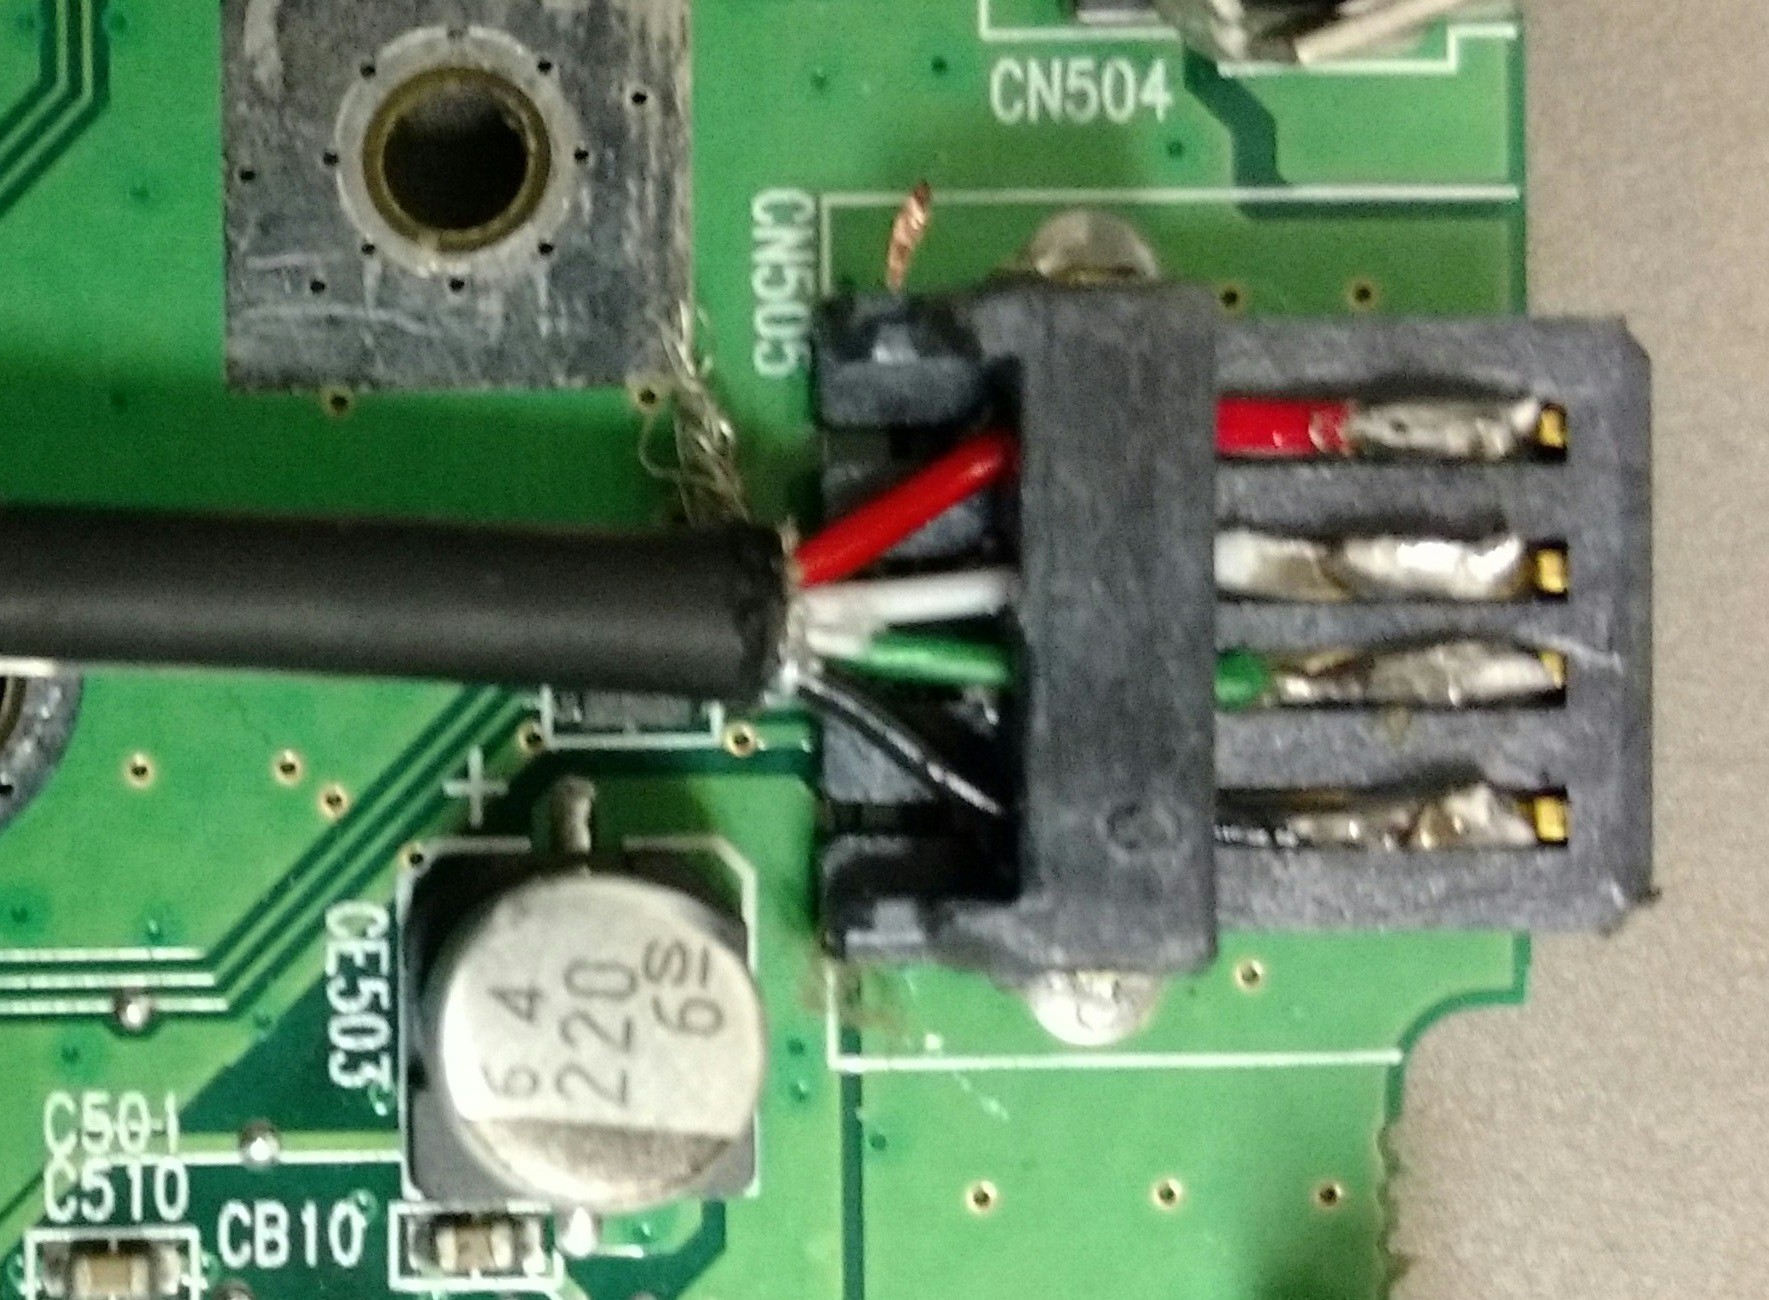
I started this project with a design where an unmodified laptop accessed a Zero via WiFi, then wound up with what you see here (see the logs). That's not unusual, but in this case everything became more compact and less expensive. I really like when this happens!

rc.local

/etc/rc.local replacement for the Zero, starts watchdog and sets up gadgets

local - 1.30 kB - 02/05/2017 at 18:17

Download

watchdog.sh

cleanly shuts off the Zero after the laptop is halted

x-shellscript - 606.00 bytes - 02/05/2017 at 18:13

Download

setup.sh

script to build a micro SD card for the Zero

x-shellscript - 2.77 kB - 02/05/2017 at 18:13

Download

poweroff.sh

safe poweroff command for the laptop

x-shellscript - 33.00 bytes - 02/05/2017 at 18:08

Download

ssh.sh

connect to the Zero via a text (ssh) session

x-shellscript - 112.00 bytes - 02/05/2017 at 18:08

Download

View all 7 files

  • 1 × x86 laptop, 1.0 GHz or faster, 1G or more RAM, no HD needed (you should be able to find one for free that is being discarded)
  • 1 × Pi Zero
  • 1 × micro-SD card, at least 16G
  • 1 × micro to USB cable (must not be OTG or charging only cable)
  • 1 × 8G or larger USB flash drive (you only really need this for setup, but it's nice to have it on hand for rescue purposes)

View all 14 components

  • write-up re-written

    mincepi02/05/2017 at 19:29 0 comments

    You remember an earlier log where I couldn't get the SD card making script working on Pixel_x86, and had to fall back to using another Pi? It turns out it was the fault of my Compaq craptop. The script works fine on a couple of other laptops, so I've changed the instructions and parts list.

    This Compaq has given me grief in the past: it has several odd behaviors, including not being able to boot from the Zero. I think it's time to retire it.

    I made several edits to the instructions to make them clearer. I also uploaded a couple of new scripts, and changed the setup script a bit. Now NAT works easily to allow the Zero to access the Internet. And remote X is easier to use.

    I'm going to mark this project completed. That doesn't mean I won't be making changes in the future, just nothing major.

  • write-up finished

    mincepi02/03/2017 at 00:38 0 comments

    I've finished the write-up, and added some pictures. I hope my writing isn't too confusing.

    Remote X is running, and I added instructions for it to the write-up.

    I've been using the laptop (Frankentop?) on my daily commute, and it's working well. Now I can get all of the unfinished/unupdated bits of my projects taken care of!

    Next is trying to get the SD setup script running under Pixel_x86. As I mentioned before, I can't completely copy the ISO image using the laptop. I think it's something having to do with udev and automounting. Wish me luck!

  • day nine - writing write-up

    mincepi01/31/2017 at 01:00 0 comments

    I've finished a preliminary write-up. After writing everything down it looks a lot more complicated than I remember when building mine. It probably shouldn't be someone's first project.

    It desperately needs pictures! I've already taken a few but I haven't posted them. I didn't take any details of the USB wiring though. I should probably solder a cable to an old USB jack and take one. Maybe in the next few days.

  • day eight - boot weirdness

    mincepi01/30/2017 at 22:00 0 comments

    I discovered something interesting: I thought this project was working on my Mini 510, but it turns out I hadn't tested it enough. It hangs during Xwindow load, and I haven't been able to figure out the reason why. I only testing the 510, I won't actually be using it, so it doesn't cause me a problem personally. Therefore you should test your own laptop to make sure this setup will work. As a workaround you can use a flash drive to boot your laptop.

    I also had a problem which consumed a bit of time tracking down: an SD card set up with the script would work on a laptop for the first boot, but on the second it would hang. The card that was set up manually worked fine. What was different? After a couple of hours I tracked it down to this: when I wrote my setup script I decided not to put dwc2 in the modules load file. I assumed it wasn't necessary since I put the dwc2 overlay callout in the /boot/config.txt file. Turns out it WAS necessary. But why did it work at all as a mass storage gadget without dwc2 loaded? The only thing I can think of is that the normal USB driver already contains some gadget supporting code, but not quite enough. Maybe the foundation is slowly combining the two drivers. But working on first boot, where there isn't a second partition set up on the mass storage gadget, then failing when a second partition is present, is a bit of a puzzle. I'll have to remember to test all changes PRIOR to writing instruction/setup scripts in the future. It's the old "change one thing at a time" rule I should have learned a long time ago.

    And here's another bit of weirdness: long or failed boots if the laptop SD card reader has something in it. Even if it's just an empty micro to full size SD adapter. This only happens during boot: the reader can be used after startup. I figured this out almost by accident: one of my laptops had a card adapter in it, the other didn't. It pays to strip things down to basics when testing.

    It's something to watch out for on your own laptop.

  • day seven - it's the documentation, stupid

    mincepi01/30/2017 at 21:25 0 comments

    I started writing down the steps I took to set things up. It got pretty long, so I decided to write a setup shell script to do all the work. It'll come in handy when a new version of Raspbian or Pixel_x86 comes out and I need to make a new SD card. And of course it'll make it easier for my dear readers to do this themselves. The setup script should be well-documented (doesn't everyone say that?), so have a look at what I did.

    I learned a lot about scripting partitioning software. Did you know you can call parted with parameters to do simple tasks such as add or delete a partition? Not documented is the fact that you can't do negative sizes, such as -4000, which means "4000 meg from the end of the disk". Which I of course needed to do. Parted thinks it's a parameter since it starts with a dash. So I had to pipe the command into parted using echo. Kind of makes the scripting ability useless.

    This workaround was necessary because I decided to use a partition instead of an image file as a backing store for the mass storage gadget. Why? it should be a bit faster. Or so I imagine.

    I also had to do some funny things to try and find the drive designation of the SD card. I didn't want to have the user enter this if at all possible, since it takes a fair bit of Linux experience to find this out reliably. I personally have no problem using dmesg for this, but then I've been doing this for quite a while.

    I also ran into a bit of a weird problem - Pixel on a laptop behaves quite differently than a Pi when it comes to disk mounting and copying. First, when you eject a disk on the Pi using the desktop control, the disk can still be manually mounted. But on the laptop, when you eject, the disk disappears. The kernel no longer sees it. You have to unplug and re-plug it to get it back.

    But there's a more vexing problem - if I make a new partition and then copy the Pixel_x86 iso to it I can only copy part of it. It seems as soon as I copy the first few sectors. which contains the partition table, the kernel recognises it as a kind of extended disk. And since this disk is marked read-only (because it's a DVD image), the kernel suddenly halts copying. I tried copying from the beginning of the disk with an offset, but couldn't get this to work either.

    A Raspberry Pi doesn't exhibit this behavior. So you'll need an operating Pi to set things up instead of just using the laptop running Pixel_x86 from a DVD or flash drive. I was trying to avoid this since folks might not have one available. I don't feel too bad though, a second Pi is a handy thing to have when working with Pi Zeros.

  • day six - shutdown shenanigans

    mincepi01/30/2017 at 20:52 0 comments

    There's one problem with this setup: shutdowns.

    The laptop needs to save state to the mass storage device when halted in persistent mode. After the laptop has halted the Pi Zero needs to shutdown properly. But you can't communicate with the Zero to shut it down because the laptop is halted. What to do?

    I solved this with a watchdog shell script on the Zero. It first waits until the laptop responds to pings, then when the laptop no longer responds it shuts down the Zero. That way it gets a graceful shutdown after the laptop halts. I also built in a timeout: if the laptop doesn't initially respond for three minutes the Zero shuts down anyway. This handles the case of the laptop failing to boot up properly. You also shouldn't shut down the Zero from it's command line: I'll probably remove or rename the shutdown and poweroff commands to fix this.

    Yes, I know a poweroff button on the Zero would be the best solution. There's even a device tree overlay to make this simple. But I'm trying to keep this a minimal project.

    You also should never use the poweroff command on the laptop - it kills power to the Zero while it's still running. (That was a bit of a surprise the first time I did it - I hadn't thought things through.) That's bad for the SD card. So, I'll probably remove the poweroff binary, make a new shutdown replacement shellscript that can only do halts, and modify the shutdown command in the window manager. That should cover all cases.

    I'll do the file munging later. For now I'll just have to be careful!

  • day five - working perfectly

    mincepi01/27/2017 at 17:25 0 comments

    I finally figured out configfs and got everything working on my Mini 510. I had to read several how-tos and the kernel documentation to understand it.

    It just goes to show you can solve almost any problem with software!

    I was able to mount the Zero in the drive bay by modifying the original hard drive carrier. I could have just stuck it down with foam tape, but this way I can remove the Zero by undoing one screw. Kind of handy if you need to change the SD card. Running the USB cable required only a bit of plastic trimming. I broke off part of the shell of one of the USB ports, stripped the cable end, and soldered it to the port. A blob of hot glue protects the connections. After the laptop was re-assembled I could hardly tell it was modified.

    And there's enough room in the drive bay for any (small) project I'm working on!

  • day four - mostly working

    mincepi01/27/2017 at 03:10 0 comments

    Using the composite gadget module the Zero is emulating a flash drive and an Ethernet device at the same time. Like usual, it was pretty easy because of other people's hard work documenting what they did.

    The problem is it works and boots up Pixel_x86 on everything but my HP Mini 510. I think it's BIOS is somewhat broken - it's probably enumerating only the first function of the composite device (which isn't mass storage), then giving up.

    That means I'm going to have to bite the bullet and learn how to use libcomposite and configfs. This should give me more control over enumeration order. I've been avoiding this since it looks complicated and easy to break. But I also need to learn it for some of my other projects, so off I go.

  • day three - it gets even better

    mincepi01/27/2017 at 03:02 0 comments

    I have gadget mode working as an Ethernet adapter. There are lots of good how-tos available for this which helped greatly. That's one of the perks of using a Raspberry Pi I guess.

    Then I realized something interesting - gadget mode can emulate more than one device. So the Zero could be both an Ethernet gadget and a mass storage gadget. That would allow me to boot the laptop from the Zero, no USB flash drive needed. That's a bit of a bummer - I no longer get to use that cute little flash drive I just bought.

    So things just got even simpler. At least hardware wise: software configuration will be more difficult.

  • day two - an epiphany

    mincepi01/27/2017 at 02:53 0 comments

    Well, that design didn't last long.

    I bought a really tiny flash drive and loaded Pixel_x86 on it. It worked really well with the HP Mini. Pixel_x86 also has a persistent mode that stores changes to the USB drive if you boot from one, and works really well. So I decided the hard drive was redundant, and removed it to save weight. Thus, I was faced with a rather large cavity where the drive had been:

    Then it hit me - why not put a Pi Zero there? I could run a cable inside the laptop from the Zero to one of the USB ports. I could then access the Pi via USB gadget mode, and everything would be internal and protected.

    My objections (see previous log) to using gadget mode to access a Pi were nullified. So the portable WiFi Pi is no more. And the project just got a lot simpler and less expensive.

View all 11 project logs

  • 1
    Step 1

    These instructions assume some familiarity with the Pi and it's command line. You're also going to be disassembling the laptop, cutting bits away, and soldering. Make sure you're comfortable with that.

    PREPARE THE SD CARD FOR THE ZERO

    • Download the latest Pixel_x86 iso from here and copy it to the flash drive using the same method you'd use to copy a Raspbian image to an SD card (Win32DiskImager, dd, etc). Don't worry that it's not an .img file.
    • Plug the flash drive into the laptop and boot from it. You may need to configure the laptop's BIOS to allow USB booting.
    • Get some kind of network connection working on the laptop.
    • Download the latest Raspbian image from here, unzip it and rename the image to raspbian.img
    • Download the latest Pixel_x86 iso from here and rename it to pixel.iso
    • If you're using the Pixel_x86 dated 12/2016, you need to upgrade Chromium. Run the following command: apt-get update;apt-get install chromium
    • Download setup.sh, rc.local, and watchdog.sh from this project's files page. You might want to have a look at the setup.sh script so you're familiar with what it does.
    • Insert the SD card into the card reader and plug it into a free USB port on the laptop.
    • Change to the directory where the downloaded files are and run : sudo ./setup.sh
    • After it finishes (it can take a half hour) remove the card reader, remove the SD card from it and insert the SD card into the Pi Zero.

    TEST IT OUT

    • Power off the laptop and remove the flash drive.
    • Connect the Pi Zero to the laptop with the USB cable.
    • Power up the laptop. You need to delay booting for around 40 seconds until the emulated flash drive is ready. Set a boot delay, go into BIOS setup, request a boot menu, whatever. CTL-ALT-DEL is your friend.
    • As soon as the Pixel desktop appears start a terminal and type: sudo ifconfig usb0 10.0.0.2
    • To make the network configuration automatic, add the following two lines to /etc/dhcpcd.conf:

    interface usb0

    static ip_address=10.0.0.2

    • and add the following two lines to /etc/network/interfaces:

    allow-hotplug usb0

    iface usb0 inet manual

    • Change any laptop preferences, such as the keyboard layout.
    • To connect to the Zero type: ssh pi@10.0.0.1
    • Type yes to accept the connection, then enter raspberry as the password. You are now connected to the Zero and can finish setting it up, such as changing the password.
    • To close the connection to the Zero type: exit
    • To shut everything down, open a terminal on the laptop and type: shutdown -H now
    • In about 25 seconds the Pi Zero will automatically shut down. You know it's shut down when it's LED stays off.
    • You can now power off the laptop with it's power button. You may have to hold it down for several seconds.

    TO AVOID SD CARD CORRUPTION

    • To shut down, type "shutdown -H now" in a terminal window on the laptop. Never use any other command. Never use the desktop shutdown menu options.
    • Never use any type of shutdown or poweroff command on the Pi Zero. The watchdog script will automatically power it off around 25 seconds after the laptop halts, or anytime the Pi can't successfully ping the laptop at 10.0.0.2.
    • If for some reason the laptop doesn't boot up, the Zero will shut itself off 180 seconds from power-up. Only then is it safe to turn off the laptop using it's power button.


    MOUNTING THE ZERO

    Once everything is working (try a few boot cycles to be sure), you can mount the Zero inside the laptop. I'm going to leave the specifics on how to do this up to you. It will certainly require partial disassembly of the laptop. Seek out Internet videos to help with that.

    The Zero can be located in the hard disk bay, the CDROM bay, the second battery bay, or any other place it will fit. Remember to provide some way to remove/insert the SD card in the Zero and to leave room for the micro USB connector. Secure the Zero with double sided tape, Velcro, or something similar. Laptop internal plastic is often coated with conductive paint, so make sure the Zero is insulated from it.

    On my laptop the hard disk bay is directly below the keyboard, so I leave the keyboard unsecured and I lift it up to access the Zero. You may be able to do something similar if your hard disk is below the keyboard. If there is plastic in the way you can probably cut it out. If your hard disk is below the palm rest area you'll have to access the Zero from the bottom of the laptop. This is the time to be creative!

    Here's what mine looks like with the keyboard lifted up. I cut down and inverted the hard disk carrier so the Zero could be removed by undoing one screw:

    Find a path to route the USB cable inside the laptop to one of the USB ports. Remove part of the metal shell from the laptop's USB connector to expose the contacts:

    Cut the cable to the proper length (measure twice, cut once!) strip the end, then solder the wires to the contacts. Only strip as much as absolutely necessary to preserve USB signal integrity. You might also want to solder some of the shield wires to a good ground, such as what's left of the metal shell:

    MAKE SURE YOU WIRE IT PROPERLY. The USB color codes are standardized, but that doesn't mean the cable manufacturer followed them! Double check everything, especially the power wires. A micro USB breakout would be a handy tool to have. Getting the data wires reversed won't cause any permanent damage, it just won't work, but reversed power wires will destroy the Zero. (If you have a Pi A+, B+. 2, or 3, you can use it as a power polarity tester since it has reverse protection circuitry and won't be damaged. If it powers up you know the power wiring is correct.)

    Cover the soldered connections in hot glue. Here's what it looks like on my HP Mini 110. It's ugly but it works:

    It's always a good idea to test it out before full reassembly. You know the saying, "test twice, assemble once". Or something like that. Reassemble the laptop and you're done!

    REMOTE X

    Download the XWindow.sh script to the laptop and run it. It will switch to vt8, and after 10 seconds present you with a login prompt for the Zero. Log in, and after about 20 seconds you will have a full graphical desktop connected to the Zero. You can switch back and forth between the laptop and the Zero using Ctrl-Alt-F7 and Ctrl-Alt-F8. Exiting the terminal window will kill the connection.

    The XWindow system was designed to be used remotely, where the display is on a different computer than the one running the programs. That's exactly the setup we have here. I prefer this arrangement over using VNC, but you can use it if you wish.

    INTERNET CONNECTION SHARING

    Get an Internet connection working on the laptop, download the nat.sh script to the laptop, and run it. The Zero will now be able to access the Internet via the laptop. Note that the script will need to be re-run after each laptop boot. I've done it this way for security reasons, you can set the script to automatically run on each boot if you wish.

    If you build this please let me know!

    Also, if you notice any problems with these instructions please contact me (hackaday.io message or mincepi at gmail dot com) so I can fix them.

View all instructions

Enjoy this project?

Share

Discussions

Clint wrote 12/22/2017 at 06:10 point

Love this project!  Any chance it can be done using a Pi3B?

  Are you sure? yes | no

Arya wrote 05/28/2017 at 03:34 point

Just came to my mind that, if this laptop originally had the disaster of a GPU called PowerVR, it's now much, much more capable, actually =) Also, check out #pyLCI - Linux Control Interface , I developed it with small projects in mind and it can be used with OLEDs, small LCDs etc. etc. - just needs a Python driver.

  Are you sure? yes | no

ksemedical wrote 02/07/2017 at 15:42 point

pretty cool idea and implementation, and nice write up. Thank you :)

  Are you sure? yes | no

Arya wrote 02/05/2017 at 18:58 point

Awesome project! Keep it up, will be waiting for more projects like this one =)

  Are you sure? yes | no

mincepi wrote 02/05/2017 at 19:32 point

Will do. I really enjoy tinkering with USB gadget mode!

  Are you sure? yes | no

Eric Hertz wrote 02/05/2017 at 03:07 point

Weird. I didn't get it originally, but with the new writeups, now I think I do... So you're running a Pi inside the laptop, and basically remote-desktoping/VNCing to the Pi...? Giving me some ideas, here...

  Are you sure? yes | no

mincepi wrote 02/05/2017 at 17:57 point

That's right. In addition the Pi replaces the laptop HD by emulating a mass storage device.

All of this is possible using Linux USB gadget mode. You can emulate quite a wide range of devices using a Zero, and even several at the same time. In this case, think of the Zero as emulating a USB hub with both a flash drive and a USB Ethernet adapter plugged into it. And the Ethernet adapter is connected to a Pi via an Ethernet cable. That's what this unholy mess looks like from the point of view of the laptop.

I'm glad to hear the write-up is improved. I'm going to work on it some more!

  Are you sure? yes | no

Eric Hertz wrote 02/05/2017 at 22:55 point

That's awesome when your laptop can boot from USB! I'm still not sure I see why having a Pi-based laptop makes more sense than, say, the Pentium4 already installed in the laptop *unless* the point is to develop for Pis to be used in other circumstances. But I'm sure y'all have your reasons ;)

For my own purposes, am thinking about this, though, as essentially a means to give a brain-upgrade to much older computers... E.G. my Toshiba T200 486-based tablet, or my Pentium150 laptop, or my iOpener. A bit difficult since they either don't have USB, or can't boot from it, but maybe enough Pi GPIOs could emulate IDE... maybe a custom "partition" that'd be nothing but streaming-video for the original display... another for I/O. Hmmm... Where you've built a USB computer-upgrade, maybe an IDE computer-upgrade is only a [dozen] step[s] away :)

  Are you sure? yes | no

Similar Projects

Does this project spark your interest?

Become a member to follow this project and never miss any updates