Close
0%
0%

Cable Six Axis Robotic Arm

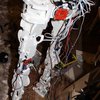
This six axis robot arm is controlled by hand with 6 slide controls. It is an experimental project to research movements and for challenges.

Similar projects worth following
This six axis robot arm is my first prototype and i already have some ideas for an advanced version with this pull cable schematic.
All axis are cable driven and controlled by hand in the base of the 6 axis robotic arm.

Hello this is 3DMeister Julius and i hope you like this project and my english.

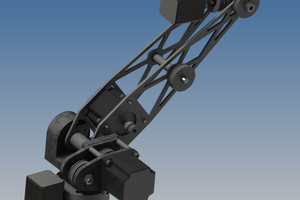
This is an experimental prototype for a manual controlled mechanic 6 axis robot arm.

All 6 axis are connected across a cable with the slider controllers. 3 rotation axis and 3 pivot hinges can turn and lift at the same time with closed loop cables.

The controls are on the base of the arm. This is where all cable loop. Each loop is connected to a sliding knob.

By operating the slider, the cable gets pulled on one side and therefor it lifts or rotates the axis on the arm.

All cables must go through the center of the arm and they must bend in the center with each axis. The rotation axis twists the cables so they must be well sorted for minimal friction in any position.

The hinges work in an 180 degree angle and the rotation axis can turn more than once.

I got a very good result in this first arm without noticable interference between the cables during all positions of the 6 axis arm.

The structure is made of a quality plastic with very good sliding abilities because i made everything without ball bearings in this simplified prototype.

The cable are also plastic plump cords with few thick fibers and wich can hold about 15kg .

The sliding controllers hold there position when there is a tension on any cable after trough lifting and moving the axis. This happens with an anchor in the slider.

At the end of the arm, there is another hole for the tools to activate by another cable.

It is all very tricky and i hope i can make a second version with optimal proportions, ball bearings and even add stepper motors to the cables.

This is the first video review with some test movements. More will come.

Slide Bar Six Axis Controls Kopie.jpg

Slide Bar Six Axis Controls

JPEG Image - 720.98 kB - 07/13/2017 at 18:37

Preview

Robotic Arm 6 axis Cable Driven Kopie.jpg

Robotic Arm 6 axis Cable Driven

JPEG Image - 662.25 kB - 07/13/2017 at 18:37

Preview

Sliding Controller Anchor Kopie.jpg

Sliding Controller Anchor

JPEG Image - 790.19 kB - 07/13/2017 at 18:37

Preview

Six Axis Sliding Anchor Switch Kopie.jpg

Six Axis Sliding Anchor Switch

JPEG Image - 798.82 kB - 07/13/2017 at 18:37

Preview

Six Axis Reassemble Tuning Kopie.jpg

Six Axis Reassemble Tuning

JPEG Image - 513.00 kB - 07/13/2017 at 18:37

Preview

View all 28 files

  • 1 × PVC Structure 20mm plastic with good gliding ability for the structure
  • 1 × plumb cable PVC cord with few and thick fibers
  • 1 × Springs For the anchor in the switch
  • 1 × Anchor Special anchor from aluminium

  • 3D Model

    3D Meister07/29/2017 at 10:22 0 comments

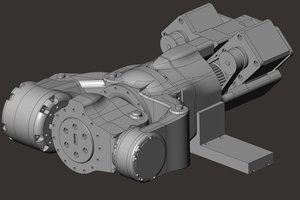
    Please Download and share my 3D Model for this 6 Axis Arm. See how it is made, try to Print it, tune it.

    https://www.thingiverse.com/thing:2448938

  • Next Step

    3D Meister07/26/2017 at 11:22 0 comments

    3DM6X currently is a completed experimental prototype. 

    The experiment was a success, next step will be to make a Real Cable Driven Electric Powered Robot Arm.

    Ideally with stepper in the base and encoder on the axis.

    Different sizes for bottom an top joints.

    Different lengths for the structure elements.

    Ball bearings for the hinges and and the bending points of the strings.

    Different material for the structure.

    Strong cables.

    ...

  • Video; How i made this project

    3D Meister07/25/2017 at 19:09 0 comments

  • So Far

    3D Meister07/12/2017 at 20:23 0 comments

    It took me 3 weeks to get this run and it works better than i expected.

    This experiment can be useful for another project, or fun.

    The structure.

    First i had cut the plastic with my CNC machine and make all the features from different sides. I am sure it 3D printable.
    The holes for the pull cables must be rounded for minimum friction.

    The holes for the cables

    The cable have to come out at the right spot and the should not pass any corner. I drilled 1.5mm holes and than i use a hot wire to melt the corners round. they lead always into the center hole of the arm.

    Thread the cables

    Starting from the arm trough the drilled holes and all elements down to the control box where they bend above an arrangement bar to the slider.


    I had it complete and now i disassemble the robotic arm for minimizing the weight and some little tunings. New style and futures cumin up in my next log

View all 5 project logs

Enjoy this project?

Share

Discussions

Dan DWRobotics wrote 07/29/2017 at 10:55 point

Interesting concept. It would certainly cut down on the weight in the arm. You might find you lose a lot of the power of the end effector through the cable transmission though. I like how effective the 'yaw' joints work. I am currently considering a similar system for the upper portion of the arm of my humanoid, although the motor will be in the arm, but the gearing will be via cable transmission similar to this.

  Are you sure? yes | no

3D Meister wrote 07/31/2017 at 12:13 point

I already did cut down the weight by drilling the big extra holes in the structure. However, i will take this concept to a useful project with optimized sizes of the joints, aluminium for lightweight structure, and much more. I definitely think of robot extensions like maybe bot spider legs or humanoid finger joint. If you want to increase the power of the yaw joint, you could use a planetary gear driven by the cable. In my case, the joint radius is limiting the strength to apply with a pull cable.

  Are you sure? yes | no

3D Meister wrote 07/31/2017 at 12:25 point

I lose some power at the cable transmission only in extrem positions a bit. It works much better than i expected. I use good plastic, plastic cables, made nice round channels for the cables and silicon spray erases a lot of friction.

  Are you sure? yes | no

Similar Projects

Does this project spark your interest?

Become a member to follow this project and never miss any updates