 CompuCat
UPDATE: Finally, I bothered to publish the presentation video! Enjoy!
The unit is based around the new Raspberry Pi 2, model B. This allows for faster (though still not lag-free) N64 emulation. The software is a snap with the RetroPie distribution (apt-get updated and upgraded, of course). The Pi's GPIO header, Ethernet jack, and USB ports are removed to save space; a single USB port is glued on to provide connectivity without sacrificing height.
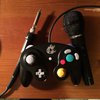
The controls are handled by a Teensy LC, which has the benefit of USB pads on its backside. This allows me to solder it to the Pi without having to solder to the pads of the microUSB connector or actually insert a connector in the unit. I could just use the Pi's GPIO, but this allows me to add analog thumbsticks for N64 games.
The screen is a 3.5 inch car backup LCD off of Amazon/eBay/random Chinese sources. These are quite easy to take apart and modify (and you get free connectors!) However, I needed to add a wire to bypass the internal 5v regulator and a decoupling capacitor to smooth out the power supply and help it lock to the composite video signal. Insulate the driver board with electrical tape, hot-glue it to the back of the display, and Bob's your uncle! Just be careful not to rip the flat-flex connector.
Power is handled by a Adafruit PowerBoost 500c, which charges a 3.7v Li-ion/Li-Po battery and boosts its output to 5v. Quite useful. Power from there is routed to the Pi, which distributes it to the screen and controls.
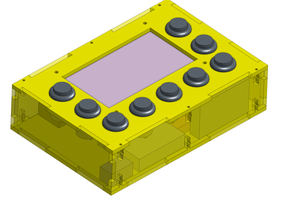
Controls are mounted on 4 pieces of perfboard. Two pieces on the front of the case house tact switches to control the D-pad, face buttons, C buttons (for N64), start/select buttons, and volume controls. A third piece, mounted to the back of the unit, houses the analog stick. A tact switch is mounted to the back of this piece to provide trigger functionality. A fourth piece acts like the analog stick PCB minus the analog stick-it serves only to make the right-hand trigger function.
The case is a 3D-printed model made on a friend's MakerBot Replicator 2, printed in PLA. The front and back halves are each about 5x7 inches. The buttons were printed as a separate insert. All of the 3D files started as 2D sketches in Inkscape, which were then exported to OpenSCAD and extruded.
There are no speakers in the unit due to space concerns as well as the problem of switching between speaker and headphone output. Ports include USB (for uploading ROMs), HDMI, and 3.5mm headphone/composite.
This was inspired by Ben Heckendorn's unit in multiple ways. He actually tipped me off on the 3.5 inch car backup LCD-a cheaper and higher-performance alternative to the PiTFT. (Funnily enough, though, his second Pi portable used a PiTFT to avoid the problems of using the composite out.) I actually had the opportunity to visit him, and he noted that the screen I ordered actually had a different driver board than his. His actually wouldn't work with the 5v regulator bypassed, so he had to use a 7.4v 2 cell Li-ion pack. (Actually, that pack is the same as mine, barring that the cells in his were wired in series while mine were wired in parallel.)
That's about it! I'm probably forgetting something, so I'll update this once I remember it.

 Craig Hissett
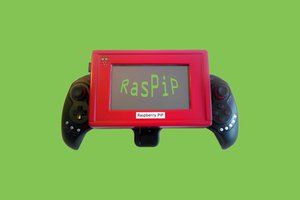
 Elliot Goofe
 Kirschner Christoph
 Bill Peterson
Great build man, looks awesome. I'm sure your friend is gonna love it. The N64 emulator seems to be running pretty good, does every game work or does it depend on the ROM?