Close
0%
0%

IBDAP - Affordable CMSIS-DAP JTAG/SWD Debug Probe

IBDAP's objective is to become an affordable open source & open hardware CMSIS-DAP JTAG/SWD debug probe implemented using gcc & makefile.

Similar projects worth following
Debug adapters are expensive, some could cost thousands of dollars, some may not be compatible among different vendors. Luckily, ARM standardized the debugging interface which is called CMSIS-DAP and released the firmware implementation on some processors, however, you still need a Keil MDK Professional edition software in order to build the firmware, even the open source one provided by mbed and the price for Keil Professional is intimidating. All these barriers has become the first issue that every inventor is facing, and we need a solution!

IBDAP's objective is to become an affordable open source & open hardware CMSIS-DAP JTAG/SWD debug probe implementation using gcc & makefile. Anyone can modify and embed a debug probe on its own device easily with everything under its control.

What’s the current status?

Both the hardware and CMSIS-DAP source codes using gcc are completed and stepping, breakpoints, flashing etc are tested on both debugging itself and nRF51822 processors.

Where to Buy?

Armstart: http://www.armstart.com/products/ibdap-cmsis-dap-jtag-swd-firmware-debug-probe

Tindie: https://www.tindie.com/products/Armstart/ibdap-cmsis-dap-jtagswd-debug-adapter/

eBay: http://www.ebay.com/itm/321800664791

Amazon: http://www.amazon.com/IBDAP-CMSIS-DAP-JTAG-debug-adapter/dp/B012LXN514/ref=sr_1_1?ie=UTF8&qid=1438011109&sr=8-1&keywords=IBDAP

Schematic and Source Codes

Schematic: https://s3.amazonaws.com/armstart/Debug+Tools/IBDAP-LPC11U35/IBDAP-LPC11U35_SCH.pdf

Source code: https://github.com/Armstart-com/IBDAP-CMSIS-DAP


How to flash IBDAP firmware onto IBDAP board

By pressing RESET and ISP buttons at the same time and then release them, a USB mass storage device will show up with a single file "firmware.bin", delete it and paste in the IBDAP-latest.bin file from below. Press RESET button again. Now Firmware flash complete.

Firmware Binary: https://s3.amazonaws.com/armstart/Debug+Tools/IBDAP-LPC11U35/IBDAP-latest.bin


How to use IBDAP to debug target board

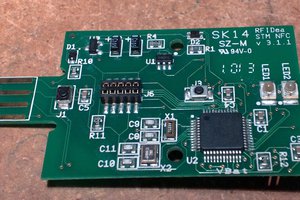
Connect IBDAP's TGT_DBG 10-pin header to the target board (note, VTREF pin at TGT_DBG provides 3.3V for the target board, but you can switch off by removing the corresponding jumper), connect IBDAP and PC via USB cable.

If your system is Windows, you should be able to see a USB HID device called "IBDAP-LPC11U35 CMSIS-DAP" in your control panel.

If you are using Keil

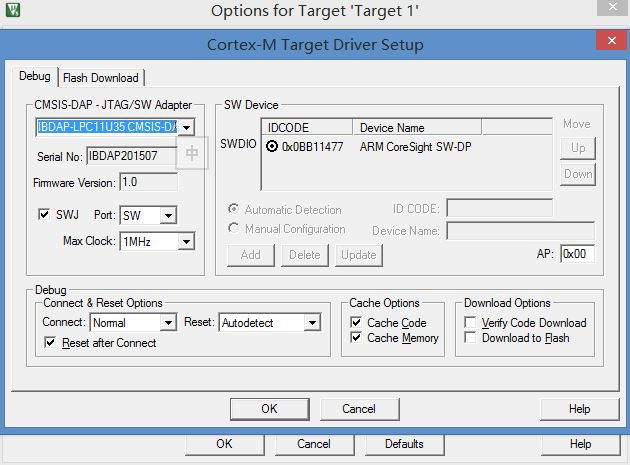
From your Keil project, click on "Options for Target" button just besides the target, choose "Debug" tab, select use: "CMSIS-DAP Debugger", then click "settings", you should be able to see the "IBDAP-LPC11U35 CMSIS-DAP" device with any error, if yes, then we are all set.

If you are using OpenOCD

TODO: complete this section

  • 1 × LPC11U35FHI33/501 Microprocessors, Microcontrollers, DSPs / ARM, RISC-Based Microcontrollers
  • 4 × LED
  • 1 × LM1117-33
  • 6 × 0.1uF capacitors
  • 1 × 10nF capacitors

View all 21 components

View all 3 project logs

  • 1
    Step 1

    OpenOCD Tutorial

    install deps

    sudo apt-get install build-essential

    sudo apt-get install autotools-dev autoconf automake libtool

    sudo apt-get install texinfo libudev-dev libusb-1.0-0-dev libfox-1.6-dev

    Download FTDI driver

    http://www.intra2net.com/en/developer/libftdi/download.php
    tar xf libftdi1-1.2.tar.bz2
    

    HIDAPI

    git clone git://github.com/signal11/hidapi.git
    ./bootstrap
    ./configure
    make
    sudo make install
    

    Build and Install OpenOCD

    git clone git://git.code.sf.net/p/openocd/code
    cd code
    ./bootstrap
    cd ../
    mkdir ./openocd-build
    cd openocd-build
    ../code/configure --with-ftd2xx-linux-tardir=../libftdi1-1.2 --prefix=/opt/openocd --enable-jlink --enable-ftdi --enable-stlink --enable-ti-icdi --enable-ulink --enable-usb-blaster-2 --enable-cmsis-dap --enable-bcm2835gpio
    make
    make install
    

    Usage

    Prepare extra OpenOCD cfg commands

    create file openocd.cfg with following contents:

    $_TARGETNAME configure -event gdb-attach {
       echo "Halting target"
       halt
    }
    
    Start OpenOCD server to Debug LPC11U35
    sudo openocd -f interface/cmsis-dap.cfg -c "transport select swd" -f target/lpc11xx.cfg -f openocd.cfg 
    
    
    Flash and Debug
    • First, flash debug firmware on board
    telnet localhost 4444
    reset halt
    flash probe 0
    flash write_image erase /home/yliu/projects/ib51822/IBDAP-FW/Firmware/IBDAP/Debug/IBDAP.bin 0x0
    reset
    exit
    
    • Second, debug using the commands:
    target remote localhost:3333
    break IBDAP.c:103
    monitor reset halt
    monitor reset init
    continue
    

    http://wiki.paparazziuav.org/wiki/DevGuide/GDB_OpenOCD_Debug

    Breakpoint limits
    set remote hardware-breakpoint-limit 4
    set remote hardware-watchpoint-limit 2
    
    gdbtui GUI debugging

    http://fun-tech.se/stm32/OpenOCD/gdb.php

    OpenOCD nRF51822 using IBDAP

    Launch OpenOCD

    $ sudo openocd -f interface/cmsis-dap.cfg -c "transport select swd" -f target/nrf51.cfg
    

    nrf OpenOCD log

    yliu@yliu-xbtu:~$ 
    yliu@yliu-xbtu:~$ sudo openocd -f interface/cmsis-dap.cfg -c "transport select swd" -f target/nrf51.cfg
    [sudo] password for yliu: 
    Open On-Chip Debugger 0.10.0-dev-00001-g70a14db (2015-06-23-16:35)
    Licensed under GNU GPL v2
    For bug reports, read
        http://openocd.org/doc/doxygen/bugs.html
    Info : only one transport option; autoselect 'swd'
    Warn : Transport "swd" was already selected
    swd
    cortex_m reset_config sysresetreq
    adapter speed: 1000 kHz
    Info : CMSIS-DAP: SWD  Supported
    Info : CMSIS-DAP: JTAG Supported
    Info : CMSIS-DAP: Interface Initialised (SWD)
    Info : CMSIS-DAP: FW Version = 1.0
    Info : SWCLK/TCK = 1 SWDIO/TMS = 1 TDI = 1 TDO = 1 nTRST = 0 nRESET = 1
    Info : CMSIS-DAP: Interface ready
    Info : clock speed 1000 kHz
    Info : SWD IDCODE 0x0bb11477
    Info : nrf51.cpu: hardware has 4 breakpoints, 2 watchpoints
    Info : accepting 'telnet' connection on tcp/4444
    
    yliu@yliu-xbtu:~$ telnet localhost 4444
    Trying 127.0.0.1...
    Connected to localhost.
    Escape character is '^]'.
    Open On-Chip Debugger
    > reset halt
    target state: halted
    target halted due to debug-request, current mode: Thread 
    xPSR: 0xc1000000 pc: 0x000006d0 msp: 0x000007c0
    > flash probe 0
    Unknown device (HWID 0x00000057) 
    flash &apos;nrf51&apos; found at 0x00000000<span class="redactor-invisible-space"></span>

View all instructions

Enjoy this project?

Share

Discussions

Similar Projects

Does this project spark your interest?

Become a member to follow this project and never miss any updates