Close
0%
0%

The Cave Pearl Project

Creating a generic data logging platform that is easy to build & modify for many different environmental monitoring projects.

Similar projects worth following
In early 2014, I started working on simple pendulum flow sensors using Arduino micro-controller boards. In 2015 I realized that by turning those into generic underwater data loggers I could open up a variety of other environmental monitoring applications. Instead of optimizing the electronics, I am using a "jumper wires & breakout boards" plan so that any major component can be replaced by several others. This provides physical layout flexibility and avoids component dependencies in the rapidly evolving hobbyist market. My original performance benchmark is at least one full year of operation on a few AA's and experiments with sleep, pin powering, buffering, and faster bus speeds have far surpassed goal. The Cave Pearl Logger has evolved into a complete open-source 'platform' which includes all of the needed electronics, connectors & enclosures. We have two major build variants: letting you choose a prefab box for classroom/edu settings, or DIY PVC.

Whenever I talk to people who actually do know what they are doing, I hear the same set of comments about how the logger would be vastly more efficient if we went to a custom PCB, with some specific micro controller, or that if we used a 3d printer for the housing it would look more professional. And that's all great advice if you are trying to bring something to market, but not so great if you want something that people can really tinker with.

In the spirit of Sheckley's 'Minimum Man', we wanted something with 'lowest common denominator' flexibility: so that modifications and part replacements don't require a significant re-write of the operating code or of the courses based on using them. This means that you can build your logger with whatever parts you can get your hands on, and we've now proven that loggers built with these cheap eBay modules can easily reach multi-year operation.
Our project includes a robust underwater enclosure that can be assembled with basic tools (ie: a drill, a hack saw & sandpaper) A good housing is as important as the electronics because environments that are challenging to observe, such as those underwater and underground, are still poorly monitored even though our society depends on them for vital resources such as ground water. This is especially true in the developing world where even the cheapest commercial equipment might still be out of reach:


20231201_SHARED_e360_LoggerRails.stl

A printable STL file of the breadboard rails in our new 2-module datalogger at https://thecavepearlproject.org/2023/12/01/the-e360-a-classroom-data-logger-for-science/

Standard Tesselated Geometry - 388.95 kB - 12/06/2023 at 19:40

Download

  • 1 × 3D print of the mini-breadboard support rails (optional)
  • 1 × 32k AT24c32 I2C EEprom module (optional)
  • 1 × Wires, resistors, leds, holders, connectors, etc ( $3-10 ) I splash out now on soft silicone wire, and pricey Deans connectors, but early builds used the scraps I had lying around and they worked fine.
  • 2 × 25-TiePoint mini breadboard
  • 1 × Any Pro-Mini style 3.3v Arduino ( $2-$15 ) i'm currently using Rocket ultra boards, but have working builds with many others including some fairly dubious no-name clones. Note that you must use a 3.3 volt Arduino to connect the SD card directly to the pins! Also note that the pin layouts vary from one board to the next so you will have move some jumpers to accommodate that.

View all 6 components

  • Calibrating a BH1750 Lux Sensor to Measure PAR

    Ed Mallon08/12/2024 at 15:23 0 comments

    With a complete logger solution that can be built for less than $10, I think it's safe to say that the financial barriers to the deployment of DIY monitoring systems have been overcome by the open source hardware movement. However the slow adoption of solutions like ours has highlighted that other barriers remain. For these innovations to have more impact in teaching & research developers must also transfer knowledge about testing, calibration, and implementation procedures. Our latest effort in that area is cross-calibrating an inexpensive Bh1750 lux sensor to measure photosynthetically active radiation. This was done with natural sunlight and one of the many online irradiance calculators so that the overall procedure is accessible to anyone no matter what level of resources they have access to. While using a lux sensor for this is not new and inexpensive PAR sensors are now entering in the market, hopefully our approach to the task conveys more of the background information that's actually required for this kind of calibration - especially in an educational context. 


    https://thecavepearlproject.org/2024/08/10/using-a-bh1750-lux-sensor-to-measure-par/

  • How to Normalize a Set of Pressure Sensors

    Ed Mallon05/06/2024 at 15:04 0 comments

    Another bread n butter post for enviro-sci, but we couldn’t release that post on calibrating sensors without covering the closely related process of sensor normalization. And the two are not exclusive: you can normalize after calibration to bring a set of sensors into better alignment than even your reference sensors. Unfortunately, a good reference for pressure is hard to find, or very expensive, so you are usually stuck using Airport climate stations which can be many miles away.

    https://thecavepearlproject.org/2024/05/01/how-to-normalize-a-set-of-pressure-sensors/

  • A practical method for calibrating NTC thermistors

    Ed Mallon04/22/2024 at 00:58 0 comments

    Much of the existing information on sensor calibration assumes a certain level of pre-existing equipment/capability. This creates a chicken & egg problem with white-paper procedures targeting an accuracy that can not be obtained unless all the supporting parts of the system meet or exceed that same specification. This is almost never the case in educational contexts where STEM instructors often pay for classroom materials out of pocket. This mismatch parallels the situation twenty years ago when audiophiles dismissed the early MP3 players because they sounded so crude, completely missing the point that regular people were using them while jogging through downtown traffic. They were a good enough solution to a problem that didn’t need anything better. 

    From the beginning our project has been developing DIY logger solutions with that kind of 80/20 point in mind, and this thermistor calibration procedure hits that mark:  https://thecavepearlproject.org/2024/04/20/a-practical-method-for-calibrating-ntc-thermistors/

    To my knowledge this is the first time anyone has used the water freezing process to calibrate thermistors, rather than the melting point of an ice slurry.

  • IR transmission through the falcon tube housing

    Ed Mallon12/14/2023 at 18:30 0 comments

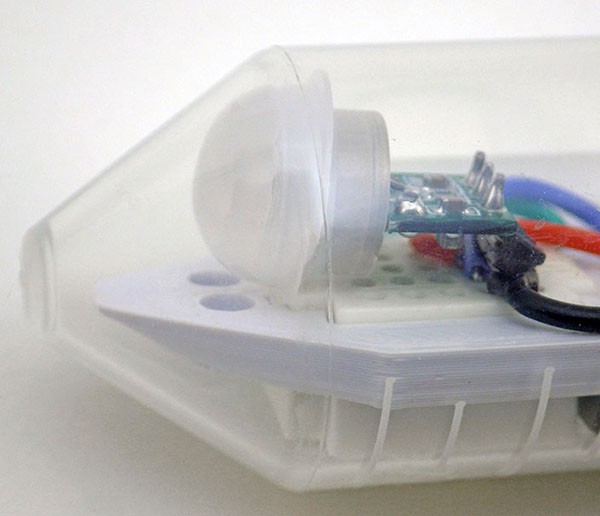
    Another hidden gem: the polypropylene those centrifuge tubes are made from transmit IR frequencies opening up several sensor possibilities.  PIR detection through the housing reaches about 5m for people. The loggers can also be triggered by animal traffic, so pet behavior is a popular theme for final student projects.

    https://thecavepearlproject.org/2023/12/01/the-e360-a-classroom-data-logger-for-science/

  • 0.49" micro OLED screens are remarkably low power

    Ed Mallon12/11/2023 at 17:06 0 comments

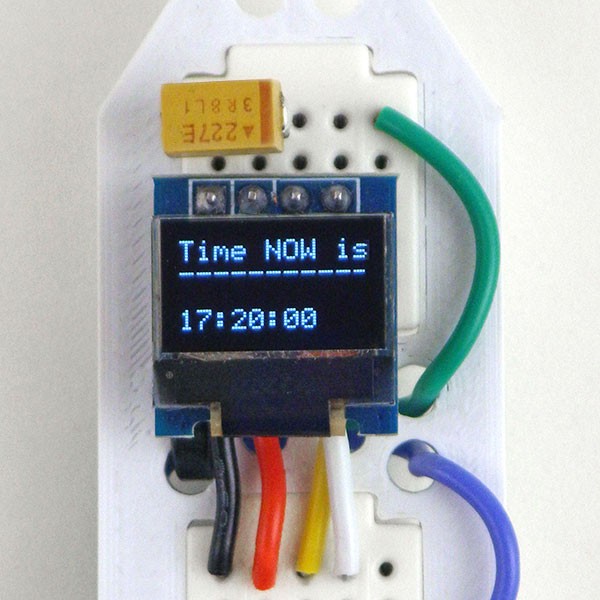
    A hidden gem with our new e360 classroom loggers: the 0.49” micro OLEDs only draw about 3-400 µA and sleeps ~6µA! So you can have screen output like this for about same amount of power as an indicator LED and that means you can run them on a Cr2032!  Since they use SSD1306 controller they can be made to work with standard libraries provided you compensate for mis-match between the origins on screen and the origin in the controllers 1K memory.


    https://thecavepearlproject.org/2023/12/01/the-e360-a-classroom-data-logger-for-science/

  • The e360: A Classroom Data Logger for Science

    Ed Mallon12/01/2023 at 21:03 0 comments

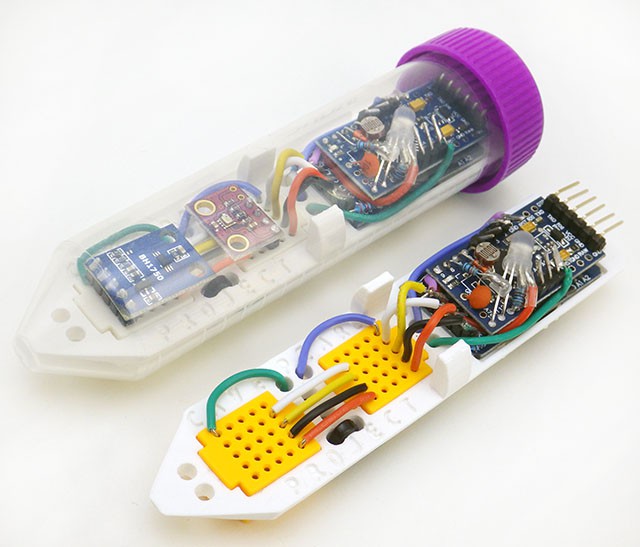
    Well it's been a long road, and several remote runs of the instrumentation course during COVID didn't help the process because they had to be done without soldering. But I think we've finally arrived at an educational version of the ProMini based logger that has the right mix of software and hardware adaptability to be a real contribution to other STEM educators . After a practice session soldering header pins to perf-board, students can build these and actually deploy them out in the real world. Two breadboards make it easy to align connections with the many different I2C sensor modules on the market provided they aren't too demanding for the little Cr2032 that powers the unit. Memory expansion is nearly effortless with 32k EEprom modules. At between 5-10uA sleep current with those cheap sensor modules attached, you should easily get at least 6 months of operation.
    https://thecavepearlproject.org/2023/12/01/the-e360-a-classroom-data-logger-for-science/

    The software is now much more streamlined compared to what we released in 2022, and we moved the LED / sensor cluster around to accommodate the lab activity sequence:

  • Testing Cr2032 Batteries with our 2-Part Mini loggers

    Ed Mallon06/05/2023 at 19:55 0 comments

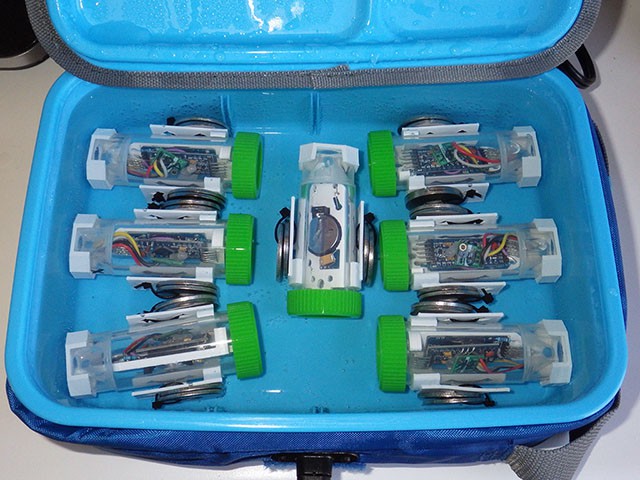
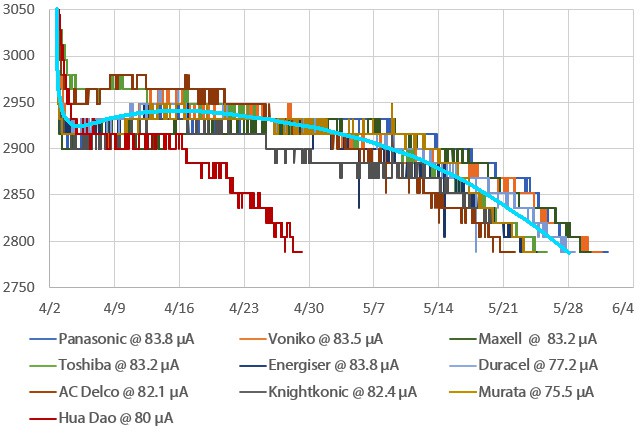
    Ran a series of Cr2032 battery tests with our 2-part falcon tube loggers and was pleasantly surprised to find that even with the default BOD limiting us to the upper plateau of those cells; we can still expect about two years of run time from most name-brand batteries. https://thecavepearlproject.org/2023/06/05/testing-cr2032-battery-discharge-time-with-our-2-part-promini-loggers/

    With a series of resistors on the digital pins, this little logger might be the easiest way to simulate duty cycles for other more complex devices that you can’t afford to lose a dozen of for the duration of long term tests. Also note the curves are a bit chunky because the internal vref trick only has a resolution of 11mv, and we use index compression that reduces the record further to 16mv/step.

  • A DIY Pressure Chamber to Test Underwater Housings

    Ed Mallon05/25/2023 at 16:00 0 comments

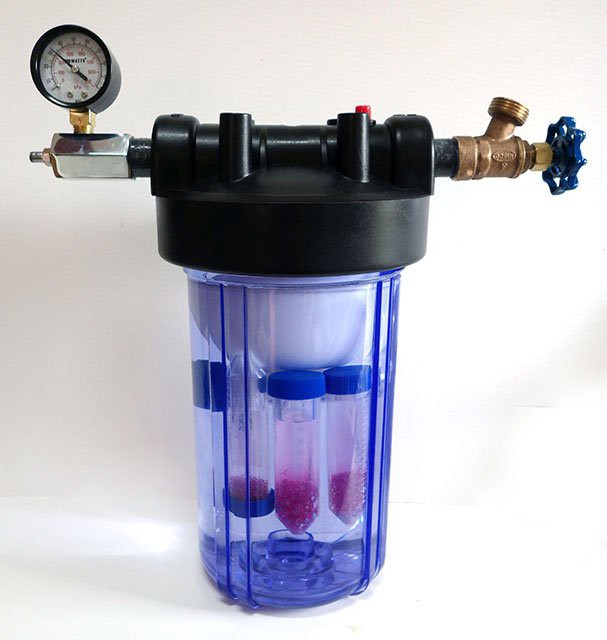
    The max depth for conventional scuba diving 130 feet - 40 meters - as dives to those depths can usually avoid complicated decompression procedures. This also covers the vast majority of underwater research deployments, and our work is focused there with our little falcon tube loggers. In keeping with the projects 'hardware store' ethos, household water filters offer a good solution for pressure testing DIY builds for deployment in that zone without blowing the budget:
    https://thecavepearlproject.org/2023/05/24/a-diy-pressure-chamber-to-test-housings/

  • 2-Module Mini Logger Build Tutorial (w 64k EEprom upgrade)

    Ed Mallon04/25/2023 at 14:47 0 comments

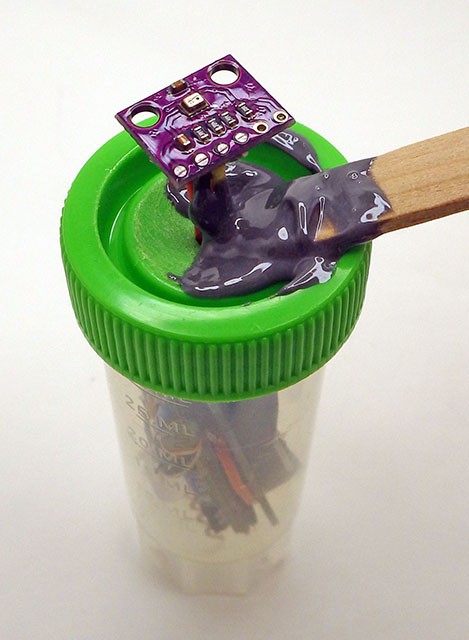
    The latest in an ongoing series of build videos supporting Dr. Beddows enviro-sci students who all have to first build the logger(s) that get used for their final research project. These videos also support the other instructors who have adopted our DIY loggers for their own courses. These Falcon tube mini-loggers may well be as minimal as it is possible to go while still offering the flexibility of supporting multiple different sensors. About the only limitation is that the CR2032 levels out at 3.0v and runs all the way to 2.8v before shutdown - which rules out some older  sensors like the DS18b20 which has a lower limit of 3.3v. After calibration, the NTC has so much more resolution that it’s not much of an issue.

    And for those with more build experience we also posted a 4minute 'rapid review' of the steps: 

  • Insights from a Decade of Tipping Bucket Rain Gauge deployment

    Ed Mallon04/17/2023 at 14:59 0 comments

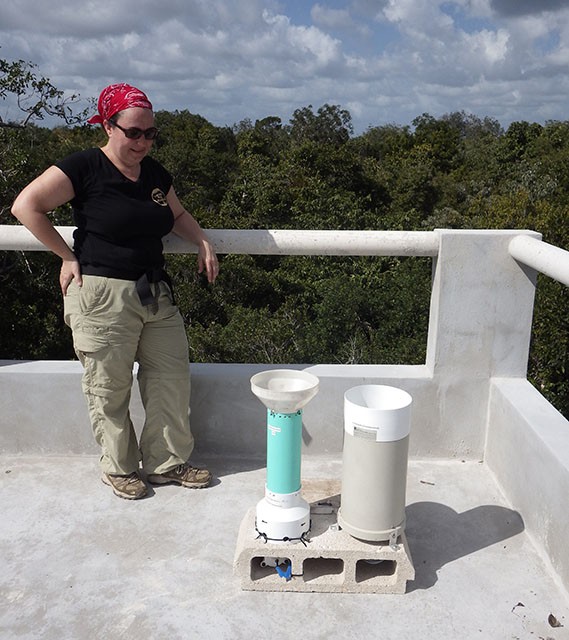
    I know these janky installations will have the weather nerds out there inhaling through their teeth, but it’s worth noting that we made multiple attempts over the years to do things the ‘right way’ that just kept failing to go the distance. Even in a harshest environment, critters are the biggest threat to actual ‘boots on the ground’ research - both four & two legged. So our rule of thumb for anything that’s going to last is: “Make it ugly & make it heavy” 
    https://thecavepearlproject.org/2023/04/15/insights-from-a-decade-of-tipping-bucket-rain-gauge-deployment/

View all 73 project logs

  • 1
    Step 1

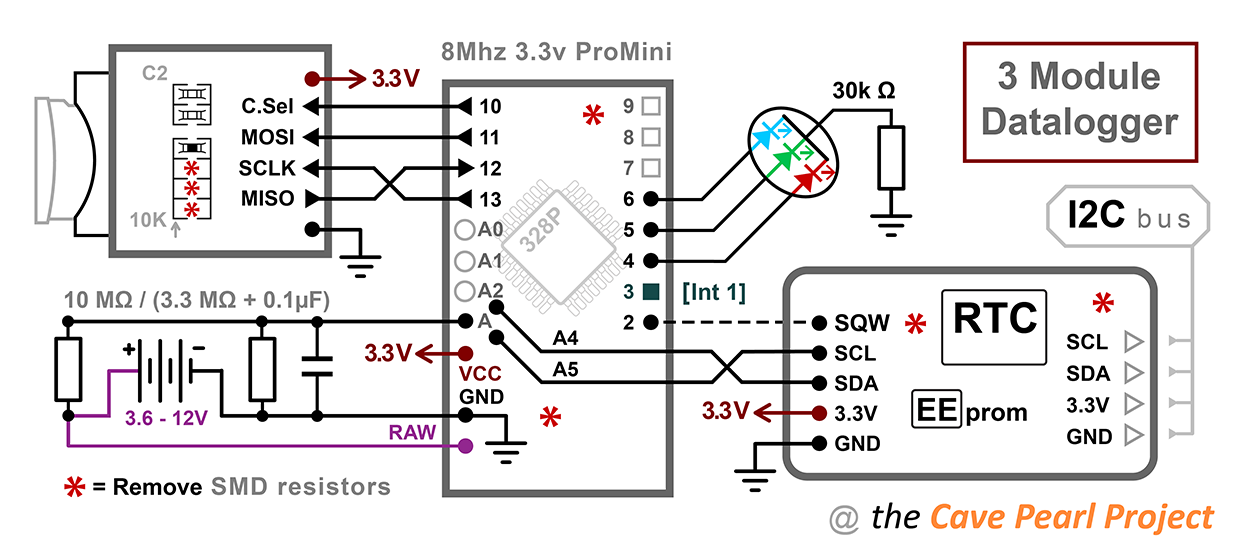
    There have been many improvements to the way we build our basic 3-module logger over the years, and you can find a summary of those different build tutorials at:

    https://thecavepearlproject.org/how-to-build-an-arduino-data-logger/

    If you go with the cheapest parts, the basic platform can be built for less than $10. But noname clone boards usually have poor voltage regulators, and tend to draw higher sleep currents: shortening your operating lifespan to between 4-6 months. Boards with better regulators (like the MCP1700 series) can almost double that. The same thing applies to sensors where better quality Adafruit / Sparkfun breakout boards often draw considerably lower sleep currents than the eBay stuff. But the basic logger works fine across the range so you can build one with whatever you can buy locally. If you standardize your I2C or 1wire bus connectors, (I use 4 pin Deans Micro Plugs) it's easy to change the 'sensor caps' later and re-purpose the logger portion.

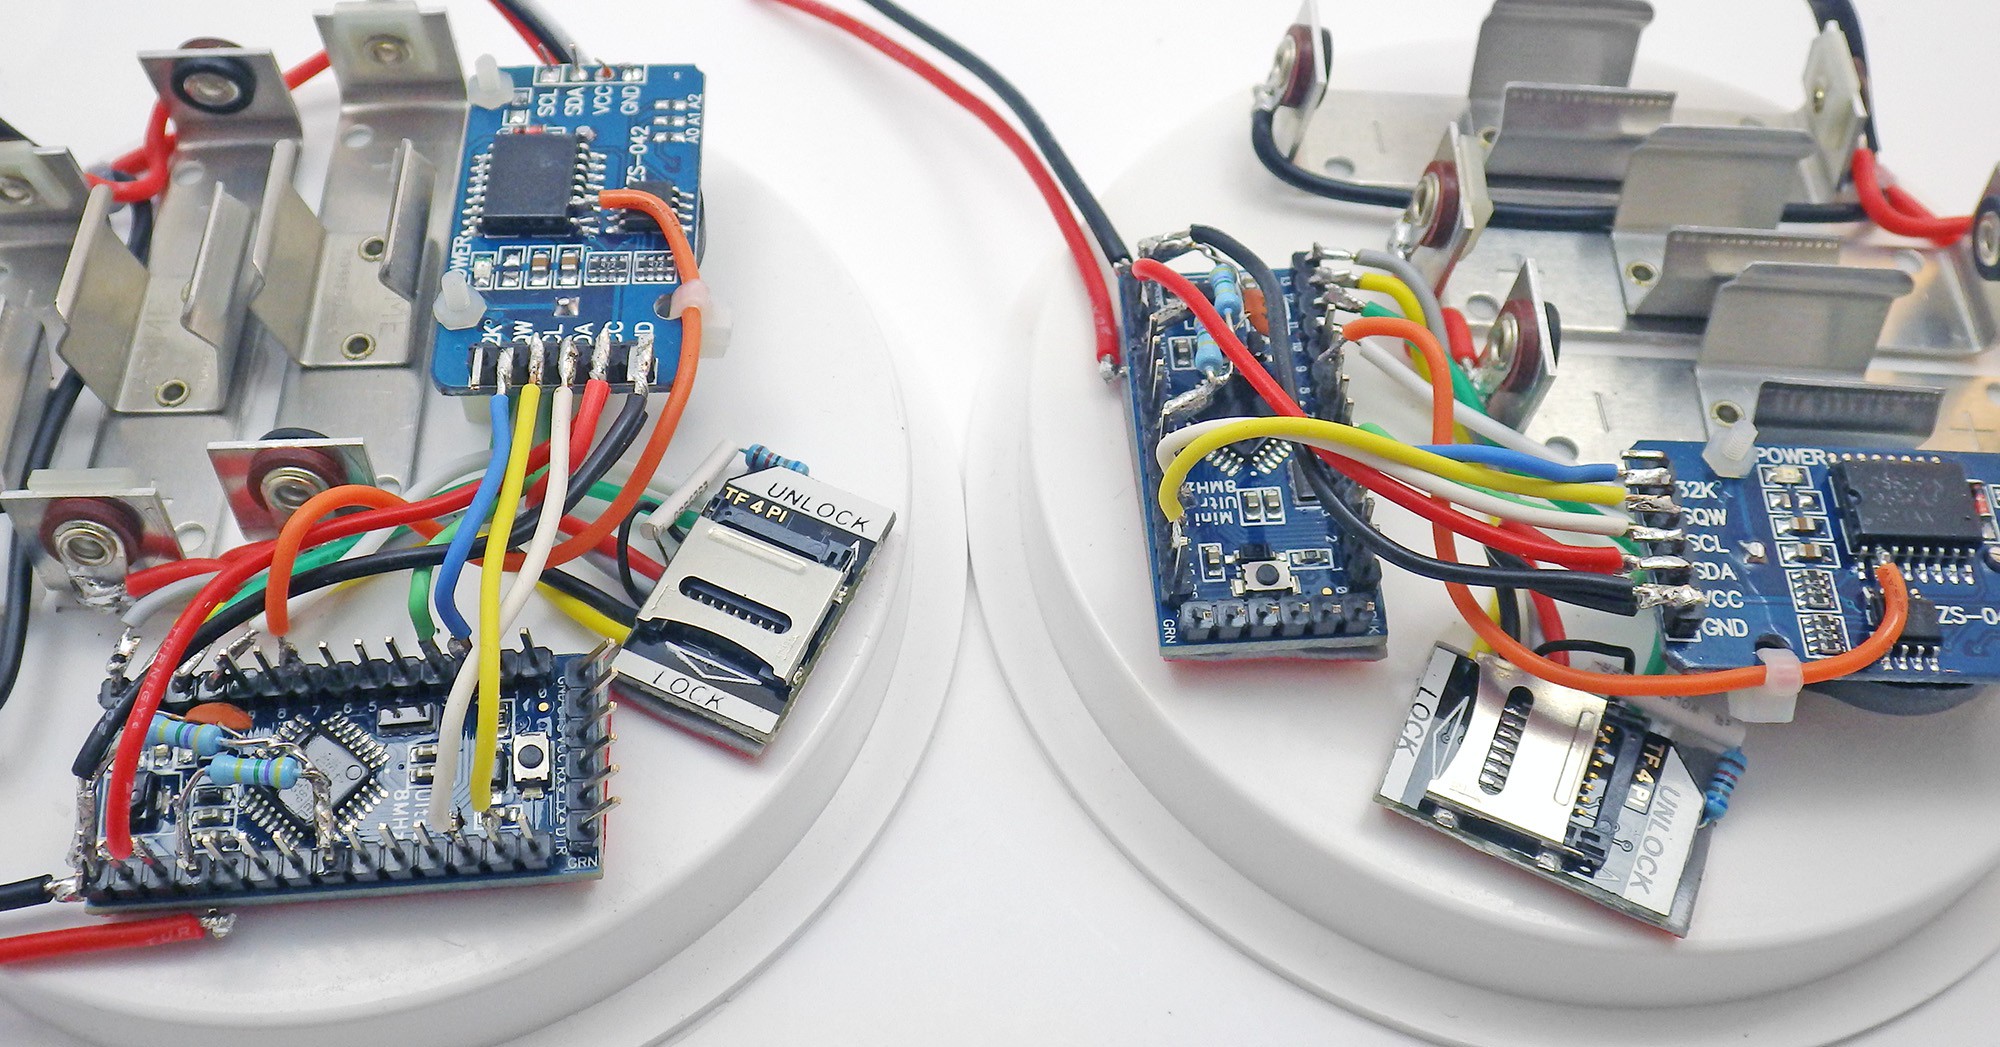
    Here's a closeup shot of the three basic components laid out in a flat platform configuration (in this case built with 8mHz Rocketscream Ultras):

    (Note: the orange wire in this image is for powering the RTC directly from an Arduino pin 7. This is NOT in the wiring diagram above as I am still conducting experiments to see if this trick to lower the sleep current is robust enough to be adopted on all of my loggers. If you want to give it a try you can read more about it on my RTC page.

    The history of my underwater housings:

    http://edwardmallon.wordpress.com/category/a-diy-underwater-housing/

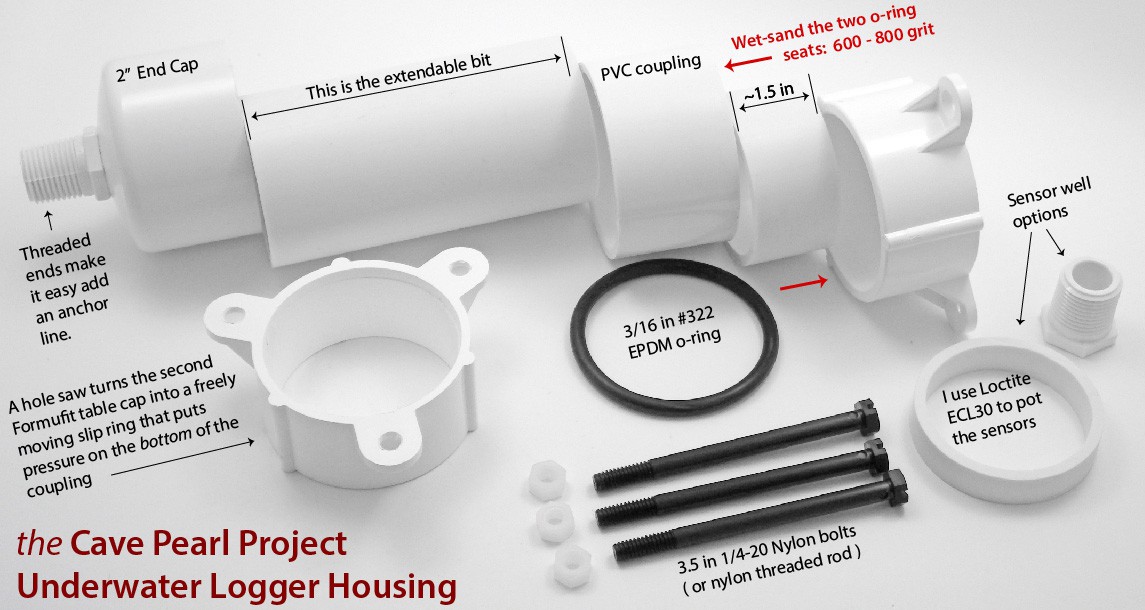
    It's been a long road, but the new smaller housings can be built with a few straight cuts, a hole saw & some pvc cement. The design can be extended to any length, making room for more electronics and as many batteries as you need for a long deployment. Presented here is an exploded view, and only the two surfaces indicated need to be sanded smooth enough to mate with the o-ring. 2" Formufit table leg caps provide the struts for the bolts and you can find more supplier links in the New Housing for 2015 post. Total cost runs about $10-12.

    While it's probably not obvious to someone who isn't a diver, having a freely sliding top cap means that the o-ring will be more compressed at depth, improving the water tight seal. I haven't had enough spare units yet to do destructive testing, but I am confident these housings will survive long duration deployments at significant depth. This design has already survived a five months at 10m, and several units are now on long term deployments ranging from 5 to 25m depth.

View all instructions

Enjoy this project?

Share

Discussions

John Opsahl wrote 11/20/2020 at 04:48 point

So great to see a device made of hobby electronics and hardware store parts being applied to real world problems and achieving real results. I started development on a data logger device called BoatDetect (https://hackaday.io/project/171951-boatdetect) a few months ago and took inspiration from the Cave Pearl designs. I have learned a lot from all the documentation you have posted on this project. Thank you for sharing.

  Are you sure? yes | no

Ed Mallon wrote 11/20/2020 at 05:20 point

The thing I like about environmental monitoring is that there are an endless number of challenges to work on so you're never at a loss for something to do next.  Don't be surprised if your boat detector morphs into other useful things over time.  That's been happening constantly on our project.

  Are you sure? yes | no

hyperzap wrote 02/10/2018 at 02:44 point

How did you make the housings? Are those PVC parts with the three screw mounts standard parts? if so, do they have a name?

  Are you sure? yes | no

Ed Mallon wrote 02/10/2018 at 15:24 point

Those struts are on 2" Formufit table leg caps, availiable at Home Depot, Amazon, etc. All the other parts are just standard off the shelf PVC fittings. There are a few housing variants at:

https://thecavepearlproject.org/2015/02/04/a-new-diy-underwater-housing-for-2015/

  Are you sure? yes | no

Joseph Demers wrote 06/16/2016 at 18:46 point

Very cool project. PVC is great stuff and easy to work with. Nice job.

  Are you sure? yes | no

Ed Mallon wrote 01/09/2016 at 16:10 point

@ alex: Like many I have been waiting for the physical print sizes in the low end 3-D printer market to become large enough to be useful for my project, as I would love to use one for internal scaffolding, etc. But with such good results from the current housings, I suspect that I will be sticking with the PVC plumbing for quite a while. The stuff is just so easy to work with, and more importantly, it's available to everyone around the world at low cost.

  Are you sure? yes | no

Alex Rich wrote 01/09/2016 at 14:42 point

Great project, these toys look like a ton of fun to build and play with - making stuff with PVC brings me back to potato gun days.

  Are you sure? yes | no

Ed Mallon wrote 11/05/2015 at 22:30 point

Now that we have reached a decent lifespan with the loggers, I've been considering ways to download the data in-situ with opto-couplers through a transparent window in the housing.  This would be pretty simple to implement, and with the fierce attenuation of RF in sea water, I would have to be almost on top of the units to use wireless anyway. Of course, once you've done the technical dive out to a cave deployment, simply swapping the whole logger with a new unit probably takes less time, and that is a precious commodity when you are down at 20m.

  Are you sure? yes | no

Jarrett wrote 11/02/2015 at 23:10 point

Are you still using the Arduino IDE?

From the outside, it looks like you've gotten comfortable enough with the code to try and graduate to AVR Studio. Manually setting registers is a great way to get dirty with your code and have absolute control over your sleep modes.

Same thing about designing your own circuit boards. Comparing two different Arduino flavours seems strange to me, because you could be looking at _what parts_ of the boards themselves consume power.

Super impressed with how far you've come and how you've stuck with it, though. Read the whole blog, marine environment failure points are really interesting.

  Are you sure? yes | no

Ed Mallon wrote 01/10/2016 at 06:17 point

Generally I try to keep the code understandable for other beginners, as my current task is bringing a bunch of other researchers who we have partnered with up to speed on their own logger builds.  And for me personally its much more fun to build new different instruments, than to perfect my code past the 'works ok' stage.

WRT different Arduinos, you are absolutely right about the component variations, but I am out to prove that you can make viable loggers with just about anything, including the cheap eBay stuff. 

No doubt there are more marine failures on the way for the amusement of all. The current plan is slowly move the old models "out to pasture" on open ocean deployments - mostly because the cave installations have more complicated logistics, so we would rather have the newer, more reliable builds in the caves.

  Are you sure? yes | no

Xeon wrote 11/02/2015 at 10:18 point

Something i think this needs.

A way to remotely collect data either nearby real time nearby bluetooth or wifi radio.

idk how these devices preform under water. 

  Are you sure? yes | no

jlbrian7 wrote 08/30/2015 at 11:31 point

How deep are your sensors?

  Are you sure? yes | no

Ed Mallon wrote 08/30/2015 at 16:51 point

The underwater units are installed in systems ranging from 5m to about 25m depth. We haven't pushed them much farther than that because finding a good installation site, and hooking everything up, takes some time. Once you get below 20 meters air limitations start to conflict with those other requirements of the dive. I'm just now starting to retire the first gens, and I am tempted to take the electronics out and lower the housings on a line to see how far they could actually go.  My hope is that they will make it past 60 meters, because that kind of range would open up a big chunk of research territory to more projects on a DIY budget.

  Are you sure? yes | no

jlbrian7 wrote 08/30/2015 at 17:54 point

That is awesome.  I read your blog as well, maybe one of these days I will try it out my self.  You also look like you have your fair share of experience of housing failures, but I would say be careful any way.  I have seen housings blow up because they have a small leak and if left down long enough to equalize then when they are brought up they don't have time to relieve the pressure because the leak is too small.  At the depths you are talking about it shouldn't be too bad, but you wouldn't want a cap to slap you in the face as you are taking it apart.  The worst one that I have seen was an acoustic pinger.  It was sent down to about 8,000ft, and we didn't know there was a problem because we weren't using it.  It came up and set on deck for about 20min and then it sounded like a shotgun went off.  It was a good thing no one was working with it.  

I also wanted to say good job, for using pvc you have a really clean finish for the enclosure.

  Are you sure? yes | no

jlbrian7 wrote 08/30/2015 at 18:00 point

as a side note, something that we would do with some of our enclosures is fill them with oil (vegetable oil should work)  that way the housing is pressure balanced with the ambient conditions, but the type of sensors that you are using will dictate the viability of this option.  Also, if you can put some type of QD on the housing then you can use one of those garden hand pump sprayers and pump the oil in so that the internal pressure is a little over ambient.

  Are you sure? yes | no

Ed Mallon wrote 08/30/2015 at 19:15 point

Wow! I have not seen a battery meltdown that dramatic...yet

I've already been thinking about putting oil into the small section connectors for the temperature sensor strings, since they have much smaller o-ring contact surfaces, so are more likely to fail at depth. For the main housing, I would probably go with a wax fill rather than oil simply to make the data retrieval & repair process less messy. But before I try that I still have the option of using schedule 80 pvc, which could extend the depth range by  another 30-50%

  Are you sure? yes | no

Alex Rich wrote 01/09/2016 at 14:25 point

25 m is not nearly enough to warrant oil filling - you only see like 35 psi at that depth.  Your PVC can structurally handle ten times that or more I would guess.  But the comment @jlbrian7 made about small leaks is a serious one if you go to deep depths and have an air interior.  I have also seen water leak past a gasket seal or glue seam and compress the air inside the housing, then when you pull your housing up the leaks are very often really slow or sometimes they re-seal as the pressure gradient reverses.  This just makes your device into a bomb.

  Are you sure? yes | no

jlbrian7 wrote 08/30/2015 at 20:11 point

:) there was no battery.  It was a plastic housing and when it failed - BOOM.  I think that the leak was at the bottom, so all the air inside was compressed.

  Are you sure? yes | no

Sophi Kravitz wrote 07/30/2015 at 00:56 point

HI- Did you show these at Pumping Station in January?

  Are you sure? yes | no

Ed Mallon wrote 07/30/2015 at 03:40 point

I think I had a few drip sensors at that meetup, and one of the old 3" PVC models (?) but I don't think I had anything in the 2" underwater housings ready at that time. I have put together several new sensor combinations with the 2" housing since then, and I've done quite a few experiments to get better performance out of the basic three module logger.  Most of those new builds are out running in a cave/underwater right now, but by early Sept I will have the data from them to show everybody. The real world deployments always teach me something new, so I am careful not to count my chickens just because something seems to work on the bench.

  Are you sure? yes | no

tlankford01 wrote 07/27/2015 at 23:03 point

This is a great project.  I am going to make one to monitor my tank for my rainwater catchment system.

  Are you sure? yes | no

Ed Mallon wrote 07/27/2015 at 23:55 point

You can find a somewhat recent code build at:

https://github.com/EKMallon/The_Cave_Pearl_Project_CODEbuilds/blob/master/_20141002_DripSensors_WithPowerControl/_20141002_DripSensors_WithPowerControl.ino

You will still have to make a number of manual tweaks depending on which sensors you are connecting.  If you look through the setup you should see the "standard pattern" I used to add sensor support. Once you have an "init" function in setup & a "read" function at the start of the main loop all you have to do is change the Pstring print statements that load your sensor data in to EEPROMBuffer. Don't remove the CycleTimeStamp

PString str(EEPROMBuffer, sizeof(EEPROMBuffer)); 
    str = CycleTimeStamp;           //17 / 16 characters without seconds plus comma
    str.print(F(","));
    //str.print(TEMP_Raw);  //4 digits both 12 bit sensors, so 4095 is largest value 
    str.print(IntegerVariable);  //two digits positive
    str.print(F(","));
    str.print(AnotherIntegerVariable); 
    str.print(F(","));  

etc - only up to 28 characters! Pstring simply ignores the extra data if you try to put too much in the buffer.

Then:

    Write_i2c_eeprom_page(EEPROM_ADDRESS, CurrentPageStartAddress, EEPROMBuffer); // whole page is written at once here
    CurrentPageStartAddress += EEPromPageSize;

puts the data into the eeprom till the buffer is full. Moving the data from the buffer to the Sd should card happen automatically but its up to you to make sure you are loading & unloading the same number of eeprom pages per sensor read cycle. A simple 1 or 2 sensor build usually only needs two pages stored per cycle.  You can use real number variables if you want, but the print routine eats more sram on the compile if you do.

I am working on a fairly major re-vamp of the code with faster bus speeds, and a whole bunch of other tweaks, but I don't want to post it till I see the results from the currently deployed loggers and that wont be till the end of August or early September.

  Are you sure? yes | no

Ed Mallon wrote 07/27/2015 at 19:58 point

I know some of the photos look like they are of different machines but they all share the same 3-component logger at their heart, run essentially the same code, and use off-the-shelf PVC plumbing hardware for the housings.  So the variety is meant to demonstrate the same components in different physical arrangements, because that's kind of the whole point of what I am trying to do.  I2C and one-wire breakout boards make it easy to build interchangeable sensor-caps for the same logger platform if you use standard connectors between the cap and the logger. My current favorites are Deans Micro plugs because they are really solid, but you can use just about anything.

  Are you sure? yes | no

Similar Projects

Does this project spark your interest?

Become a member to follow this project and never miss any updates