 Reginald Sourn
- Chapter 1: --- Raspberry Pi Zero W Stepper Motor ---
Raspberry Pi Zero W is so tiny for 4 stepper motor driver a4988 module so i separate the story 2 part . Part 1 for 2 module driver and power supply , part 2 just module driver a4988.
- Part 1: Robot Self Balancing
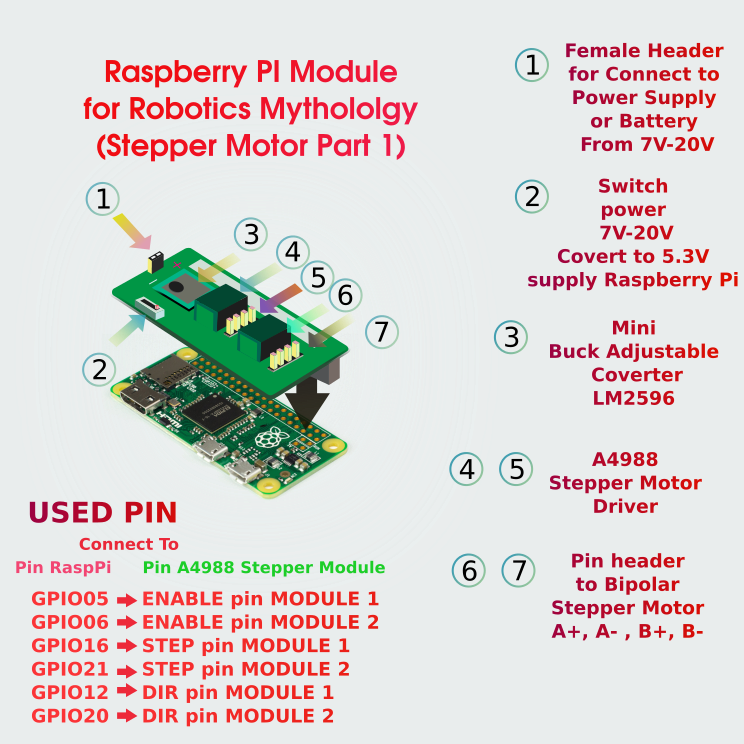
Robot Self-Balancing have a great performance with stepper motor. Because Stepper allow us to counting step , precisely and high torque without gear box. Self Balancing robot need Battery lightweight , gyro and motor that we can counting step like stepper motor . That board module have lm2596 mini regulator power supply module adjustable. Because voltage will not stable from battery (Battery always over charge or go low every time ). When we want plug it to Raspberry Pi Zero W we need to plug battery(!!! Don't use Battery over 20V )and turn switch off to the on board module stepper turn off and turn potentiometer inside power supply to 5.3V- 5.5V measure it with multimeter before you put it over 40 pin Raspberry Pi Zero W . and then check power voltage with multimeter again after you plug your stepper motor.
And That A4988 driver stepper motor we can use only 3A Stepper Motor.
Pin used from that driver :
- GPIO05 -> ENABLE pin MODULE 1
- GPIO06 -> ENABLE pin MODULE 2
- GPIO16 -> STEP pin MODULE 1
- GPIO21 -> STEP pin MODULE 2
- GPIO12 -> DIR pin MODULE 1
- GPIO20 -> DIR pin MODULE 2
POWER SUPPLY:
- IN+ LM2596 Connect to Battery +
- IN- LM2596 Connect to Battery -
- OUT+ LM2596 Connect to Raspberry Pi 5V Pin (!!! IF YOU TURN SWITCH ON the indicator LED)
- OUT- LM2596 Connect to GND
Plug Battery to 2 pin headers or cut wire battery solder by yourlself (Careful don't plug raspberry with that module without change voltage from power supply Cause it can kill your Raspberry PI)
I will write source code to test with it.
Check out in GITLAB link down below that I commented.
Part 2: CNC machine Or 3d Printer (Stay tuned)
I will continue writing after I design next PCB
Please give me a big thumb to inspire me continue design part2


 Mirko
Mirko
 Andrew Kotite
 Zepan
Zepan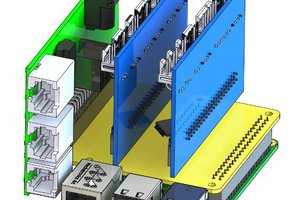
 Jon Buford
Thanks for posting this blog