Close
0%
0%

Tote HaD

Special edition of Tote for the Belgrade workshop.

Similar projects worth following
We will be building those at the Hackaday Belgrade workshop. The design is very similar to regular Tote, but there are some improvements and surprises. There is also a large Jolly Wrencher logo on the PCB.

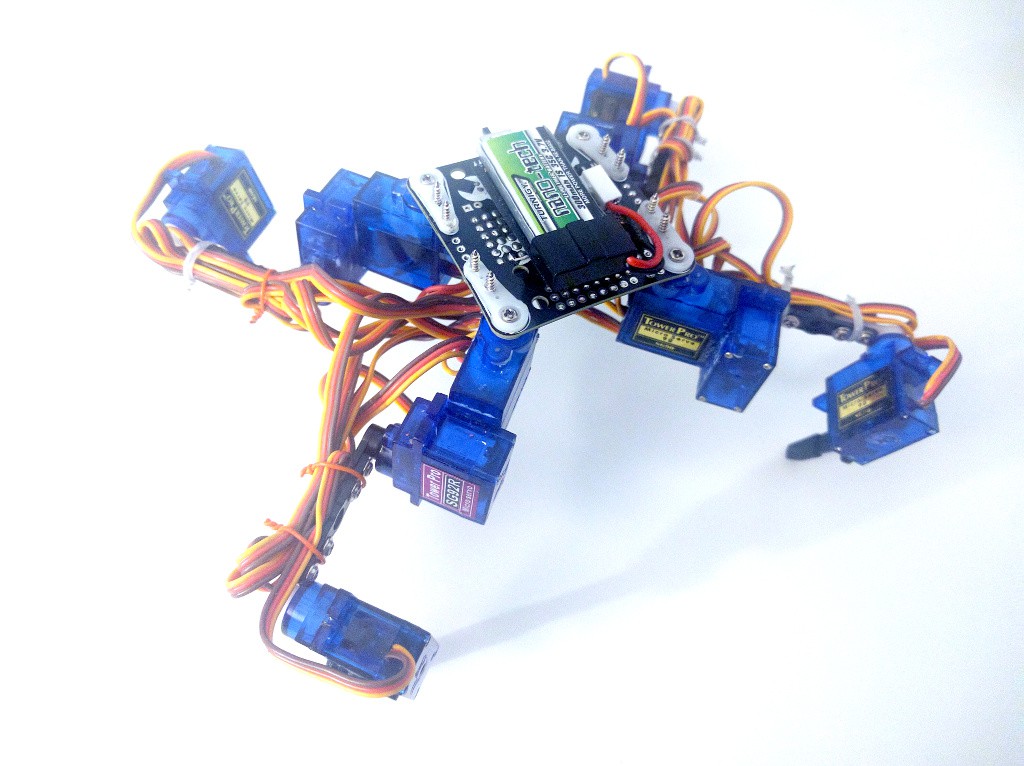
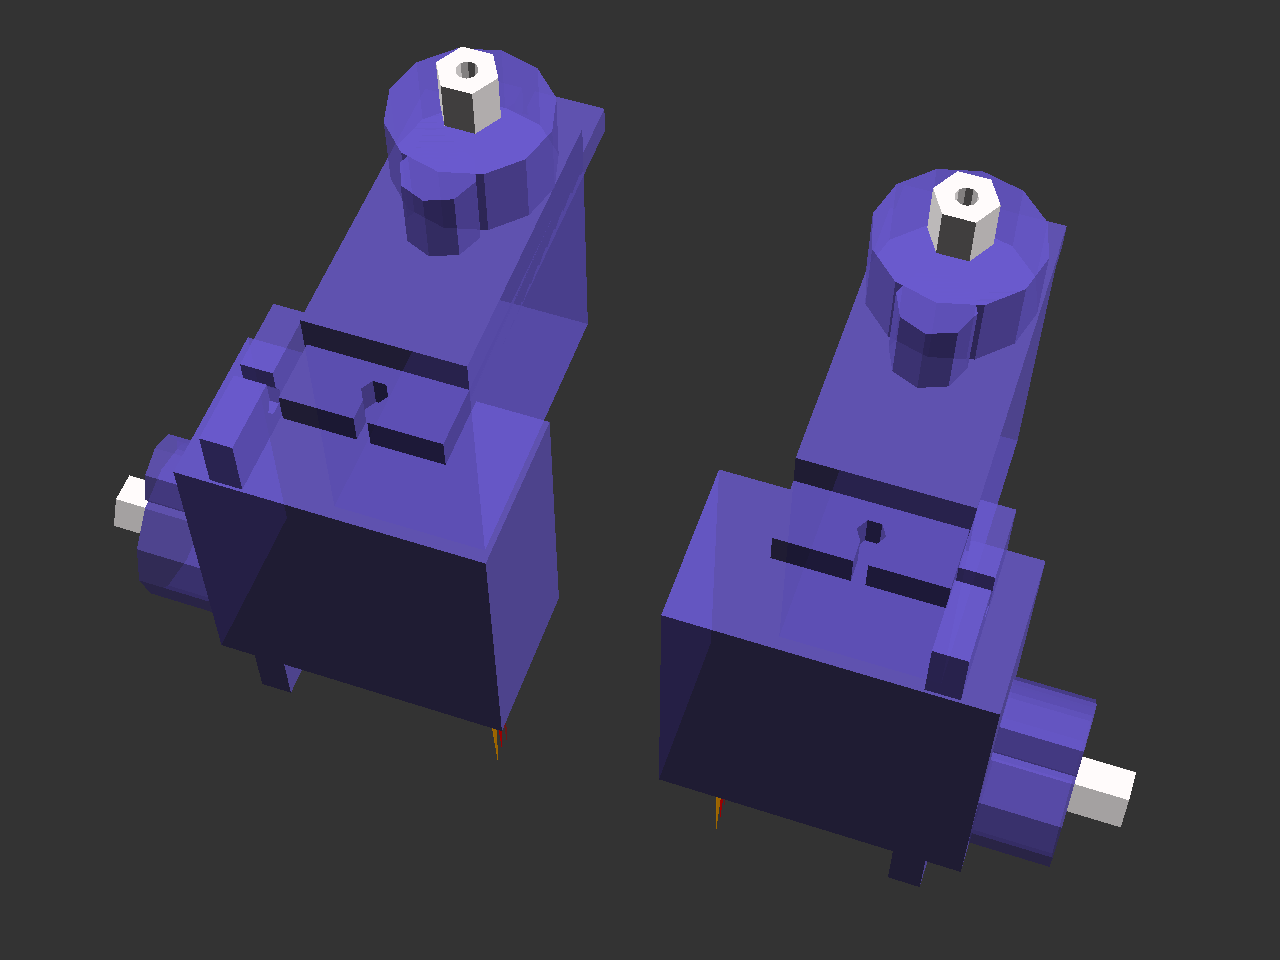
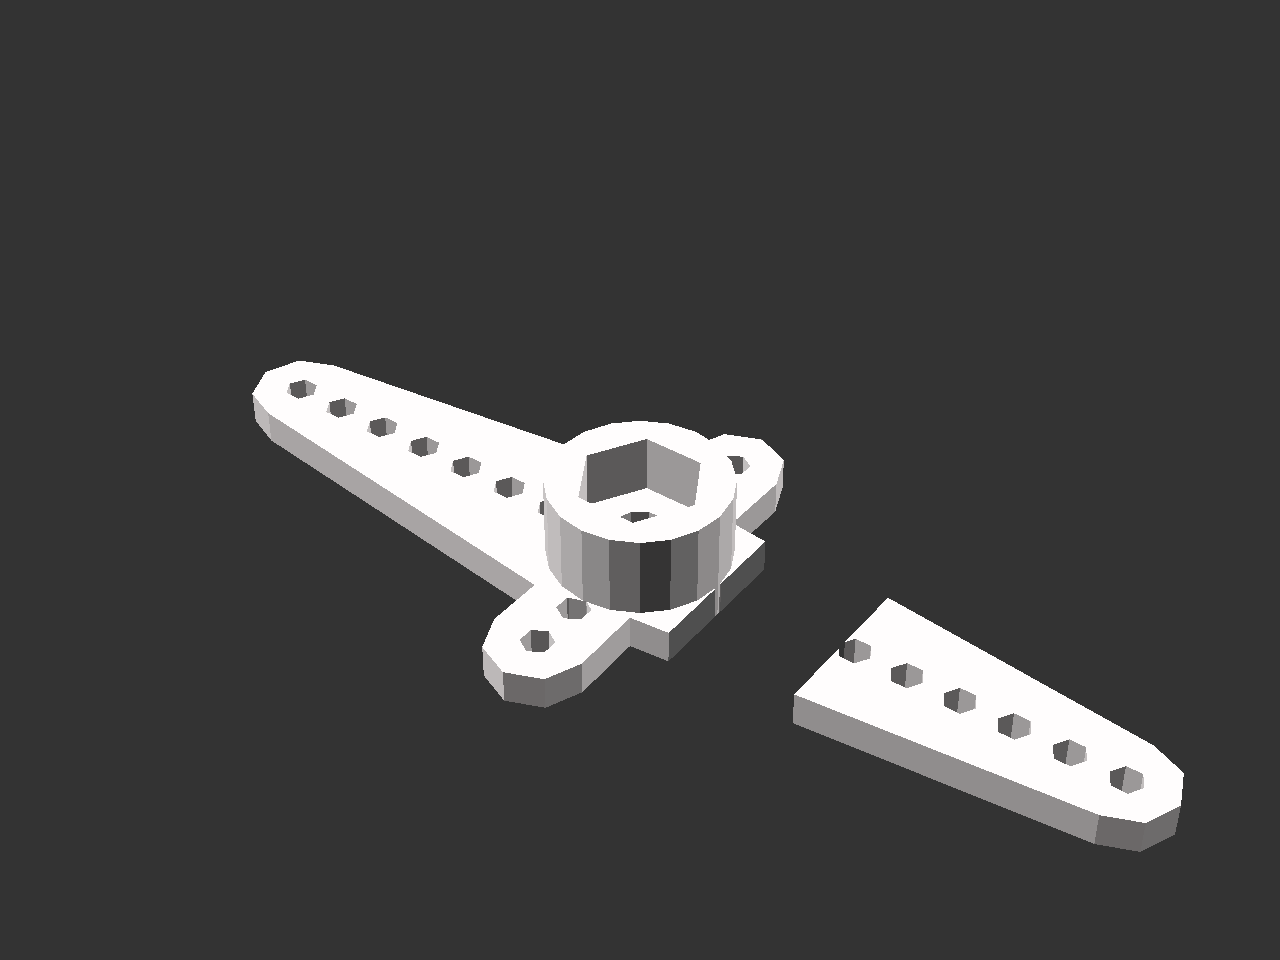
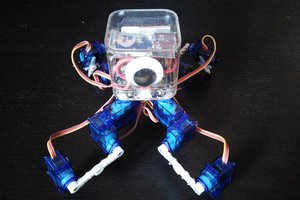
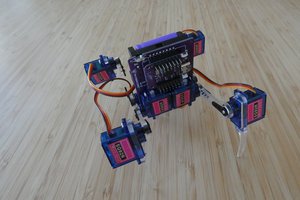
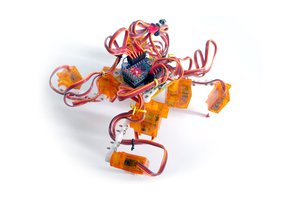
#Tote is a spider-like quadruped robot. While its small size and plastic parts make it look like a toy, it was in fact designed as a platform for experimenting with walking robots. Unlike many toys that have their gaits hard-wired, Tote has individual control over each of its legs, with three degrees of freedom, using inverse kinematics calculations. This gives it great flexibility, and makes it possible to implement gaits that let it walk on uneven terrain, and even climb obstacles! Of course it can also dance.

There are also a lot of options for extending it. While initially Tote doesn't have any sensors, it's possible to give it touch, sight, force sensing, hearing and sense of balance, by simply adding appropriate sensors, connecting them to the free pins, and -- of course -- programming new behaviors based on their reports.

Even without the extra sensors, Tote can be quite useful. It's small and portable, so it can be conveniently transported. It's sturdy, flexible and relatively weak -- which makes it quite safe to handle. And it's complex enough to explore the problems of robot walking and test new algorithms.

firmware-combined.bin

Firmware for the ESP-01 module, version 2.0

octet-stream - 431.21 kB - 04/11/2016 at 20:40

Download

Graphics Interchange Format - 1.99 MB - 03/06/2016 at 21:02

Preview
Download

Zip Archive - 438.30 kB - 04/16/2016 at 13:58

Download

Zip Archive - 501.40 kB - 04/16/2016 at 13:58

Download

  • 1 × Custom PCB
  • 8 × M1.5x3mm Screws (optional)
  • 8 × M1x4mm Screws (optional)
  • 1 × TP40561A Lipo Battery Charging Module (optional)
  • 1 × 1000µF Capacitor (optional)

View all 12 components

  • This is not the robot you are looking for

    deʃhipu03/15/2023 at 23:10 0 comments

    Apparently there are some rumors that this is a robot we are going to be building at a workshop in Berlin during the 2023 Hackaday conference. That is not true.

    This is the robot we were building back in 2016 in Belgrade.

    Yes, there is going to be a robot-building robot in Berlin, but we are going to be building #Fluffbug, which is a newer design with many improvements.

  • 3D printed body

    davedarko04/16/2016 at 14:20 3 comments

    Hey all, @davedarko writing. As you might have seen at the #Hackaday | Belgrade event - I've brought my Tote with 3d printed legs along to the workshop. There I was asked for the files and @Radomir Dopieralski told me I could share them in a log. It took me a while to chamfer some edges and fix the hip orientation of my design, but now I finally have all the parts in a presentable state. You can find the STL files for printing in the file section. The design files are made with 123D Design by Autodesk. That's the 3rd time I completely disassembled my Tote.

    Read more »

  • Compiling Your Own Firmware

    deʃhipu04/13/2016 at 22:16 0 comments

    For anyone who wants to build their own version of firmware, here's a really quick howto:

    You can also skip the main.py file (it's the file that gets executed on the board start), and instead create it after flashing -- this way you will be able to modify it without recompiling the firmware:

    with open("main.py", "w") as f:
        f.write("import server; server.main()")
    There are some tools that make it easier to upload files to the ESP8266, like here: https://github.com/wendlers/mpfshell

  • Fixed Firmware

    deʃhipu04/11/2016 at 20:50 28 comments

    As promised, I fixed the firmware for the robot -- now it will start walking immediately after being switched on, and after connecting you can control it. Below are flashing instructions.

    1. Download the firmware-combined.bin file, and save in the current directory.
    2. Download the esptool.py file, and save in the current directory.
    3. Connect the USB2TTL to the pins on the side of the robot:
      • gnd ↔ gnd
      • rx ↔ tx
      • tx ↔ rx
    4. Connect together two pin holes (or pins, if you soldered pins in there) on the other side of the robot (leave the third pin alone):
      • gnd ↔ sda
    5. Connect the USB2TTL to your computer.
    6. Switch on the robot.
    7. Run the flashing command:
      $ python esptool.py --port /dev/ttyUSB0 --baud 460800 write_flash --flash_size=8m 0 firmware-combined.bin
    8. On Windows/Mac change the path to the USB2TTL port accordingly.

    9. Wait for the firmware to flash. If you get an error, try again.
    10. Switch the robot off.
    11. Remove the connector from the pin holes.
    12. Switch the robot on and see it walk. Congratulations, you have the new firmware.

    Note, that flashing new firmware will not delete the network information from the board, if you had the robot connect to some network. If you want to do that, you can with this command (before flashing the firmware):

    $ python esptool.py --port /dev/ttyUSB0 erase_flash

  • Command Line

    deʃhipu04/10/2016 at 20:05 0 comments

    The robots are built, but due to a bug in the communication code, they didn't walk "straight out of the box". The bug makes them wait for a connection before they start walking, and I will be fixing this soon, and I will provide new firmware to flash soon.

    In the mean time, you can play with your robots by using a serial connection. In fact, you will have access to the Python console on them. All you need is a 3.3V USB2TTL converter (I gave out a couple at the workshop, it's that red thing with USB plug on it). If you don't have one, I highly recommend you get it anyways, because they are extremely useful in debugging all sorts of projects anyways, and you will also need to to flash the new firmware, both for the Arduino and the ESP8266 parts of the robot.

    Connecting

    To connect the serial interface of the ESP8266 on your robot to your computer, you will need to use the three pins on the left side of the robots. If you look at the bottom side of the board, you will see they are labeled, from front to back, "gnd", "tx" and "rx". Use three female-female dupont cables, and connect the "gnd" pin on the robot with the "gnd" pin on the USB2TTL, the "rx" pin of the robot with the "tx" pin on the USB2TTL, and the "tx" pin on the robot with the "rx" pin on the USB2TTL.

    • gnd ↔ gnd
    • rx ↔ tx
    • tx ↔ rx

    Next, plug the USB2TTL into your computer (or even better, a USB hub connected to your computer), and open a serial terminal with speed 115200 on the serial port that appears. On Linux, I use the screen program for that, with the command:

    $ screen /dev/ttyUSB0 115200

    On Windows you can use PuTTY for that (you might need to have the drivers for the USB2TTL installed first). I have no idea how to do that on macs, but there must be some way. Once you do that, you should see black screen... Then switch on the robot, and you should see something like this:

    rll��|�l�|�l�b|����r�b�b��nn�lnn���bplblrlp�n��lbn�|쌌��b��nn�l��l`�nnl`nr���nr�`p�n�r�����bn�|lb��nn�l`�nnl`nr���nrrl`p�n�r�����쌜bn�|쌎b��nn�l`�nnl`nr���nl`r��nl`�l��|��rrnb��l��b�lb쌜���l��b�lrldon't use rtc mem data
    ll��|��rrnb��ll�p�b�b쌜���l��b��lrl�l��|��rrnb��ll�|�b�b쌜����b�lblrl��rl���bl�br|�bll���lb��n�nn��l�|�l�l��l������l`�n��

    That's the booting messages of the ESP8266 received at a wrong baud rate. Don't worry about that. Now, if you press Ctrl+C, the program that is executing on the robot will be interrupted, and you will see this:

    MicroPython v1.6-374-g2c407bc-dirty on 2016-04-07; ESP module with ESP8266
    Type "help()" for more information.
    >>>

    That's the Python console prompt, also known as the REPL console. You can type Python code in there, and it will get executed on the robot.

    Walking

    So how do you make it walk? Type in this code:

    from robot import Robot
    from gait import Creep
    robot = Robot()
    gait = Creep(robot)
    for frame in gait.run():
        pass
    
    That should get the robot creeping forward. To change the directions you can set the dx, dy and rotation attributes on the gait object, and repeat... Read more »

  • Quick Notes

    deʃhipu04/09/2016 at 18:12 10 comments

    The workshop just finished, and I will have more to say about it, but for now I need to take a couple of notes for improving things, in case I will be doing it again.

    • Cheap screwdrivers are useless,
    • The screws that come with servos are really bad for this, make sure to use the 1.5x3M screws,
    • Check the software also in the AP mode, not just when it's connected to your home WiFi,
    • Investigate the glue-less approach to making feet,
    • Provide more detailed instructions. Separate instructions for left and right legs, better instructions for what to plug where, mark the colors for B&W prints,
    • Tell people to use the servo horns that came in the bag with the servo, as they differ very much for servos from different sources.
    • Order plastic bags and divide the parts into kits. Make sure to use servos from the same source in each kit,
    • Add instructions for cutting off the servo "ears" for the hip servos,
    • More detailed instructions for centering the servos,
    • Tell the organizers about the upper limit on the number of people in advance. Order everything at once, in bulk,
    • The cheap LiPo chargers are 1A, not good for batteries smaller than 1000mAh,
    • Have enough USB2TTLs for everyone to use,
    • Double-check all the boards for soldering errors and missing parts,
    • Bringing a soldering iron and basic tools was a great idea,
    • Send the kits to the organizers as a package, to avoid customs problems at the airport,
    • Tell people to bring laptops,
    • Add web interface,
    • Have it blink LEDs in different patterns to indicate different stages and/or errors,
    • Print the address of the project website on the instructions and the PCB,
    • Have a helper for every 10 people,
    • 4h is barely enough to assemble everything, forget about programming them,
    • If servos are erratic, check the battery,
    • People who came are amazing! Thanks!

  • Software

    deʃhipu04/07/2016 at 15:22 0 comments

    I finished the Arduino code and flashed to all the boards, and now I'm in the process of flashing the Python code onto all the ESP-01 modules, and setting their SSIDs.

    As usual, the software doesn't do all that I wanted it to do. By default it makes the robot walk forward and listen for connections. I wrote a small PyGame program that lets you control the robot from your computer with the keyboard. That's it.

    Things I wanted but didn't have time to do:

    • there is only the "creep" gait, no "trot" gait,
    • the communication with the Arduino controller is one-way, no telemetry,
    • thus, no battery voltage monitoring,
    • there is no remote Python console, for that you have to connect the serial cable.

    However, all that can come in the future versions of the software. During the workshop I will show you how to modify and flash the software for both of the microcontrollers, so hopefully you will be able to perform the updates when new versions become available here.

    Oh, the code repository is at: https://bitbucket.org/thesheep/tote-had/src

  • First Steps

    deʃhipu04/04/2016 at 20:52 0 comments

    With the kits all soldered and ready, I'm focusing on the software development. As usual, I won't have everything I wanted there at first, so expect software updates after the workshop. However, the basic walking is a must, so I'm focusing on that. The Micropython for ESP8266 is actually usable enough now, and I only needed a small patch to slow down the I²C communication, so that the Arduino can keep up without clock stretching. After doing that, and adding the Python code to the scripts directory, I compiled a working version of the firmware. Here are the first steps of the robot:

    Of course for now the walking is slowed down (with long pauses between movements) and the leg reach is small -- it should be much faster and smoother when I tune it. I will also need to add a way to control it over WiFi, and to read any sensors connected to the Arduino. By default, there is going to be only one telemetry value you can read, the battery voltage, but of course you can connect pretty much any sensor you can think of.

    Also note that the front left hip servo is broken and only moves into two positions -- that's because I had to use recycled servos for the prototype. On the workshop we will use the new servos that just arrived, and they should all be fine.

  • Mass Production

    deʃhipu04/02/2016 at 17:05 0 comments

    This was a productively spent day.

  • 1 Done, 24 More To Go

    deʃhipu04/01/2016 at 11:43 0 comments

    The remaining parts just arrived, including the package of 200 servos:

    I'm still waiting for 20 batteries, but hopefully they will arrive sometime next week.

    I finally can start assembling the PCBs for the kits. I already did the first one:

    You can see some unpopulated headers and footprints there -- that's because they are optional, and the parts I got are not enough to fill them on all 25 boards. But that also means that you can improve your robot even further once you take it home. I will be posting detailed instructions here about each optional feature, so that hopefully this will be easy. We can also talk about this on the workshop, if there is time.

View all 22 project logs

  • 1
    Step 1

    Start by assembling the legs. You will need two "left" legs, and two "right" ones, which are mirror images of the "left" legs. Instructions below are for just one "left" leg.

  • 2
    Step 2

    Glue together the two servos making up the coxa. Make sure to apply glue on all surfaces that touch, including the "ears".

  • 3
    Step 3

    Cut off the shorter side of the "cross" horn, as shown below:

    And then attach it with one of the servo mounting screws to the tibia servo:

View all 10 instructions

Enjoy this project?

Share

Discussions

Milan Maletic wrote 04/19/2016 at 00:04 point

Can someone tell me what is the name (if there is any) of the connector that is on the battery? Thanks - EDIT - found it... JST if someone else is wondering also... It is written on the connector :)

  Are you sure? yes | no

deʃhipu wrote 04/19/2016 at 01:47 point

There are lots of different JST battery plugs, those particular ones are "JST BEC" 

  Are you sure? yes | no

davedarko wrote 04/15/2016 at 23:01 point

How big has the flash to be on the ESP again? I remember that you told me something about it.

  Are you sure? yes | no

deʃhipu wrote 04/16/2016 at 10:00 point

It has to be at least a megabyte (8 megabits).

  Are you sure? yes | no

davedarko wrote 04/16/2016 at 14:37 point

I've put that to the component section and finally added 3D files and a log :)

  Are you sure? yes | no

Nebojša Arežina wrote 04/10/2016 at 13:52 point

I made small modification to robot feet. Instead of gluing horns (or whatever they are called), I cut them up a bit and screwed them to servo. Seems to hold alright. Images here: http://imgur.com/a/lS6vK

  Are you sure? yes | no

davedarko wrote 04/10/2016 at 15:36 point

That's a great mod! :)

  Are you sure? yes | no

deʃhipu wrote 04/10/2016 at 19:04 point

I tested it when I got home, and it actually works great! Thank you for this, I will update the instructions.

By the way, if anyone has any ideas on improvements, modifications or extensions to the robot, don't hesitate to write about them. I will gladly add you to this project, so that you can write logs on it (and use the chat too!). If you didn't change anything, it would also be great to see the photos of your robots here!

  Are you sure? yes | no

Nebojša Arežina wrote 04/10/2016 at 19:40 point

No problem, it's just a simple mod which seemed to make sense :) I'll familiarize myself with software when I find the time, perhaps next weekend. I might be able to contribute something.

  Are you sure? yes | no

davedarko wrote 03/26/2016 at 08:12 point

Today 11 boards arrived from dirtyPCBs.com - I'll bring them with me to the #Hackaday | Belgrade Meetup :) 

  Are you sure? yes | no

deʃhipu wrote 03/26/2016 at 11:15 point

I will have some extra boards too, as it turned out that 10 places was the minimum, and in the end I needed to order much more. Oh well, next time I will know better.

  Are you sure? yes | no

davedarko wrote 03/26/2016 at 12:31 point

Oh dear. So how many are in the workshop?

  Are you sure? yes | no

deʃhipu wrote 03/26/2016 at 12:50 point

The workshop is for 25 people, because that's the upper limit of how many people I can help at a time.

  Are you sure? yes | no

M.daSilva wrote 03/02/2016 at 14:05 point

Nice! An ESP8266! It'd be interesting to have something in the lines of an interactive webpage to send commands to the robot... Maybe a smartphone app? :D
Bought my ticket for the workshop yesterday, I'm really looking forward to building this robot...
Congrats on all your work, I'm still amazed at how you managed to bring the costs down to. 

Crawling robots for everyone!

  Are you sure? yes | no

deʃhipu wrote 03/02/2016 at 14:29 point

Thank you! I will have to see what is possible with the esp8266, this is still work in progress, but I think that you won't be disappointed. However, I will let others write the phone apps, etc.

  Are you sure? yes | no

Craig Hissett wrote 02/29/2016 at 21:44 point

That is one sexy silkscreen!

Looking forward tobseeung what improvements you have made :)

  Are you sure? yes | no

deʃhipu wrote 02/29/2016 at 22:58 point

Thanks. I will be describing it all here gradually, while I also prepare the documentation and code.

  Are you sure? yes | no

Arya wrote 02/29/2016 at 18:07 point

>>>"I think that at the least I will have to do all the soldering -- because I really don't think I will be able to teach people to solder during the workshop, and I don't want injuries."
Is it presumed that folks that'll attend the conference won't necessarily be able to solder?

  Are you sure? yes | no

deʃhipu wrote 02/29/2016 at 18:13 point

It's also easier for me to focus on the robot-specific topics during the workshop, not general electronics.

  Are you sure? yes | no

Similar Projects

Does this project spark your interest?

Become a member to follow this project and never miss any updates