-
Cricut Setup on Computer: Easy Connection Guide
05/14/2024 at 12:41 • 0 commentsSetting up a Cricut machine on a computer may seem like a tedious task, but it’s not. Being a craft enthusiast, I have setup many Cricut machines on devices. With my experience, I can tell you the procedure involved in the setup of a Cricut machine. Thus, if you were searching for a guide to learn the Cricut setup on computer, your search is complete here.
I will show you the easiest ways in this guide. Cricut machines are excellent feature-rich tools that are compatible with almost all devices except Chromebooks. With the Cricut machine, you can make tons of things using numerous Cricut materials and supplies.
If you want to learn the process quickly and start your crafting journey with this ultimate machine. Never miss this opportunity to see what I can teach you here.
Cricut Setup on Computer (Windows and Mac)
Explore the steps to learn how to setup the Cricut machine on a computer. I’m using a Bluetooth connection to connect the machine to a computer device. Check out the steps below.
For Windows
If you’re a Windows user, you’ll need to consider the steps below to setup your Cricut on Windows.
- To get started, verify if your Cricut product is ON.
- Then, make sure that it’s placed at least 10-15 feet away from your computer.
- In the next step, head to the Start menu on your computer.
- Now, hit the Settings option and click the Devices option.
- After that, ensure that the Bluetooth option is ON.
- Next, hit the Add Bluetooth or other device option.
- Also, you’ll see the Add a Device option.
- Choose the Bluetooth option and select your Cricut model from the on-screen list.
- Thereafter, launch the Cricut New Product Setup page.
- Lastly, your Cricut machine will be setup on the computer.
That’s how to perform the Cricut setup on computer. Now, you can start crafting with your amazing Cricut machine.
For Mac
To perform the Cricut machine setup on a Mac computer, you’ll need to follow the steps given below. The steps for Mac are slightly different, so follow them carefully.
- On your Mac, go to the Bluetooth option and go to the Apple menu.
- Then, hit the System Settings option.
![]()
- After that, locate the Bluetooth and turn it on.
- When the Bluetooth is ON on your Mac system, locate your Cricut model from the list.
- Now, choose your Cricut machine from the list.
- At last, your Mac will be connected.
Finally, your Mac will connect to your Cricut product via Bluetooth. This is how to complete the Cricut setup on computer effortlessly.
Download Cricut Design Space on Computer
The Cricut Design Space software is important for setting up your Cricut machine on any device, like a desktop or smartphone. This software will help your machine communicate with your device. Let’s get started with the steps.
For Windows
To get the Cricut Design Space on your Windows computer, follow the steps below.
- To start, navigate to an internet browser at design.cricut.com.
- Then, tick the checkbox to accept the Cricut Terms of Use.
- After that, hit the Download option.
- Once the download is complete, visit your Downloads folder and find that folder.
- When you see your file in the Downloads folder, double-click on it to open it.
- Thereafter, select an option to trust the application.
- Next, you’ll see installation progress.
- Also, you need to sign in with your Cricut ID and the password.
- Now, you will see a Design Space icon on your system’s screen.
- You can right-click on that icon and select Pin to Taskbar to create a shortcut.
- Finally, enjoy your Design Space.
That’s how you can get the Cricut Design Space software and start creating projects.
For Mac
To get the Cricut Design Space on a Mac system, you’ll need to follow these steps. Have a look at them.
- In the first step, visit Cricut’s official website at design.cricut.com and accept the Cricut Terms of Use.
- Then, hit the Download button.
- Now, you’ll see an option to select a location to save your file. Usually,...
-
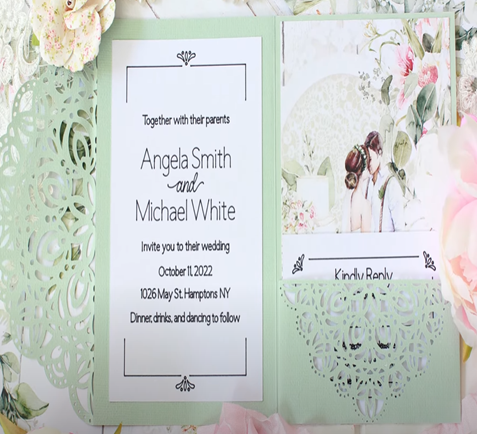
How to Make Cricut Wedding Card: 4 Easy Steps
03/15/2024 at 12:01 • 0 commentsAre you getting married but can’t decide which Cricut wedding card will be best? I was hoping you wouldn’t stress as I will help you by teaching you how to make them out of the Cricut machine. Weddings are all about reuniting with close ones, singing their favorite songs and dancing.
I have been in the crafting business for the past two and a half years and have done tons of DIY projects for various events. But this is the first time I am going into custom-made wedding invitations. Thanks to Cricut machines, invitations will be a lot easier and a memorable craft for me.
Every crafter will agree that to make any craft out of a Cricut machine; they must have a specific set of tools to help them give the project the perfect shape. Follow the blog to learn in-depth about making personalized invitations.
Step 1: Creating a Cricut Wedding Card
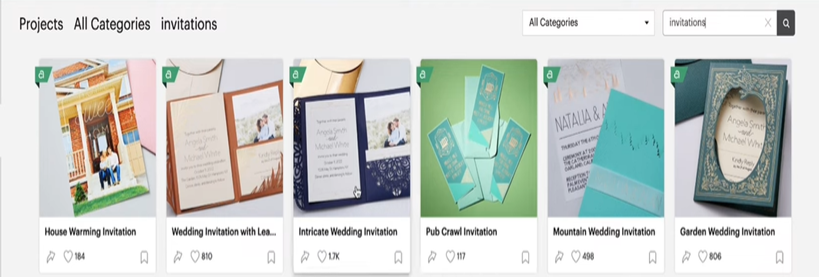
To create your favorite invitation design, switch on your device and open the Design Space app. After that, tick New Project, press the Projects tool, and type Invitations into the search box. Now, select the design, read the details about the design, and then click the Customize option.
![https://cutting-setup]()
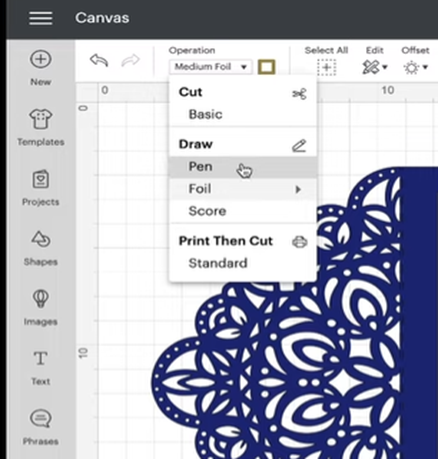
Following this, select the Cricut Foil section by going to the Operation section and selecting the Pen option. After making the changes, select the text and change its font, style, size, and color. Following this, press Weld, which is visible under the top right side of the canvas.
![https://cutting-setup]()
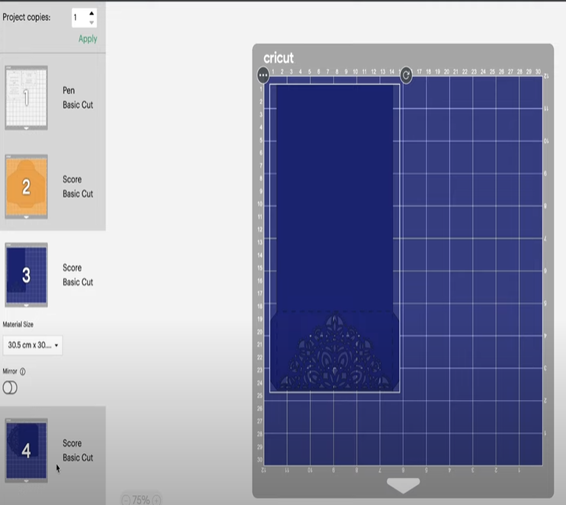
Once you are done after making all the changes on your Cricut wedding card, click the Make It option. Next, you need to check that the designs are placed properly in their respective places. After checking all the designs, hit the Continue option.
![Cricut Design Space Download]()
Step 2: Cutting Your Design
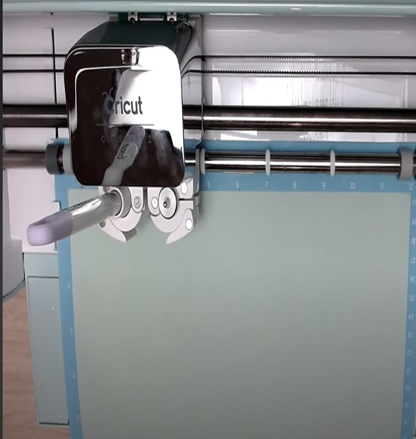
Following this, unbox your Cricut cutting mat and place your Cricut material on top of it with the help of the brayer tool. Then, check that you use the correct material and tools before cutting. After that, connect your devices, load the mat into the machine, insert the tools inside the Clamp, and turn on your cut-die machine. Now, you need to wait till the cutting process is going on. Once it is finished, start unloading your mat from the Cricut machine.
![Cricut Design Space]()
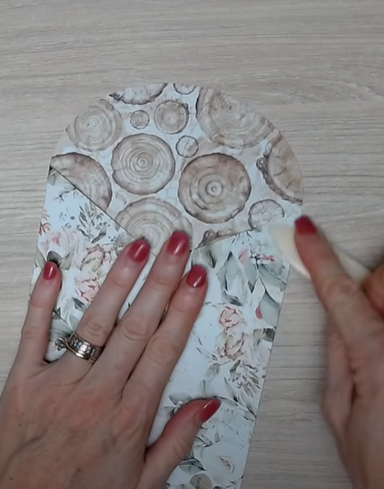
Step 3: Assemble Your Materials
Now, peel off the Cricut material from the mat and use a sharp item to remove tiny pieces of material from your Cricut wedding card design. Following this, take your Cricut scoring tool and start folding your envelope. After folding the envelope equally from all sides, stick the sides using strong adhesive glue. You can also use a Cricut glue gun to spread the glue equally. Also, repeat the same steps by folding and sticking the invitation pieces together. Keep the card and envelope aside for a few minutes until the glue ultimately gets dried up.
![Cricut Design Space login]()
Step 4: Share Your Final Wedding Invitation
Last but not least, cut the extra sides of your Cricut wedding card and insert them inside the respective envelopes. Now, deliver them to your loved one’s address along with a box of sweets. Alternatively, you can personally visit and invite them to attend your wedding and give you blessings.
![]()
Conclusion
See how easy it was to make a Cricut wedding card with the help of Cricut machines. Apart from this DIY craft, you can also do other projects for your D-day with this cut-die machine within a few minutes. Projects that it can make are wine glasses, welcome signs, coasters, table runners, ring boxes, and so much more. You must be patient and focused while working on these projects using the Cricut craft machine.
Frequently Asked Questions
Question: Is Cricut Worth Making Wedding Crafts?
Answer: Absolutely; Cricut is the ultimate cutting machine you can prefer while making any craft for your wedding ceremony. This craft product can cut any material, tissue, or leather within a few seconds....
Read more » -
How to Make a Monogram on Cricut: A Step-by-Step Guide
02/28/2024 at 13:09 • 0 commentsIsn’t it amazing to always be eager to learn how to make a monogram on Cricut? Then, you will be a part of the journey where you will get all the information, from basics to the end. I have done thousands of DIY projects over the past few months, but designing custom-made monograms is close to my heart. From wine glasses to hats, you can combine them, making them look more casual and trendier.
There are many models of Cricut machines that you can customize to your liking. Besides the cutting machine, essential supplies will make this project more manageable. Apart from that, you can also create and sell your respective monograms in the market and start your own business.
To get the best results out of the Cricut machine, keep reading this blog until the end and avoid jumping into any section while going through it.
Step 1: Start By Designing a Monogram Design
Begin by choosing the Text toolbar and entering your initial inside. Afterward, go to the Fonts section, press System, and type monogram inside the Search box. Now, click the monogram system you want to choose, and it will directly appear on your canvas.
Following this, increase your monogram size and select the Ungroup option. Afterward, tick the Shapes tool and choose anyone from the list. Next, put the shape on top of your monogram design, select both, and then tap the Slice option at the bottom side of your screen. Then, repeat those steps and slice down the remaining monogram designs.
Once the first step of your how to make a monogram on Cricut is finished, tick the Make It button present at the top right side of your canvas. After a few seconds, you will connect to the preview page and check that the design and the alignment are perfect on the mat. Now, choose the compatible material and tools for the cutting process and tick the Continue button.
Step 2: Cut Your Monogram Design
At this point of the process, unbox your Cricut products and then turn on your cut-die machine. After that, remove the plastic sheet from your material and place it on the Cricut cut mat with the scraper or brayer tool. Following this, start loading your cutting material into your craft plotter.
Step 3: Weed Out the Monogram Design
After the cutting process, in this section on how to make a monogram on Cricut ends, unload your mat from the cut-die machine. Now, remove your weeding tool and remove the extra material from the design. However, you need to be very careful while using the tool because small mistakes can damage your design.
Step 4: Transfer the Design to Your Glass
At completing this step, clean your glass with baby wipes in a circular motion. After adequately clearing the design, shift it to the glass and cover it with the transfer tape. To properly change the design on the glass, use a scraper tool to remove any space between the glass and the design.
Step 5: Cover Your Design With Etch Cream
In this step, while performing how to make a monogram on Cricut, remove the tape from your design and cover it correctly with the etching cream. Now, you must wait at least 05 minutes and clean it with baby wipes or keep it under the cold water. You must ensure the water isn’t too hard; otherwise, it might inappropriately clean the cream.
Step 6: Show Your DIY Monogram
Finish making this do-it-yourself monogram by removing the remaining pieces of the cream with tweezers, baby wipes, or an alcohol-free wipe. Next, you need to wait for a few minutes, and your monogram is all set to be used for various purposes. Moreover, you can also upload your project images on an online platform and share your creativity with people worldwide.
Frequently Asked Questions
Question: What Are the Different Types of Monograms That Can Be Made With Cricut?
Answer: Since Cricut is a multi-tasking cutting machine, the various...
Read more »

 Lutetium
 Sagar
Sagar ArsenioDev
 Skyler Brandt
 M. Bindhammer
 Ray
Ray Darian Johnson
 Tim Schonberger