Close
0%
0%

Thor

OpenSource 3D printable Robotic Arm

Similar projects worth following
Important Note: Go to Thor's Website to download the latest version and access updated the content of this project!

Thor is an Open Source and printable robotic arm with six degrees of freedom. Its configuration (yaw­-roll­-roll­-yaw­-roll­-yaw) is the same one that is used on most manipulator robots that currently exist in the market.

In its upright position, Thor is about 625mm and it can lift objects up to 750 grams.

The main purpose of this project was to design a robot that could be used in universities and schools to teach robotics.With this in mind, the design had to be affordable and accessible. Releasing the source files and doing so under an open source licence was the best option: anyone could study any element of the robot in depth and, moreover, modify or adapt it to their needs.

At Thor's Website will find updated info about this project, manuals, list of materials, the community forum and much more. Visit us!


To develop this project, I have been involved in several areas of expertise:

Hardware choice

In order to have a nice accuracy on the moves without raising the price too much, I chose stepper motors for the movement transmission. I had to choose stepper motors with mechanical reduction for the second and third articulation in order to manage the torque generated in these articulations. For the two last DOF I chose smaller steppers with the purpose of reducing their weight.

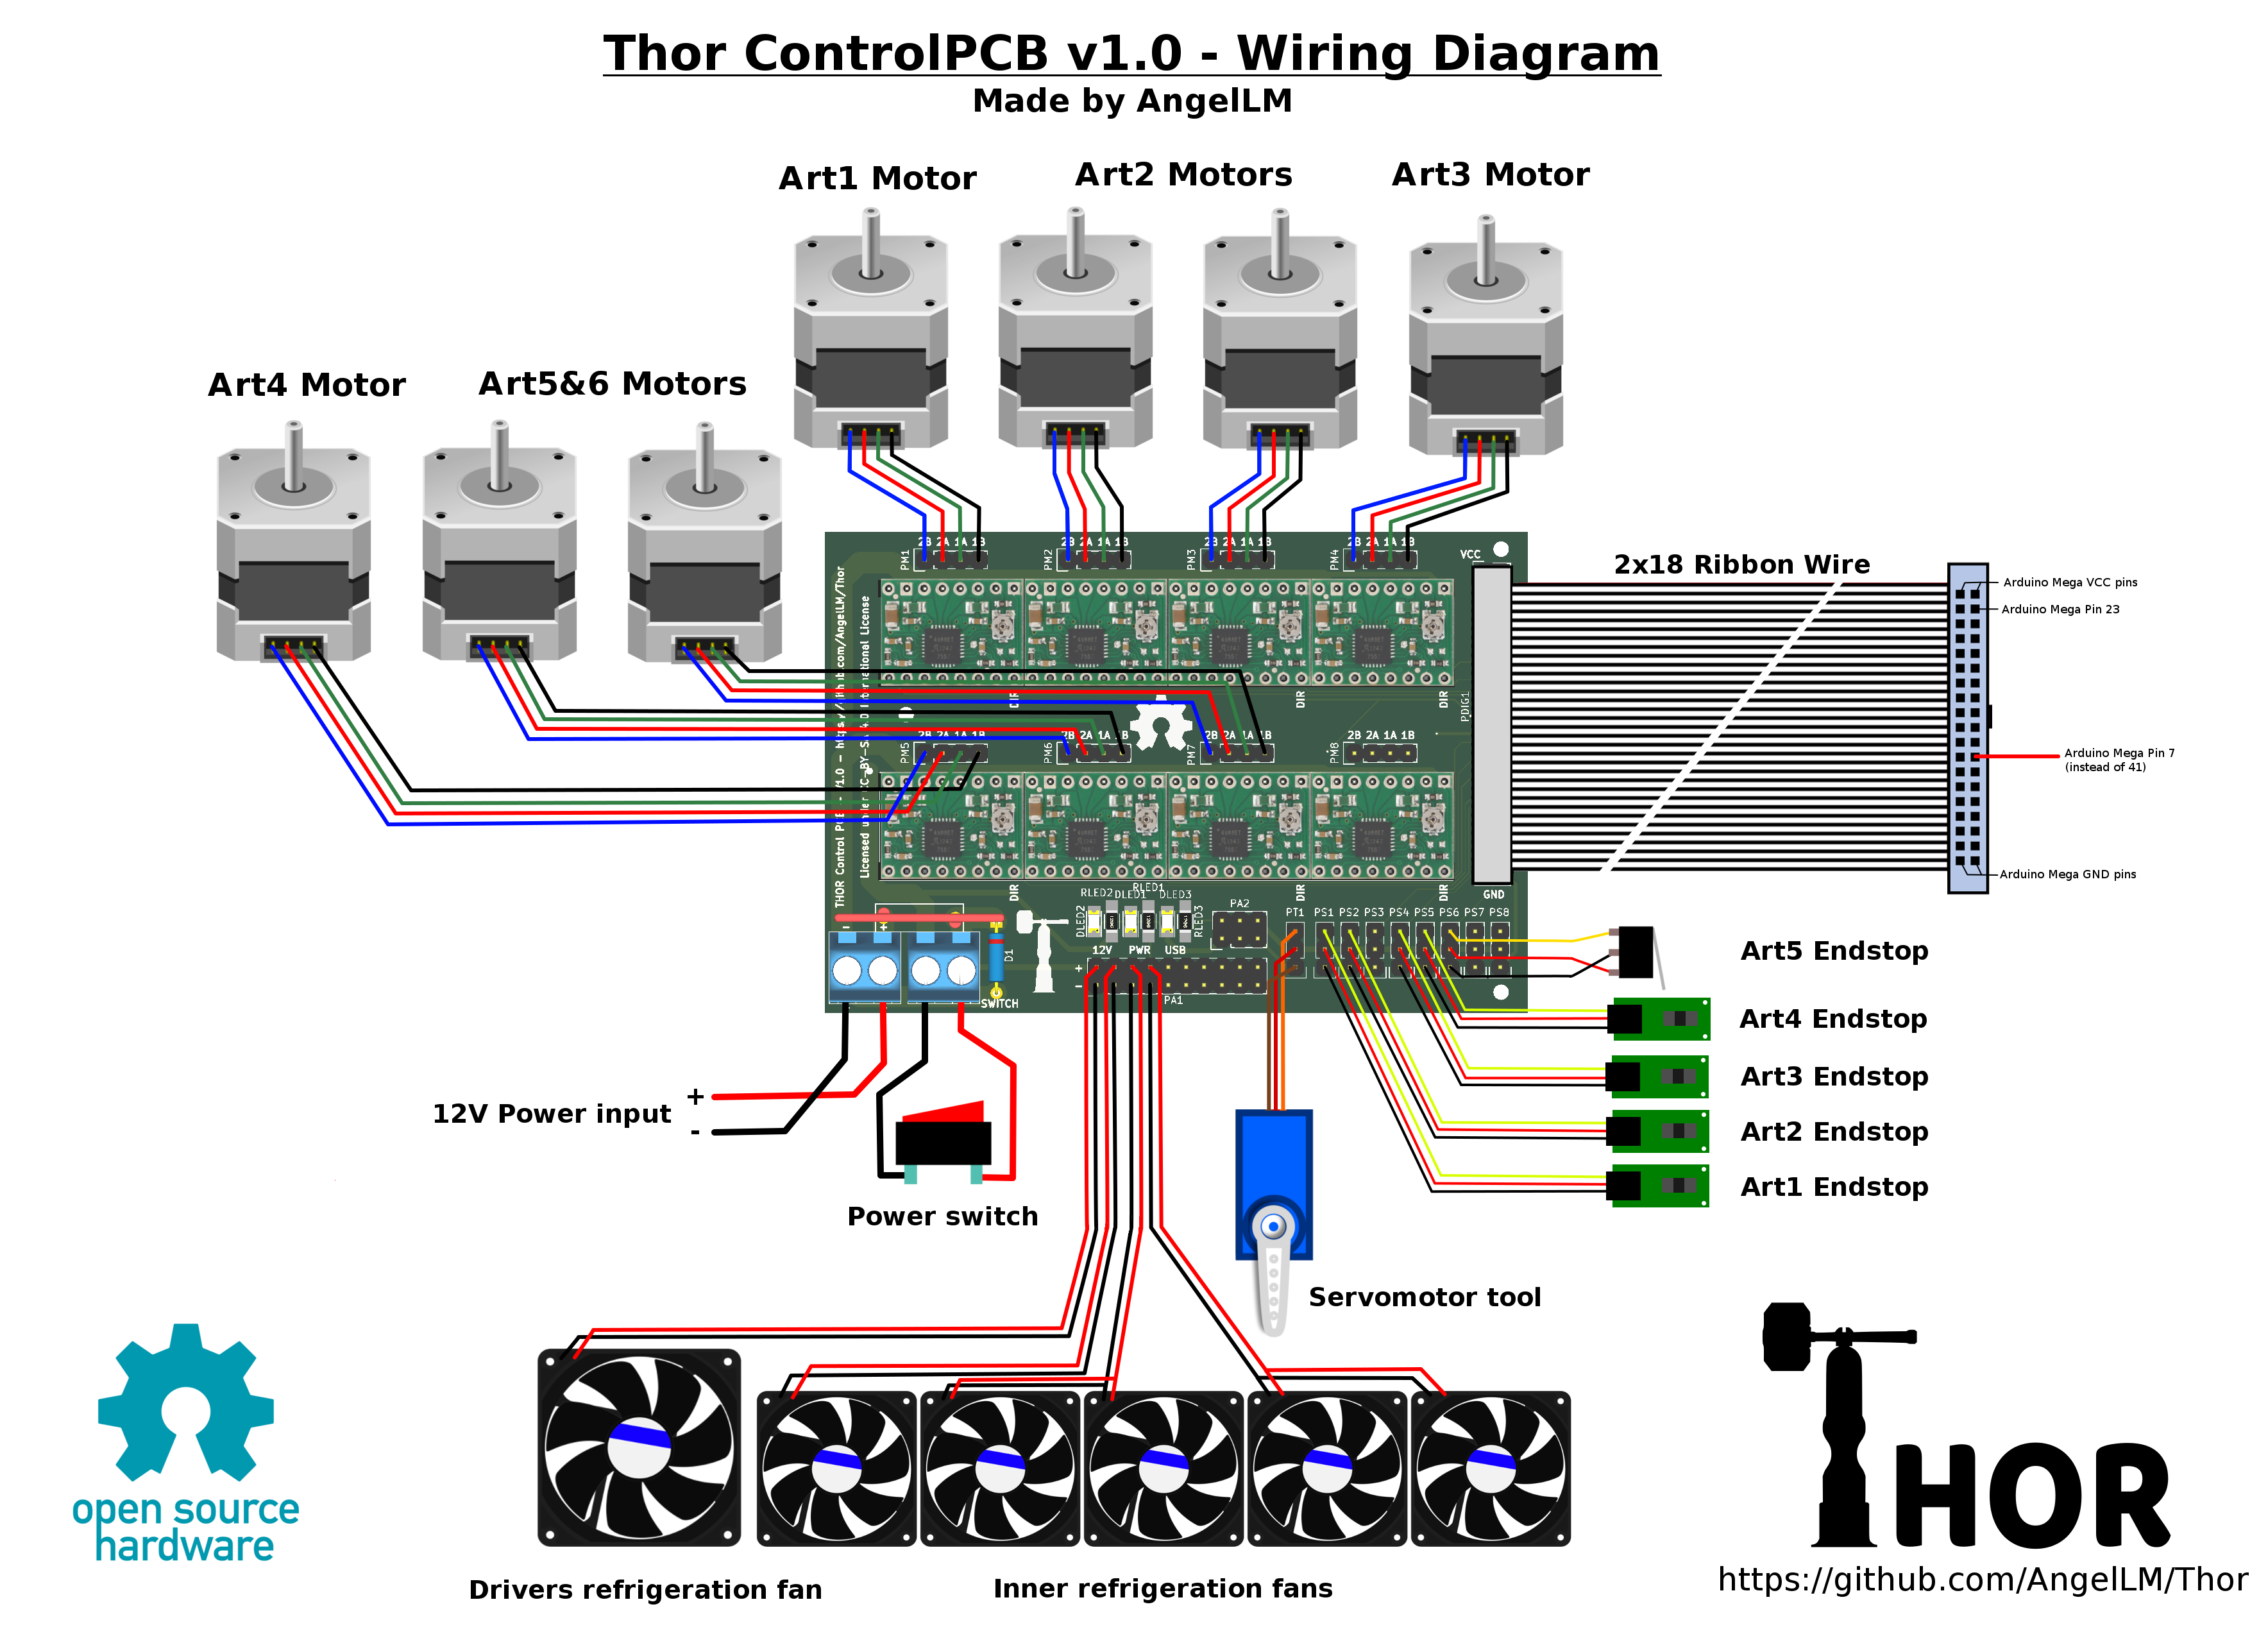
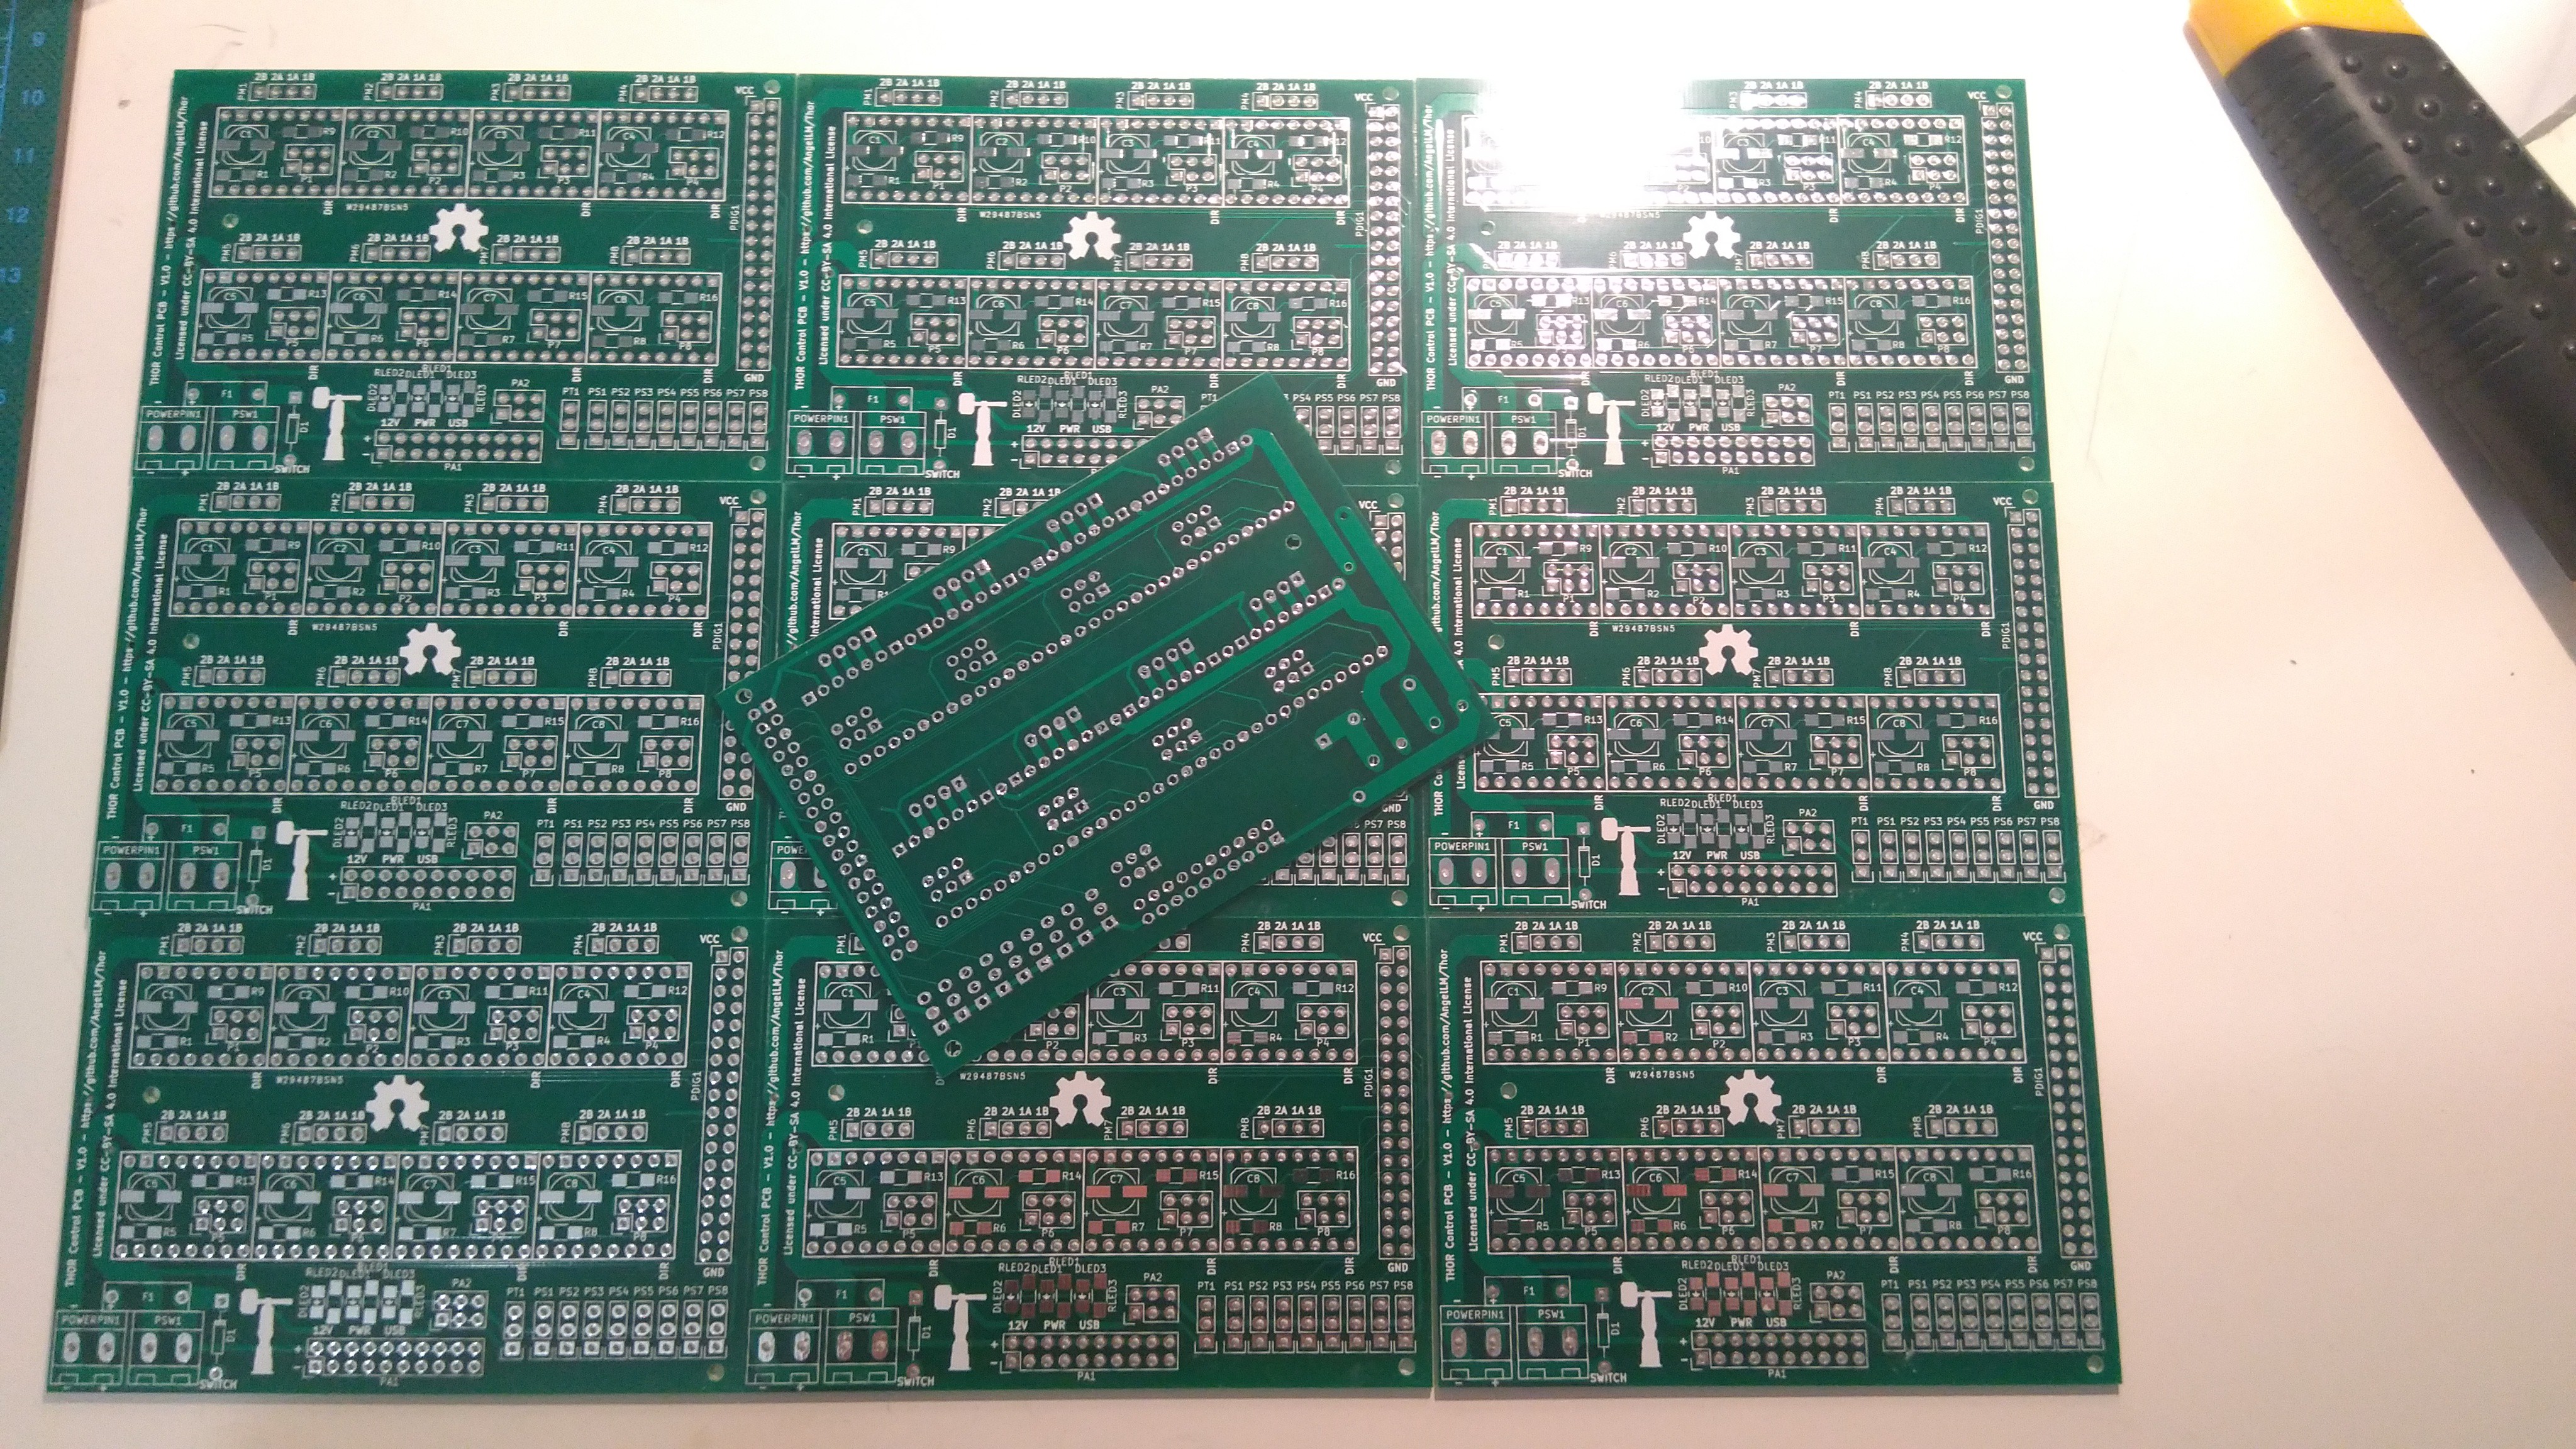
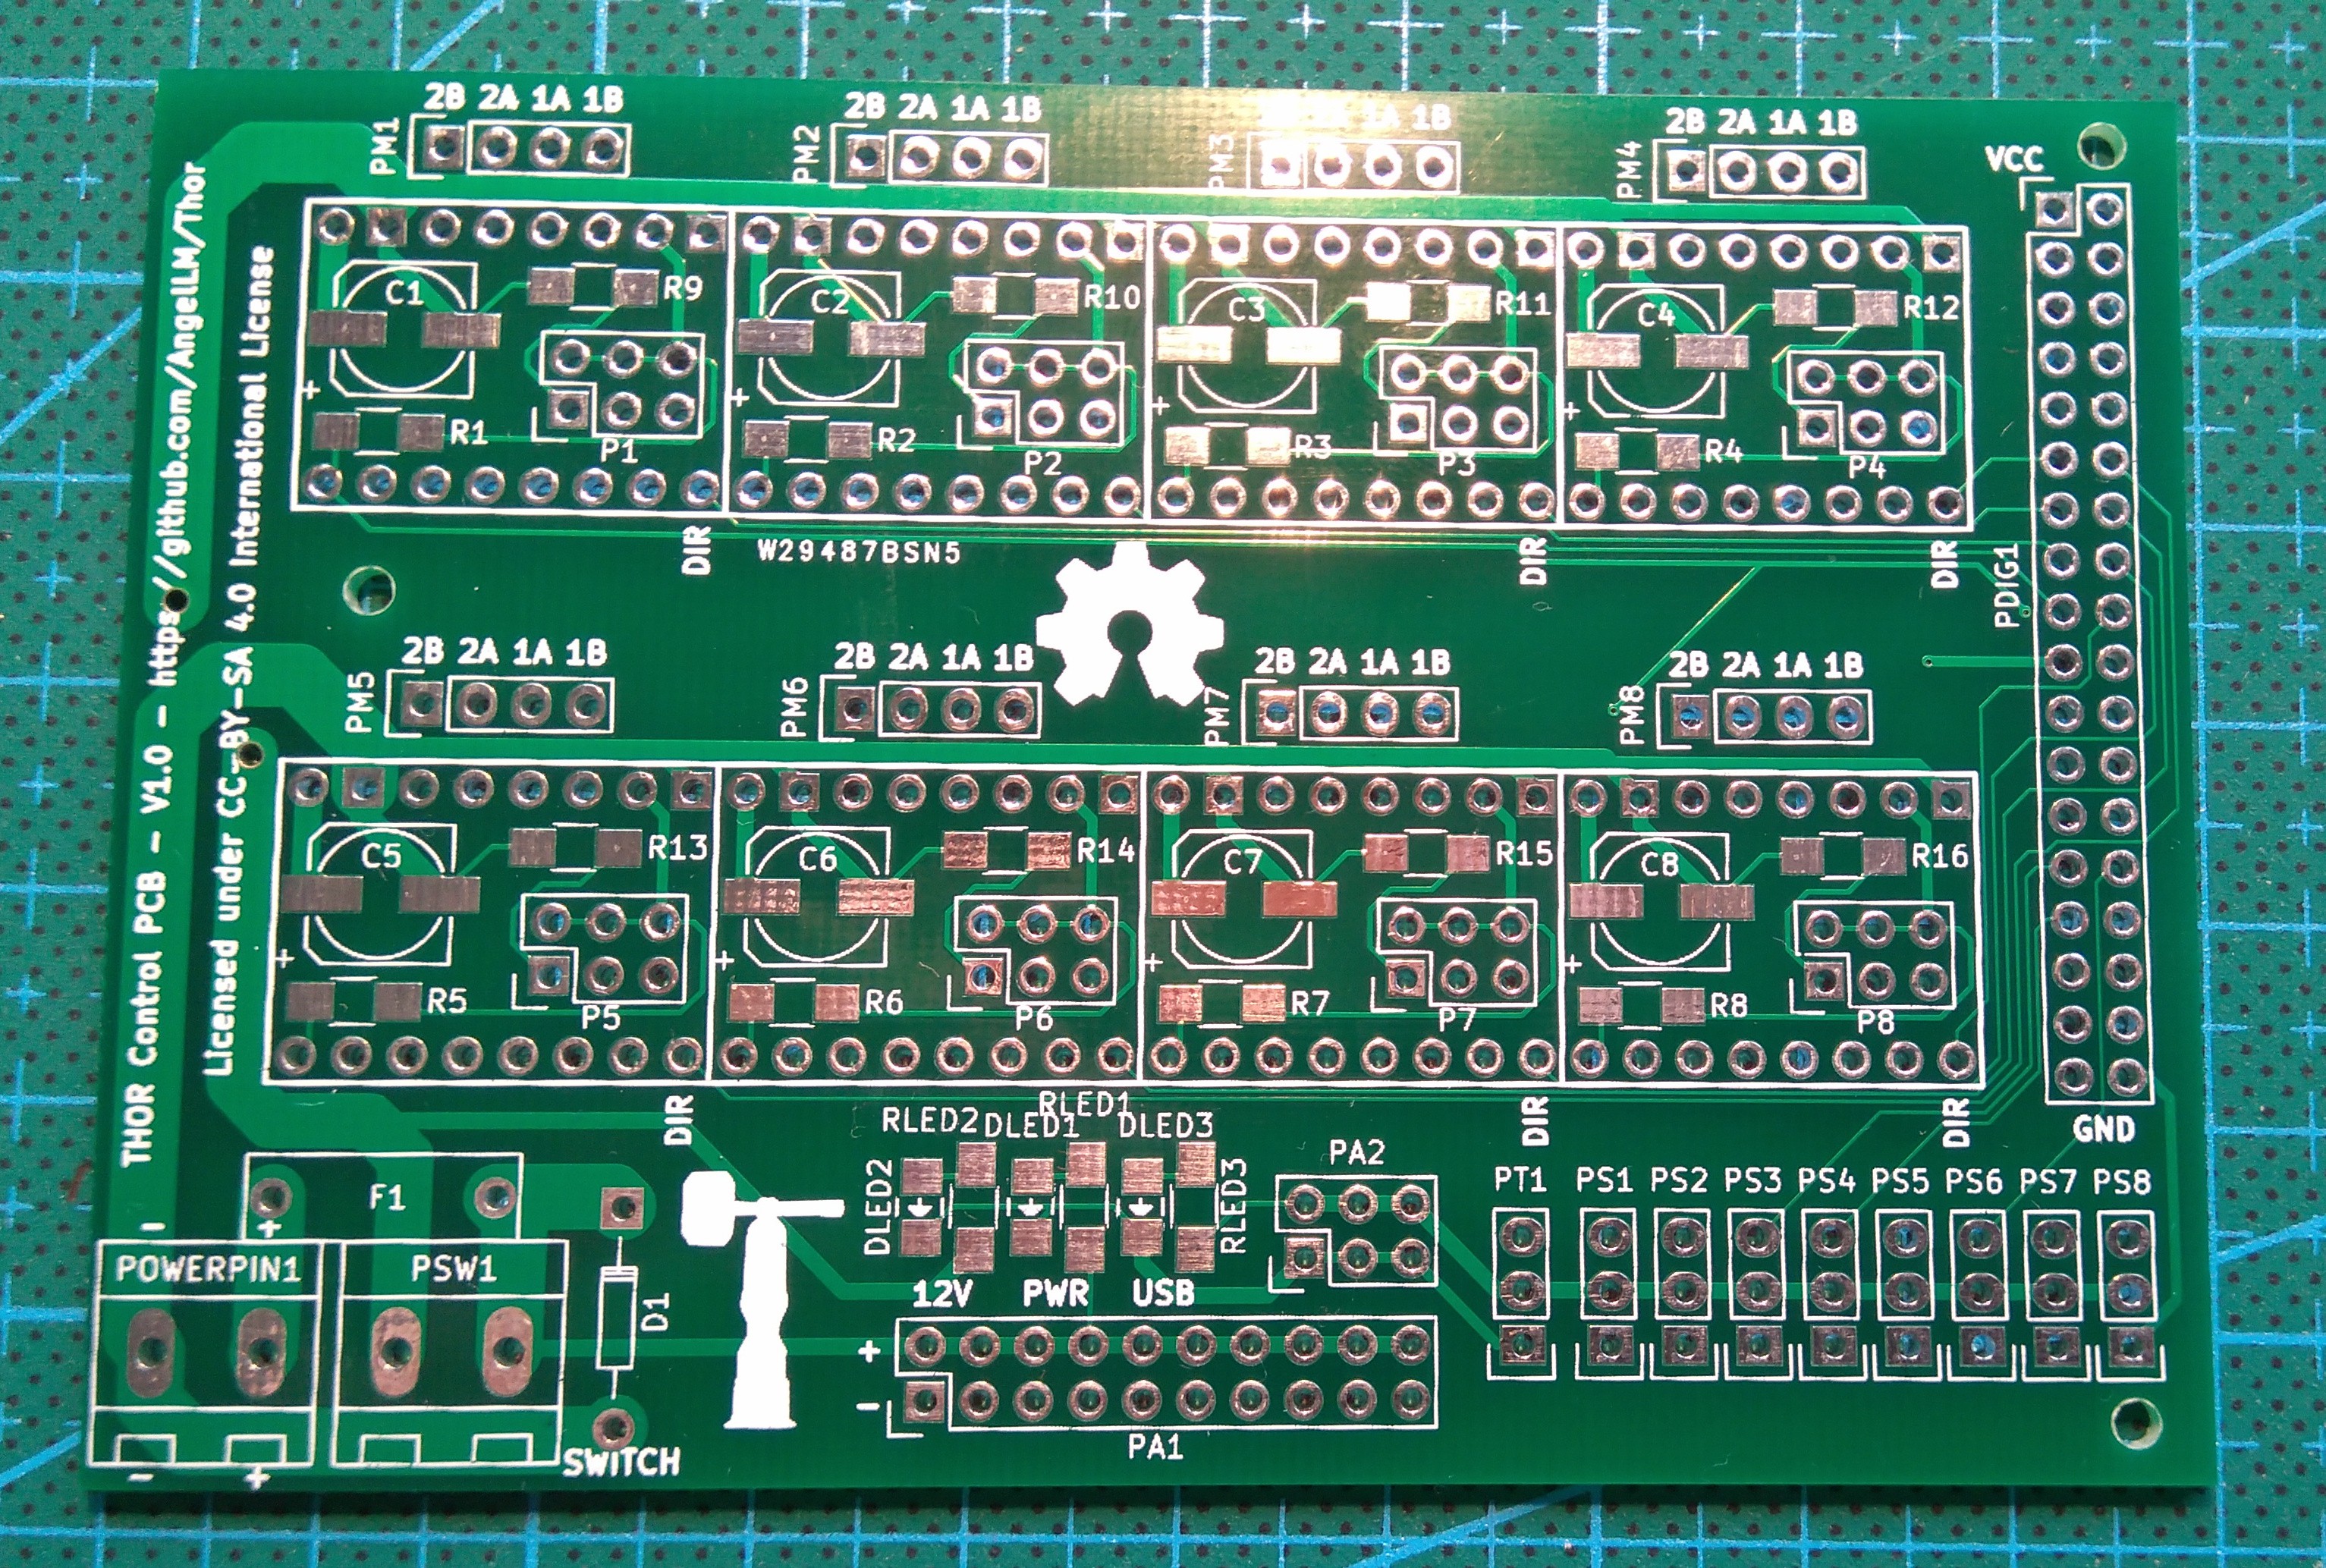
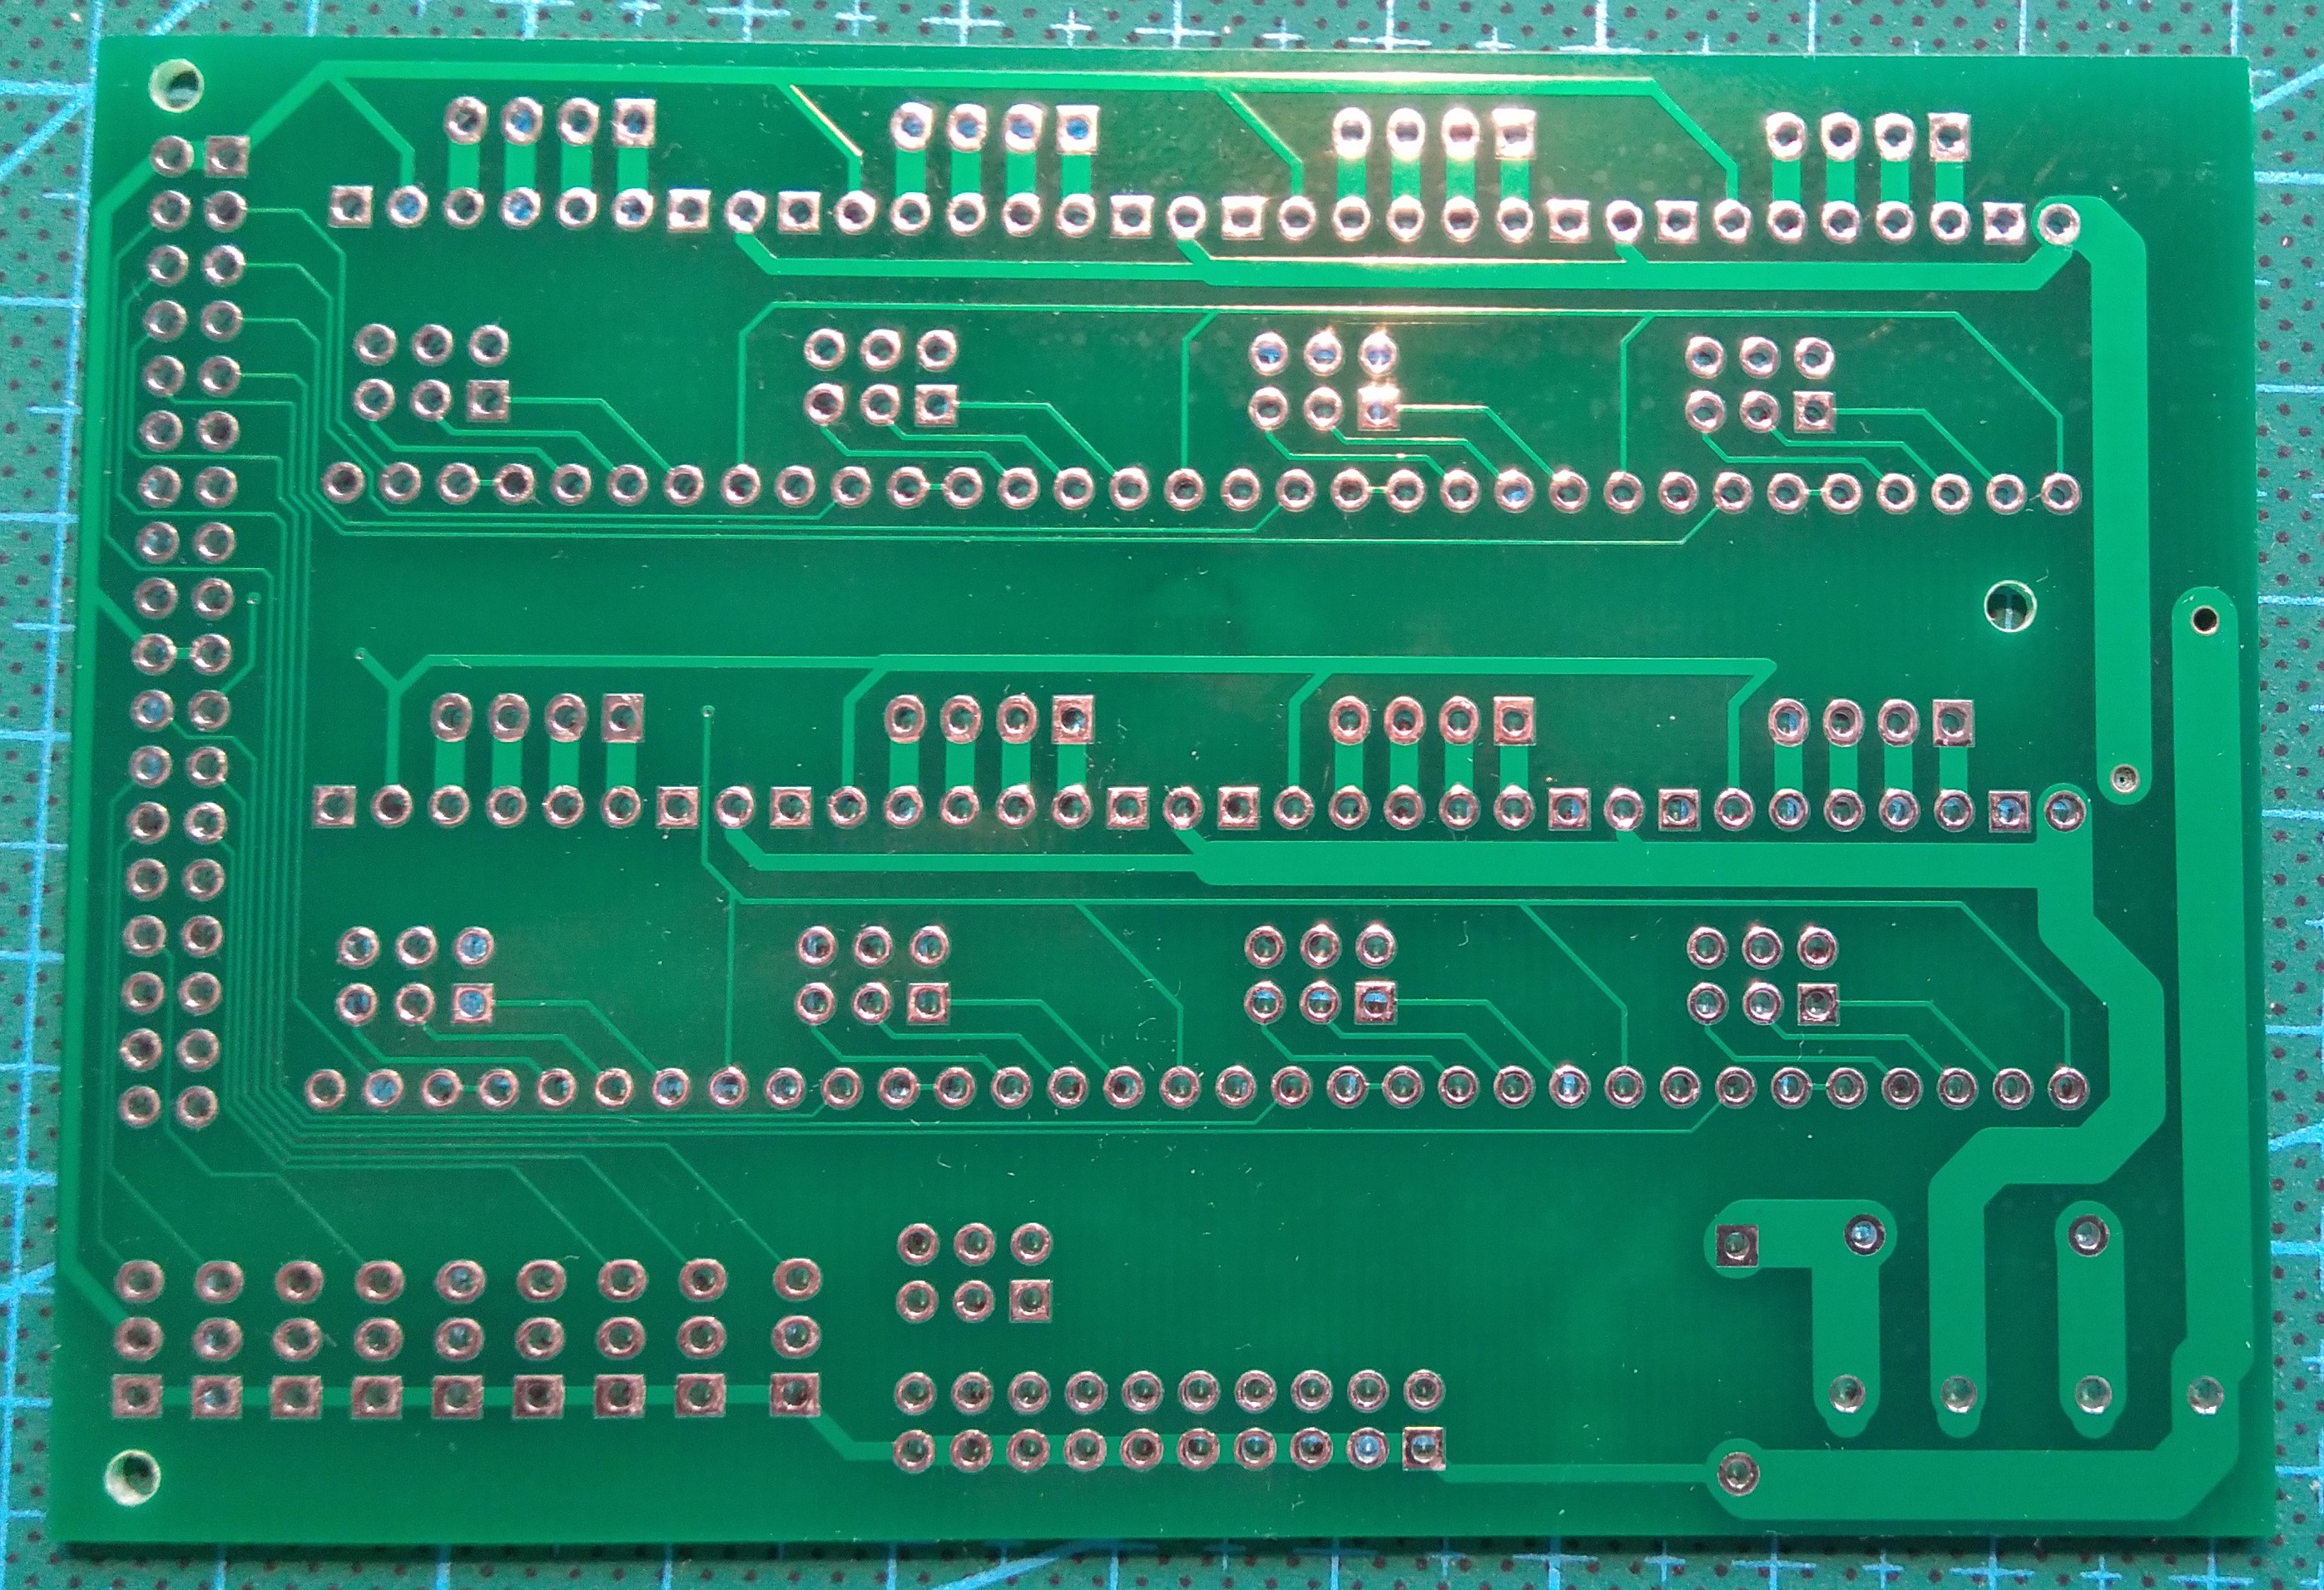
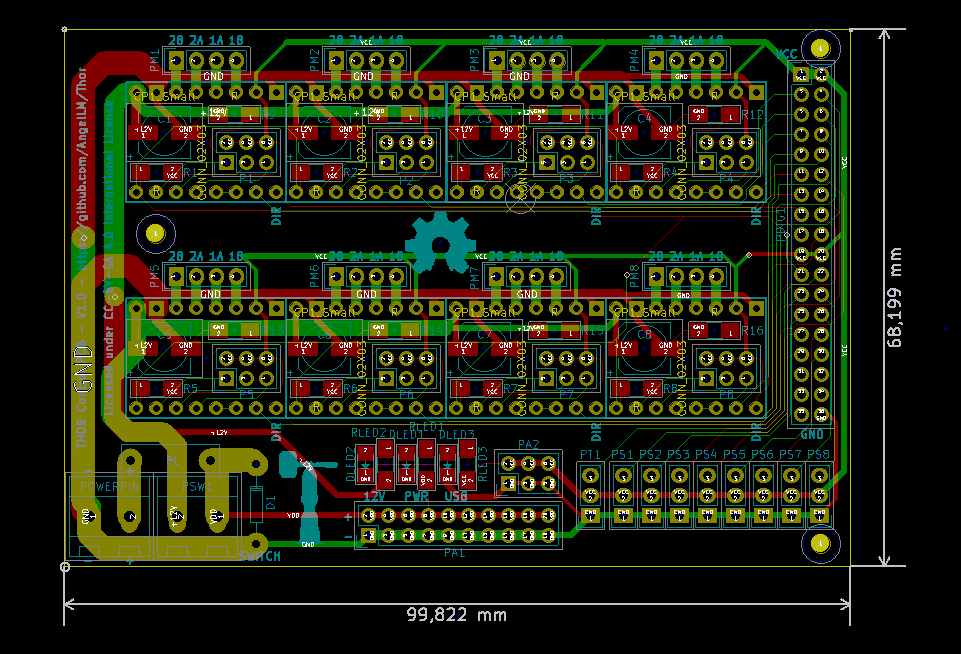
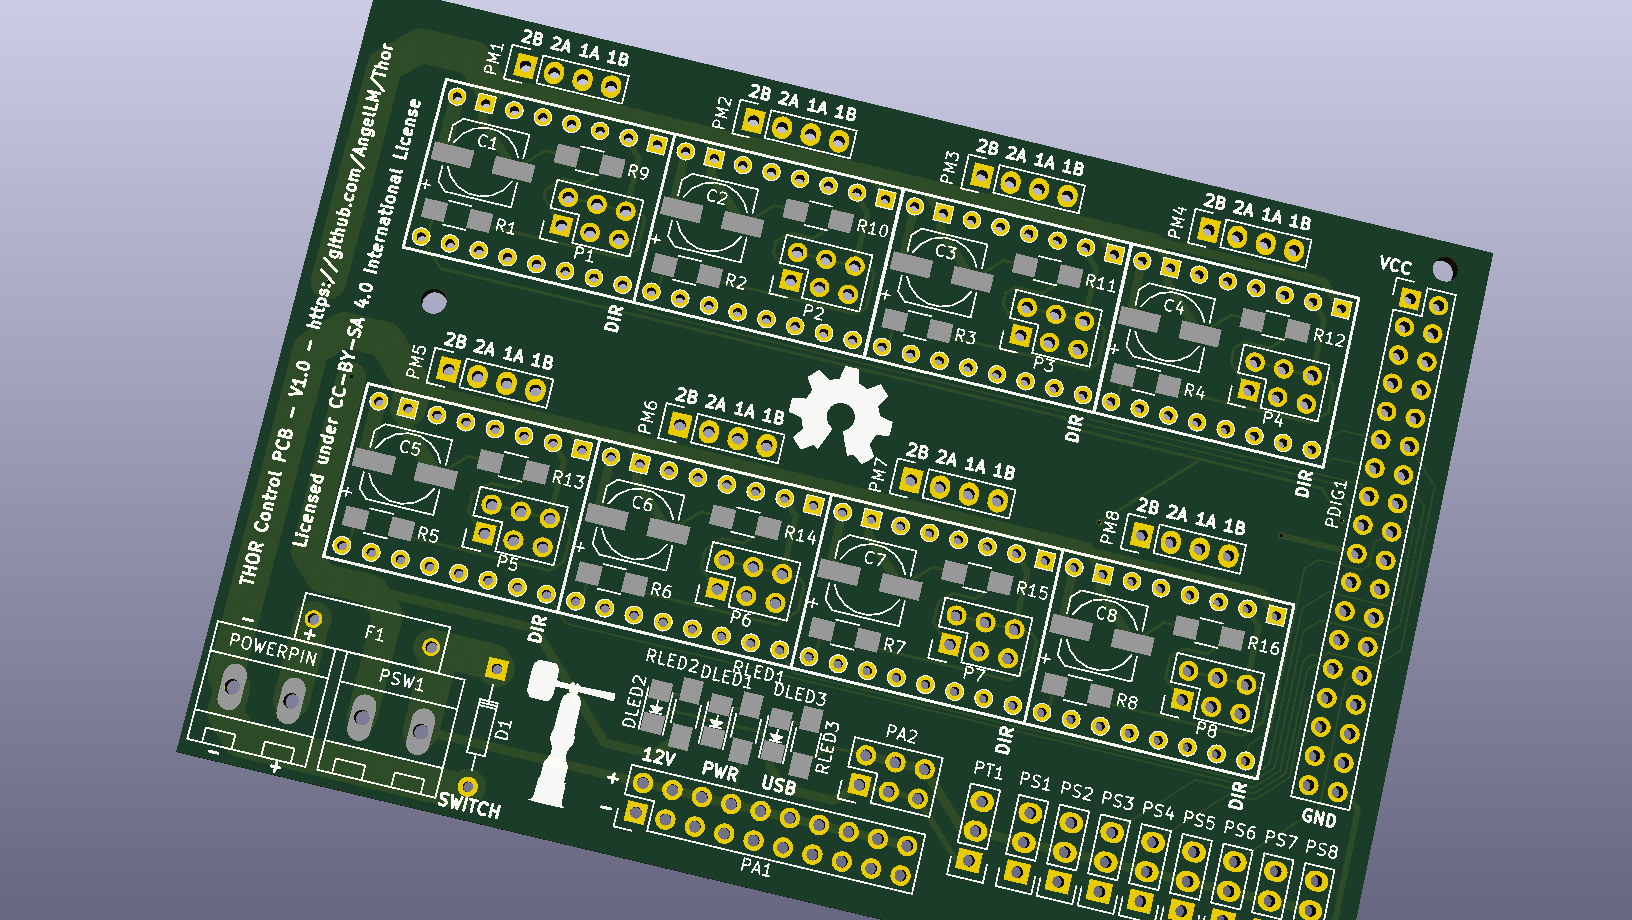
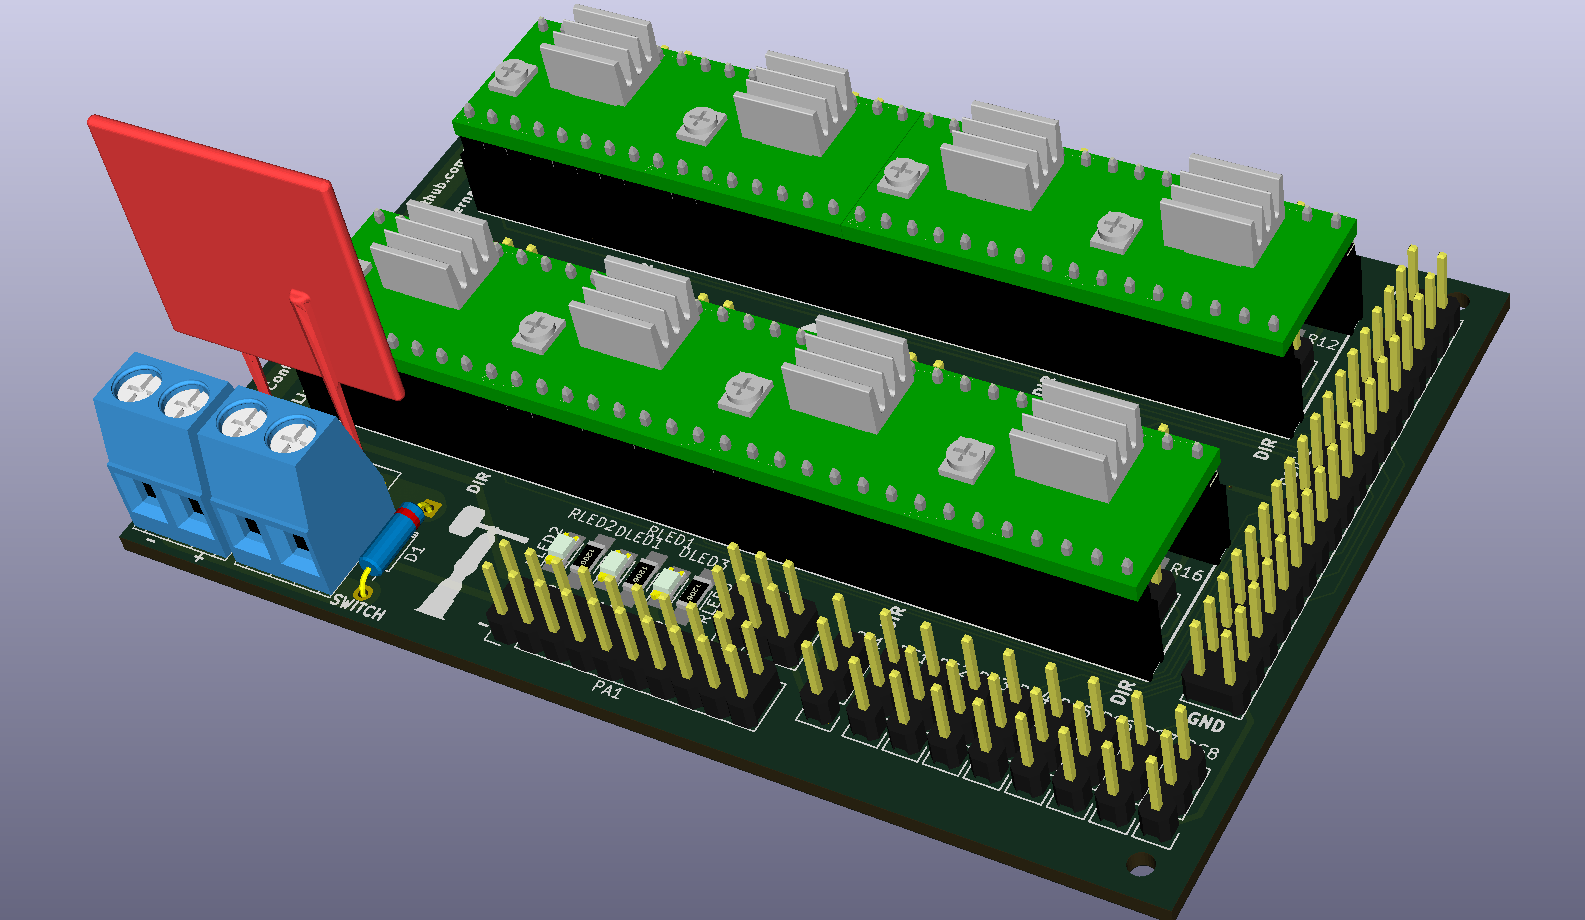
For the electronics I chose an Arduino Mega as main controlling board. And I designed a "shield" to make possible the control of 7 steppers. I chose pololu A4988 as stepper drivers.

For the transmission of the third, fifth and sixth articulation I have used GT2 Pulleys and GT2 Belts.

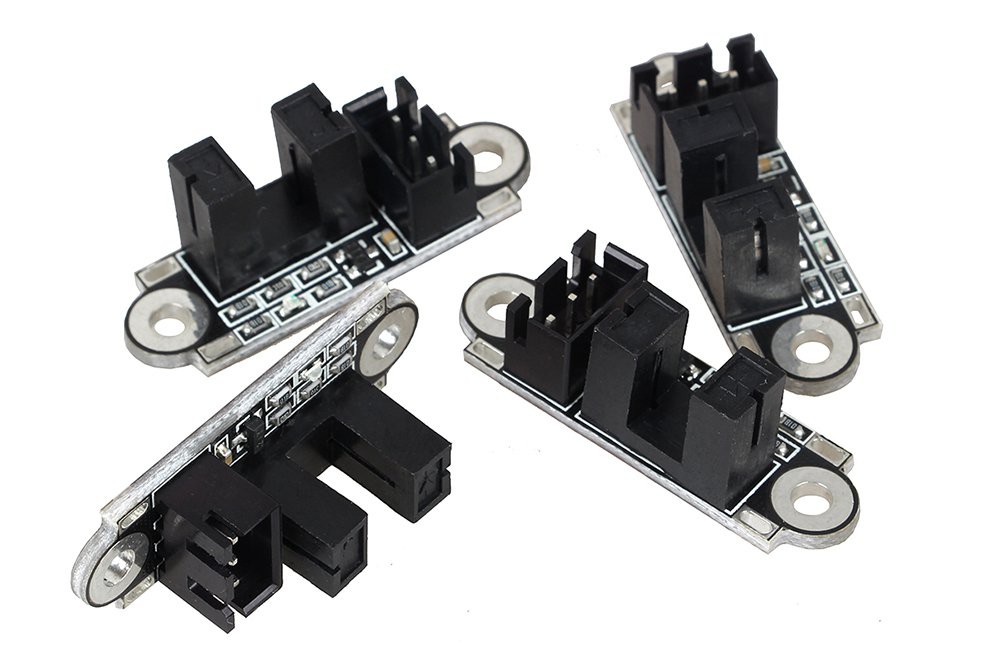
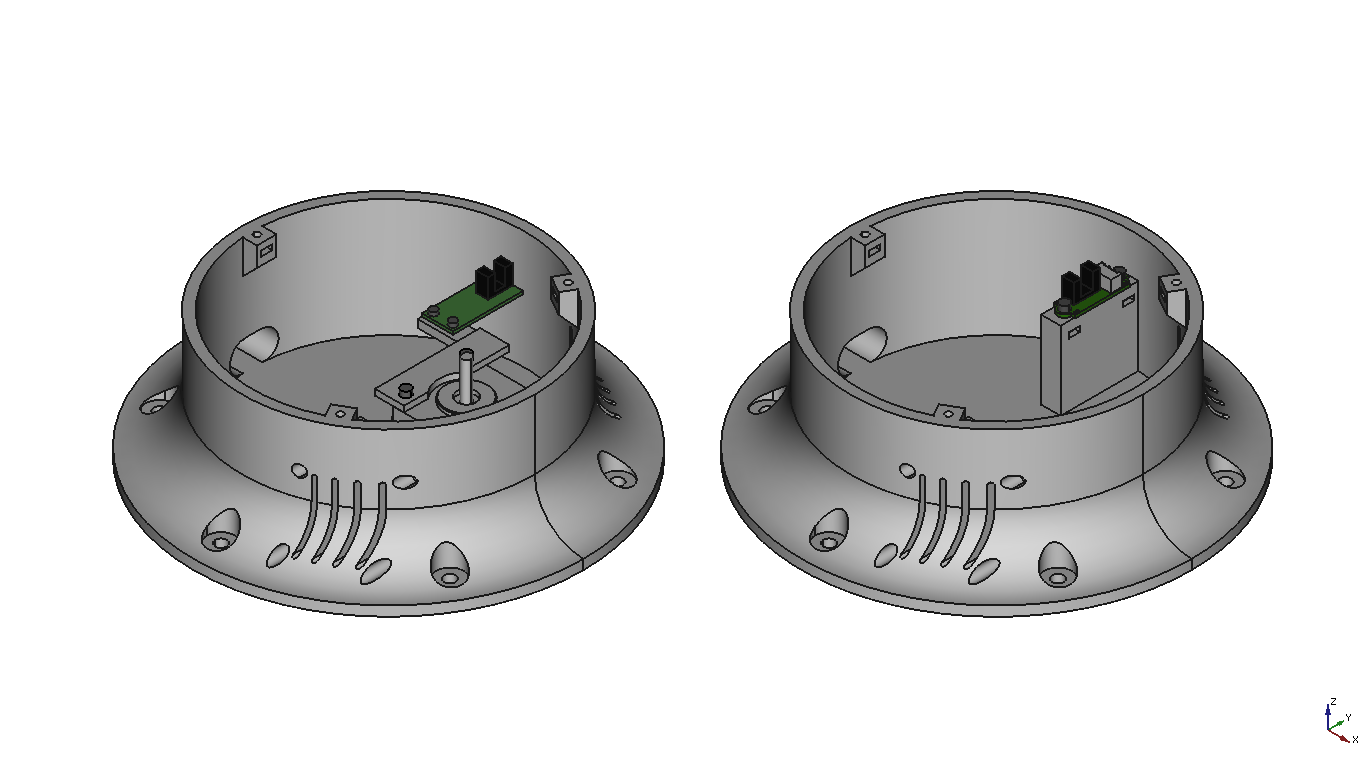
Finally, I chose optoisolators and a micro-endstop in order to establish a home position for the first five articulations. Using optoisolators instead of mechanical stop allows it to rotate more than 360 degrees without colliding with the sensor.

As you may have realized, all of the hardware I have chosen is commonly used on DIY 3D printers.
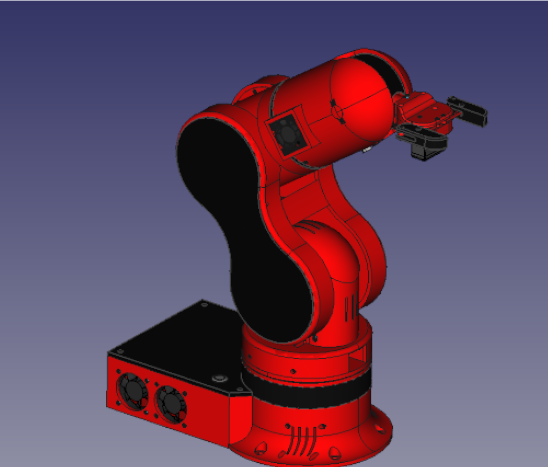
3D Design

I used FreeCAD software in order to design the pieces of the robotic arm. There are 37 different printable pieces in Thor. For every piece there have been a lot of iterations behind the final one.

Some design solutions are inspired by commercial robots, others are the result of hours of work and others are just serendipitous ideas.

The final design had to be compact and safe. I wanted to hide every motor and every single wire to make it more aesthetic. Also, I designed covers and protections to reduce the risk of entrapment while the user is manipulating the robotic arm.

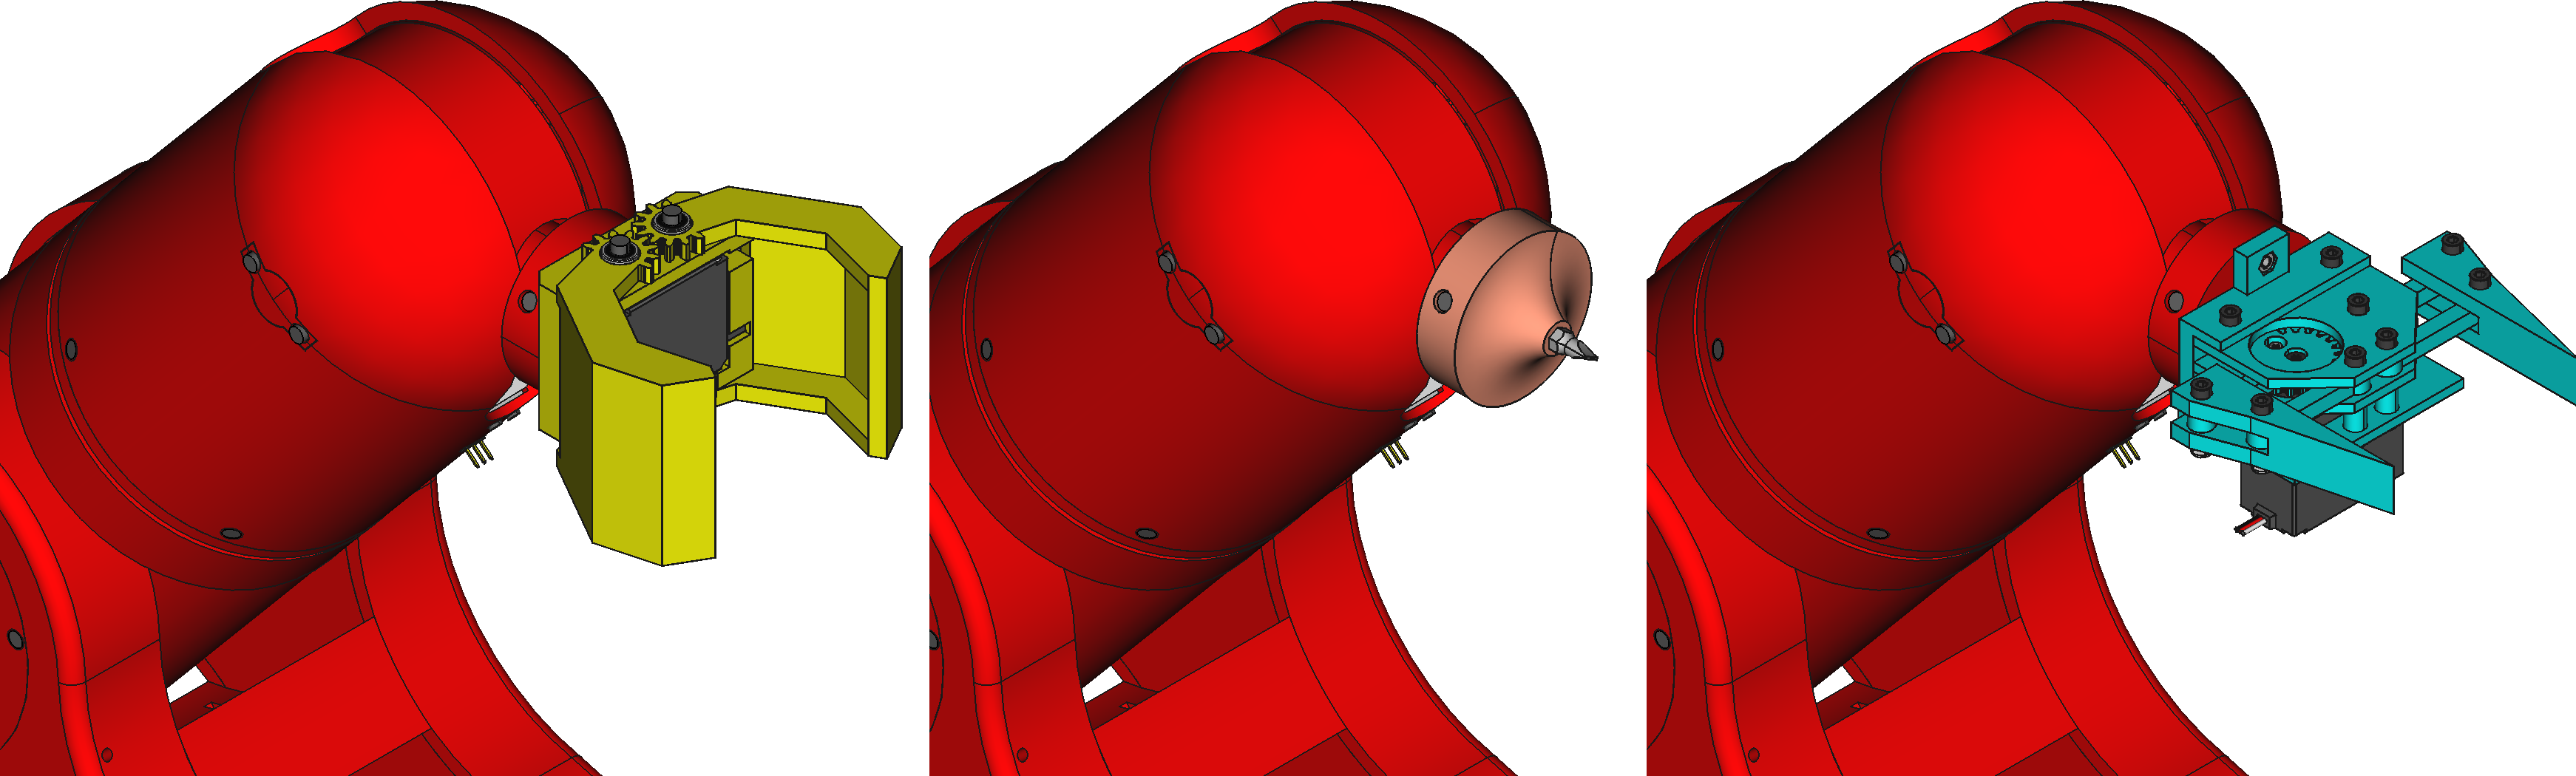
None of the 6 DOF is a end-effector. There are a lot of commercial and DIY grippers/vacuum/hooks around the web and for each use something different is needed. Instead of integrating a gripper into the design I decided to make an adaptable design making an interface between the end-effector and the robotic arm. This way you have 3 options to include a tool on Thor:

1. You can modify the interface, placing the mounting holes wherever you need them.

2. You can modify the tool, matching its mounting holes with the interface ones.

3. You can design an intermediate piece that fit with the interface on one of its sides and with the tool on the other side.

I like the whole robot, but I'm especially proud of these 3 solutions:

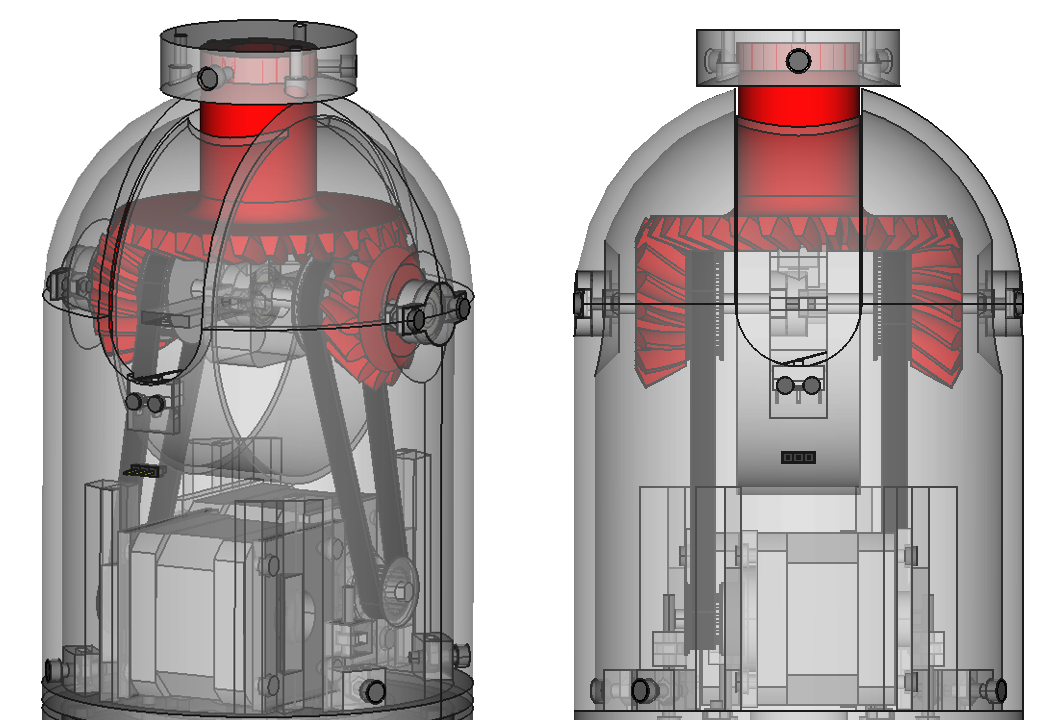
- Semi differential (5&6 DOF)

This kind of transmission allows it to do two types of movements using two small gears that act over a big one. When the small gears rotate in the same direction, the big gear bloks and rotates around the small gears' axis. When the small gears rotate in opposite directions, the big gear rotates around its own axis.

This way, actuating over the two small gears allowed me to place the steppers as lower as I could, transmitting the movement with GT2 belts and reducing the torque generated by the motor's weight.

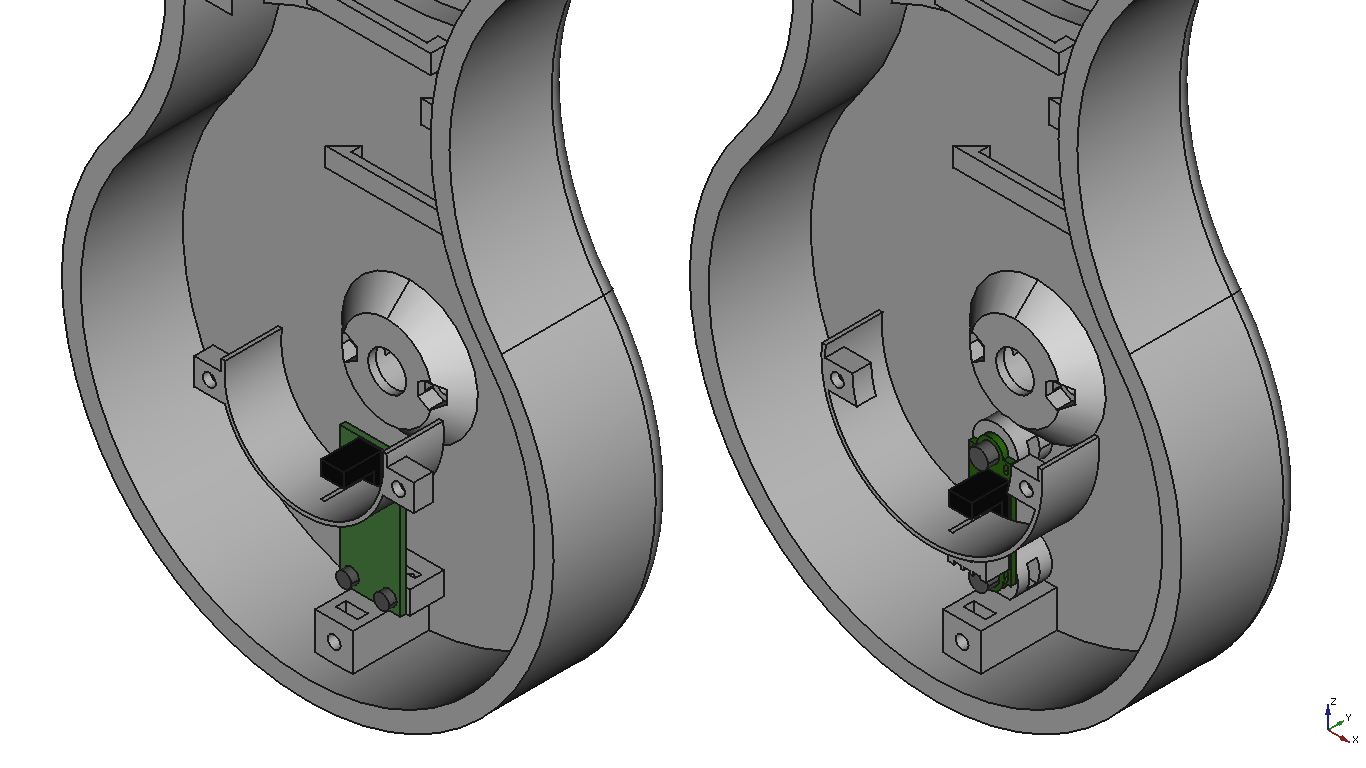
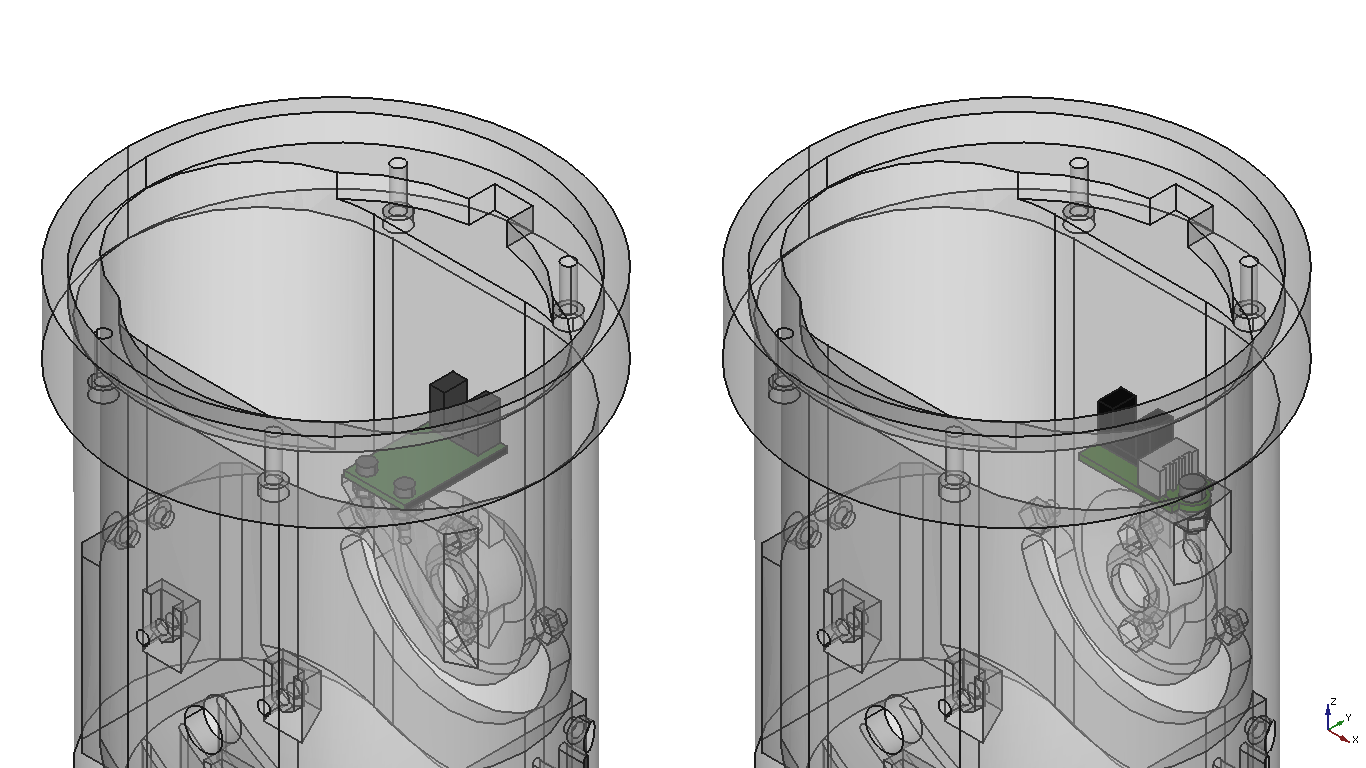
- Support point of 2nd DOF shaft

While I was designing the second and third articulations I was worried about the available space. The motors tookup a lot of space and there wasn't a single small area to establish the second support point for the second articulation axis. The solution was one of the serendipitous ideas I have mentioned early. Why not use the shaft of the stepper of the third articulation as the support point for the second articulation axis? And voila! It worked well.

- DIY Bearing

The design of the 4th articulation had an issue, I didn't find a commercial bearing adjusted to my needs. After days of searching, I decided to make my own. Inspired by a solution that some users used for the Ciclop's bearing, I designed the bearing using 6mm airsoft balls as bearing balls. The result was precise, almost without backlash (after some printing...

Read more »

sla - 864.73 kB - 08/03/2016 at 14:50

Download

sla - 991.29 kB - 08/03/2016 at 14:50

Download

sla - 29.57 kB - 08/03/2016 at 14:50

Download

sla - 745.20 kB - 08/03/2016 at 14:50

Download

sla - 133.68 kB - 08/03/2016 at 14:50

Download

View all 39 files

  • 1 × Barrel Jack Connector Control PCB
  • 112 × Female Pins Control PCB
  • 5 × 3 Wire female connectors Sensor PCBs
  • 4 × Kg of filament
  • 1 × Nema 17; L=40mm; Holding torque: 39.22 N.cm

View all 51 components

  • Important Announcement: Community migration & Thor v2.1

    AngelLM11/24/2021 at 12:51 0 comments

    Hello everyone!

    It has been a while since I last had the time and motivation to make a substantial improvement to this project. This time I have taken it up with enthusiasm and I think it has been worth the effort.

    I'm proud to introduce you the new Thor's website. I did my best to gather all existing project documentation in one place. I have also taken the opportunity to add new documentation and improve the existing one in order to make the project accessible to more people.

    And let's be honest, although it has been useful, Thor's Google Group mailing list is not pleasant to use. It's also a service that Google could eliminate from one day to the next, losing all the information there. That's why I've taken the trouble to migrate all the messages to a forum hosted on the new site, much more intuitive to use in my opinion.

    I have migrated the users, but not the passwords, so if you had posted a message in this group you will have your user created in the new forum. To set your password you will have to follow this link.

    From now on, the google group will be obsolete and only the new forum will be used, in order to centralise all information in one place.

    And this is not the only change I am proud to announce. I have also released a new Thor design. Designed in FreeCAD 0.19 and based on an old redesign I started a few years ago, Thor v2.1 is now available for download.

    Besides the aesthetic changes it is worth mentioning the new features:

    • Integrated electronics box.
    • Ventilation grills in every articulation.
    • Integrated fan holders.
    • New gripper design.
    • Several design fixes.

    And that's all, I hope you like this new news and see you on the new website!

    Best Regards, Ángel LM

  • Thor's 3rd Birthday!

    AngelLM08/31/2019 at 12:38 0 comments

    It has been 3 years since I released Thor! Woah, time goes by really fast.

    As a birthday gift I want to boost this project, but I'll need help from the community to do it.

    I want to gather all the features, improvements, crazy ideas... that you would want to see in the new version of Thor.
    I have created a list where you can vote and add ideas in a quick and simple way. ¡Feel free to add anything! I will take them all in account!

    How would you improve Thor?

    Thanks for these three years! :)

    Ángel L.M.

  • Thor GUI - Asgard

    AngelLM02/18/2018 at 15:26 0 comments

    Hello everyone!

    It has been more than a year since I released the Thor project. From the beginning, the project was very well received. It received tons of views, likes, comments, forks...
    And more important than the "fame", the feedback started to arrive. Many people liked the robot, but not the way to control it. Not everyone knows how the GCodes work and, even if you know it, sometimes you don't want to type a GCode to move a robotic arm.

    So, some users started developing or adapting GUIs for Thor (I can't really express all my gratitude to they). But at this point, I don't really know the state of that GUIs.

    That's why I decided to make my own program to control Thor. A GUI designed using Qt and programmed in Python. It's my first time programming something that doesn't use the terminal for the user interaction so please be gentle with me hahaha.

    This GUI is called Asgard and is OpenSource too. You can find the source files at the Github repository. Do not hesitate if you want to collaborate in the development, help is always welcome!

    These would be the key features of Asgard GUI: (features marked with a ✔ are already implemented!)

    • User-friendly Graphical Interface ✔
    • Forward Kinematics implementation (1st version) ✔
    • Inverse Kinematics implementation (2nd version)
    • Sequence Programmer (3rd version)

    Some things that I have though about but not in the short-term:

    • 3D display
    • 3D IK Controller/Sequence Programmer

    Finally, this is the current look of the graphical part of Asgard:

    I'll be posting logs as the development reach the different versions. But if you want to be more in touch with Asgard and Thor notices and developments, I would recommend you to join us at Thor's Google Groups community!

    If you have some suggestions/tips/comments please post them! I will be happy to know what do you think about this!

    I'll keep you updated!
    Ángel L.M.

  • Commercial Sensors Adaptation!

    AngelLM08/17/2017 at 09:31 0 comments

    Hi there!

    It’s been a long time since the last time I wrote a log! I’m back!

    Thor’s community is growing fast! There are (at least) 4 Thors assembled & operational around the world and another 17 being built! There are schools and universities relying on Thor for teach robotics… Great yaaay!

    The more people are interested in this project, the more feedback I get. Recently I have received several questions about the sensors I’m using to establish the home position of Thor (opto-couplers, opto-transistors, opto-switches… whatever). To be honest, until now it was pretty tricky… I made my own sensors using a DIY CNC for the PCBs and soldering the components by myself. As this project has attracted different kinds of people, I thought that it could be nice to simplify this issue: making Thor compatible with commercial sensors instead of creating the custom ones. Let’s try to not reinventing the wheel!

    The first thing was to find a cheap commercial sensor which could fit inside Thor. To make things easier, I was looking for a single model which could fit in the 4 articulations. For the first three ones was an easy task, but the sensor located in the Art3body piece for the 4th Articulation had to be pretty small to not collide with the  Art4TransmissionColumn piece.

    Finally I found this one in Aliexpress which met all my needs. I think that it won’t be hard to find that kind of sensors in other online-shops, but I tend to use Aliexpress because of its large catalogue.

    So, without further ado, these are the changes I made in the design (on the left side the old design and on the right side the new design):

    The sensor for the 1st Articulation is now fixed to the BaseBot piece.

    The sensor for the 2nd and 3rd Articulations are placed in a similar position as the custom ones, I modified the Art2BodyB piece adding fixing point for them. Also, the Art23Optodisk has been redesigned to work properly with the new distances.

    The Art3Body piece has been redesigned to fix the sensor of the 4th Articulation. The board of this sensor has to be cut to avoid the collision with the Art4TransmissionColumn piece. Do not worry about that cut, there are no circuits in that zone of the PCB, so can be cut gently.

    I have only tested it using the 3D models. The sensors fit, but presumably the connector of each sensor will have to be replaced with other flatter.

    FYI: the last commit where you can find the older files (the ones for the custom sensors) is this one: b86594c4d48fa64d71cc373a52b4e3dac6e4bde9

    Do you like it?

    Ángel L.M.

  • THOR support in Robot Overlord

    Dan Royer08/08/2017 at 19:28 0 comments

    It's the crossover episode you've been dreaming about!

    https://www.instagram.com/p/BXi0Ci4gLqb

    THOR robot arm is now simulated in Robot Overlord.  Forward and Inverse kinematics can be manipulated visually in 3D.  I feel confident it won't be long before RO is talking to the firmware and any THOR owner can drive their arm from the software.  One step closer to fully open source process automation!

    Special thanks to @angelILM for producing the STL files and dimensions on request.

  • Control PCB Wiring Diagram

    AngelLM04/22/2017 at 14:13 2 comments

    I just made a Wiring Diagram for the Control PCB v1.0 board.

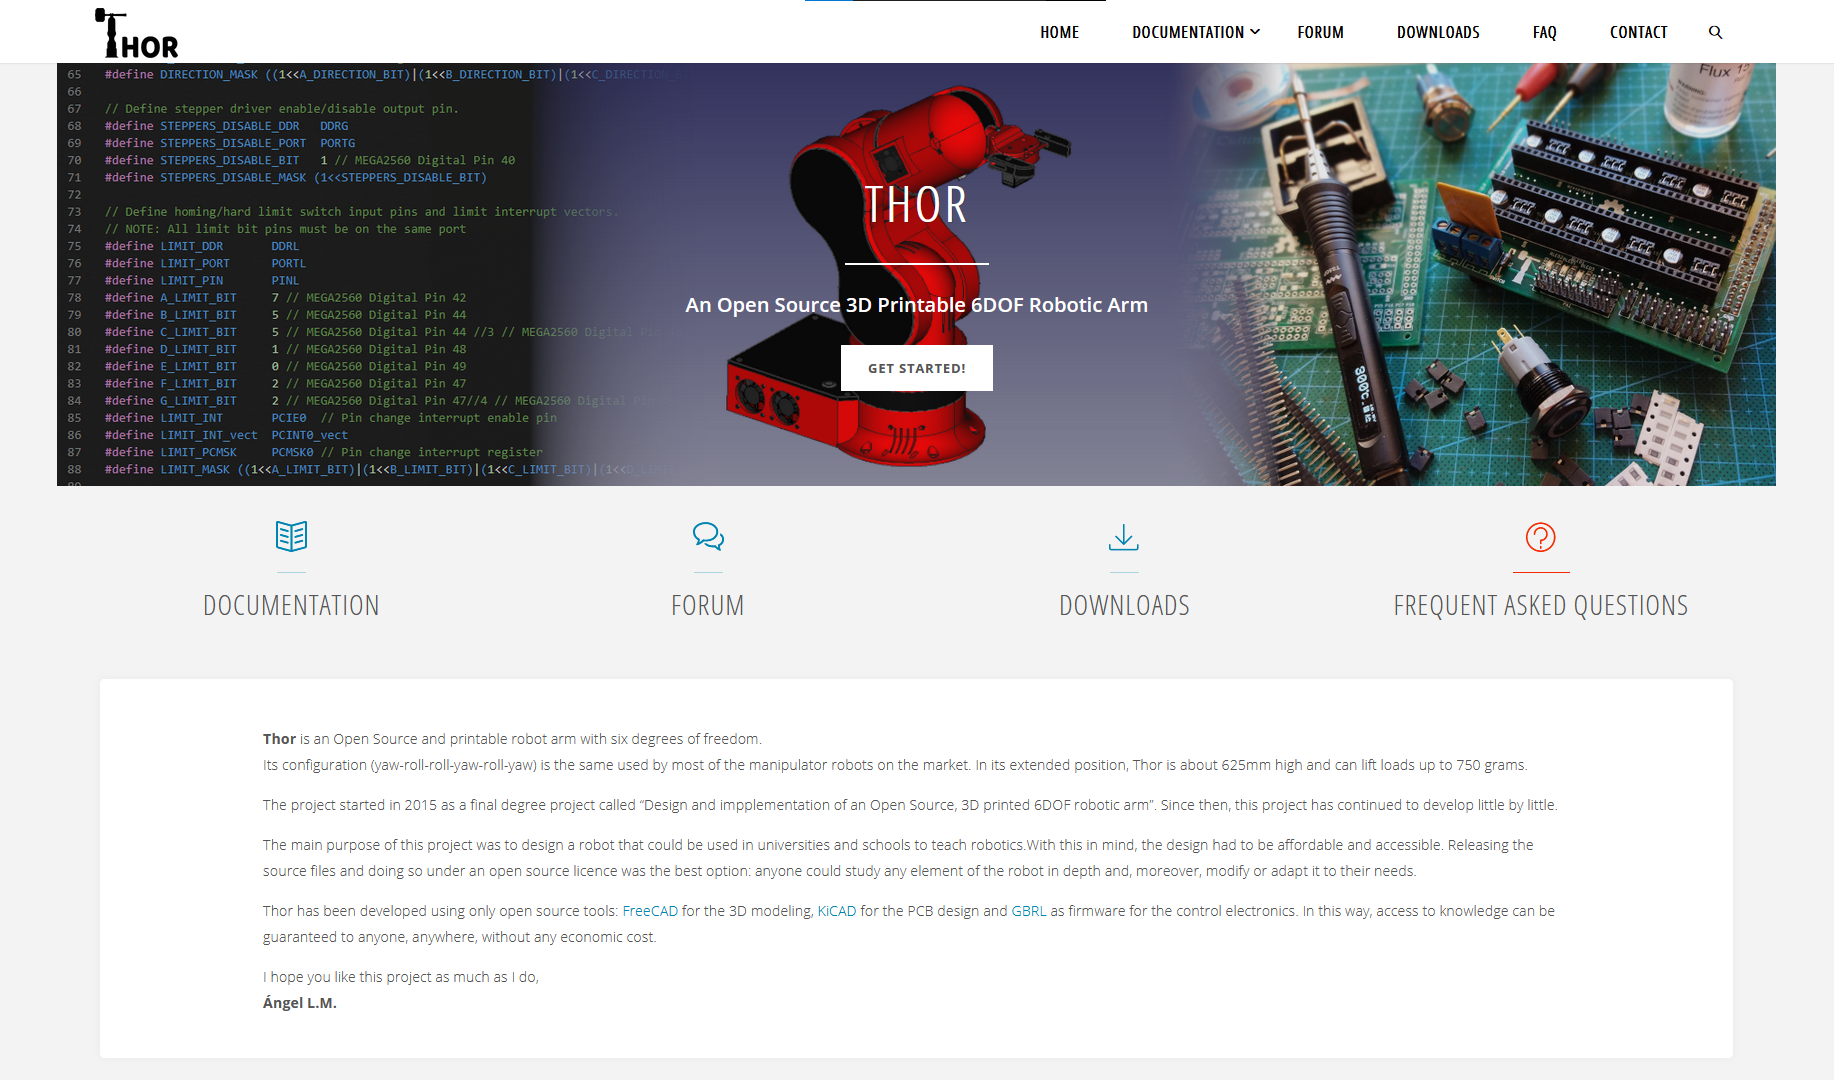
    You will find the full resolution image & source files at the
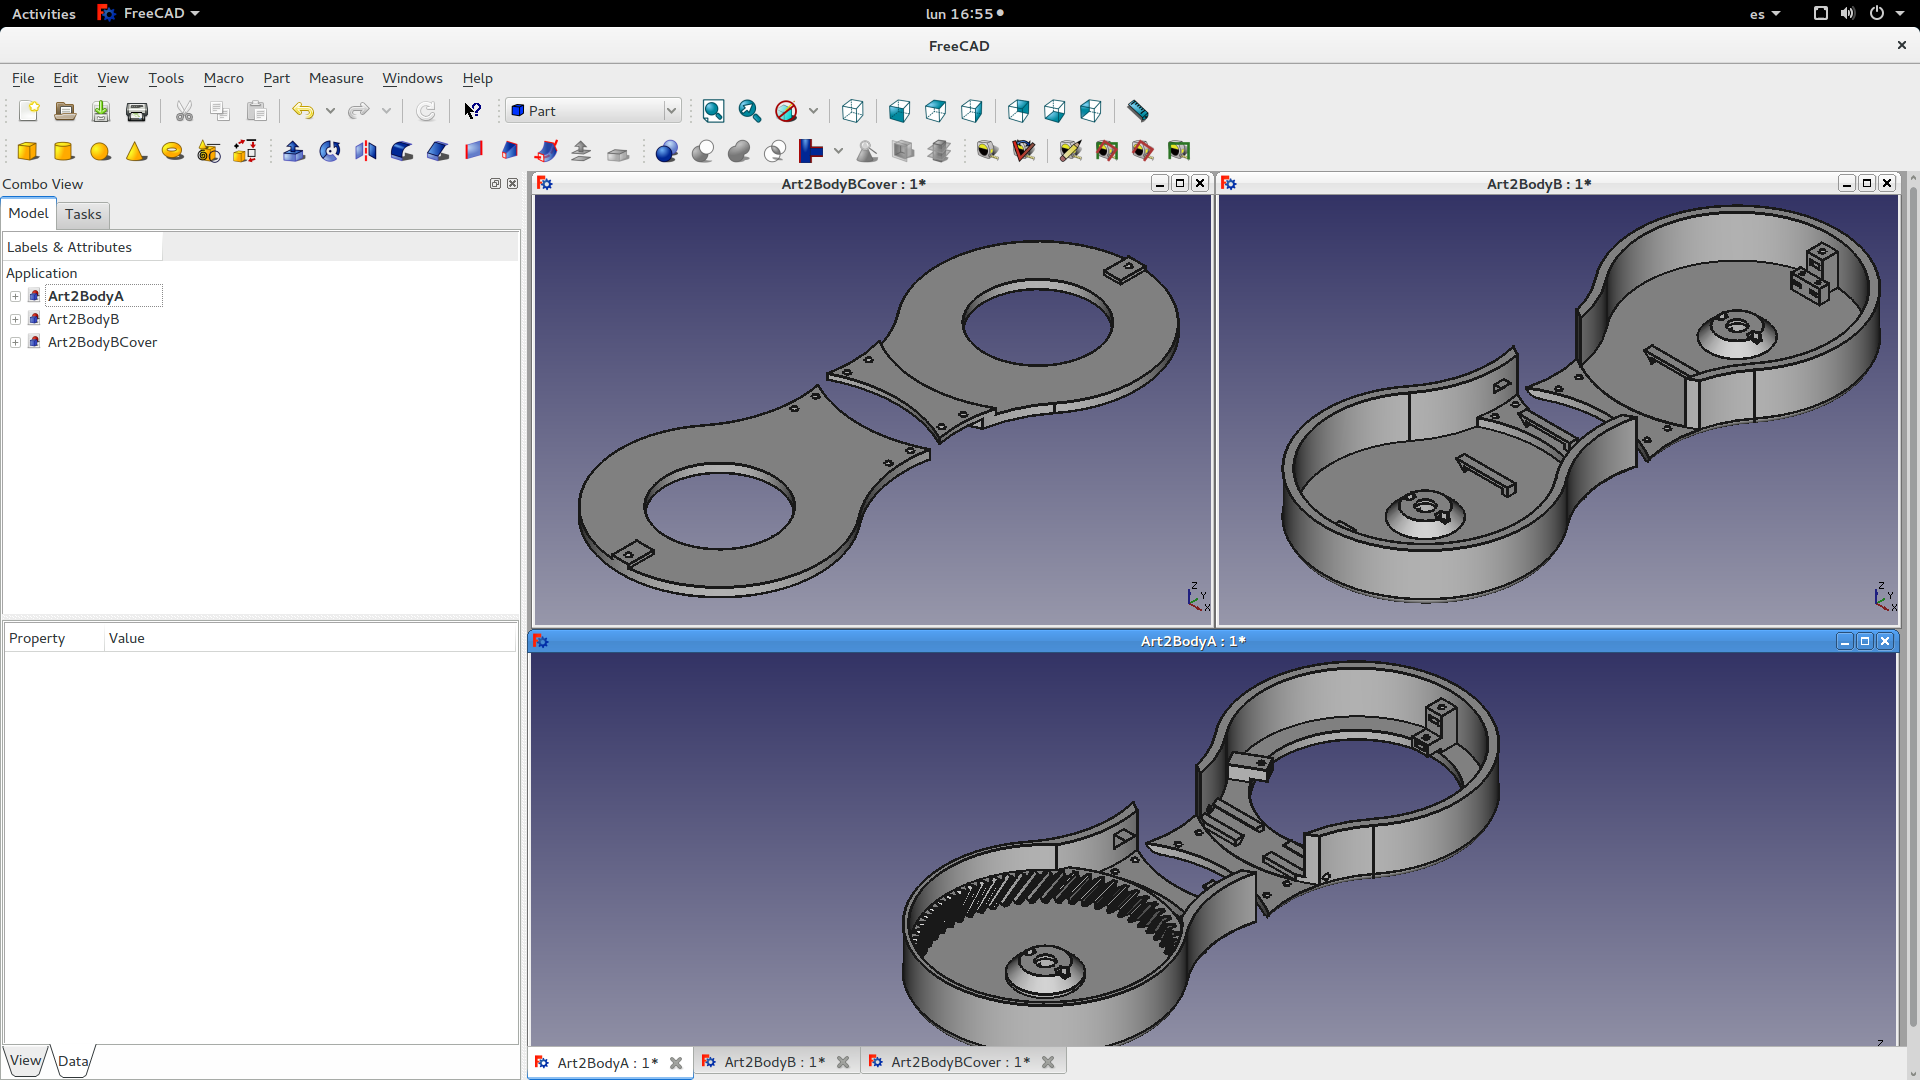
 Github repo.

    I want to remind that there is a Google Groups community with 90 members in this right moment where you can ask, share and read about this project! Join us! :)

    Check soon my fork of the grbl repo to get the lastest firmware for the ControlPCB board.

    Best regards,
    Ángel LM

  • Thor's community is now online

    AngelLM01/15/2017 at 16:30 3 comments

    Hi!

    Since a few weeks I'm receiving a lot of questions/feedback/information from many different directions (email, Twitter, Hackaday, Thingiverse, GitHub, Wevolver, etc.).
    One thing is clear, this project has become known, at least more known than I expected at the beginning, and I cannot do other than thank you! Thank you for your likes, your comments, your feedback, for sharing the project, contributing to it and for building a Thor. You rock!

    Also, from the very beginning I wanted everyone to became part of this project and share all the information. I think that the current platforms I'm using are not the ideal ones to develop a community project. Using a lot of platforms is convenient for spreading the word, but not for focus the information...

    That's why I decided to make the Thor mail-list community. I have been in other communities of Google Groups and it works so well. Everyone can access, everyone can ask/answer/show, it's easy and clear and it's free. In this way I want to share all the info I have with you all. And you will be able to help, give/get feedback and share your ideas, progress and modifications with other community members.

    From now I'll group all info there and I'll be answering the questions there. I'll be posting there my progress and changes too (I will still doing that here too).

    See you there!

    EDIT: I forgot to say that I also did a Frequently Asked Questions in order to answer them :)

  • Danny's mods incorporated!

    AngelLM12/19/2016 at 16:05 5 comments

    Hi!

    Time ago, Danny made some modifications to largest pieces, splitting them and making them printable in 180*180mm bed area printers.

    He made an awesome work, and I wanted that modifications to be in the main repo, so I added it! Also, I migrated the design to FreeCAD in order to have the source files too ;)

    EDIT 21/12/16: I have migrated another 2 modifications to FreeCAD :)

    On the left, my remix of Art4Body modification made by Danny. Designed for low height printers, thank you again Danny :)

    On the right, the BaseBot modification made by Ctrl-Alt-Dude for 190*190mm print area. This will allow more users to print Thor. Thank you too! ;)

    Are you having issues with other pieces?

    Season's greetings for all!

  • New ControlPVB PCB arrived!

    AngelLM12/16/2016 at 14:33 1 comment

    Yay! I received them 3 days ago... Exciting!

    I ordered them to PCBWay and my experience was great! They are fast, kind and very cheap :D And the quality of the PCBs is incredible, very professional. I'll work with them again for sure!

    As you see I have designed it for THT and SMD (1206 package) components. I never used SMD before, but there's a first time for everything haha.

    Now, it's time to wait for the arrival of the components... I think that it will take about a month or two... I don't know if I'll be that patient...

    Hope you like it! :)

  • New electronic board very soon!

    AngelLM12/07/2016 at 21:43 2 comments

    Woah, more than 300 followers! Hello everyone!

    As I said weeks ago, I needed a new electronic board to control Thor... The one I was using had many mistakes (a man may learn wit every day...) and I got tired of botching it. The initial idea was design a DIY PCB board, but due to its limitations and how cheap is to manufacture it in China I decided to design a better control board.

    Of course using OpenSource software, KiCad again.

    First of all, some pictures:

    It took me a few hours to understand the values that I had to set (track width, drills diameters, etc.) in order to send it to the manufacturer... but it won't happen the next time >:D

    Anyway, the new features:

    1. First and the most necessary: Reverse current protection circuit. No more burned drivers because of mistaken power input polarity... It will save my wallet!
    2. This board allows to control up to 8 stepper drivers (instead of 7 of the previous version).
    3. Smaller size: Less than 100mm*70mm.
    4. Easier assembly: the Silkscreen is a nice helper!
    5. Added 3 confirmation LEDs (Power Input, PCB Power, Arduino Power).
    6. Added more 12V aux outputs for the fans.
    7. Added a switch to power off the steppers and keep the fans working.
    8. The connections between the drivers and the male pins that connect with the Arduino Mega are now well driven. This has been possible thanks to the 2 layers board, and it will allows to simply connect a ribbon cable with a 2x18 connector without "hacking it"

    And I think that's all! I'll send it to the manufacturer as soon as I finish another PCB I'm designing.

    Of course, I shared it on the Thor's Github repository. If you are reading this close to the publish date, you will find the new PCB files in the ControlPCBUpdate branch. Feel free to take a look and share your opinions!

    Hope you like it!

    Best regards,
    Ángel LM

View all 17 project logs

  • 1
    Step 1

    Print it!

    3D printer: I have used one with 300x220mm of printing area and 0.4mm nozzle.

    Material: I printed every part with PLA.

    Printing Profile: I recommend to slow down the outer shell speed at least to 50% of its normal printing speed in order to get accurate results on holes, gears, etc. For some pieces supports are needed.

  • 2
    Step 2

    Prepare materials!

    If you want to include the home sensors, you will need to make the PCBs and weld the components.

    It's also recommended to weld a wire extension to the steppers wires, specially for the last three ones.

  • 3
    Step 3

    Make the electronics!

    Make the Control PCB and weld the components!

View all 6 instructions

Enjoy this project?

Share

Discussions

Kylehata wrote 06/15/2023 at 18:29 point

Hi what is the positional accuracy of the thor robot.

  Are you sure? yes | no

Daniel Wu wrote 12/30/2020 at 14:34 point

This is really amazing, I am gonna build one.

  Are you sure? yes | no

nokdam wrote 12/16/2020 at 15:05 point

can i use this project for my study ?

  Are you sure? yes | no

MatiasRi wrote 11/04/2020 at 02:07 point

I need this schematic please, if someone can give me the file I would really appreciate it

https://cdn.hackaday.io/images/6778151470241404077.jpg

  Are you sure? yes | no

MatiasRi wrote 10/28/2020 at 17:37 point

Hi! Sorry, I'm building a cheap Thor design, and I need the schematic of the PCB to control the robot motors, I saw the original board and it is impossible to make it with the elements that I have, so I need the schematic to be able to do it myself

  Are you sure? yes | no

john wrote 09/19/2020 at 04:48 point

can you extend the reach? if yes, did you post the files as well?

  Are you sure? yes | no

Padmanaban wrote 08/27/2020 at 06:52 point

Hi

This is padmanaban. I going to design 6 DOF gripper arm, can you help me in design:)

  Are you sure? yes | no

j.franciscovilla wrote 01/14/2020 at 21:33 point

Tendrá algún documento sobre la cinemática directa y la cinemática inversa del robot.

  Are you sure? yes | no

dunroving wrote 10/22/2019 at 07:12 point

Hi all, I see that it is recommended to use 5:18 to 1 Nema 17 34mm stepper motors but I can only find 42mm motors with an overall length of 70mm, is there enough room in the arm to install these motors? I ask before starting to print the arm.

  Are you sure? yes | no

Gyojin wrote 07/29/2019 at 04:05 point

Hi Angel,

Could you tell me servo motor model?
I have built Thor and now trying operate Gripper(Hs 311 servo motor).
But it didn't operate well.
Thank you :)

  Are you sure? yes | no

thamhut wrote 07/02/2019 at 15:27 point

Wow i like this project

  Are you sure? yes | no

emre_guney_52 wrote 06/13/2019 at 20:05 point

The stl file of the gripper part does not exist in the githup folder. Where can I find.

  Are you sure? yes | no

AngelLM wrote 06/15/2019 at 12:52 point

Hi Emre, I'll fix it soon in the Github repo, meanwhile you can get the gripper in thingiverse: https://www.thingiverse.com/thing:1611164


Best regards!

  Are you sure? yes | no

emre_guney_52 wrote 06/15/2019 at 20:58 point

Thanks angelLm

  Are you sure? yes | no

Ivan Martinez wrote 05/27/2019 at 22:55 point

If someone can add me to the google group I´ll appreciate it a lot :)

  Are you sure? yes | no

AngelLM wrote 06/15/2019 at 12:53 point

Hi Ivan, there was a problem with the Google Group but now it's fixed and you should be able to join it!
Sorry for the late reply! I don't know why but the notifications were off :(

  Are you sure? yes | no

Ivan Martinez wrote 05/27/2019 at 22:48 point

Does anybody out there have the dynamics model? 

  Are you sure? yes | no

luiz.csilva82 wrote 05/21/2019 at 00:44 point

Please add me to the google group.  luiz.csilva82@gmail.com
Thank you

  Are you sure? yes | no

AngelLM wrote 06/15/2019 at 12:53 point

Hi Luiz, there was a problem with the Google Group but now it's fixed and you should be able to join it!

Sorry for the late reply! I don't know why but the notifications were off :(

  Are you sure? yes | no

soundbeat.nb wrote 05/06/2019 at 17:45 point

Hello, did anyone From germany build this very cool Thing? I have many questions! 😅

  Are you sure? yes | no

Michele wrote 10/05/2018 at 06:33 point

Salve sono il proprietario di un piccolo canale youtube chiamato elettropianensi, mi piacerebbe discutere di questo braccio. 
Sono uno studente, vorrei usarlo, con le opportune modifiche, come progetto di maturità. 
Con modifiche intendo: l'utilizzo di questo robot è cnc per la realizzazione di pcb. 
Posso fare quanto detto in precedenza, un patto di imparare tutte le modifiche? 
Eventualmente specificatemi colomba pubblicarle.

Grazie.

  Are you sure? yes | no

AngelLM wrote 06/15/2019 at 13:25 point

Could you please post it in english? I tried to translate it but I didn't be able to understand the translation either...

Thanks!

  Are you sure? yes | no

zubiar950 wrote 08/05/2018 at 19:56 point

hi, i am very much impressed with this project, and want to learn more about it and build one my self, i'm just missing some part of connections of your module to arduino also the arduino setup for the operation of this robot... if can provide such info it will be great !!

  Are you sure? yes | no

AngelLM wrote 06/15/2019 at 12:57 point

Hi Zubiar, which part of the connections are you missing?

Sorry for the late reply! I don't know why but the notifications were off :(

  Are you sure? yes | no

Daniele wrote 06/05/2018 at 11:45 point

Hi, I'm assemblyng thor, but i can't understand how the art 3-4's bearing works

Can you help me ?

  Are you sure? yes | no

Similar Projects

Does this project spark your interest?

Become a member to follow this project and never miss any updates