Close
0%
0%

Sonic Screwdriver Remote Upgrade Project (SRUP)

My attempt to upgrade/customize my Eleventh Doctor's Sonic Screwdriver universal remote control.

Similar projects worth following
Another Sonic Screwdriver project, but one that I hope will garner advice from the community, and maybe help or inspire other people.

So here's my story: after I had purchased the 11th Doctor's Sonic Screwdriver universal remote control from ThinkGeek.com, and learned that it didn't extend like in the show, I decided that I wanted to modify my sonic so that it could. So I hopped on the internet to do some research and discovered, without surprise, that a few people had successfully modified their sonic to extend. Fantastic information.

However, as I delved further into my research I also discovered many other things people had done to modify their Sonic Screwdrivers. All of these people's journeys to modify and/or create their own Sonic Screwdriver inspired me to attempt my own upgrade/customization project. So here we go!

FOREWARNING: It's been a while since I've worked with electronics or programmed so progress will be slow.

ORIGINAL FEATURES (For those who don't know)

- Programmable by learning the code from almost any remote control.

- Audio confirmation when correctly receiving codes or performing motion gestures.

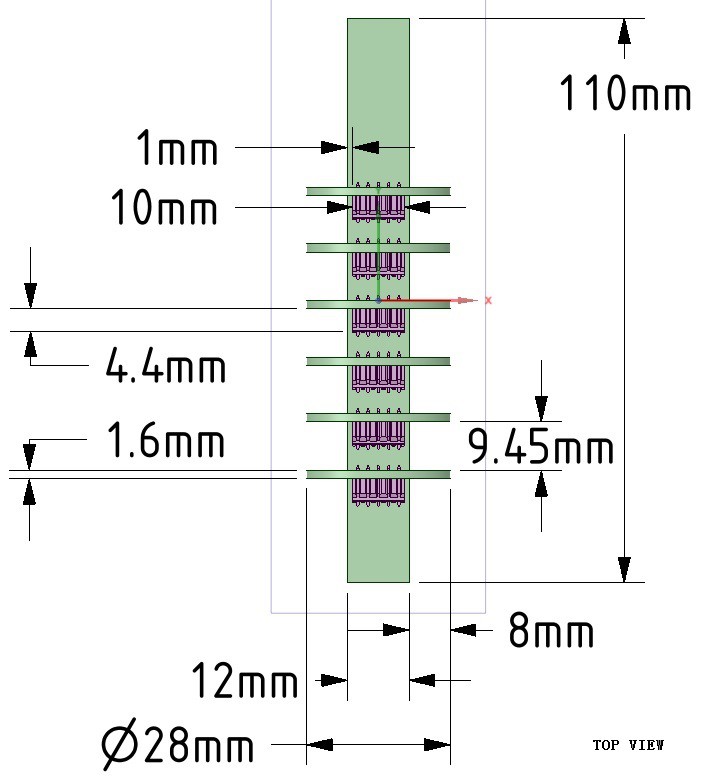
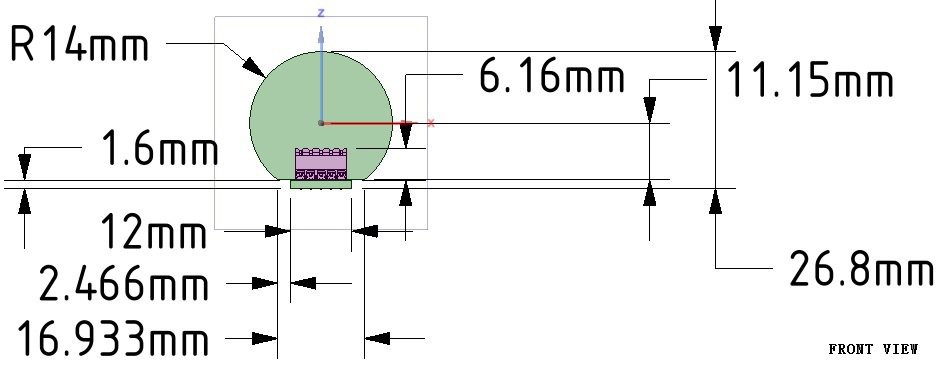
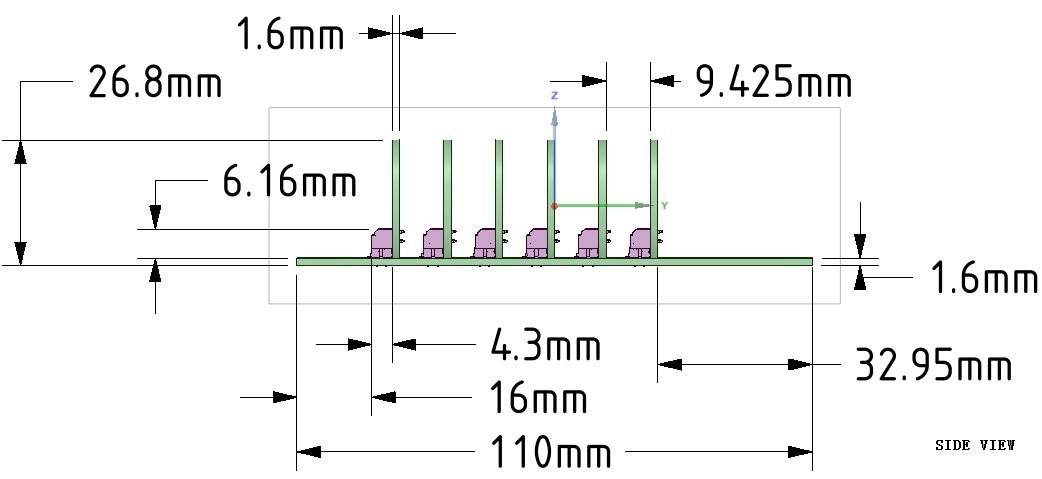
- Custom three-chip 5mm LED: one IR (943 nm) indium gallium nitride chip and two green (520 nm) gallium arsenide chips, encapsulated in a single transparent epoxy lens.

- Code-learning feature supports all the major consumer IR protocols, including RC-5, RC-6, XMP, RECS-80, NEC, SIRC, and NRC17 with IR carrier frequency ranging from 33 to 50kHz.

- Motion sensing courtesy of a three-axis accelerometer (1 mm x 2 mm silicon MEMS sensor).

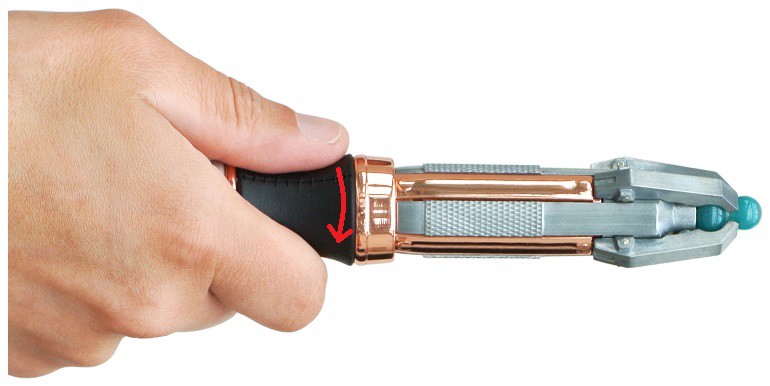
- Four operation modes: Practice Mode, Control Mode, Quiet Control Mode, and FX Mode. Copper button at the base is pressed to cycle through each mode.

- Thirteen different sound effects in FX Mode.


CURRENT GOALS

So far these are the following features I would like to add to my Sonic Screwdriver, but this list may grow or shrink during the course of this project.

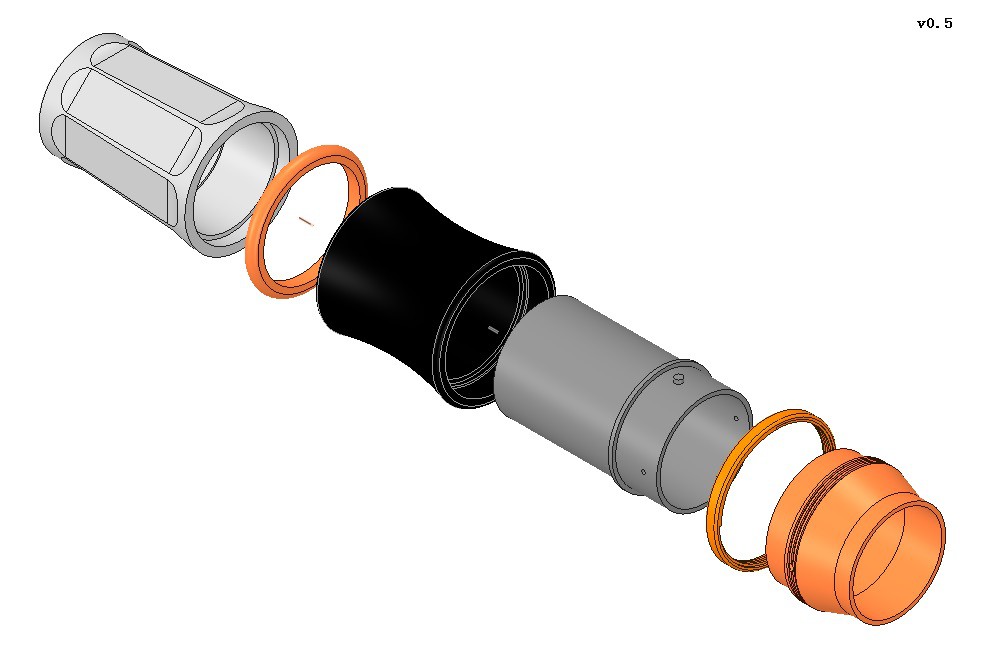
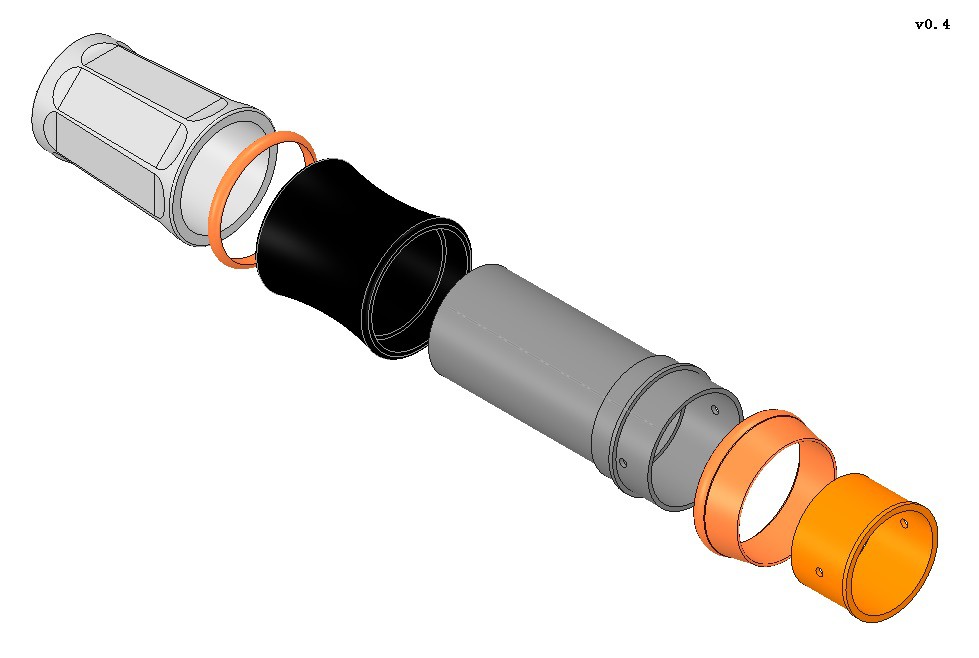
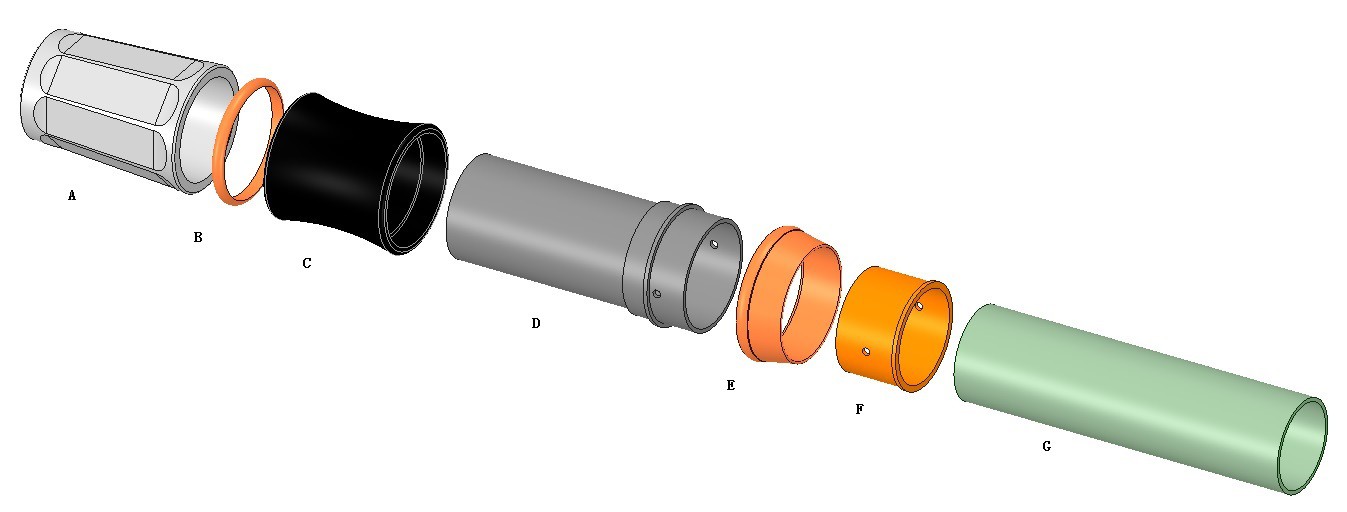
01 - Modify Sonic Screwdriver remote to be extendable yet still retain all of its original capabilities.

02 - Add basic universal IR remote ability which allows the Sonic Screwdriver to work on almost any TV without having to be programmed first.

03 - Add ability to change default green color of the LED emitter to other colors; at minimum red and blue.

04 - Add viable flashlight capability.

05 - Add laser pointer capability.

06 - Add motion detection capability.

07 - Add distance measuring ability (digital tape measure).

08 - Add Micro USB-B interface/charging capability.

09 - Upgrade power source to AA Lithium-Ion battery(s) or better alternative.

10 - Add garage door remote control capability.

11 - Add car remote unlock, lock, start, and alarm capability.

12 - Add Science Tricorder capabilities, similar to Peter Jensen's brilliant project. Note: I might move this goal up towards the top because the 9th - 12th Doctor's Sonic Screwdriver has been seen frequently used as a multipurpose scanning device. (Maybe)

13 - Add OLED display in central chamber; thus, only visible when Sonic Screwdriver is extended. (Maybe)

14 - Add voice command recognition capability. (Maybe)

15 - Add digital camera capability. (Maybe)

  • Tinkering and Time

    Darcueid11/14/2014 at 17:23 0 comments

    So progress is going slower now, mainly because of shiny distractions like: the Skyforge MMORPG - Technical Beta that I got into, and probably the upcoming Dragon Age: Inquisition video game. Worst yet, progress may go even more slowly if I decided to do a couple more projects that have popped into my mind recently.

    Even so, I'm still happy to post the tiny bit of work that I got done this week. The only problem is that I'm going to have to redo the threading on the parts, because they do not conform to ISO metric screw thread standards. The Unified Thread Standards didn't dawn on to me until after I had done most of the screw threads for v0.5 of the Sonic; silly me.

    I'm also having trouble trying to figure out how to best connect the ivory-like handle part with the leather-like grip part of the Sonic Screwdriver. My current design for the connection seems really weak, so I'm thinking of ways to improve that. I still think that getting a looking at the innards of my Sonic Screwdriver Remote will be able to provide some ideas, but I still can't get the bloody copper end apart from the while handle.

    Anyway, here is a small comparison of v0.4 to v0.5 so far.

  • Preliminary Parts Customization and Popping

    Darcueid11/07/2014 at 10:17 0 comments

    When I started this project my initial idea was to use as many of the Sonic Screwdriver remote's parts that I could. However, after receiving my Sonic Screwdriver and examining it, I realized that I had a lot less space to work with than I had initially guesstimated. So I decided that I would redesign some of the parts and have an online 3D printing service make them for me. After a few days of modifying parts, I've gone from customizing only a few parts to practically remodeling the whole Sonic Screwdriver. Below is a glimpse of one version of a few parts that I've done. I know that they don't look like they've been modified but they have been ever so slightly.

    Creating the white handle (A) part was a bit frustrating, but in the end I was able to design a version that I felt was satisfactorily accurate to the original. I've also been successful with increasing the space of the casing for the PCBs from a diameter of 14 mm to 21 mm. I was thinking about having the inner grip casing (D) to be constructed out of metal for more durability, but I'm not sure if the Force-Sensing Linear Potentiometer (FSLP) will work that well with that.

    On another note, a few days ago I decided that I was going to add an auto extending feature, like the one you see in the toy version of the Sonic. I'm planning of keeping it simple, so I'll probably be using a spring-loaded action setup. Until next time folks.

  • Abstract PCB Layout and Apples

    Darcueid10/31/2014 at 18:26 0 comments

    So today I went nuts with some parametric modeling of a PCB layout for my Sonic Screwdriver. I don't have my Sonic yet, so its all pretty abstract. The Sonic Screwdriver Motherboard is half of the max length of the Sonic; 110 mm. I'm guess-timating that will be the length I'll have to work with. I set the diameter to about 27 mm, which is probably too generous since that's only 3 mm shy from the maximum diameter.

    Oops, I'll be back later to finish this...

    Woot! I just got my Sonic Screwdriver! It looks and feels fantastic, but it's a lot smaller on the outside than I thought it would be. Looks like this project got a little bit tougher, unless it's bigger on the inside. Okay, that's enough fun for now. :)

    Now, during my work on the abstract PCB layout, I found some nice, very low profile, board-to-board, rectangular sockets/receptacles: Molex 87340-1024. They freed up quite a bit of space, and were reasonably priced in my humble opinion. Couldn't do much about the male headers so I ended up using the right angle ones that were designed to go with them: Molex 87760-1016. Note: the parts that I've listed above might change as I progress on the project, hence the reason I did not list them in the components section of this project page.

    The next thing I'll probably do is get all of my Sonic Screwdriver's measurements as I disassemble it. Actually, I might hold off on taking it apart for now and let myself enjoy it for a while.

  • Preliminary Volume Control Idea and Bendy Straws

    Darcueid10/31/2014 at 04:37 0 comments

    My sibling just sparked my brain and lit up my proverbial light bulb giving me an idea for volume control that's kind of neat because it could potentially work with my Force-Sensing Linear Potentiometer (FSLP) button idea. The original concept is still that when you press down on the FSLP it acts like a button, and I'm still considering on having it increase the frequency of the Sonic Screwdriver sounds the harder you press down. The volume control idea builds on that by letting you drag your thumb towards the left or right to decrease or increase the volume of the sounds, respectively.

    I think it would be fantastic if I could get this to work! It's kinda funny that this didn't dawn on to me a lot earlier. Funny brain, funny world, and funny straws.

  • Preliminary Button Idea and Blue Boring-ers

    Darcueid10/30/2014 at 11:27 2 comments

    Apparently, the actual Sonic Screwdriver TV prop has a button on the leather grip area that the actor presses to activate the Sonic, but it's cleverly never shown in the TV show. The Wand Company believes that it was not intended for the overall look of the Sonic, and I agree with them. So instead of placing a button on the leather grip area, like I've seen in most Sonic Screwdriver modifications on the internet, I was thinking about adding a Force-Sensing Linear Potentiometer Strip (FSLP) under the leather-like grip area. Maybe not that exact one I posted in the link above, but something similar that is a bit wider. I'll also have to consider the operating temperature and power usage; it gets really cold where I live. According to one company's website: FSLPs are rugged, moisture resistant, low power consuming, and can be used with fingers, stylus, or gloves even in harsh conditions. So bonus marks there if that is all true.

    Might set up the sensor to adjust the frequency of the Sonic sound to something like the more force you apply the higher the frequency of the Sonic Screwdriver sound. Not sure if this is plausible tho, because I'm not really certain if you can remove the leather-like grip layer without damaging it.

    Anyway, it's just an idea that popped in my head, if it turns out to not be feasible then I can probably live with just using the gesture controls.

  • Preliminary Menu Idea and Jammie Thingys

    Darcueid10/30/2014 at 00:46 0 comments

    So on the way to the theater tonight I had an idea for how I would setup the way to access the different functions/modes of my Sonic. I realized that even if I do find a way to install an OLED in the central core of the Sonic, it would probably be annoying to have to extend the Sonic every time I wanted to look at the OLED to change modes.

    Oh bugger, movie is starting... :)

    Good movie. Now, I figured that instead of pressing the button at the bottom of the Sonic to cycle through the different modes. I'd use its motion sensing ability so that each of the 13 gestures you perform lets you access different functions/modes. That means I would be able to have 13 different functions for my Sonic. If I need more modes then I would setup it up so that you can also double gesture to access 10 more modes for a total of 23 modes! Bonus, this would allow for 10 more control commands. To me, using gestures to access the different modes sounds better than having to push the button, for example, 19 times to access the 19th Sonic Screwdriver function.

    This would make the button at the base of the Sonic obsolete, but I figured that I would configure it so that it will enter/exit the various modes, lock/unlock the Sonic, and something else that I can't remember at the moment... oh right, power on/off and something else.

    So the menu system for my Sonic would work something like this:

    1. To select a function/mode use one of the following gestures: push, pull, flick up, flick down, flick left, flick right, tap top, tap left, tap right, tap bottom, rotate clockwise, rotate counter clockwise, and push button. Double gestures are twice the previously listed, except for rotates, and push button.

    2. Use two short button presses to enter a selected function/mode or exit the mode you are currently.

    3. Use any of the gestures in step one to utilize the control commands for the mode your are in.

    Other commands:

    Three Short Button Presses: Lock or unlock the Sonic for security and to prevent any accidental gestures being registered while you're carrying your Sonic in your coat pocket.

    One Long Button Press: Power on/off.

    After writing this up, I was just thinking about the double gestures for commands idea again, and I'm not sure if the double push, pull, and flicks could be easily implemented with the original accelerometer in the Sonic. I've been trying to do some research, but haven't seen anything specifically for double flick, push and pull gestures yet. However, I am patient and the the night is young, so maybe I'll figure it out or find something.

  • Preliminary Brainstorming and Wibbly Wobbly Stuff

    Darcueid10/27/2014 at 20:30 0 comments

    According to The Wand Company website, the Sonic Screwdriver has the following dimensions: Length: 221 mm, Max Diameter: 30 mm, Weight: 218 g.

    I don't have my Sonic Screwdriver yet, so I can't get the exact diameter of the space inside that I'll have to worth with. Although, I read on a Doctor Who prop modification forum thread that The Wand Company has fantastic support, so I'm considering on emailing them for the information.

    In the mean time, I've been trying to figure out the best way to layout the PCB(s) for the Sonic. I quickly drew up some simple, crude, and not impressive layouts.

    The first, probably most common, layout that popped into my mind was just a single, possibly double sided, PCB that ran down the middle of the Sonic.

    Top View Single Layer PCB

    Pros: Simple. Cons: Not very modular. (I swear I had more pros and cons thought up, but I can't remember any of them. Probably because I haven't slept yet.)

    For the second layout, I tried to think of a way to maximize PCB area, and make the layout more modular so it would be easier to replace damaged parts or upgrade the Sonic. The idea that popped out is basically like the motherboard for a PC. There would be a single PCB with evenly spaced rectangular connectors like steps on a ladder. Then you would take your other PCB "chips" and slot them in like how you slot RAM into a motherboard. Octagon shaped PCB chips might be the best way to go to maximize surface area.

    Pros: Modular. Cons: More complex. Possibility that PCB "chips" could become unseated from rough handling of the Sonic. Small surface area per chip.

    I wanted to go further in discussing the viability of the second design, and also layout my ideas for the layout of the transceiver cluster at the tip of the Sonic Screwdriver, but I think I've been up for over 20 hours now and feel like taking a nap. I'll edit and finish this log later.

    Many many hours later...

    Okay, so for my third layout I decided to go with a hybrid of the first two. Motherboard PCB with evenly space horizontal rectangular connectors, and PCB chips would slot in like how you would install RAM.

    Pros: Modular, large surface area, Cons: Not as modular as previous design, greater probability that a PCB chip could dislodge,

    Gotta bounce so until next time.

View all 7 project logs

Enjoy this project?

Share

Discussions

V McCoy wrote 03/17/2016 at 18:08 point

Great project! I might attempt to do the same thing to my 10th doctor's sonic (made by the same company, with identical features)

  Are you sure? yes | no

Similar Projects

Does this project spark your interest?

Become a member to follow this project and never miss any updates