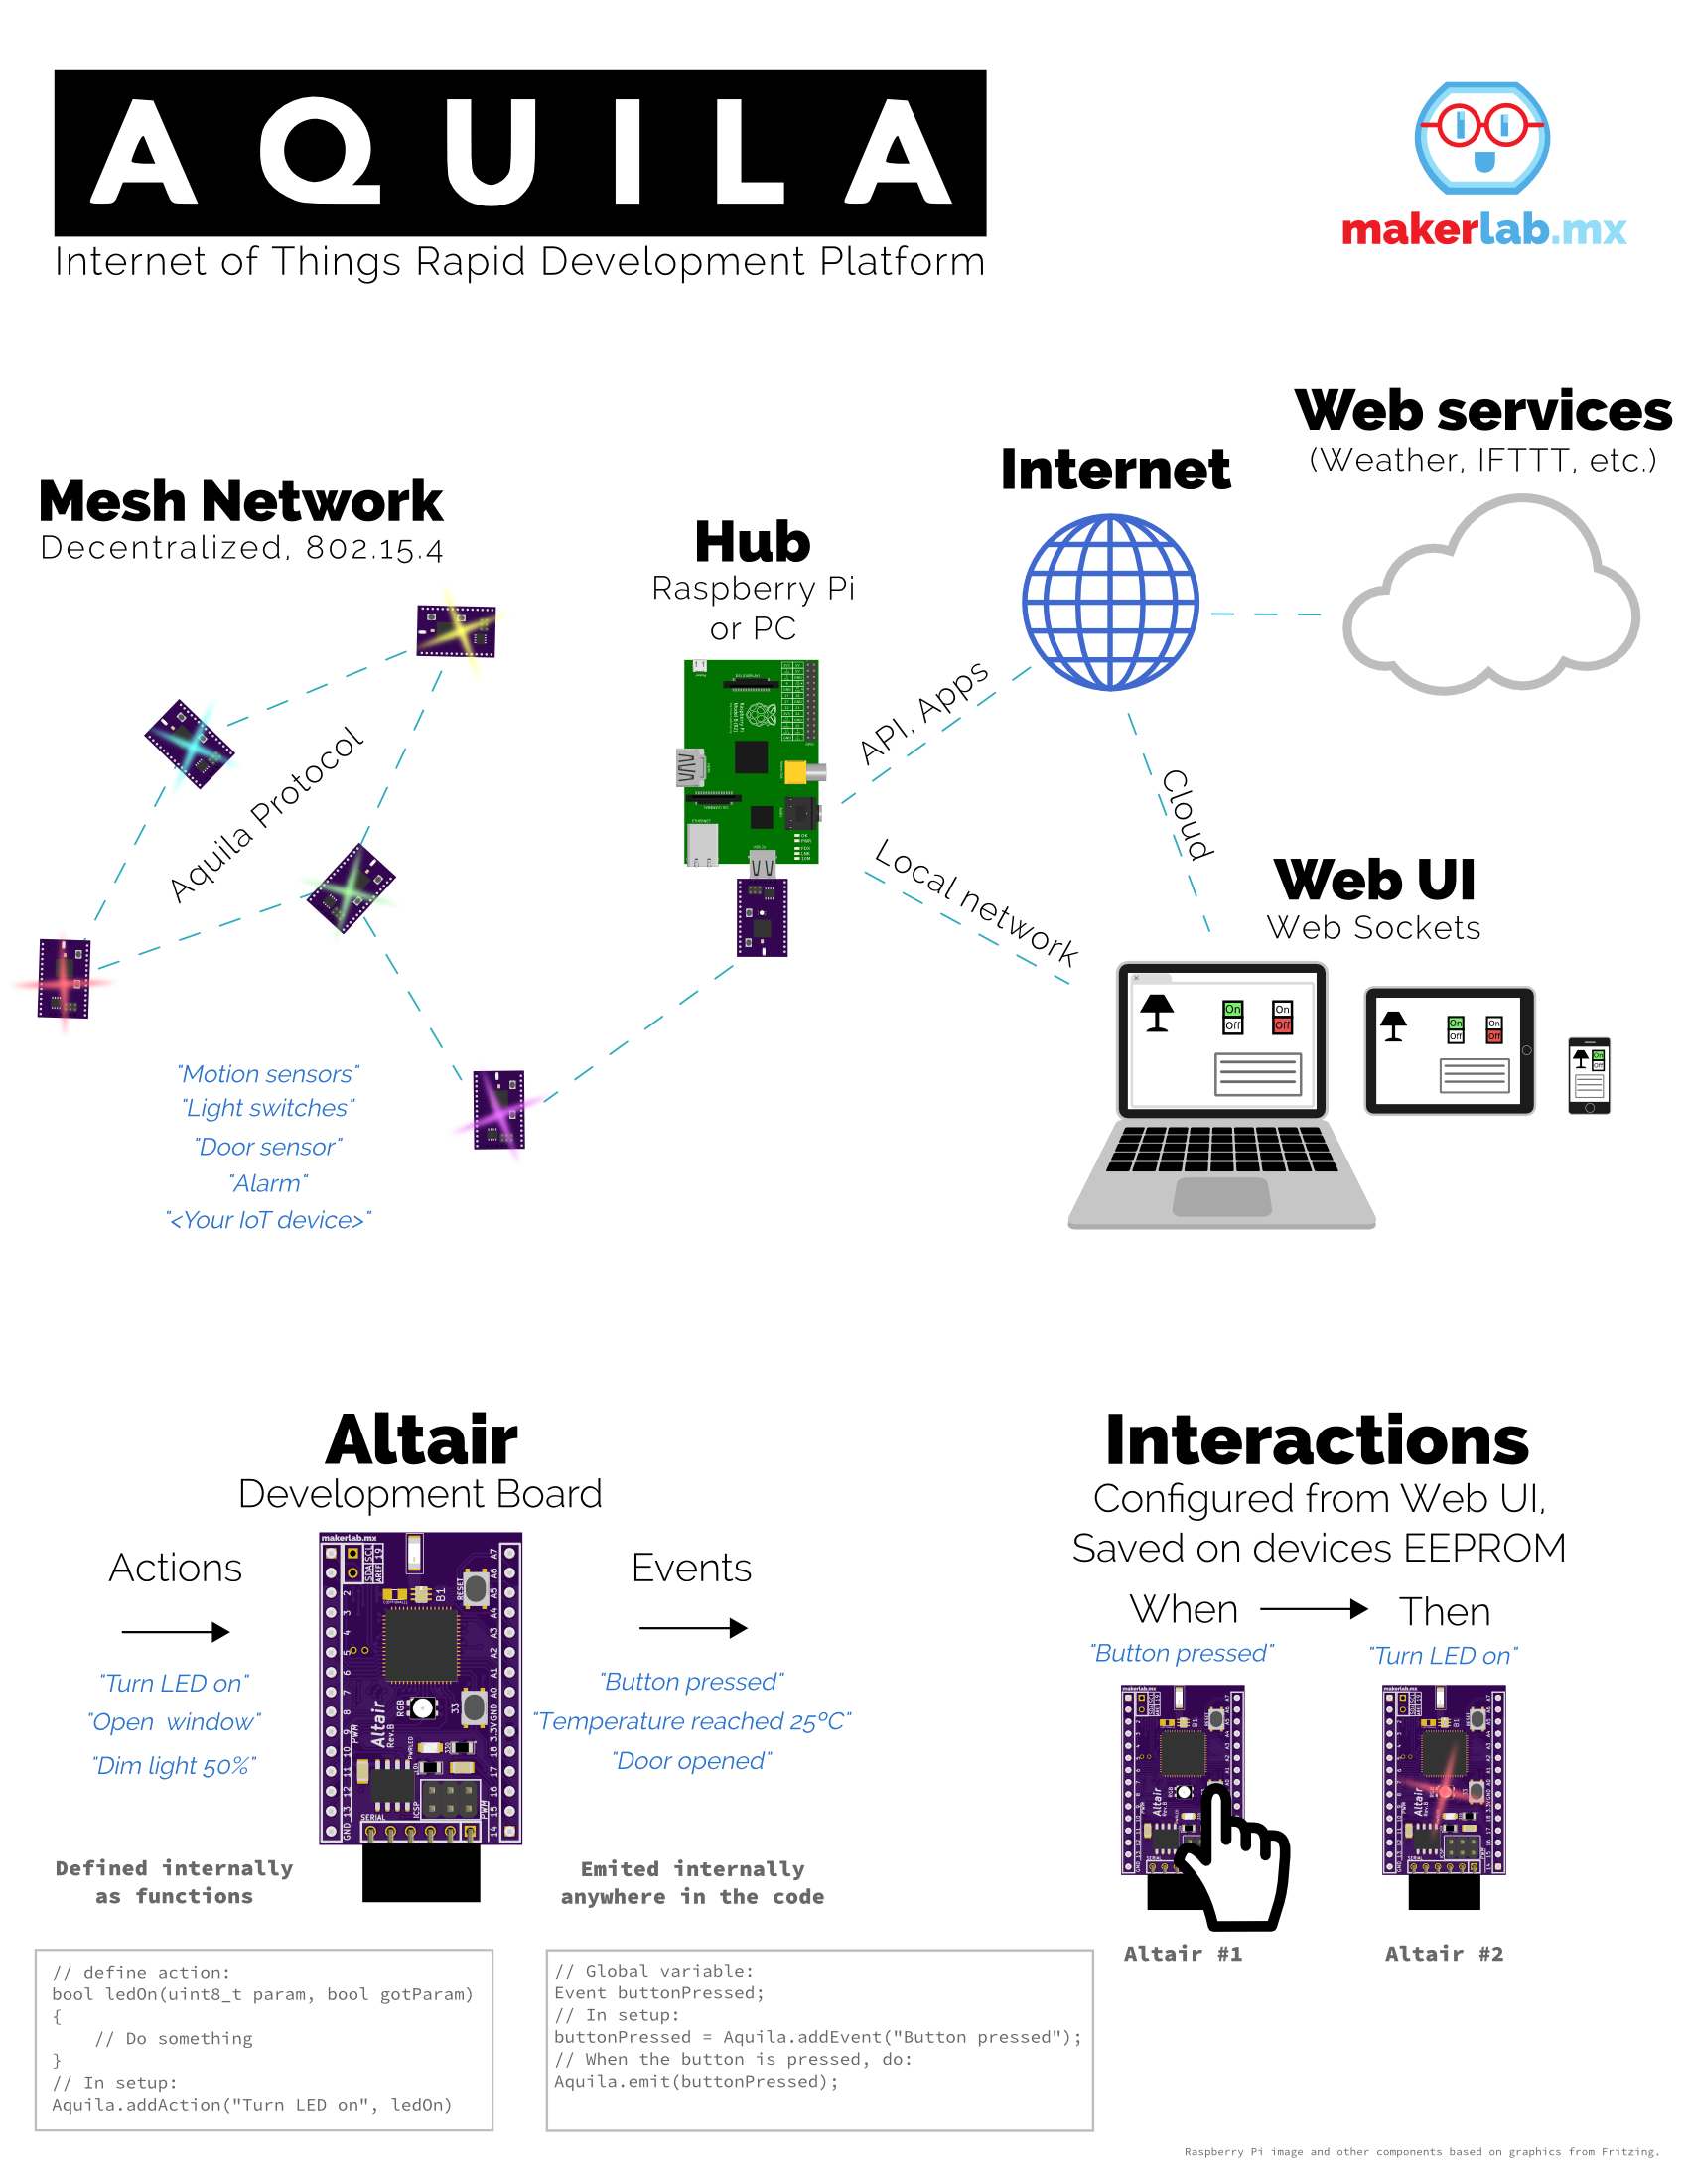
Close
0%
0%

Aquila IoT Platform

Internet of Things rapid prototyping platform.

Similar projects worth following
Aquila is an Internet of Things development platform.

We wanted to be able to test ideas and have functional devices for home automation and for fun with minimal effort.

It uses the Arduino libraries, plus a special communication library that allows you to easily define Actions and Events, so multiple devices can interoperate together with just connecting the events from one to actions from another via an web-based graphical interface from any web browser.

The Aquila Platform consists in:

  • Altair devices
  • Hub graphical interface
  • The Aquila protocol that binds them together

Altair is an Arduino-compatible development board, It features an ATmega256RFR2 microcontroller with embedded 802.15.4 wireless communication.

Each Altair has a unique EUI-64 Address and can communicate with others directly using the Aquila protocol, designed to simplify interaction using Events and Actions.

When programming an Altair, you can define Actions and Events easily using the Aquila libraries directly in the Arduino IDE, this way you can use the same code that you would use in Arduino, and with just a few extra lines of code your devices will be interacting with each other.

Actions are defined as functions. When your device is detected in the Web UI, you will be able to make these actions happen with just pressing a button.

Events are given a name and then you can emit them anywhere in your code. for example, when a push button is pressed, you could emit the "Button Pressed" event, then in the Web UI you could connect that event to the "Turn On" Action of a lamp.

We are using a decentralized p2p mesh network, that means that if a device goes down, even the Hub, the rest of the devices will continue working and interacting normally as configured.

The Hub is a web-based graphical interface, it is built upon node.js and web sockets. The server can run in your PC, or in a dedicated device such as a Raspberry Pi, and you can access it from any modern web browser and mobile device.

System design

  • Aquila 2.0 Released! - MQTT-SN based IoT Platform

    Rodmg10/09/2016 at 05:23 0 comments

    Aquila 2.0 implements a MQTT-SN gateway, bridge and libraries for wireless nodes.

    It allows the communication of low power devices using various types of RF (currently 915MHz rfm69 radio and 2.4 Ghz 802.15.4 Altair board) with standard MQTT networks without losing the low power nature of the devices and the features of a full MQTT implementation.


    Characteristics of Aquila 2.0:

    - Ideal for low power networks
    - MQTT all the way via MQTT-SN
    - Sleeping nodes support according to MQTT-SN spec
    - Security by default (using radio encryption features when available)
    - Easy and flexible implementation
    - Interoperability between different wireless networks via MQTT


    Aquila 2.0 consists of:

    - Gateway MQTT-SN
    - Bridge (Firmware)
    - Wireless nodes (Firmware and MQTT-SN libraries)

    Check it out!:

    http://hackaday.io/project/16031-aquila-20-mqtt-sn-based-iot-platform

  • Alarm System using Aquila

    Rodmg08/20/2014 at 17:21 0 comments

    In this tutorial we will make an alarm that works automatically, although it could be also manually triggered.

    4 Altairs will be used; one will be the Hub, other the Altair with the buzzer, and the two remaining will have one of the two sensors that will trigger the alarm.

    Also, some concepts that may cause you some confusion will be explained.

    It’ll have two sensors that will tell the Altair that has the buzzer when to sound.


    Events are happenings that occur within an Altair and that we do not have direct control over it through the Hub.

    This events sorted by sensor are:

    Movement Sensor

    • “No presence detected”
    • “Presence detected”

    Door Sensor

    • “Door is closed”
    • “Door is opened”

    As you can see, an event would be something like a notification from an Altair to all the other Altairs plugged through the network.

    And, through the hub is where you configure if another Altair “listens” and reacts with an Action. All this through the Interactions menu inside the hub.

    (Also, actions can be controlled directly through the hub. Imagine it as a TV remote controller).

    Knowing this, here we list all the actions that the Altair with the buzzer will have.

    • “Stop alarm” (Parar)
      • This will make the Altair to stop buzzing, even if it was activated through the Hub or through the sensors; If the alarm is “Armed” it will remain armed even after executing “Alarm Off”.
    • “Sound alarm” (Sonar)
      • It’s the manual execution of the alarm, it could be used as a “Sound check”
    • “Arm” (Armar)
      • This will make all the sensors to be on guard and will set the Altair with the buzzer ready to make some noise.
    • “Unarm" (Desarmar)
      • This will make the Altair with the buzzer to ignore everything that the sensors tell; there is no way it would buzz, even it you execute the action “Sound alarm”

    Knowing how the alarm works, here are the needed components listed:

    • 4 Altair
    • 1 Buzzer
    • 1 Movement Sensor
      • The wiring order may change due model variations, please check how your sensor is plugged before wiring.
    • 1 Door sensor
    • 1 Protoboard
      • Size doesn’t matter, as it will be only used for plugging the buzzer

    In the next section the code for each Altair will be shown; with its explanation.

    Alarm Diagram:

    Movement Sensor Diagram:

    Door Sensor Diagram:

    Hub Screenshot:

    Interaction configuration on Hub:

    Code for the Alarm:

    #include <Wire.h>
    #include <Aquila.h>
    
    #define BUZZER 9
    #define LED 14
    
    bool alarmActive = false;
    bool alarmArmed = false;
    
    bool alarmArm(uint8_t param, bool gotParam)
    {
      alarmArmed = true;
    }
    
    bool alarmDisarm(uint8_t param, bool gotParam)
    {
      alarmArmed = false;
      alarmActive = false;
    }
    
    bool alarmOff(uint8_t param, bool gotParam)
    {
      if(alarmArmed)
        alarmActive = false;
    }
    
    bool alarmOn(uint8_t param, bool gotParam)
    {
      if(alarmArmed)
        alarmActive = true;
    }
    
    void setup()
    {
      pinMode(BUZZER, OUTPUT);
      pinMode(LED,OUTPUT);
      
      Aquila.begin();
      Aquila.setClass("mx.makerlab.alarma");
      Aquila.setName("Alarma");
      
      Aquila.addAction("Alarm Off", alarmOff);
      Aquila.addAction("Alarm On", alarmOn);
      
      Aquila.addAction("Armada", alarmArm);
      Aquila.addAction("Desarmada", alarmDisarm);
      
      Aquila.sendClass(BROADCAST);
    }
    
    void loop()
    {
      Aquila.loop();
      
      if(alarmActive)
      {
        digitalWrite(LED,LOW);
        for(int i = 0; i < 100; i++)
        {
          tone(BUZZER, i*10);
          Aquila.loop();
          delay(10);
        }
        
      }
      else
      {
        noTone(BUZZER);
        digitalWrite(LED,HIGH);
      }
    }

    Code for the Movement sensor:

    #include <Wire.h>
    #include <Aquila.h>
    
    #define MOV 18
    #define LED 15
    
    Event movimiento;
    
    void setup()
    {
      pinMode(MOV, INPUT);
     ...
    Read more »

  • Aquila development status

    Rodmg08/19/2014 at 18:07 0 comments

    Aquila has been in the works for six months now, we are currently teaching to use the platform to the first users and developing the Hub UI.

    The board designs (Altair and USB-Serial) are ready and we have already assembled the first batch. The firmware has the basic functionality finished, P2P communication, Actions, Events and Interactions are working correctly. We are planning on adding multi-hop packet sending and AES-128 security encryption.

    The Hub interface is in a basic working state, you can control actions, see all the connected devices and configure interactions, However there are still some stability bugs to address. We are working on extending the hub and exposing an API so you can write your own customized App for your device, and also for connecting to web services such as weather and IFTTT.

    If you want to help, please contact me here or make a pull request on github :)

  • Aquila sources, documentation and community

    Rodmg08/19/2014 at 17:49 0 comments

    Aquila is an open-source project, here are the github repositories:

    - Documentation and repository index: https://github.com/makerlabmx/aquila-platform

    - Aquila library for Altair reference: https://github.com/makerlabmx/aquila-platform/wiki

    - Hardware definition for the Arduino IDE: https://github.com/makerlabmx/altair-arduinoide

    - Altair Bootloader: https://github.com/makerlabmx/altair-bootloader

    - Altair Datasheet and diagram (Schematic coming soon): https://github.com/makerlabmx/altair-hardware

    - USB-Serial adaptor Datasheet (Schematic coming soon): https://github.com/makerlabmx/usb-serial-hardware

    - Hub Graphical UI Server: https://github.com/makerlabmx/aquila-server-client-node

    - Hub Aquila library backend (for implementing your own server or custom applications): https://github.com/makerlabmx/aquilalib-node

    Also, we are starting a community for developers of the platform, here is the forum:

    http://community.aquila.io/

  • Aquila and Altair, where do the name come from?

    Rodmg08/14/2014 at 16:38 0 comments

    Aquila is the name of a constellation, we see connected devices as how constellations are drawn, with lines connecting one star with another.

    Altair, our development board, is named after the biggest star in the Aquila constellation.

  • Intruder Alarm with Aquila

    Rodmg08/07/2014 at 17:55 0 comments

    An example using a magnetic switch for making a remote alarm sound when a door is opened.

    (In Spanish, you can enable English subtitles in YouTube)

View all 6 project logs

Enjoy this project?

Share

Discussions

Similar Projects

Does this project spark your interest?

Become a member to follow this project and never miss any updates