There's no clip on the sensor connector and you're just supposed to squish the cable in. The contacts are on the top of the connector whereas it's on the bottom on the breakout board. I got the cable where contacts on both ends are on the same side, conviniently meaning that the pinout markings on the breakout board match the pinout numbering from the previous log.
[19 Feb 2023, 12:00] I've spent the past 70 minutes finding continuity between the cable holder and the test pads, as well as any <100K resistances:
This sounds like there's some vague agreement with this reverse engineering research on a much more expensive sensor. I think this sensor is used for monochrome scans so the RGB pins might just not be connected. Though, I'd still expect 1 of the 3 pins to have continuity as LED input power. Most pins outside the ones shown above are 20 - 40 MOhms and the NC has no continuity with any I could find.
Those 4 silver pins arranged in a vertical line are coated with some kind of thin transparent material that prevents conductivity. There are traces going to them, so perhaps this is where my mystery NC pins are going to and they just don't have their own test pads.
The only thing I could guess so far is that pins 6 and 8 are ground.
[13:50] I've found some more information in the instructions page of the aformentioned research. The project log one is on the left and the instruction page on is on the right.
I didn't notice this the first time round, but pin 2 and 10 are apparently connected and I can confirm this. The updated map:I'm not really sure what's happening with Pin3, so I'm going to assume the left one is the more up-to-date pinout research.
It seems that #Tetrinsic [gd0041] isn't going to be a thing that exists in a reasonable time frame, so I thought I'd get a cheap yet important part (Q8100-60002) of this SecSavr Suspense puzzle to work on in the meantime. I only need 2 in the printer, but when 2pcs cost £12 and 5pcs costs £17 and I could use some spares if I break any, it was an easy decision.
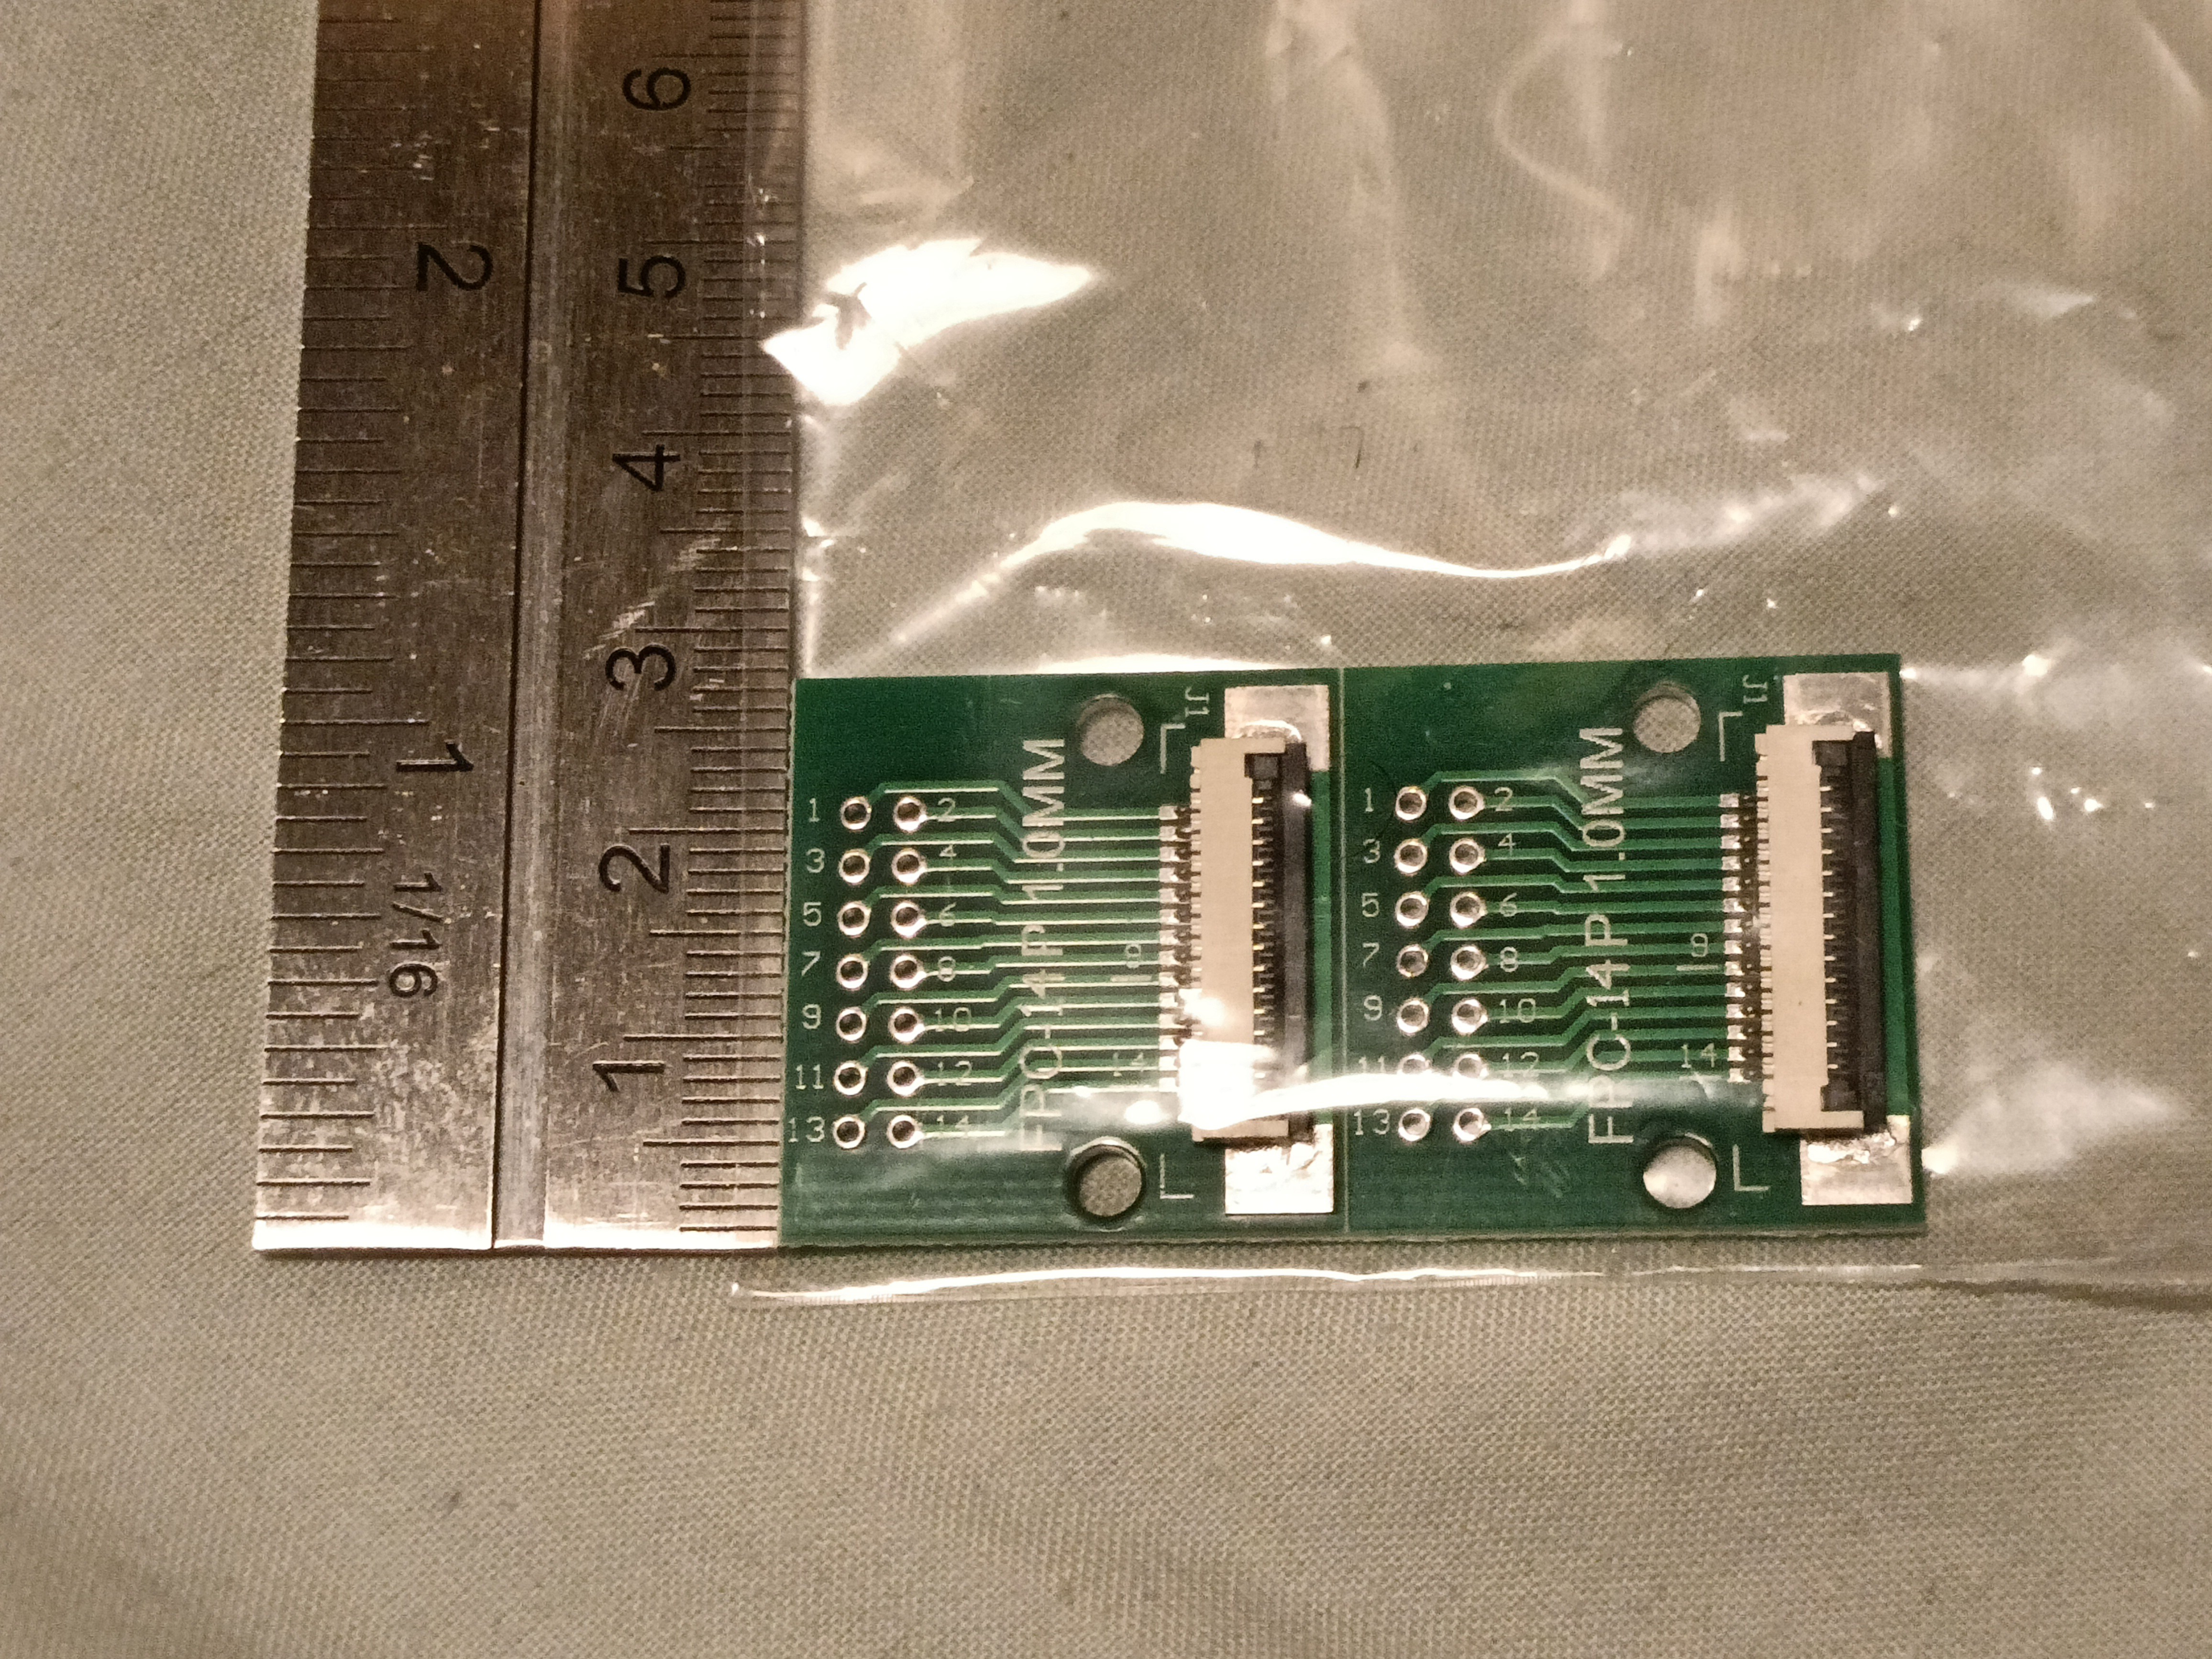
I only got 2 breakout boards though because I doubt I'd break that. Visually, I think I've got the correct pin pitch. The ribbon cable hasn't arrived yet so I can't check for certain.
So I was doing some light research to see if magnetless motors exist (they do) because, even in the best case scenario, I can't print magnets. In this hypothetical scenario, I can print copper and iron, where the latter is magnetic.
Anyway, so I was doing that and I found this project and I was like "Drats. I knew the SecSavr theoretically couldn't do it all. I already know organic matter isn't happening, but I can't print transistors!".
But don't worry. This is a sub £2000 piece of kit. The world isn't expecting something that rivals Intel's 14nm++ process. This can be more akin to the fancy but massive redstone machines in Minecraft where it's amazing if it can be done at all.
That's when I thought of mechanical relays. I didn't think too much about it until I heard that pinball machines used to use them... allegedly.
This image is nice and ordered, but most of the Google images seem to be an old nest of wires and components.
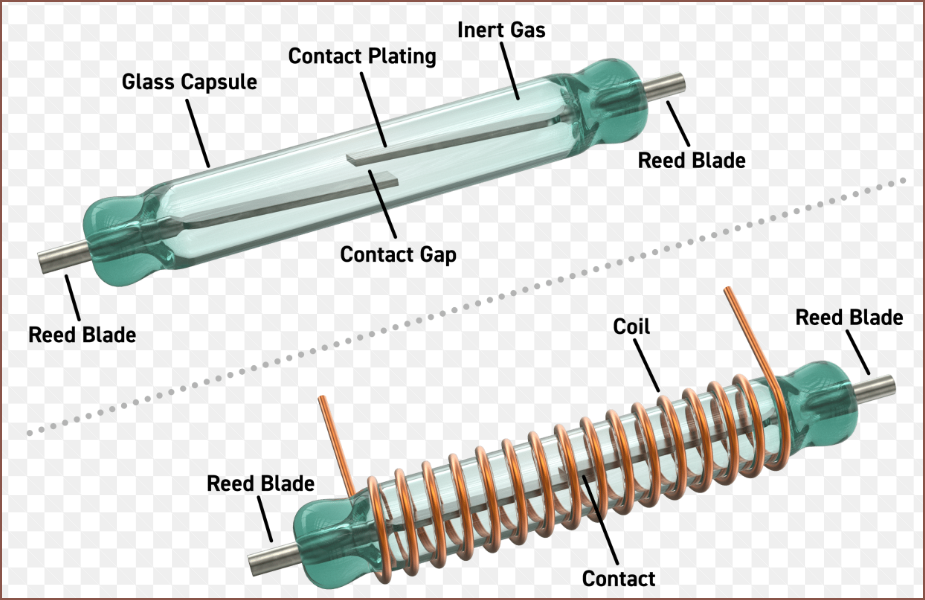
So I then googled "smallest mechanical relay" and I got reed relays, which look like this:
They indeed look small but I'm not a fan of the "inert gas", because I can't print that.
I do wonder what kind of tiny scales would be needed to be able to use electrostatic force though... seems that later in the PPT it's mentioned that the gate is like 42nm or something. At least there was something about there being "no off-state leakage" unlike CMOS.
The switching strip needing to move and also needing to be close enough to the contact(s) does pose a few print limitations if I actually want to compact them in 3D space. I'm thinking that a strategy is that I print temporary scaffolds so that the copper strip doesn't sinter-melt into the contact(s) and then use the laser to vaporise the scaffold.
Then, considering that I'm expecting the minimum copper thickness in this process to be 120 - 160um in XY and 80-120um Z, I feel like 1x1x1mm is actually a good target to aim for; it seems like a decent amount of space to get the stuff I need to fit. Thats... 10... 100.. wow that's 1000 relays in a 1cm^3 "chip". Even if the actual turns out to be 2x2x2mm, that's still 125 relays compressed in that cubic volume. Continuing with that 1K relay / cm^3 thought, and finding out that the Intel 8008 and MOS 6502 were 8-bit microprocessors with 3500 transistors, it doesn't sound like it'll be entirely useless to have such a relay density.
Printing the milli-relays also sounds a tad faster and more reliable than pick+placing thousands of the smallest transistors available. Again, this is a stretch-goal thought exercise and a lot of other stuff has to go beautifully right before I attempt the equivalent of Test Print: Nightmare Difficulty.
[17 Jan] Right now, the tool steel bed costs around £60 and the honeycomb mesh would probably cost another £60 if I could find one in the size I need. I did some research on r/lasercutting and the reasons for the honeycomb is so that the air stream has somewhere to go and the laser beam doesn't reflect back onto the cut material, allegedly. I also looked at the typical beds for top-down SLA's and it does seem that resin prints can tolerate quite large holes.
I'm thinking that a sensor will be needed to detect if the bed was able to move down to the max; this would indicate if it was able to push the boltheads through the holes in the bed or if a part or fixture stopped it. It could be as simple as a second endstop or as detailed as a load cell force sensor.
Anyway, I found this video that shows that charring of the bottom side of the laser cut workpiece can be eliminated if the sheet is elevated. A commentor suggested ball bearings as a possible object too.
Due to having tofirst layer cleaning, moving bed mass, auto ejecting and preventing laser reflections, it really seems that a bed surface with a large air:material ratio is the ideal bed choice for my application. Additionally, I was wondering how I was going to mount traditional PCBs for any PnP operations, and the holes would allow for a straightforward solution.
Ideally, the hole spacing would be equal to the mounting holes of the MGN9 rail, allowing me to actually mount the rail directly to the bed underside. M3 bolts seem common enough, and their bolt heads can usually pass though a 6mm hole, so this measurement will be the minimum size. I feel like >=8mm would be ideal, allowing for some of the bolts to be misaligned.
Here are M8 threaded holes spaced 20mm apart in an 8mm plate. There are M3 bolts on the very bottom of the Z axis travel such that when the bed goes all the way down, the bolts stick up through the bed and push off whatever is ontop. I can already see that there's still loads of surface area, so a more extreme 10mm spacing could be used:
Alternatively, ths could be an excuse to use the hundreds of M8 bolts I bought that were planned for #SecSavr Sublime [gd0036]:In any case, I'd rather not have to manually drill 528 16mm holes into an expensive...oh right. The bed is larger now than when I last got prices. I probably should resimulate too, now that I think about it.
Anyway, that number could be even higher if I can't find some industrial printer somewhere that actually can get away with holes so large. I found this model which uses 5mm holes, so an 8mm hole is probably in the realm of possibility.
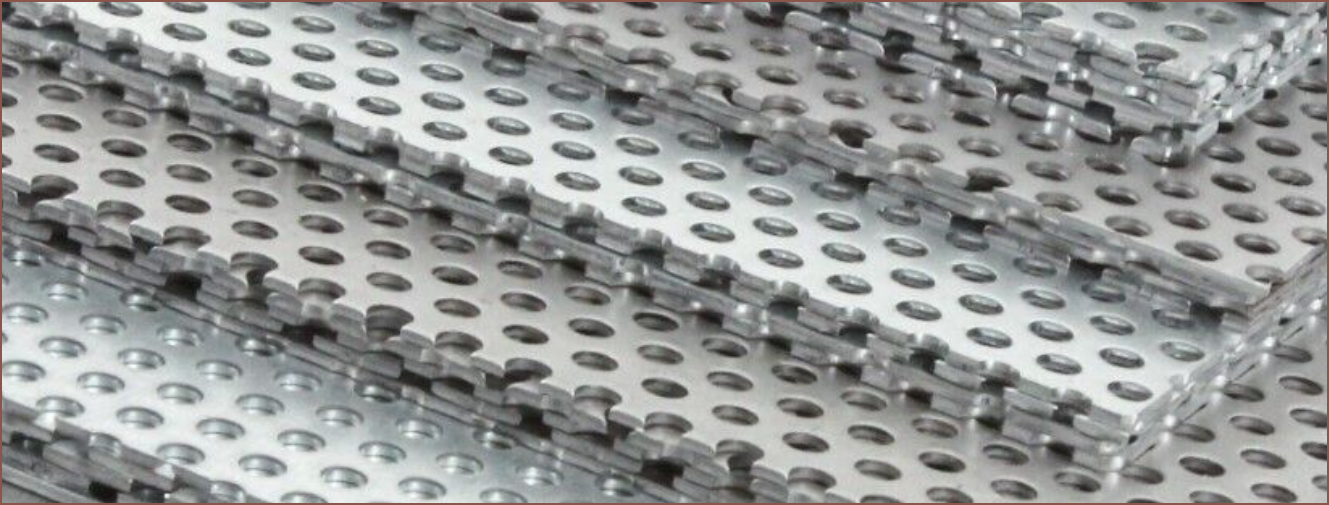
The holes in beds I can find on google images seem massive:And is it me or are they getting away with just a perforated sheet of metal?Ooo you can even get it in squares. It's a shame I can't seem to find some spare bed listing or something that indicates what sla beds are made like.Idunno about you but that looks A LOT like a perforated sheet with some backing grid. And every industrial printer is using it like it's the standard.For some, unexplained reason, 10mm and 20mm pitch just get skipped.Thanks Alibaba for telling me what this material is. It's 100% + verified + blue checkmark + no ratio stainless steel.
I can't seem to find anything against using this as a bed material for laser cutting. Only issue I can see so far is that it's only 2mm thick max (and the ones I like are 1.5mm). How am I supposed to thread that? The good news though is that stainless steel should be 3x as stiff as aluminium, so theoretically a 2mm perforated sheet should be as stiff as 6mm of aluminium, right?
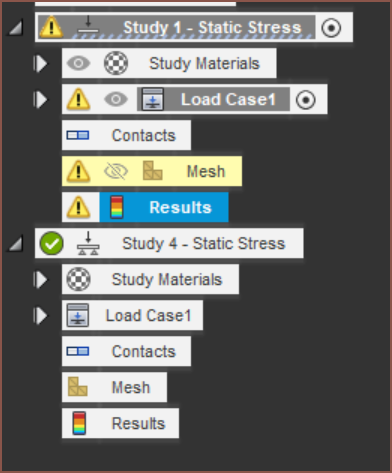
I have no idea if this is going to work, but it turns out that "simplify" applies to all studies so I can't just remove the unsimulated bed.
nope. Ok let's try "suppressing features" on the remove instances in the simplify
okay...So for a 2kg load, I'm down almost 2mm.
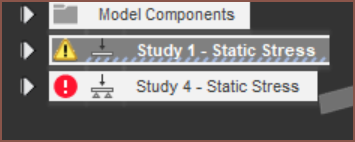
Perhaps the simulation only works if I send 1 to the cloud at a time.
Yeah uh that's a big difference.I do wonder if this has anything to do with it.Okay so the holes certainly do something to the stiffness alright. I still feel like it's salvagable by just adding rods underneath like what the industrial printers do.
Youch if I thought the 2mm one was problematic, the 1.5mm thick sheet is a no go zone.
But I feel like I'm still on the right track here... again, the entire, MASSIVE, industrial, £££££ printer market seems to have confidence in this material. A 2KG load in a 110x164mm area is also kind of unrealistic. It's just what Me In The Past already had set up.
[19 Jan]
I've done a simulation of a 10N load on one side of a custom tooling plate filled with 610 M16 holes. This is really testing for the possible displacement when the part is pushing against the PET film, but since I have no actual force data, I just thought 10N would be a bit more standardised going forward.
Unfortunately, the size of an M8 bolt is less than a millimetre smaller than the size of an M16 thread, so I'd need to aquire smaller bolts. Obviously, that's nowhere near as tedious as drilling 610 holes into a 680x340mm bed. I predict that it'll be some 8 hour process. Hopefully I only have to do it once because it'll be £100 a bed after VAT + shipping.
This is what the same design would be in 3mm 304 stainless:
For both I've set the threshold to start from approx 80um, or 1 standard layer height (for this printer).
[22 Jan]
I've also tried the pattern seen on CNC fixing plates. Half of the holes are 10mm and the other half are M12 threads. Similar displacement, the holes are spaced out the same 20mm in X and Y, and the hole count is over 1000. There's slighty less surface area with this one, but the minimum thickness between holes is now a narrow 2mm, compared to almost 4mm for the M16 bed.
I might be able to use the CNC mill or waterjet my university just so happens to have, but if not I'd have a lot of holes to drill either way.
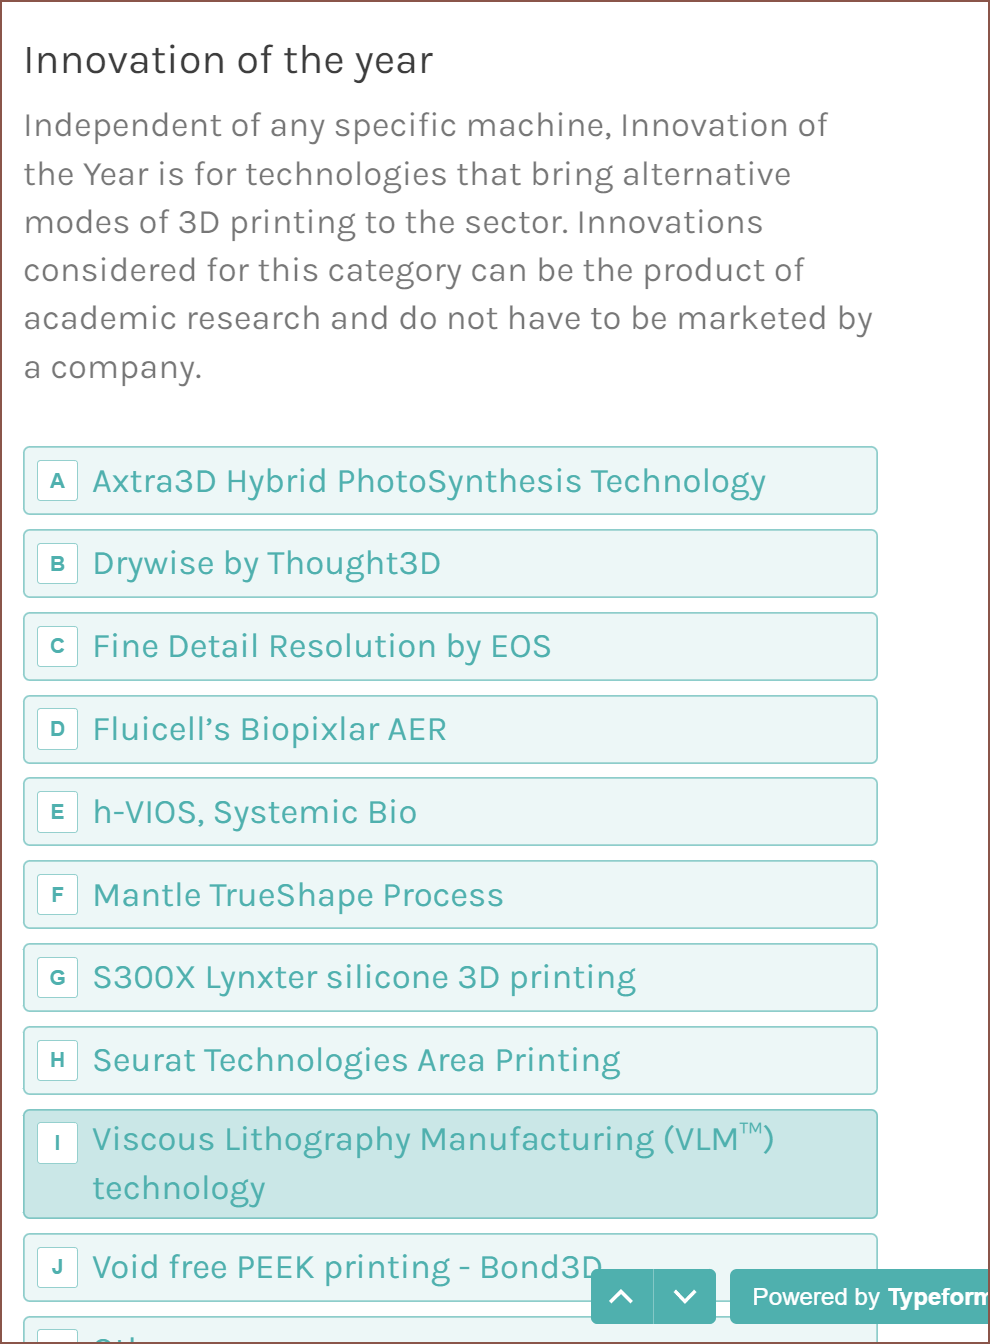
I think 2 or 3 days ago, I was voting for the 2022 3D Printing Industry Awards and this came up:
I think the last option was "Other".
Now, obviously, I'm voting VLM, but I also wanted to see all the other technologies that were good enough to make it into this shortlist. The 2 that I'm still thinking of, days later, is Mantle's TrueShape and Seurat's Area Printing. The former uses a liquid metal mixture and the latter combines a low power, blue image beam with a high power, uniform intensity infrared beam to selectively sinter an area of metal powder.
Area Printing and the SecSavr Suspense are kind of similar in that a large build area is split into smaller area sections. I imagine an LCD panel or micromirror array was not able to handle or sufficiently block the infrared light directly, so the engineers had to get inventive.
Below are videos of both processes:
I like the background music of this video. It's got that same "innovative technology" vibe like in the VLM explaination video.
The liquid metal mixture process uses a CNC mill to improve surface quality before it's baked in an oven. An L^3 DLP process (remember that Liquid Laminate Lithography is just the name I'm giving to all resin based technologies that laminates a liquid onto a transparent film, VLM included) that I mentioned in some project log ages ago claimed to be able to work with both ceramics and metals, but I only remember the website focusing on ceramics. I'm thinking that a resin process wouldn't need milling except for surfaces that require very high precision.
Anyway, quite a lot of the current metal processes require a rather large and expensive oven. I doubt the Area Printing system helps out on cost, but it might be possible to integrate it inside a L^3 printer to save on space and increase the diversity of printable materials. I could even see it being possible that both the Area Printing and the more traditional MSLA systems work together, where
The blue light photocures the metal/ceramic/glass infused resin in an area array, the same way in Area Printing
The transparent film is removed, or the beam is redirected under the beam (like the Placement Block's laser)
The patterned infrared light sinters the area array
I thought the new Hybrid PhotoSynthesis process (see below) was doing what I described in (1) but it sounds like what I thought of doing (written in a quick comment) where the edges of the pixelated layer is refined with a laser around the edges.
Another process that might be mergable into the L^3 ecosystem is Fortify's magnetic reinforcement:
Since I can't see a way to lay continuous fibres across any plane other than the one currently being printed/processed, this seems to be a good method to achieve non-planar reinforcement.
I'm just imagining a few company mergers down the line, where a printer the size of a dishwasher could be able to create a multicolour, reinforced and populated circuit board with integrated heatsink... Man I'm feeling like I should hold on to my papers, but I doubt it'll be remotely affordable.
Anyway, that's why I voted VLM as innovation of the year; these (3D printing) processes are kind of seperate but L^3 could allow them all to quad fusion merge.
[2024 - Jan 04] I've moved the research and thoughts that I had written as comments into the log itself, but more coherent.
Further research and ideas
2023 - Jan 05
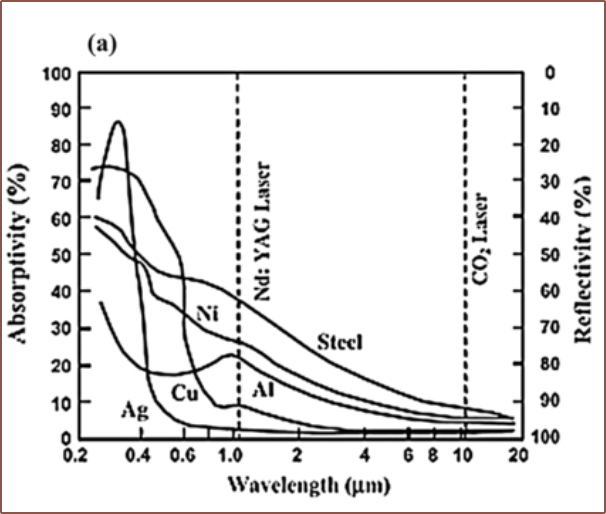
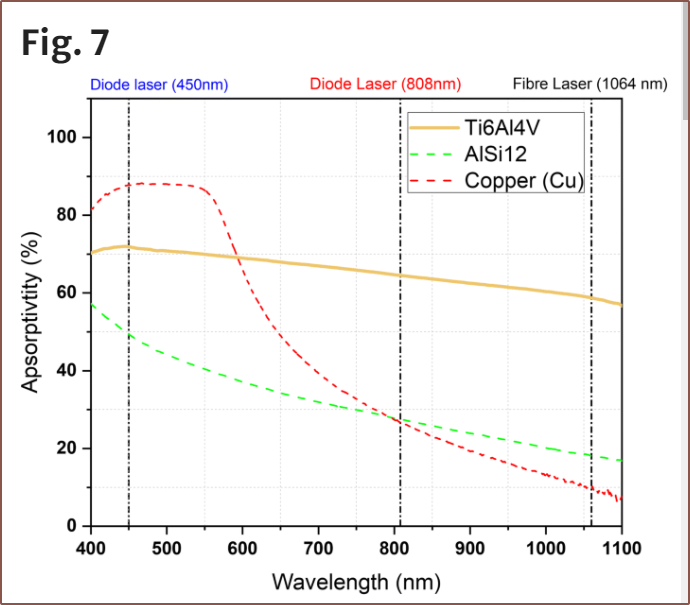
Looking at the absorption spectrum of various metals and the ones I care about (mainly copper but also silver and steel) actually have rather high absorptions in the typical diode laser wavelength.
Here's another paper I found, which has this graph showing copper absorbing near 90% of 450nm light compared to something like 10% for the typical fibre laser wavelength of 1064nm. Sounds like an industrial laser that uses a 200W fibre laser could use a 20W diode laser. Why haven't I heard of such a printer? No idea; maybe my search is incomplete or the recent advancement of 20W diode lasers is so new that printers that use them are still being developed / tested.
I have found out about the VF20 from ZBAITU (same people that make the C40/C80 I'm curently planning to use) and the form factor does look nicer than other 20W options I've seen. However, at £414 it's hard to justify. If it was £300 (2X the C80) or something.. oh wait there's multiple listings--
NOUHHH I can ACTUALLY buy it for £301 quid! I got baited in! How am I supposed to say no to that??" It'll be so hard to justify the C80 now. I've been thinking "If I could get 20W [in my league budget], that would be great. I'd have more power just in-case, can cut thicker/faster and they'd probably be 24V like the rest of the system" but it was a no-deal at the >£450 prices. At £300, and especially with the compact 80x50x80mm footprint, it's more like a simple but inescapable choice.
Jan 08
Conveniently enough, I can buy atomized copper, iron and stainless steel straight from Amazon UK at seemingly affordable prices (copper and iron are <£25/kg and 316 stainless is about £60/kg). The particle sizes are 45um so I'd expect minimum layer thicknesses to be over 90um.
I do wonder if it's possible to print an iron part with a stainless steel surface. I couldn't find anything on a quick google search on "stainless steel plated iron" though.
Jan 09
I saw the below video and parts look great. I will be adding "3D printed copper and stainless steel" onto the project roadmap.
I might also look into a small polishing tool spindle, but I don't have lab/industry grade prints in mind so the surface roughness is probably fine. It really just depends on how smooth threaded surfaces need to be, or surfaces for printed bearings. Yeah... I should look into it just in-case as it would be harder to integrate it later down the line. There's also the option of using BLDC servos instead of steppers for the pick+place tools so that they can be used for both purposes.
I'm also reading this paper about additively manufacturing in copper and it's mentioned that "Fine powders with an average particle size lower than 50 μm are typically employed" so it suprisingly sounds like these online powders are good enough for science. Since it's being embedded into a liquid photopolymer, hopefully I don't have to worry about particle shape, which is something I've heard being an issue for SLS.
It is then mentioned that laser absorption is higher because of particle reflections. That sounds promising, suggesting that if I keep the photopolymer optically clear, materials that have a lower absorption of 450nm light might still be viable. Additionally, the gantry system is much slower than the control systems used in industrial settings, meaning more energy would be absorbed, further reducing optical power requirements.
But yes, I do imagine that printing metal this way would be about as fast as using an ultrafine nozzle on an FFF printer. I'm now considering that I should have X being the moving axis for the Placement Block for higher stiffness, thus higher accelerations.
Jan 13
I read this paper which talks about sintering a track of copper powder with a 445nm laser. The lower end of their wattage recommendation was 60W. Don't fear though, because the laser they use has a dot size of 0.2mm and these AliExpress lasers are 0.08mm, so the "equivalent wattage" calculation is 60 * (0.08^2)/(0.2^2) = 9.6W!!
Jan 22
I'm watching the price of the diode lasers and I think by the time I'm ready to buy, a suitable 20W laser will be £280. This lines up with the other module prices of £70 per diode.
I'm not such a fan of spending £420 on a 30W laser module, but I'd have to see how much power iron/stainless requires before deciding on going with a higher wattage laser. Shockingly, 33 - 40W lasers are coming out very soon.
The issue I agree with is that hobbyist 3D printer manufacturers (except Prusa) aren't tackling ways to make the process less problematic. Unfortunately, there's only so much you can do with FDM, but SLA requires even more work from the user, leading on to the next article.
With (soluable) support material and reusable supports, as well as isotropic properties of resin without having to worry about enclosed voids, the process should become much simpler in both hardware and software for L^3 printing.
On the software side (#SecSavr Sol^2 [gd0045]), I'm thinking of a feature that is a merge between the Windows 8/10 UWP print dialog and the online shopping experience of AliExpress and Amazon. It's not "at the press of a button" simple, but hopefully something like "print now" and "add to queue" instead of "buy now" and "add to basket".
I also would like to make in-software tutorials similar to the reason I write these logs in the first place: to be able to direct those interested to concentrated source of my research and information.
Because of Suspense and Sol^2, I should be in a position to eliminate most of the steps described in a typical day resin 3d printing. There'd be new ones though, such as putting back the reusable support blocks, but the most important seconds to save are the ones that I have to be doing something.
There's actually a step even larger -- way larger -- than any on the list he talked about: creating the model itself.
Specifically for parametric + history based modelling, I've still got the opinion that I want to develop #enSweepen [gd0096]. Reading https://develop3d.com/cad/the-future-of-cad/, it seems that the big players in the industry also acknowledge that sketching needs some work, but they all seemingly going to use machine learning and AI to predict or inspire the user. Obviously, I don't have that kind of training data, and looking at all the stuff that I've modelled gives me the impression that each new modelling project has to be conceptualised differently enough to mean that an actually useful system is years away. I personally think that the way of creating sketches needs to be less linear and more explorative since, especially in 3D printing, requirements and specifications are usually going to change.
For human-to-computer interfacing, I'm working on #Tetent [gd0090]. I see this as the most important project of mine currently since this will speed up near everything I do when I'm awake. While the Suspense project is smaller in scope than #SecSavr Sublime [gd0036], I still need to make sure I have enough confidence and energy to go through all the required steps, and my classical keyboard and mouse isn't going to allow for that.
I also believe that as many surfaces inside the printer should be wipe-able and I'd like to get some sort of cartridge fill level sensor. Additionally, I think implementing a wizard into Sol^2 is a needed feature, especially since the material side of this project's equation is a big question mark. The other 3 features are not needed for this printer as the problems they address no longer exist.
I noticed this a few days back when it was already a suprisingly low £204, but I was expecting the price to go up, not down. It's quite a bit larger in dimensions than the ZBAITU module, but it would be notably cheaper if the time comes to actually get a laser.
2024 - Jan 04: Powder filled photopolymer for expanded material options
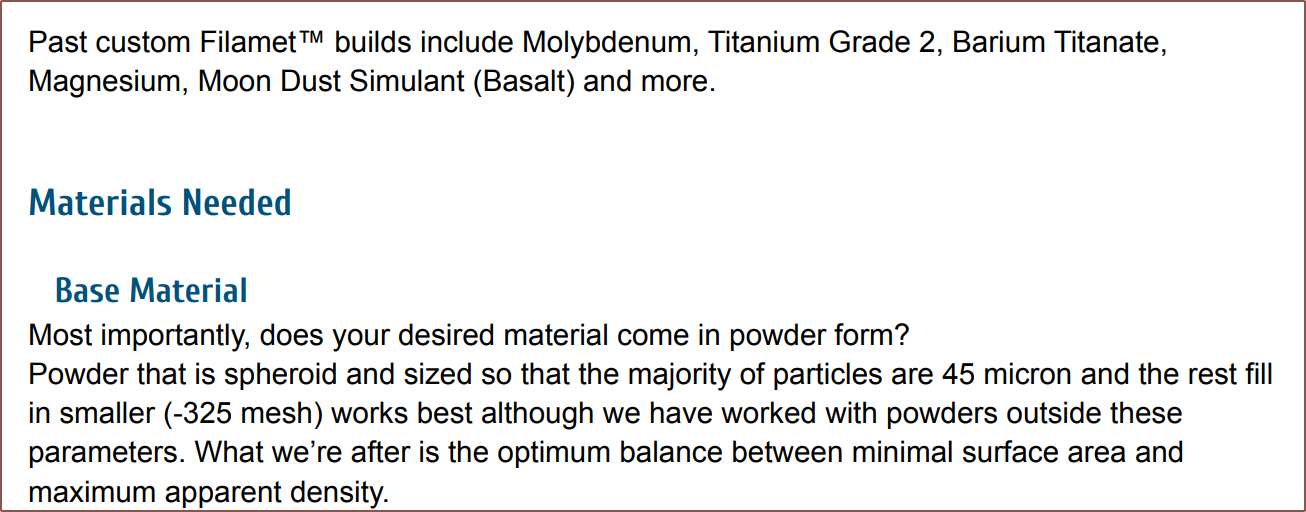
I've always thought that if the copper material worked, other materials that were in powder form could work too as long as the photopolymer sufficiently absorbed the laser power. I've just found out about The Virtual Foundry that sounds like they're doing that with PLA for FFF 3D printing, looking at this pdf about custom Filamet filament. The most notable part is that they recommend 45 micron particles:
I'm hoping that, during the printing process for L^3, shrinking predominantly happens vertically. To put another way, a 100um layer of photopolymer shrinks to 80um after being iradiated by the diode laser.
2023 - Dec 18: Orient omniwheels to long axis
This is so that the larger-diameter main wheel can go over bumps like the floor dividers in doorframes instead of the smaller wheel array on the omniwheel.
2023 - Nov 11: Send new print whilst current job is printing
The idea is to use the magnetic supports to build a scaffold for a designated amount of print area that is used if a user decides they want to print something whilst a multi-hour / multi-day print is already in progress.
Like, say you've got PartA that'll take 10 hours to print because it's multi-material, but you also think that you might finish designing a smaller/shorter/single-material PartB in 2 - 3 hours from now. The goal is to be able to start PartA, specifying to also stack scaffolds for a 50 x 50mm area. Then, when PartB is ready to be sent over, the Suspense starts printing it at its earliest possibility. Taking advantage that the area covered by the LCD will take the same amount of time to cure regardless, the hope is that the additional print would be negligible and it'll almost be like having multiple printers on demand.
2023 - Nov 11: Bed that only moves in Z
As a project targetted towards consumers, the amount of print space compared to the amount it takes up is an important metric. I looked at UK door widths, and the smallest was 27" / 686mm. I then looked at desk heights and the lowest was 28". Assuming that the thickness of the table is 1", it'll mean that there's 27" of space underneath it. From that, I'm thinking of going with a 52" x 26" x 26" (1320.8mm x 660.4mm x 660.4mm) maximum footprint area.
To maximise the print area, the plan is to have the LCD and material cartridges on a heavy duty gantry. Conveniently, this shouldn't be a printer that needs high accelerations to perform at a decent speed.
The hope is to get about 650mm x 490mm x 330mm of XYZ build volume (1cm more than the round sounding 64cm x 48cm x 32cm, like how the CR10 is advertised for 300mm but can usually do 310mm). Part of this large size is so that it meets / exceeds the XY bed area of the #SecSavr Sublime [gd0036], and part of it is because I beleive it's a very nice size to have for the expected price, but a part is so I can do reliability testing.
2023 - Nov 08: Enclosure pressure test for added safety
I'm thinking that, to test that the printer is airtight, the pressure is changed so that it's not 1 ATM and this pressure is electronically monitored. It doesn't need to be that much different, but enough to detect if there is a leak before or during the print. I'd imagine negative pressure is safer, as leaks will cause fresh air to move into the enclosure instead of pushing contaminated air out into the environment.
2023 - Sep 20: Moved from comment area
I've moved all the ideas from the comment section (called "Discussions") into the log itself so that it can be picked up by search engines. Think of these as nano-logs. The main header includes the general gist of the comment. Replies to the main coment will be shown under a smaller header.
I've also renamed this log from "Seemingly solid specification and quick comments".
2023 - Sep 19: Load cells
Considering using load cells on the bed to be able to detect pressure. Theoretically, this would allow the printer to make sure that the pressure against the LCD is constant across the printing area as well as detect if there's an unexpected amount of force being applied, stopping before LCD damage.
2023 - Aug 05: Shelving SecSavr
Currently shelving all SecSavr projects due to Tetent [gd0090] delays. This is due to manufacturing issues with Tetrinsic (https://hackaday.io/project/184180/log/221847), and I haven't even gotten to the programming stage yet.
I'm just going to have to hope that BCN3D and I are not the only ones designing a lower cost, higher viscosity compatible alternative to Polymer Jetting.
Because things like X * 1.2 * Zm grow tents and cheap 1.2 * Ym heavy duty shelving exists, I'm thinking of trying to get the footprint of the printer under 1.2m long so that it can fit in such store-bought solutions.
2023 - March 20
This seems not possible whilst still keeping the 652mm X axis. I'm only 10cm out though, so perhaps I can find a way when I start modelling.
2023 - Feb 15: Increase Placement Block X acceleration
I'm going to put a sping / damper between the PnP motors and everything else in the Placement Block to increase X axis acceleration.
I'm planning to use a self supported HGR15 rail (due to the 700mm+ span required now), so the Placement Block makes up less of a mass percentage when accelerating in the Y axis (the total mass = HGR rail + carriage + Placement Block). On the other hand, X mass = Placement Block + HGR cariage.
The syringe stuff is light so that can stay alongside the spindle (which needs the stiffness as a load will be applied against it) and laser (which is sensitive to ringing/ghosting oscillations, and high acceleration movement is a bigger factor of print time). The PnP shouldn't have any X axis loads applied to it and the 2 stepper motors likely have a significant enough mass % of the entire Placement Block such that mounting them like flying extruders in the FDM world will show noticable improvement in acceleration.
2023 - Jan 13: Meshed bed instead of solid
I'm thinking of initially trying to print on a mesh (similar to the print beds used in top-down SLA printers). I need the mesh anyway because of the laser cutter, and I can already see it now where I'm having difficulty cleaning off the first layer if I used a solid bed. Plus, I'd then have the option to fill the bottom of the build area with bolt heads for auto part eject similar to the SLAminator. I can imagine that now, and it looks sweet!
2023 - Jan 05: Another multi-material resin method found
I just realised that if I fully cure the first layer or layers under magnet stacks, won't the part the part be bonded too securely? Would the slicer need to print some kind of surface area reducing pattern?
2022 - Dec 10: Q5D 3D printer found
I saw this video and it's possible to laser sinter copper inks (with what looks to be a red (likely infrared) laser. Their machine can also lay copper wire or continuous fibres.
I'm trying to understand how they're doing it, but this company has been able to print from both the top and bottom of a build plane at the same time, essentially cutting the print speed in half and reducing the amount of supports required. They call it MAP(tm).
2022 - Oct 16: Tiles for enclosure
I'm likely going to use tiles for the outer enclousure. I've got maybe £60 of 50x60 and 55x60 tiles I bought for the SecSavr Soap that are now not doing much. Additionally, I'm looking for a rigid, cheap, opaque, non flamable, good looking sheet material, and tiles sure tick all those boxes. I'm somewhat concerned about weight, but I'm also going to be using galvanised steel tubes where I can for the frame, so it's probably not a metric I should use to consider usability.
This could merge 2 printer ideas I've wanted to do. First, the "original SecSavr" (which I renamed to the SecSavr Cylinder) was going to be a cube CoreXY printer that used tiles as an enclosure. The second was a printer built into a coffee table. At over 70cm tall and with no foot space, the Suspense would probably be more like a cupboard.
2022 - Oct 10: Increase X to 652mm
I'm tempted to increase the Suspense X from 614 to 652mm because 326x2 = 652 and the MGN9H is 40mm long. I'd like to stick to off-the-shelf rail lengths, and so a 650mm rail won't be long enough and I'd have to go to 700mm.
Additonally, I'm likely not going to build the SuspenseSmall mainly because the Suspense hypothetically CanDoTheTaskApp and an additional SuspenseSmall would only CanDoTheTaskBetter. If any component had to be (re)bought because expectations differed from reality, it'll cost 2x with 2 printers. To further add, the money would be better spent towards the materials R+D budget. I'd still have the SuspenseSmall in the BOM to confirm that a solution can cost under the arbritrary £999 with the Placement Block, but the real value meal deal in this lineup is the Suspense.
2022 - Oct 08: Laser edge smoothing
I just realised that, since I most likely would have to formulate the materials anyway, and the whole system blocks visible light getting in or out, I could have a photoinitiator for both 405nm and 450nm wavelengths. Then, the 450nm laser could be used to obtain SLA like surfaces. This would primarily be used on block-colour or transparent-coated surfaces to add a smoother or glossy surface.
The order would be: Coat film -> expose layer -> peel part -> laser edges -> clean excess -> cure all -> recoat film.
2022 - Sep 06: Increase X to 614mm
Now that the printer is planned to be fully enclosed and sealed (again), the requirements for the SleepCinema / CeilingSingle [gd0099] kinda just fell of a cliff, to the point where it would make much more sense to use a "heavy duty" shelf off ebay for cheap than cobble together the CeilingSingle. Therefore, I'm going to reclaim the 85+mm of space the 42.4mm vertical tubes would've taken up and increase the lengths of the Suspense + Slim to 614mm.
Can I think of a use for a 600mm long X axis? No, not really; there's more 500mm prints I've got in mind than 400mm ones, but the amount of prints drops off after 510mm. However, I expect the cost difference to be like <£30, the footprint to be about the same and FutureMe might have that one-off print and glad I made the decision. Additionally, the largest FDM in the hobbyist space is the TronXY X5SA 600 and I did ask "The best of resin with the best of filament; is such a 3D printer possible?" and this is an easy way to get even closer to "the best of filament" across all metrics.
2022 - Sep 10
Oh it makes the SecSavr Skyrise practically redundant. That printer has a >700mm Z height and I only cared for >600mm long prints.
2022 - Sep 04: Discovered Nevermore
I'm adding filtration back onto the list of features due to this article.
2022 - Sep 01: Silver paste in ceramic tracks
I'm thinking of trying to print the silver paste tracks in ceramic / ceramic-like resin in the hope that a near full sinter of the silver trace is possible with the laser.
2022 - Sep 01: Kickstarter 3D printers
Oh yeah. I forgot I heard about the NexD1 at the start of June. The Kickstarter got suspended because it was a complete scam apparently. I'd really like the Suspense to be the actually-working-version of the concept and have it not cost over 2300 euros (55% off super early bird, shockingly). Actually... I shoud probably keep a low profile until I've got prints because the project's deliverable now sounds like a massive overdeliver in comparison to anything else currently on the market, even though the science seems sound in my eyes. 🥺
There's also this little machine called Rubanmaster that can be turned upside down to switch from SLA mode to Laser cutter.
2022 - Aug 26: Overcuring and curing speeds
I'm currently reading a paper called Slurry Based Stereolithography and found out that "overcuring" refers to resin that would be in the layer under the one being exposed also being cured. I'm assuming that's the reason why UV blockers are added into the resin, and I suspect that these UV blockers are also responsible for clear resins being yellow-tinted. I don't have the information to confirm such a hypothesis, but I can conclude that UV blockers... block UV, the stuff that is supposed to be curing the material in the first place. This slows down the curing speed, so will not be added into DIY resin since I need curing speeds to go up and there *isn't* uncured resin under the exposed layer -- it's air or fully cured resin. This change would also add into the need for opaque doors to prevent premature curing from stray light.
Speaking of curing speeds, I'm reminded of this reddit post [https://www.reddit.com/r/resinprinting/comments/pcbvbv/diy_continuous_resin_printer/] where the vat is rotated to replenish the PDMS layer with oxygen. I don't know if this is going to be a bug or a feature, but the PET film for L^3 is cleaned and exposed to air after every exposure. Does this mean fast peeling of the part or trouble with cleaning up uncured resin?
2022 - Aug 27 (00:13)
I've been reading "Slurry Based Stereolithography" because it sounded like it could actually be a paper that inspired VLM; I still refuse to believe it's never been tried untill BCN3D. By the way BCN3D were talking about it, it sounded like it was one of those technologies that struggled to get out of the lab and they finally perfected the science/engineering.
Anyway, they're talking about ceramics and I was like "I've got a laser... could I sinter ceramics with it?", so I google search and see this image:
It's a diagram of a film based printer, where a projection comes in from the bottom, material is deposited onto the film from the right and pumped from the left, and it's a printer designed to print ceramics and metals!
I kinda thought this was possible (and that's one reason why I didn't initally want to use "liquid" in the technology's name), but I valued the rightside up print bed more than the mayyyyyybe that I could print ultra expensive metal powders that I'd still need to sinter. I believe that polymers + continuous fibre would meet the needs of most of the situations I'd want a metal part, which is stiffness without being brittle.
Anyway this is an animation of it printing [timestamp: 39s] and I can finally rest easy knowing that the 3D printing rule still stands: If you think of a cool 3D printing idea, someone else has probably done it already and usually at least 5 years ago. It seems that they are able to pump the liquid up and off the film. I was wondering if there was a solution that could make this kind of process gravity independent and this seems to fufill it.
2022 - Aug 27 (10:05)
I've found another instance of using a film, and this one is closer in line to what I'm doing. The researchers say that the printer is called the Onestage 6500, but Google doesn't find any relevant results.
There's also a study that uses an air jet to clean uncured resin off the part to allow for multi-material printing. It doesn't use a film but a moving glass plate.
2022 - Aug 26: CadQuery
I looked into CadQuery since I wanted to scan over my CAD options again before embarking on implementation modelling in Fusion360 and it was all seeming well until I read in the docs that tangent arcs haven't been implemented yet, which is kind of my "bread 'n' butter" after mutli-profile sketches.
2022 - Aug 28
I'm starting to suspect that Fusion360 is what's preventing me from project progress (in more than just this one) so I tried writing out a concept in Markdown.
2022 - Aug 26: Syringes
Found the syringe needles but it seems that 2x5ml is the max I can fit in the space provided instead of 4 x 10ml due to the lack of screw capped syringes under 100ml. There's a very nice looking steel 10ml on aliexpress, but they're 10x too expensive and I won't be able to use a light-based approach for detecting when the syringe is almost empty. For the latter, I may be able to detect a current difference on the pump.
I might be able to get 2x5ml + a 3ml syringe in there, so that UV curable resin, silver paste and solder paste can be used in a 3DPCB. I'd also be fine with 5ml + 2x3ml or 3x3ml.
2022 - Aug 25: Paste extruding via compressed air
On the search to make sure 400kPa (58psi) was good enough to despense things as viscous as solder paste, I found out about nScrypt's fabulous and fancy printer demonstrations:
Seeing this, it seems that it's possible to do away with the printed tracks, and instead: print PCB surface -> deposit tracks -> laser cure/sinter -> print next layer straight on top, filling in the gaps.
Additionally, I'm thinking of a 6 section rotating cam to use for enabling or disabling 4x10ml syringes + fibre nozzle. Ideally, I'd like to still be able to use pressurised air to extrude the paste, as then I can swap to 5 / 2 / 1ml syringes without much issue.
2022 - Aug 26
It's likely that the paste would spread out if it's not dispensed into a track. It might be something like 0.24mm min track width on substrate vs 0.16mm min into substrate. I'm going to aim for 0.16mm-into since a 30G syringe needle is 0.159mm.
2022 - Aug 25: Piezo probing
I'm thinking of going with piezo sensors instead of 3D Touch so that I can get Z offsets for all nozzles, as well as detecting if the entire head has hit something when the Z axis is raised (eg for laser cutting).
Thus, it makes sense to have a 5W laser in the Small. I was thinking of no laser since "Do I really need 2 laser cutters?"
2022 - Aug 25: Implementation research
Now I'm in "implementation research", which is the tedious process that can be simplified to something like "Should I use these bolts or those bolts?". I think it makes sense to write such research as comments to this log. The first one is going to be large because of the backlog before this idea.
So far:
Confirmed that the C80-EAIR + 12V slim PSU is the best option whilst keeping the upgrade price for laser under £200. The 12V has the same outer dimensions as the 24V, so at least I can make the wiring symmetrical.
Found out that off the shelf pick and place heads are really expensive.
Found out that silicone tubing is flexible enough to rotate +/- 180 degrees, avoiding a coupler that adds Z height and is apparently leaky.
Found the SY-020, which looks like the UV-U3 pump but it's rated for 50dB instead of 60dB and has a max pressure of 400kPa instead of 350kPa.
Found a current sensor (ACS712), which will be used on the pump to detect if a part has been picked up successfully.
Made a quick sketch in fusion to confirm that everything might be able to fit in 90x90mm XY, though it would be nicer if I could get 80x80mm.
Confirmed that basalt fibre is the best option currently available to me. I found out about UHMWPE fibres, but then I read a paragraph the basalt fibre seller sent me months ago that said basalt was better. UHMWPE also seems more expensive.
Decided to scrap the Desktop Metal way of placing continuous tow and will design for a 0.5mm thread. This is because raw carbon fibre and basalt tow doesn't seem to be all that stable at the tip end. I'll have to make a machine that takes the raw fibre and spindles it into nice, managable rolls. Additionally, this change to 0.5mm round thread means that I can get truly continous fibre and fit it in smaller cross sections. Very small and very large parts is what I expect would benefit most from reinforcement.
Currently, I'm:
Reading about using compressed air to dispense pastes. Apparently, I thought anything that needed "compressed air" needed a massive air compressor. Turns out 20 - 40psi is only 137 - 235kpa, and uh... the SY-020 does 400. I'm looking for solutions different from the classic syringe plunger since Z height is limited. Now I'm wondering if I can actually use this air pressure to move the syringes up and down like a button press pen, as this would further reduce the amount if stuff that needs to be in the Placement Block whilst simultaneously increasing the amount of pastes and the volumes it can carry. I might actually be able to port the chocolate extruder from #SecSavr Sublime [gd0036], though I'd have to look into sub-ambient part cooling for actually decent results.
Things to do:
Briefly look into sub-ambient cooling.
Look into cheap + small cameras to use as syringe nozzle and cartridge application cams. Unlike gd0036, the movement would be slow enough to use 30fps cameras without it being a complete blur.
Look into the pressure required for the button press pen idea.
Things I'm not sure about:
Inclusion of a vinyl cutter. The blades used are dirt cheap, but that's an additonal tool I need to actuate.
It might be possible to use the laser to heat the silver and solder paste. Useless for BGAs, but might be required for localised heat curing the traces without having to expose the entire print to temperatures well over its Tg.
Things I might research further:
Flexures for the LCD screen. I found out whilst watching a video of a DIY scanning laser microscope that those dirt cheap steppers can be used for micron level movement. [see https://openflexure.org] Not sure why this hasn't been done, but if I can get 20 micrometres of movement, I might be able to get edges that even beat current 8K (28um) printers on the market.
Laser Direct Write. Researchers in 2017 were already making PCBs with it. See Timestamp 210s
2022 - Aug 25
Oh yeah and the rotational axis once used by the fibre tool is now being used for a second PnP nozzle.
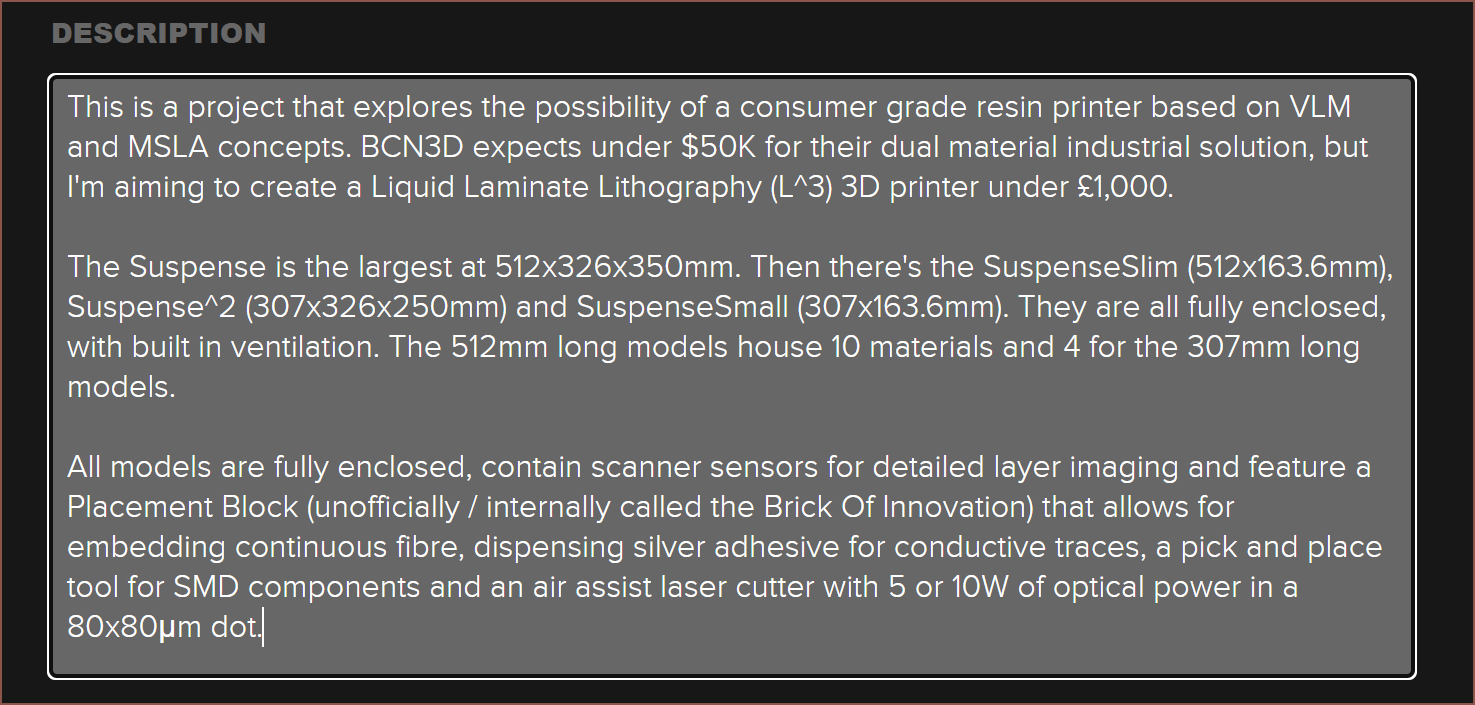
2022 - Aug 21: Seemingly Solid Specification
With a description as confident-sounding as this, I think I can assume that I'm out of the bulk research stage and moving into the development stage. I can't think of anything now, but there's a low but not 0 probability of discovering a new innovative feature to implement whilst modelling the printers. Also, the Slim/Small is expected to change from 305mm -> 355mm in Y footprint for the Placement Block.
As I said in the previous log, unlike most cheap laser engravers and 3D printers with attachments, the Suspense has nearly everything for safe and effective laser cutting use. I'm not interested in engraving, and Klipper doesn't support it either, though at the time of writing, it sounds like it's in the pipeline.
I did a quick scan of modules, and since they were <= 40mm square by some Z height, I quickly thought of a solution that could fit in the Placement Block (the thing that houses things like the silver paste dispenser and fibre).
Still though, while it's technically an afterthought, I still have to treat it like a first rate citizen. I don't want some "Jack of all trades, master of none" review, but "It's just BetterTM". So I spent all of yesterday researching lasers, both for the SecSavr and so that I'm finally somewhat informed in this traditional manufacturing method.
The lifespan of the CO2 actually suprised me. I thought CO2 was a complete upgrade over the cheap diode laser modules, but allegedly, there's quite expensive recurring maintenance costs.
Cheap-ish diode lasers max out at around 5.5W of light power. The best efficiency I've seen is 27.5%, or 20W of input power. Unfortunately, the diode laser industry likes to advertise the input power. To get more light power, multple diodes go through optics to merge the beams.
The above is from Snapmaker's AliExpress listing. I saw it right at the start of the day and it's what got me thinking of lasers in the first place. It's >£400 at the time of writing and they advertised 10W, so I was wondering why. Other than getting the impression that Snapmaker is like the engineering version of Dyson, I eventually deduced that it was because of the optics and dual diodes. For the rest of the log, I'm just going to refer to lasers in their output power (unless talking about specific lasers on AliExpress).
Looking at options
The only 405nm laser I could find had 1W of output power; the vast majority are 450nm with some being 445nm. I couldn't seem to find any remotely affordable and high powered UV lasers either.
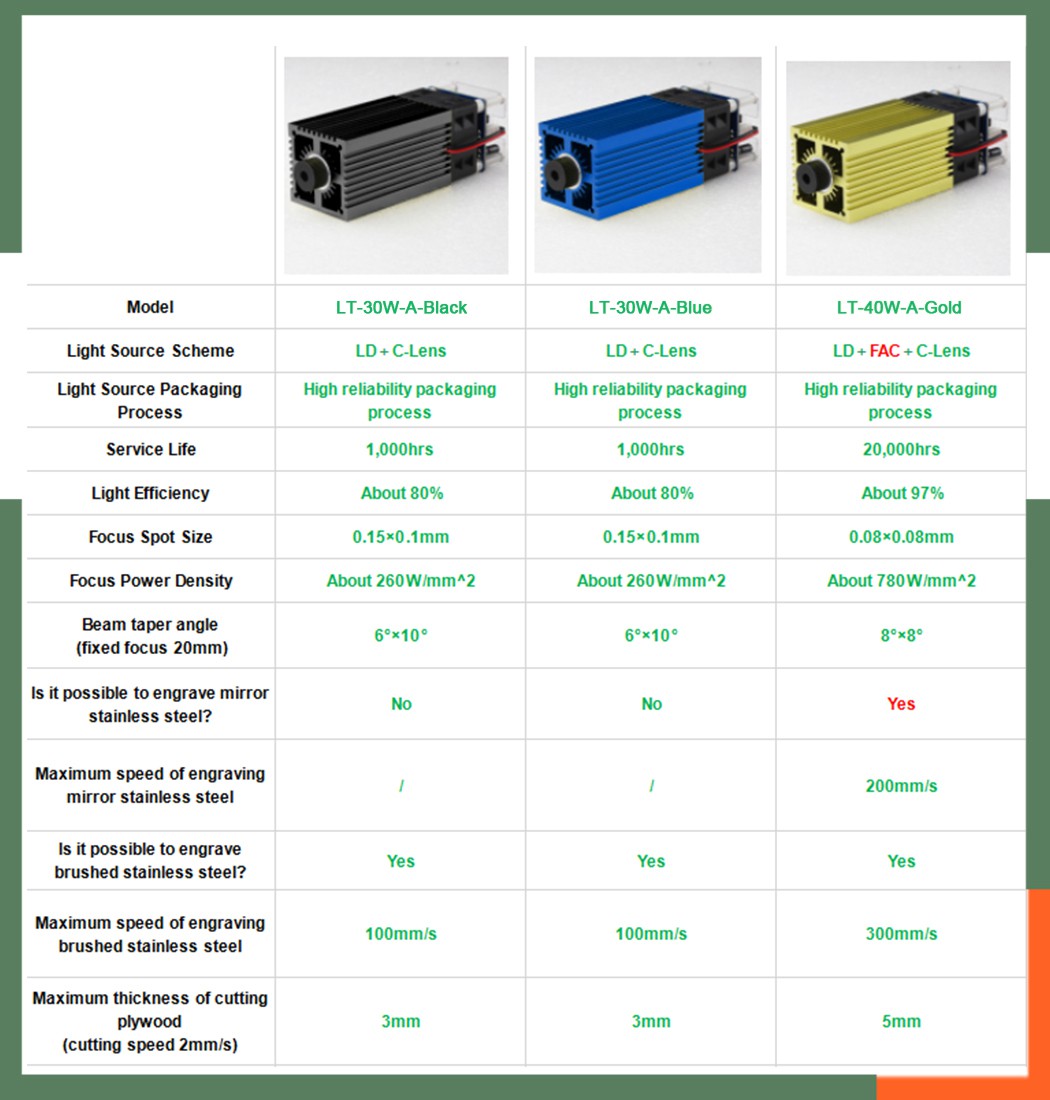
I found a black heatsink, 5.5W diode for £32 on the same listing as a 5W, gold heatsink diode for £80. Obviousy I'm confused, but it's because of optics again. As you can see from the snapmaker image above, Fast-Axis Collimating lenses decrease the laser dot, allowing for 100% faster cutting speeds. It's only when I went onto another listing that had this handy table that I found out.
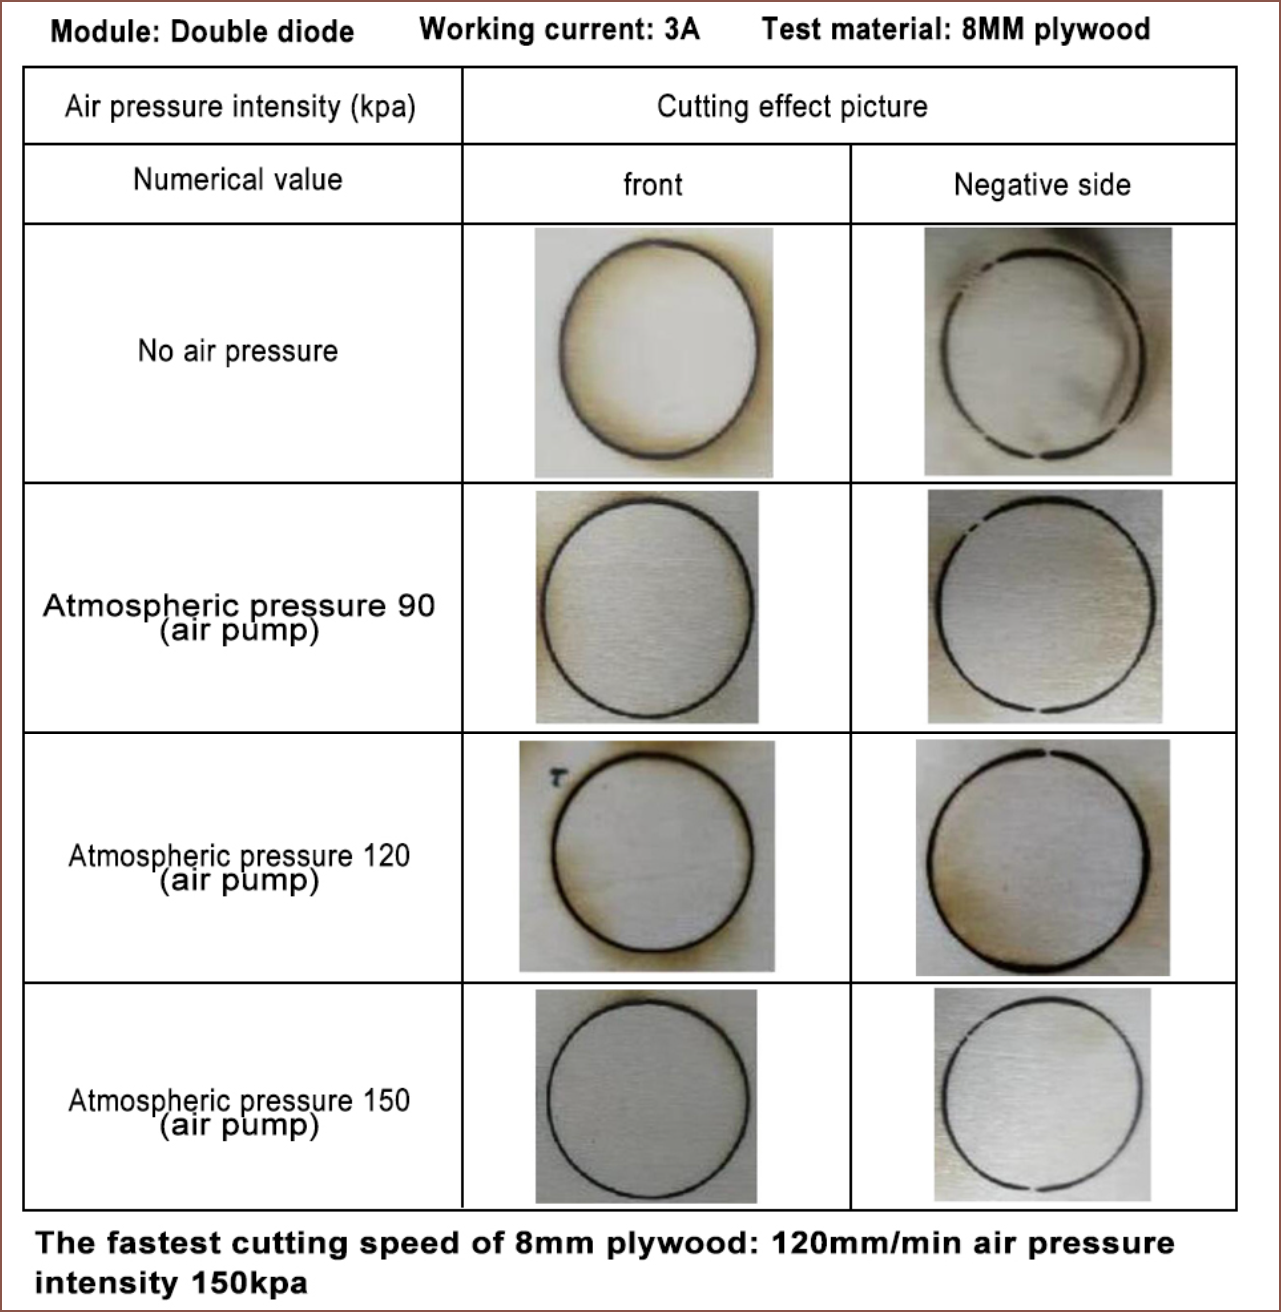
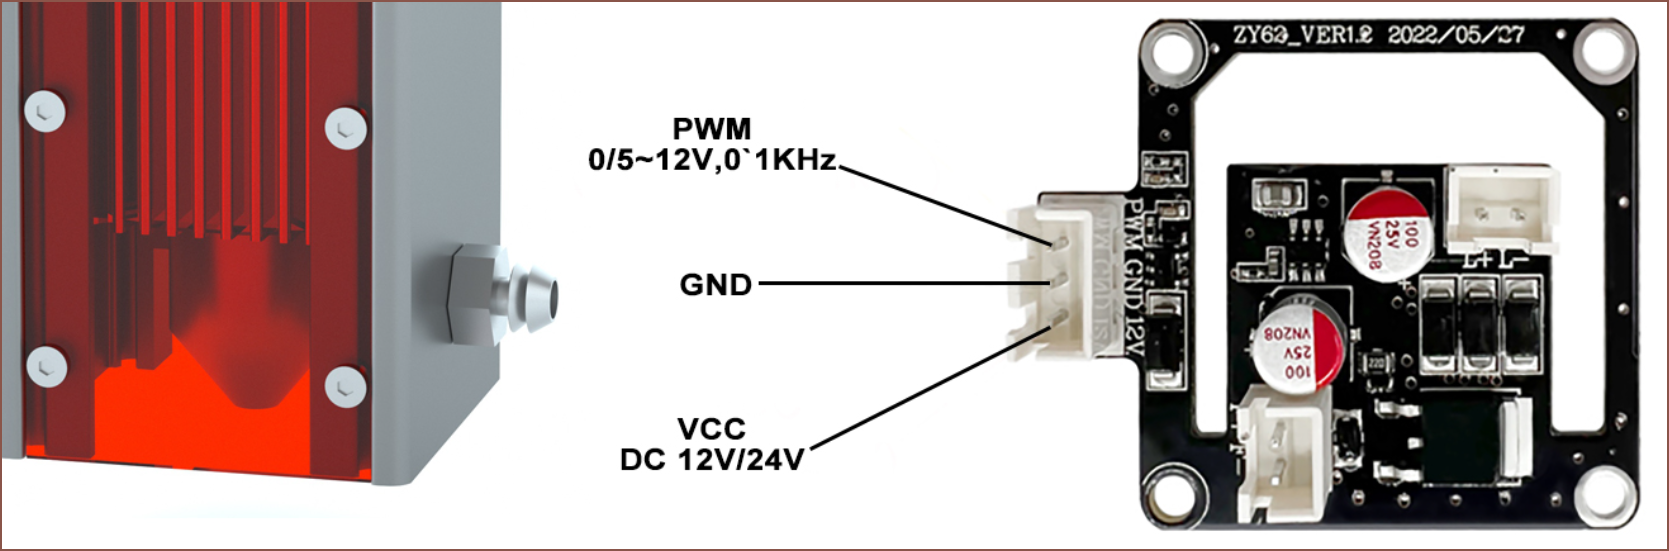
Air assist, where pressurised air blows burnt debris away from the cutting area, is also an important feature to have:
Shortlisted Options
A few minutes later, I found the bottom two lasers:
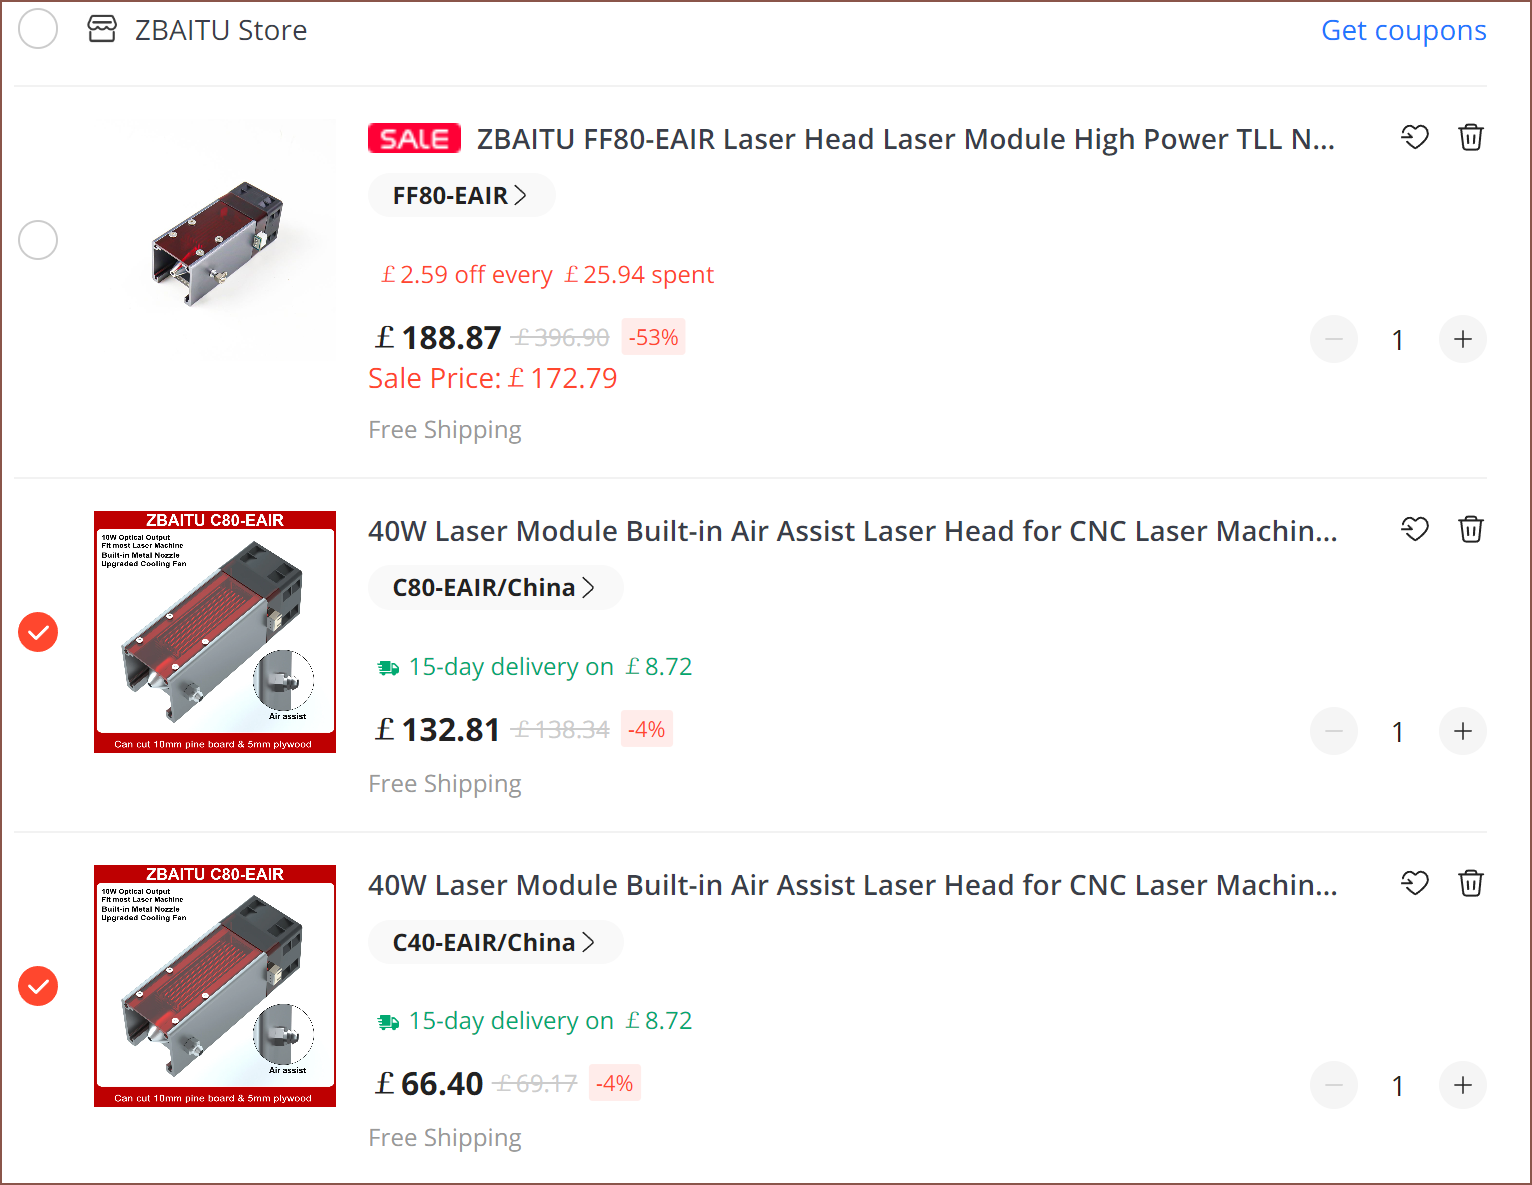
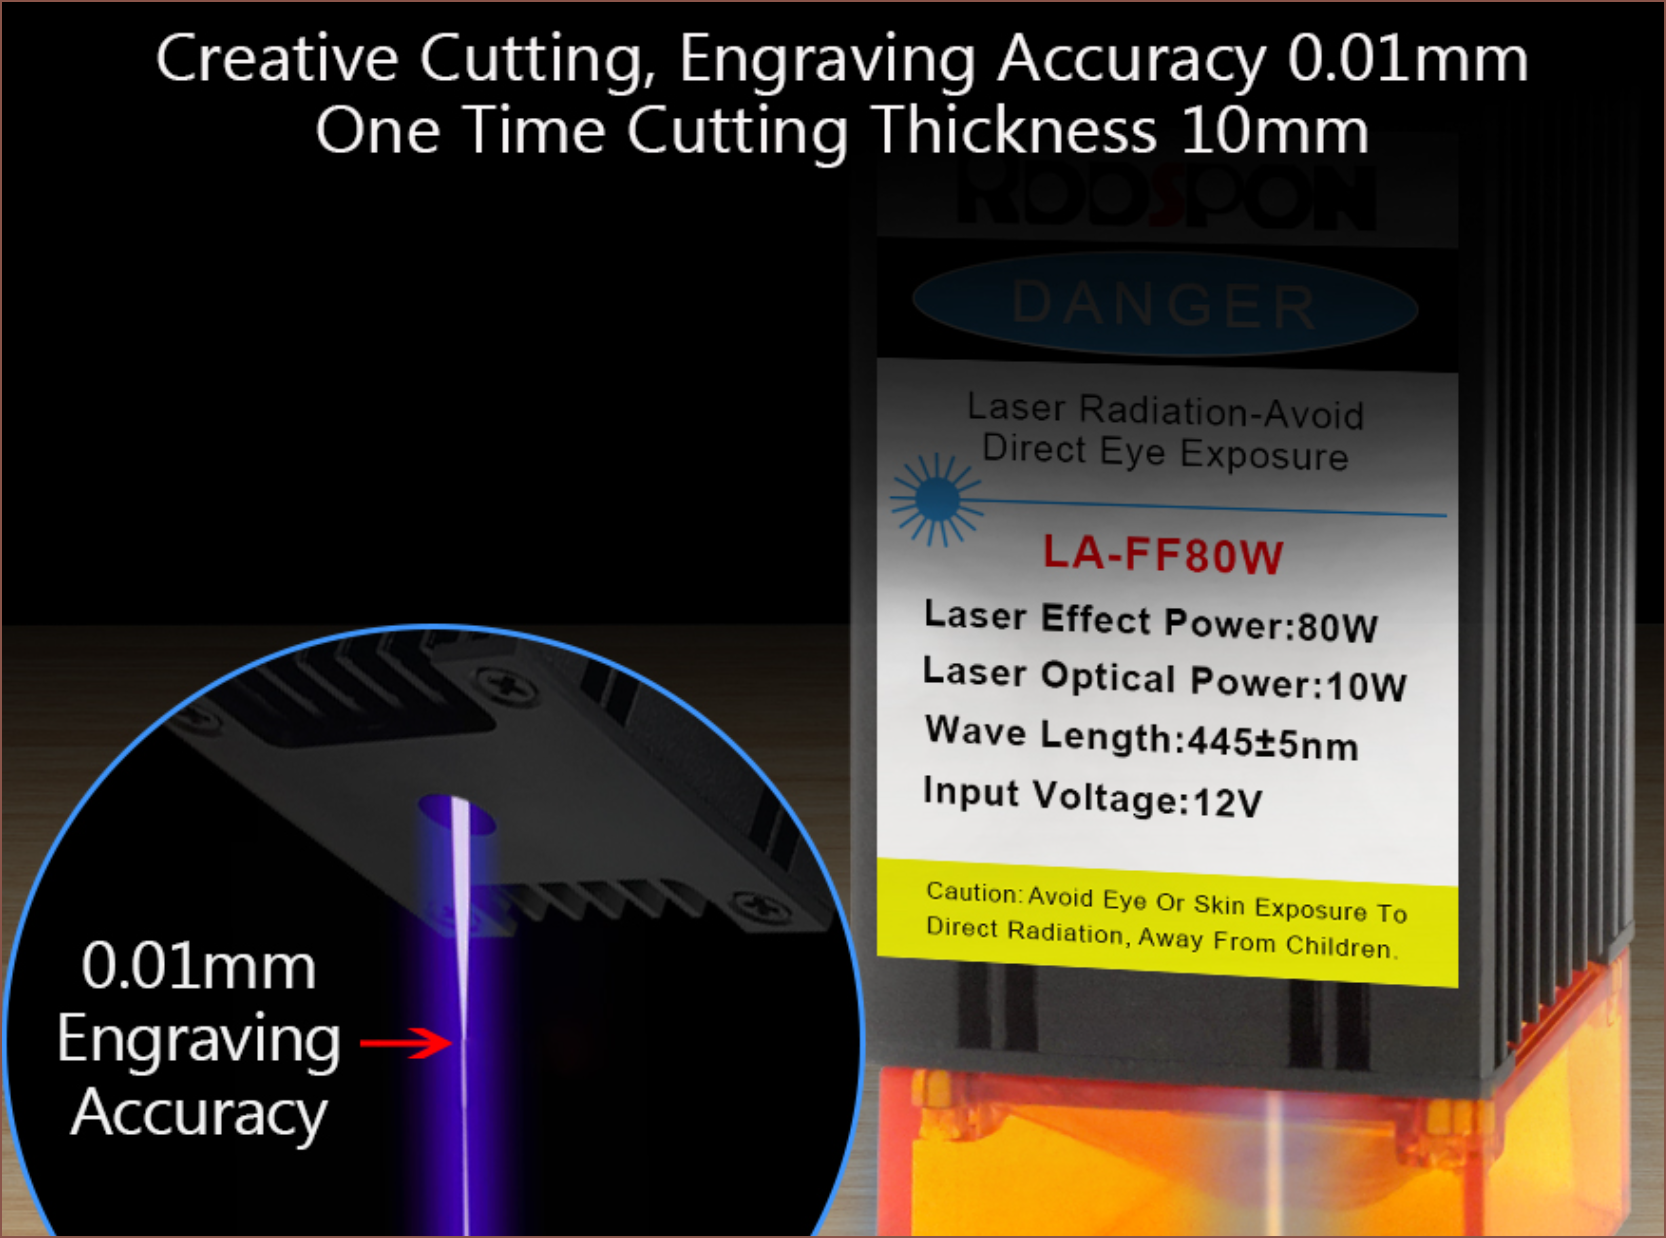
I've been wondering why the 80W version is cheaper than the other 80W version on their same store, but while they look identical, only at this present moment that I'm writing this log that I see that the codenames are different so obviously there's got to be some change I don't know about. I just didn't want to pick a laser that was going to spontaneously bump in price, even if AliTools said that £132 is some of the highest seen in recent months.There are other "80W" lasers that have the same 10W output power, but the TwoTrees has a larger 69x157um dot, the gold one doesn't say and the orange one has a bold claim of 10um, though I suspect it's 100um.
Neither of these had air assist out of the box and TwoTrees was the only other laser to support 24V input. Additionally, the C40 is one of the cheapest modules with FAC lenses and the exact same outter dimensions as the C80. I would have to ask about 24V input since they only mention 24V once and 12V everywhere else.
Safety
I'm planning on putting a switch in an area of the door hinge that cannot be reached from outside (like a fridge light door switch) so that the laser only has power when both doors are closed.
An e-stop should be easy to add to the front of the machine, but I'd also need to have some way to mount it to the back of the machine if it's more favourable to use the machine in that way (closer access to the Placement Block, printer can be placed right next to a wall...).
The laser input power will be connected to one of the onboard mosfets.
Due to the toxic fumes of resin printing already, I'm planning on electronic locks on the doors that only unlocks when VOCs have returned to a safe level. These locks will also be on when the laser is in use.
Unfortunately, I don't think there'd be any suitable amount of space for fire suppression in the SuspenseSlim and SuspenseSmall. The expected laser cutting area is also not large, and the BOM suggests that the price between the Small and the Squared is going to be slim, so I'd recommend the Suspense and Suspense^2 if a laser is to be installed in the Placement Block. From my basic knowledge of fire, I assume that it would eventually run out of oxygen in an enclosed volume and self extinguish.
Considering there's not much safety precausions for 1mW laser pointers, I'm assuming that the laser power has to be reduced to this level when talking about safetly glass. The OD rating has the formula ResultantP
ResultantPower = LaserPower * 10 ^ (-1 * OD)
So an OD rating of => 4 is needed to reduce a 10W laser to 1mW. For glasses, that's straightforward to obtain. For an A3 sized window... no. Therefore, a dark and heavily frosted material is required instead of the dark grey lexan window. The laser focus is fixed, a 3DTouch will be included on the Placement Block and there's a scanner inside, so there shouldn't be any requirement to see the dot of the laser. Heavily frosted is preferred over opaque as light from the laser or the start of a fire can still be visible from outside, but I cannot confirm if the laser dot will be diffused enough to be safe. Considering that the 108W UV LED is now being used to cure the 3d printed part, it's likely that I'd opt for an opaque door regardless.
Comparisons with other budget laser cutters on the market
The first thing I was concerned about is the cutting area. The "Ender3 of the laser cutting world" K40 CO2 laser cutter only comes in at 300x200mm, and the Suspense is expected to be 360x320mm without replacing the bed for a larger one that doesn't move in Y. If this bed is replaced, the area becomes an expected 360x480mm.
Watching this video (timestamped), it's probably fine to have any airflow at all. Actually scratch that as I just found this writeup and a 24V fan actually looks worse than no air at all, but the compressor that looks very similar to the one I just found is where the good cuts start (and it seems that David, the author of the writeup, also questioned adding a laser to his project). I found the pump on Amazon for £28 and most of the reviewers use it on laser engravers fine, though a PC fan on the heatsink would help with keeping the compressor cool.
Other than CO2 lasers, I can't seem to find lasers with enclosures. The most similar I've seen is this:
It has a 370x370 work area.It seems that the market for both buy and DIY is:
Large, cheap and open laser cutters, which may be part of a cheap CNC mill or 3D printer,
The ultra rare DIY diode build with an enclosure and filtration,
The K40's for £400,
DIY enclosures for the open laser cutters, and
The >£1,000 CO2, enclosed-diode and fibre laser machines.
Thus, it seems that a laser in the Suspense would fufill a gap in the market.
You may be wondering why it sounds like I'm once again considering increasing this SecSavr Suspense lineup when I haven't even got a working prototype, but it shouldn't be that much of a design alteration since the idea is just to put a Y axis stage on the bed.
I've been considering this for >2 weeks I believe, and it stems from reading a post in one of the online spaces for DIY resin printers about someone wanting to make a 24" SLA printer. I've also seen instances of 15.6". The latter in an X only design can be done with an 8.9" LCD, but the 24" would be somewhat expensive, requiring 13" screens iirc. Uniformily coating the PET becomes more questionable the longer the Y axis, and there likely wouldn't even be an off the shelf scanner long to verify it. I've also been imagining some perfect, idealistic future where the printer is so good that I can print custom LED matricies for #T^2 Tiles [gd0095], but the PnP wouldn't be able to cover the entire area of the PCB.
The main drawback is that printing in 2 Y zones would take 2x the time. For things like the 260*260 mm LED matrix cover of the #T^2 Tiles [gd0095] where [ Z in current build volume] >> 2 * [ Z in Sizeable build volume], it makes 100% sense. I also worry that there'd be new things I want to print that would exceed the current build volume. Just like the goal of the #SecSavr Sublime [gd0036], I'd rather not have to design another printer further out in the future. There's also things like #Teti [gd0022] and #TetInventory [gd0039] that use the entire Z height for half the print anyway, so I just get the possibility to save on assembly time or being around to send another print job.
With the plummeting probability that I'd actually make the Sublime because of the Suspense, and the fact that I'd need to build the biggest printer to make sure it scales issue-free, I'm thinking of this as the new strategy:
SuspenseSizeable -> Suspense [build this]
Suspense -> SuspenseSlim [design only]
Suspense^2 (SuspenseSquared) [design only]
SuspenseSmall [build this]
Some othe quick things to mention:
I might need a (thick) layer of insulating material on the surface of the print bed so that the aluminium doesn't affect the static pulling force of the Charge plate on the first few layers. The issue is that electrons from the surface of the aluminium would be repelled away, causing a positive charge on the plate. Polar molecules are attracted to all charges, so the resultant force on the resin would be reduced.
The new Suspense and Suspense^2 can theoretically scan A4's now. The Suspense might even be able to stitch together an A3 scan. Wait, it could actually print those optimally now too! Hey, speaking of A4's and A3's, I could now have a build volume to compete with Ainsoprint's A3 Composer.
This new lineup reminds me of the iPhone Pro Max / Pro / [Standard] / Mini.
[11:55] I don't have much interest for laser cutting (and Klipper doesn't really support it), but the printer looks like a good candidate for safe laser use. It just needs a protective window material instead of the grey lexan, since things like locked doors, airtight-ness and ventilation are already things needed for safe resin use.
[11:55] The MGN9H is rated for 1.9kgf-m in the Y moment axis, and according to Fusion360, the mass of the new Suspense bed is 2.7kg for a 517 x 325mm bed for a Y axis of 320mm. (327.x mm is the max, so I could stretch for 325mm on a 330mm long bed.) At the extremes, the bed's centre of gravity would be 75.5mm from the rails, creating a moment of 0.2039 kgf-m which is well under the static force. I'm planning to use a thrust bearing between the star bolts and the printed bed holder so that the moment isn't transfered to the bolt and loosens it over time.
 kelvinA
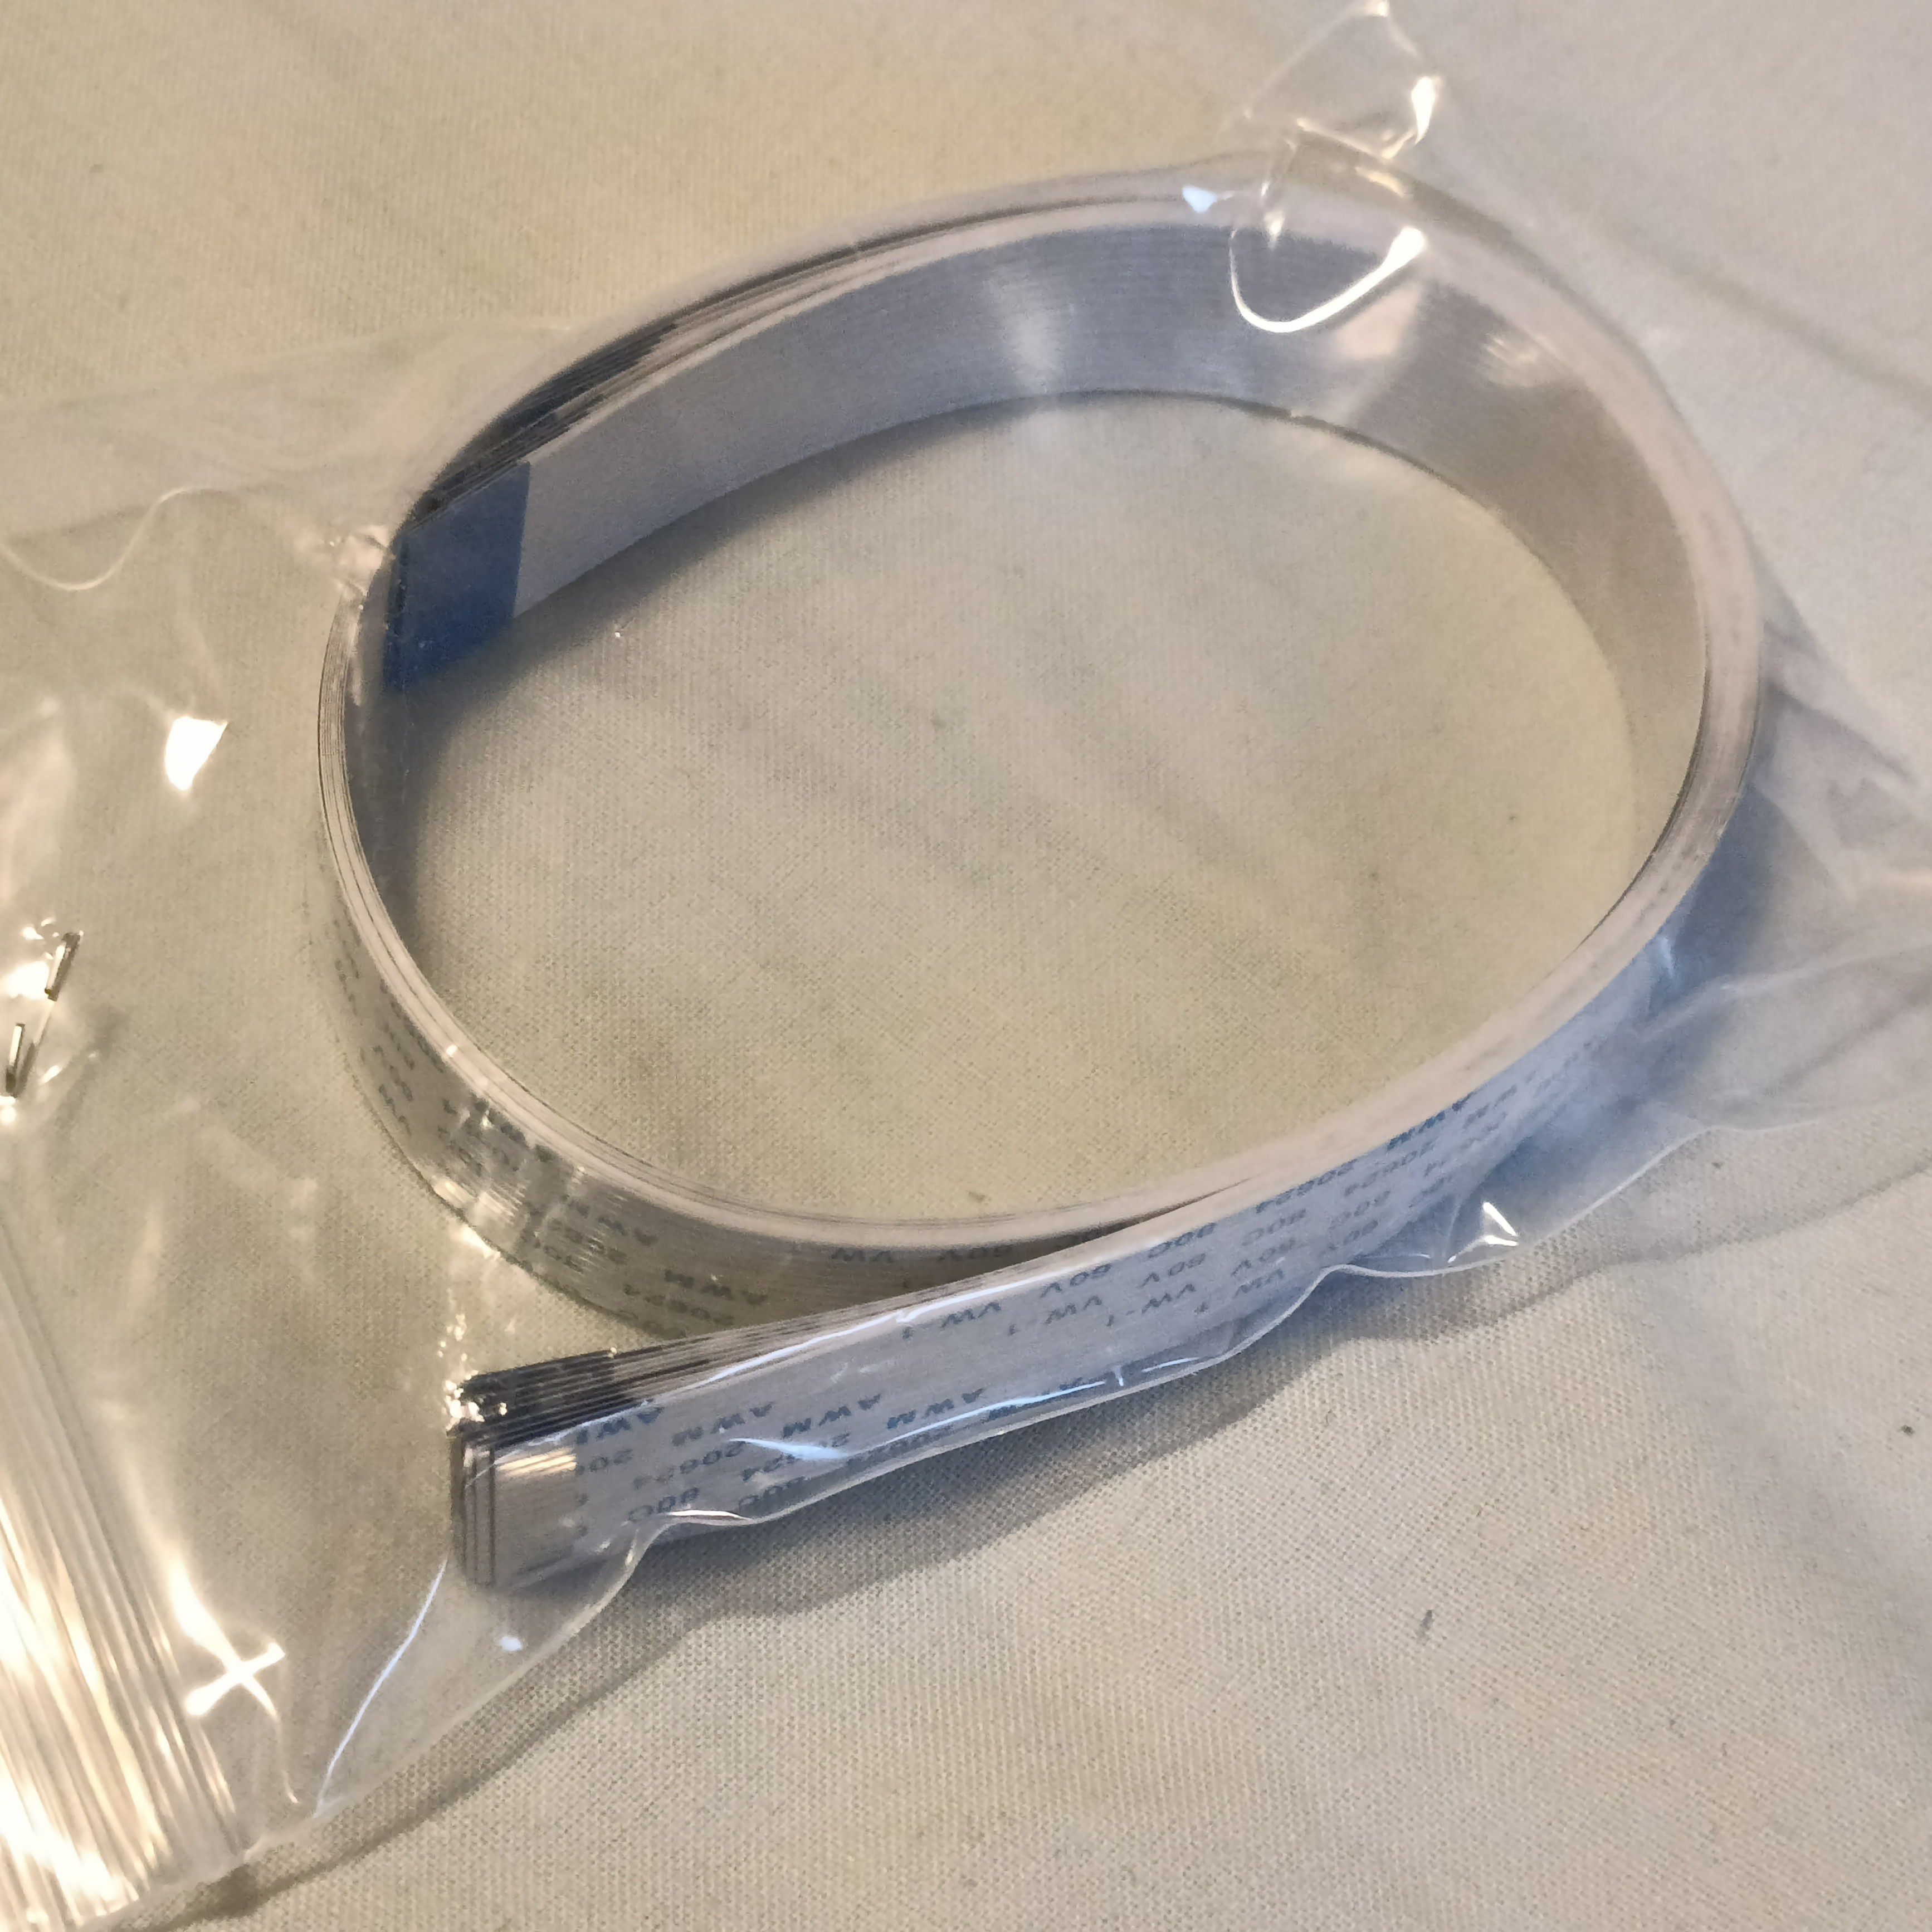
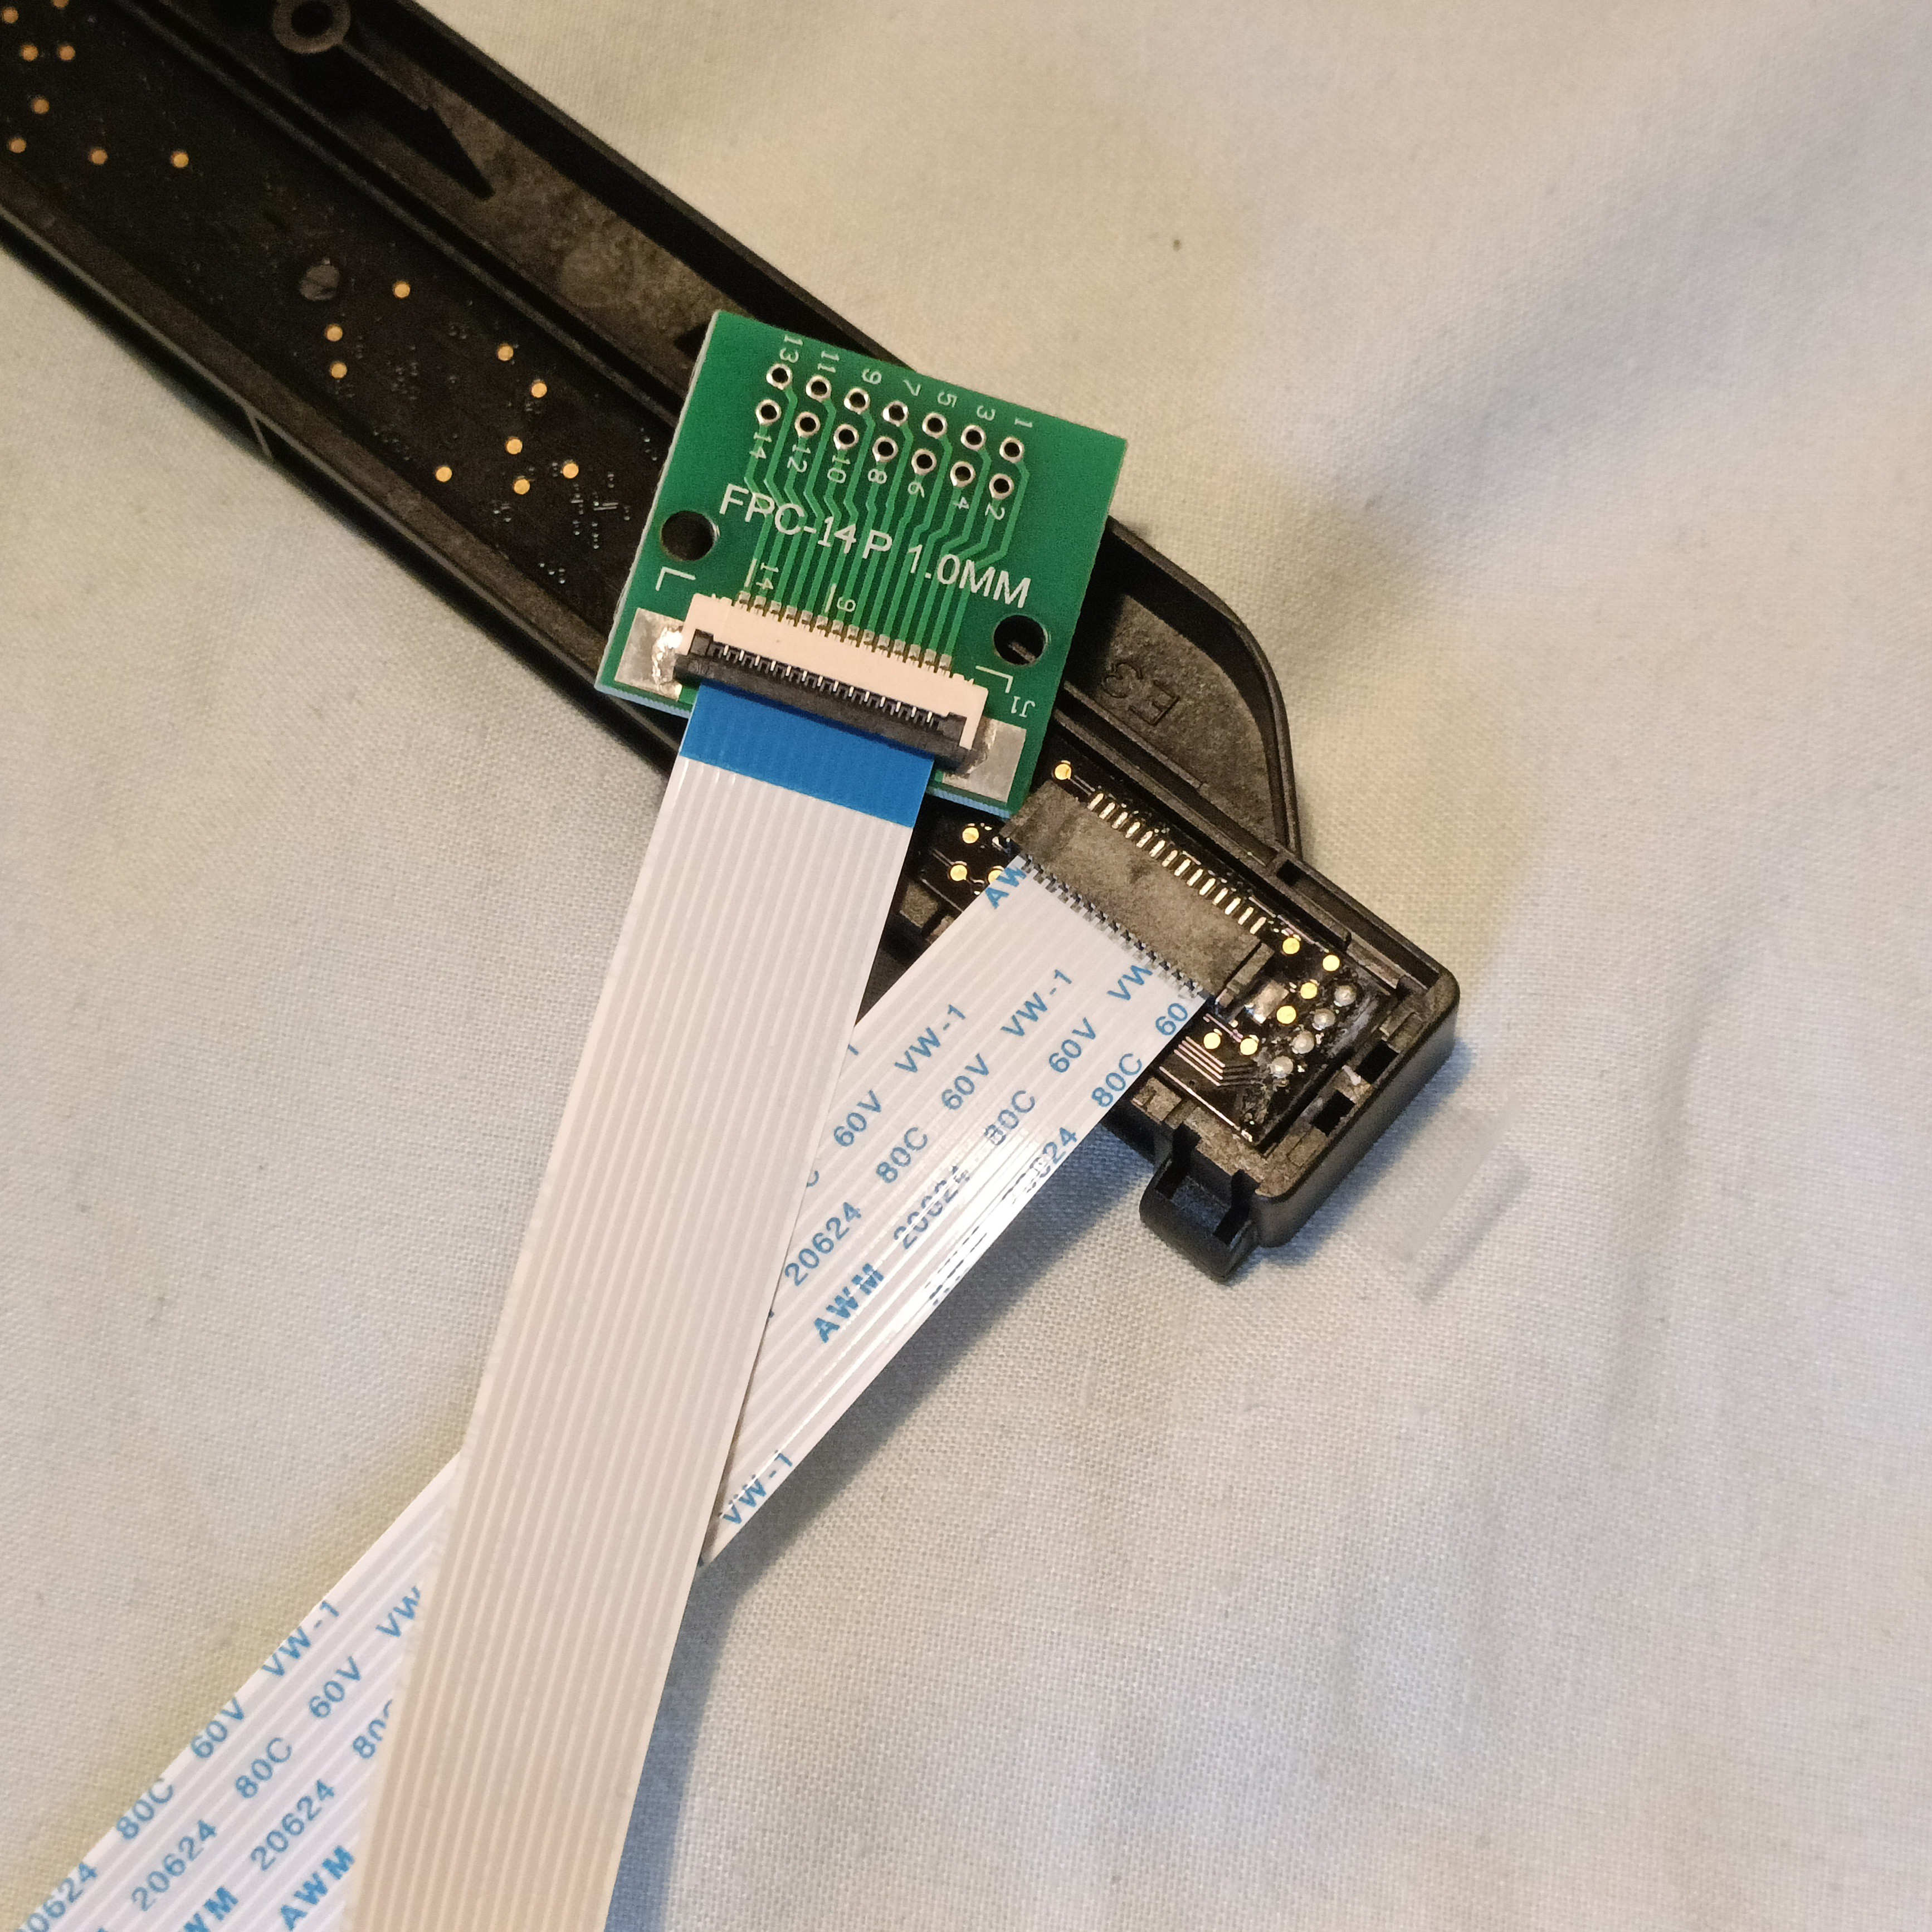 There's no clip on the sensor connector and you're just supposed to squish the cable in. The contacts are on the top of the connector whereas it's on the bottom on the breakout board. I got the cable where contacts on both ends are on the same side, conviniently meaning that the pinout markings on the breakout board match the pinout numbering from the previous log.
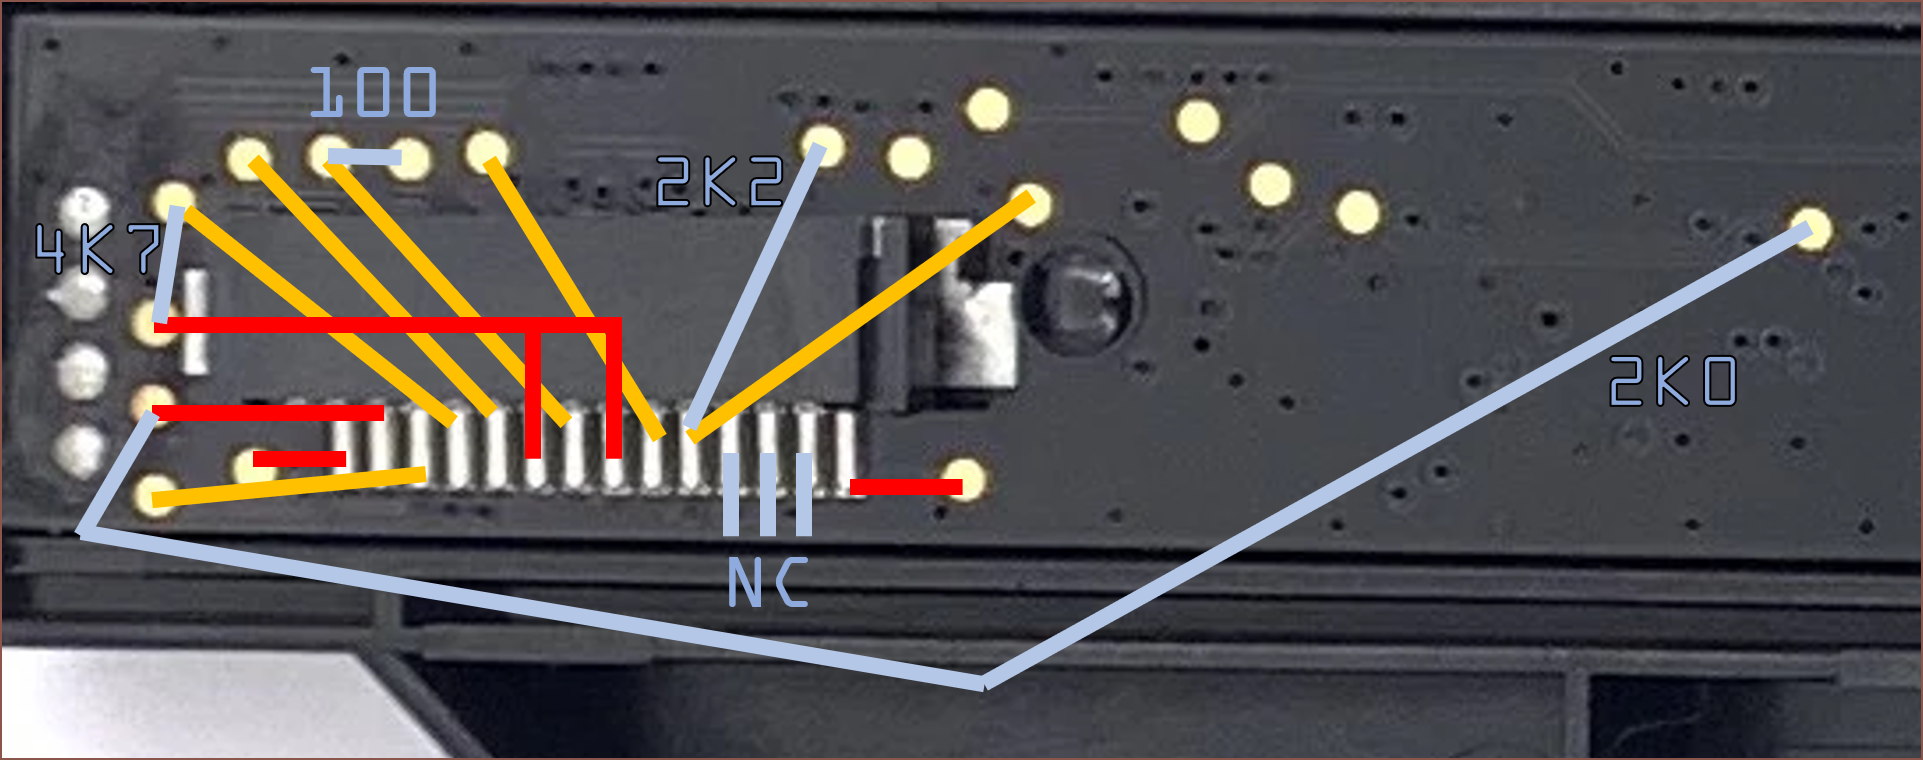
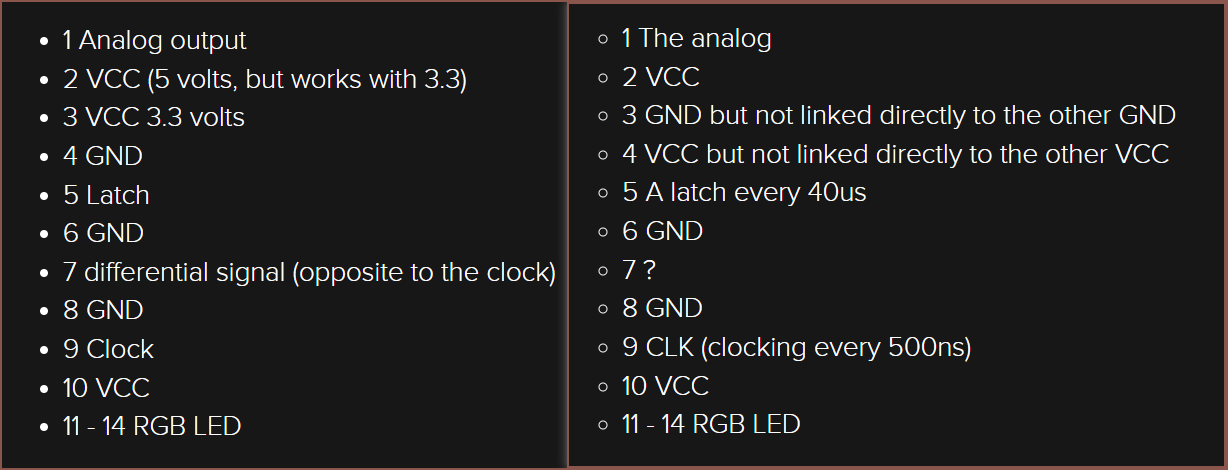 I didn't notice this the first time round, but pin 2 and 10 are apparently connected and I can confirm this. The updated map:
 I'm not really sure what's happening with Pin3, so I'm going to assume the left one is the more up-to-date pinout research.
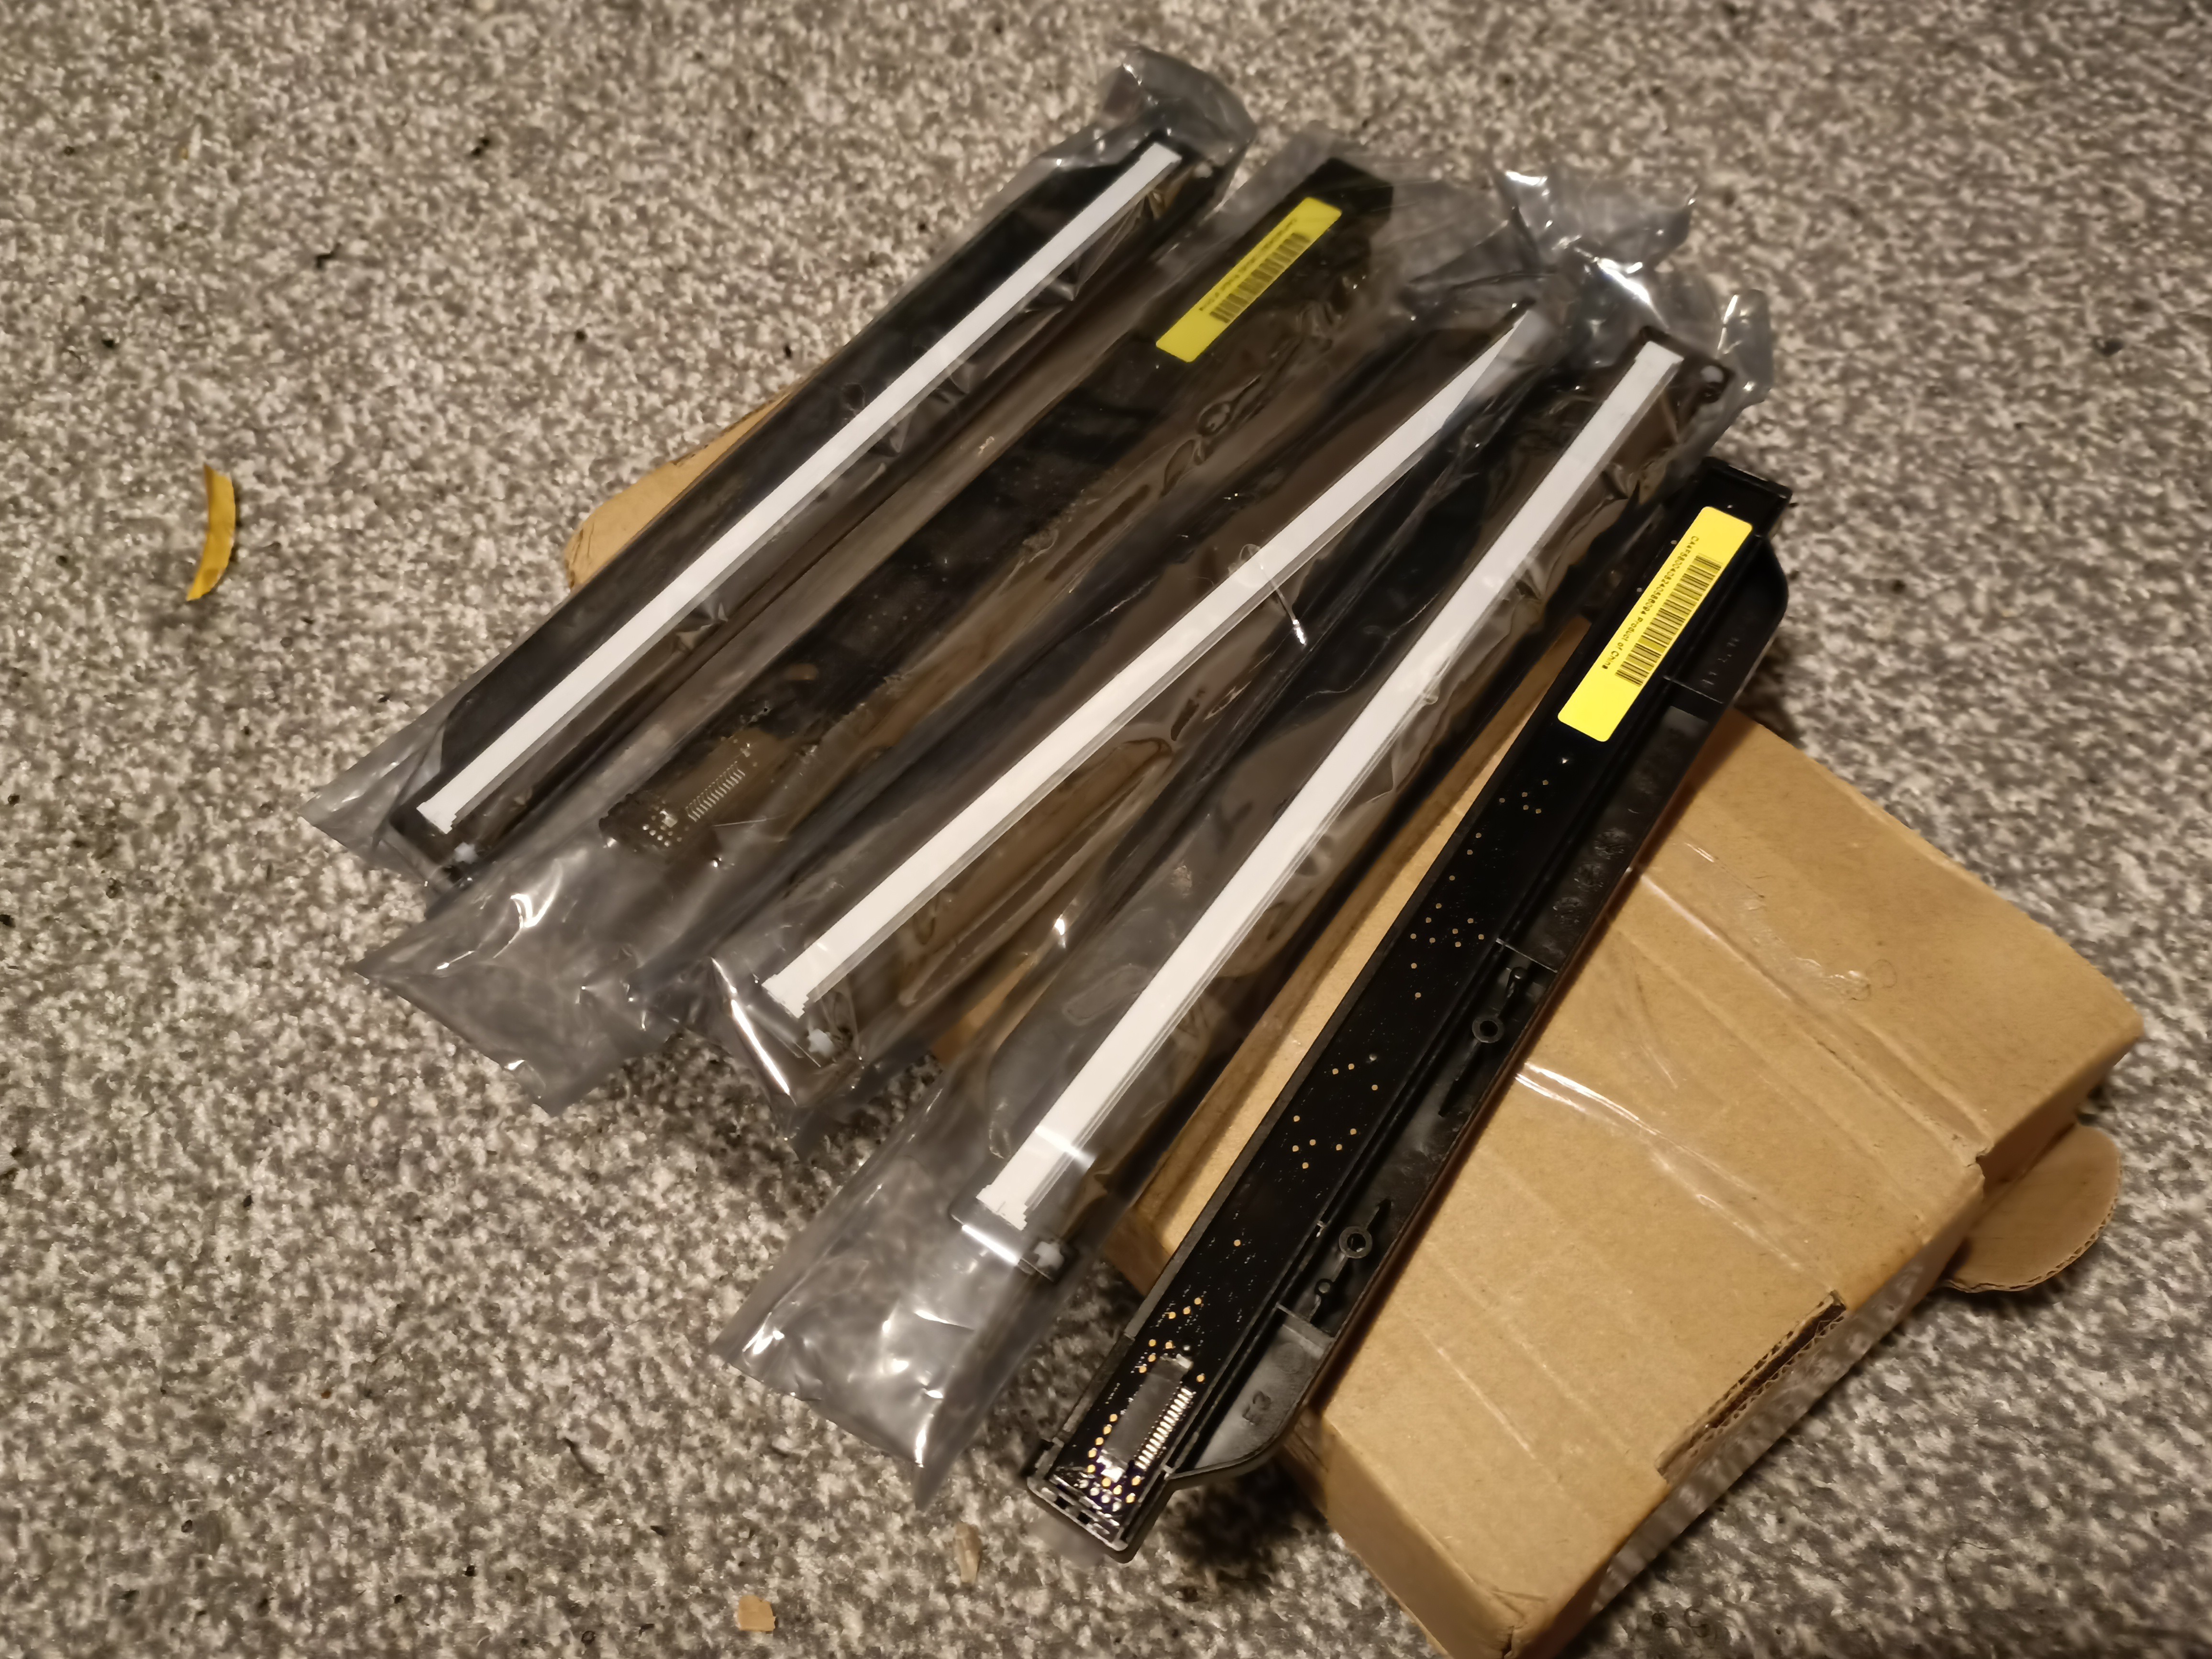

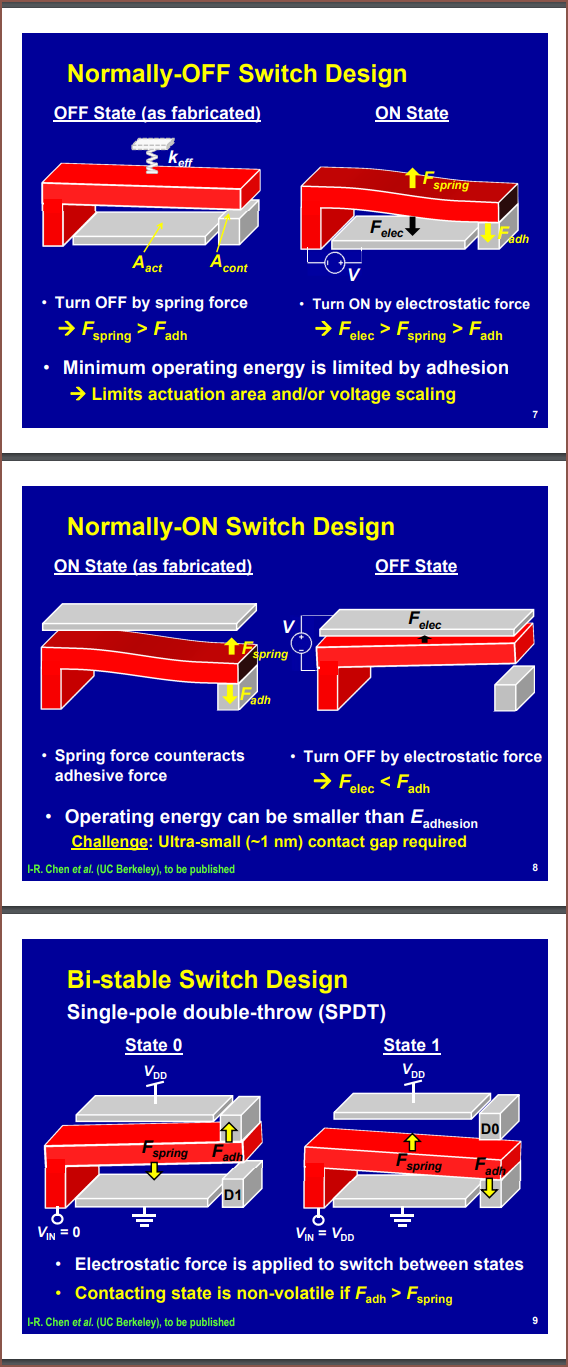 I do wonder what kind of tiny scales would be needed to be able to use electrostatic force though... seems that later in the PPT it's mentioned that the gate is like 42nm or something. At least there was something about there being "no off-state leakage" unlike CMOS.
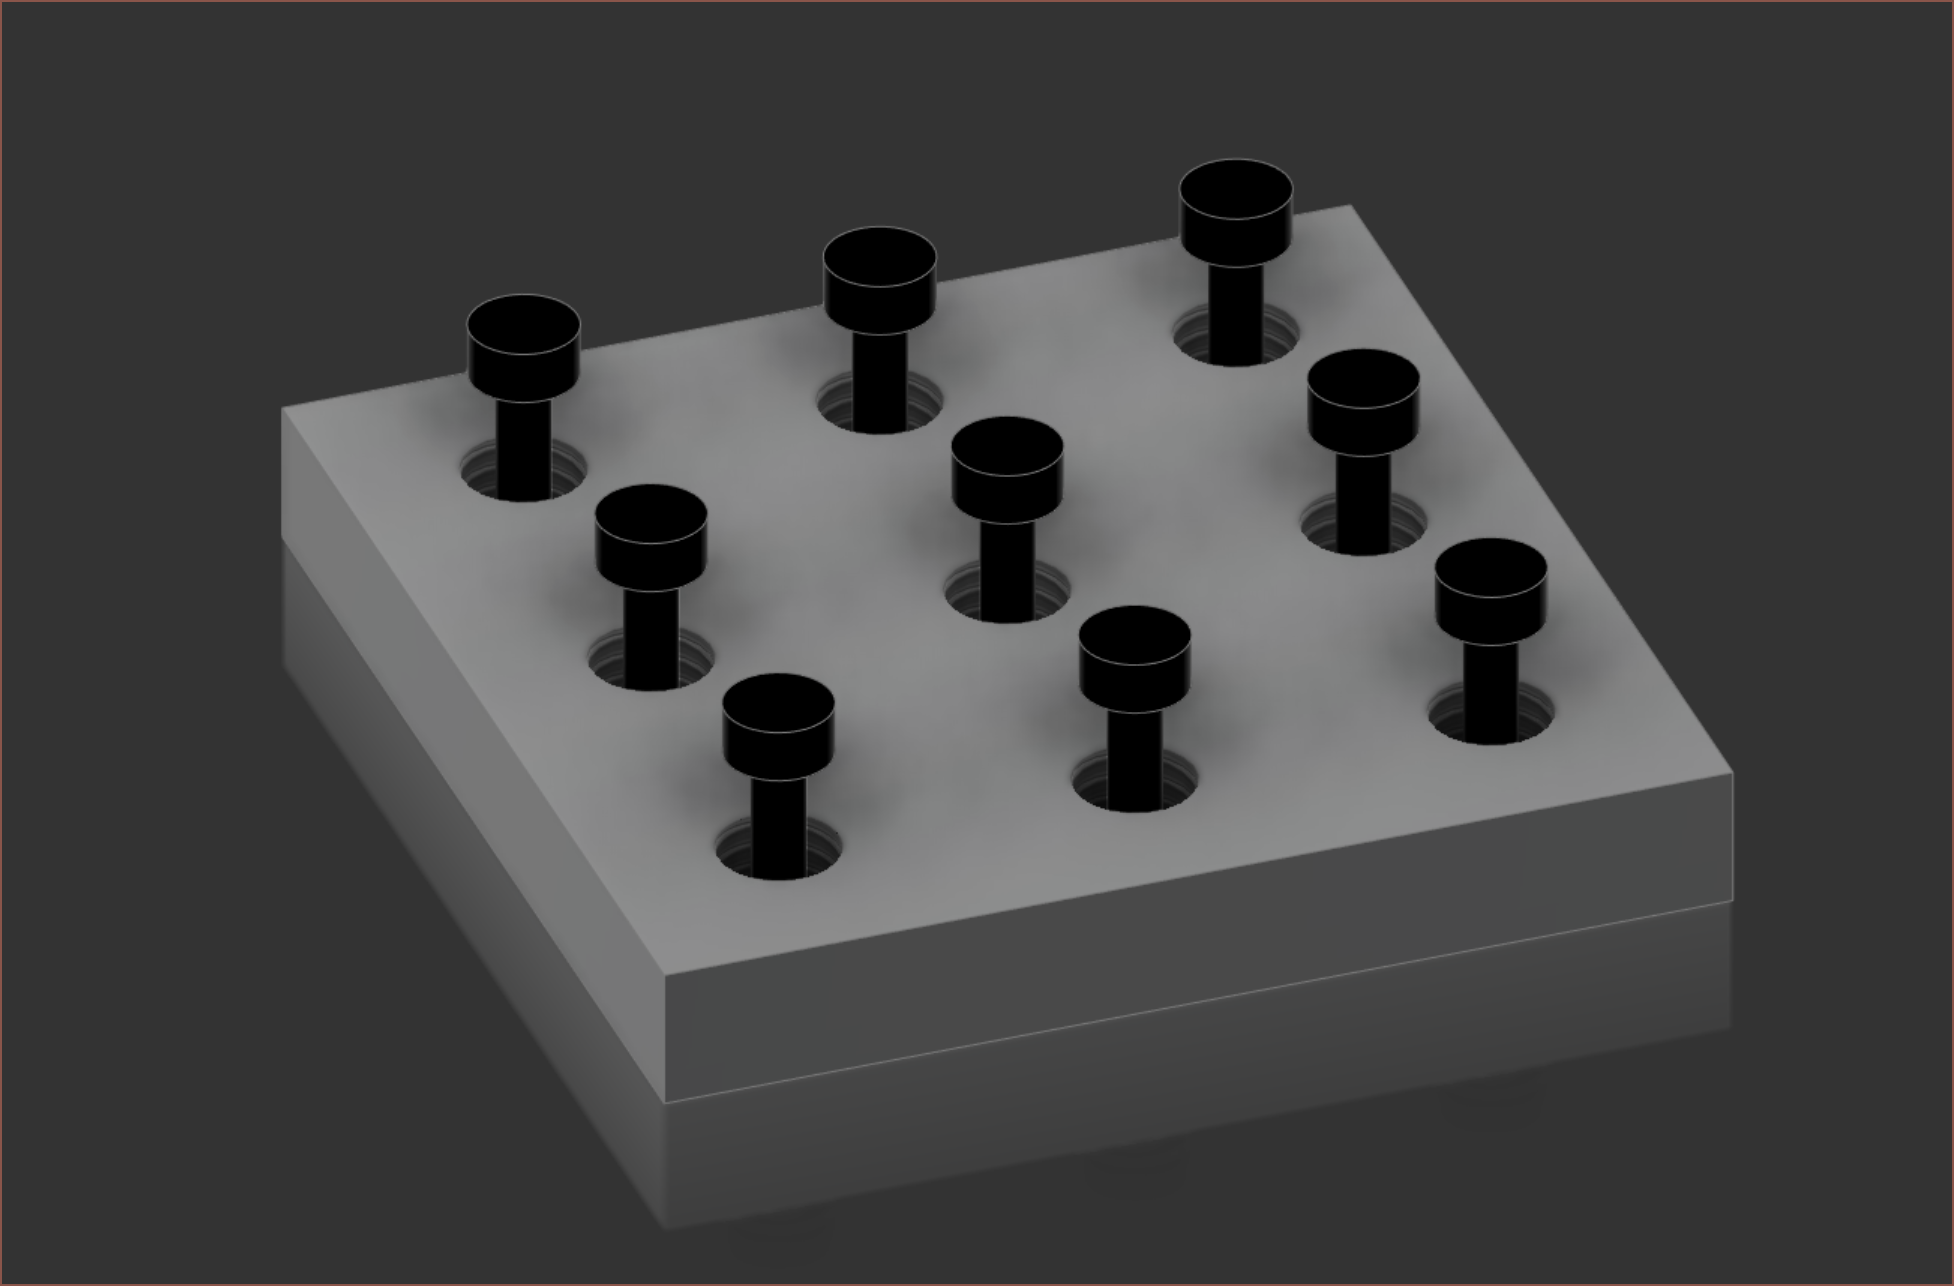 Here are M8 threaded holes spaced 20mm apart in an 8mm plate. There are M3 bolts on the very bottom of the Z axis travel such that when the bed goes all the way down, the bolts stick up through the bed and push off whatever is ontop. I can already see that there's still loads of surface area, so a more extreme 10mm spacing could be used:
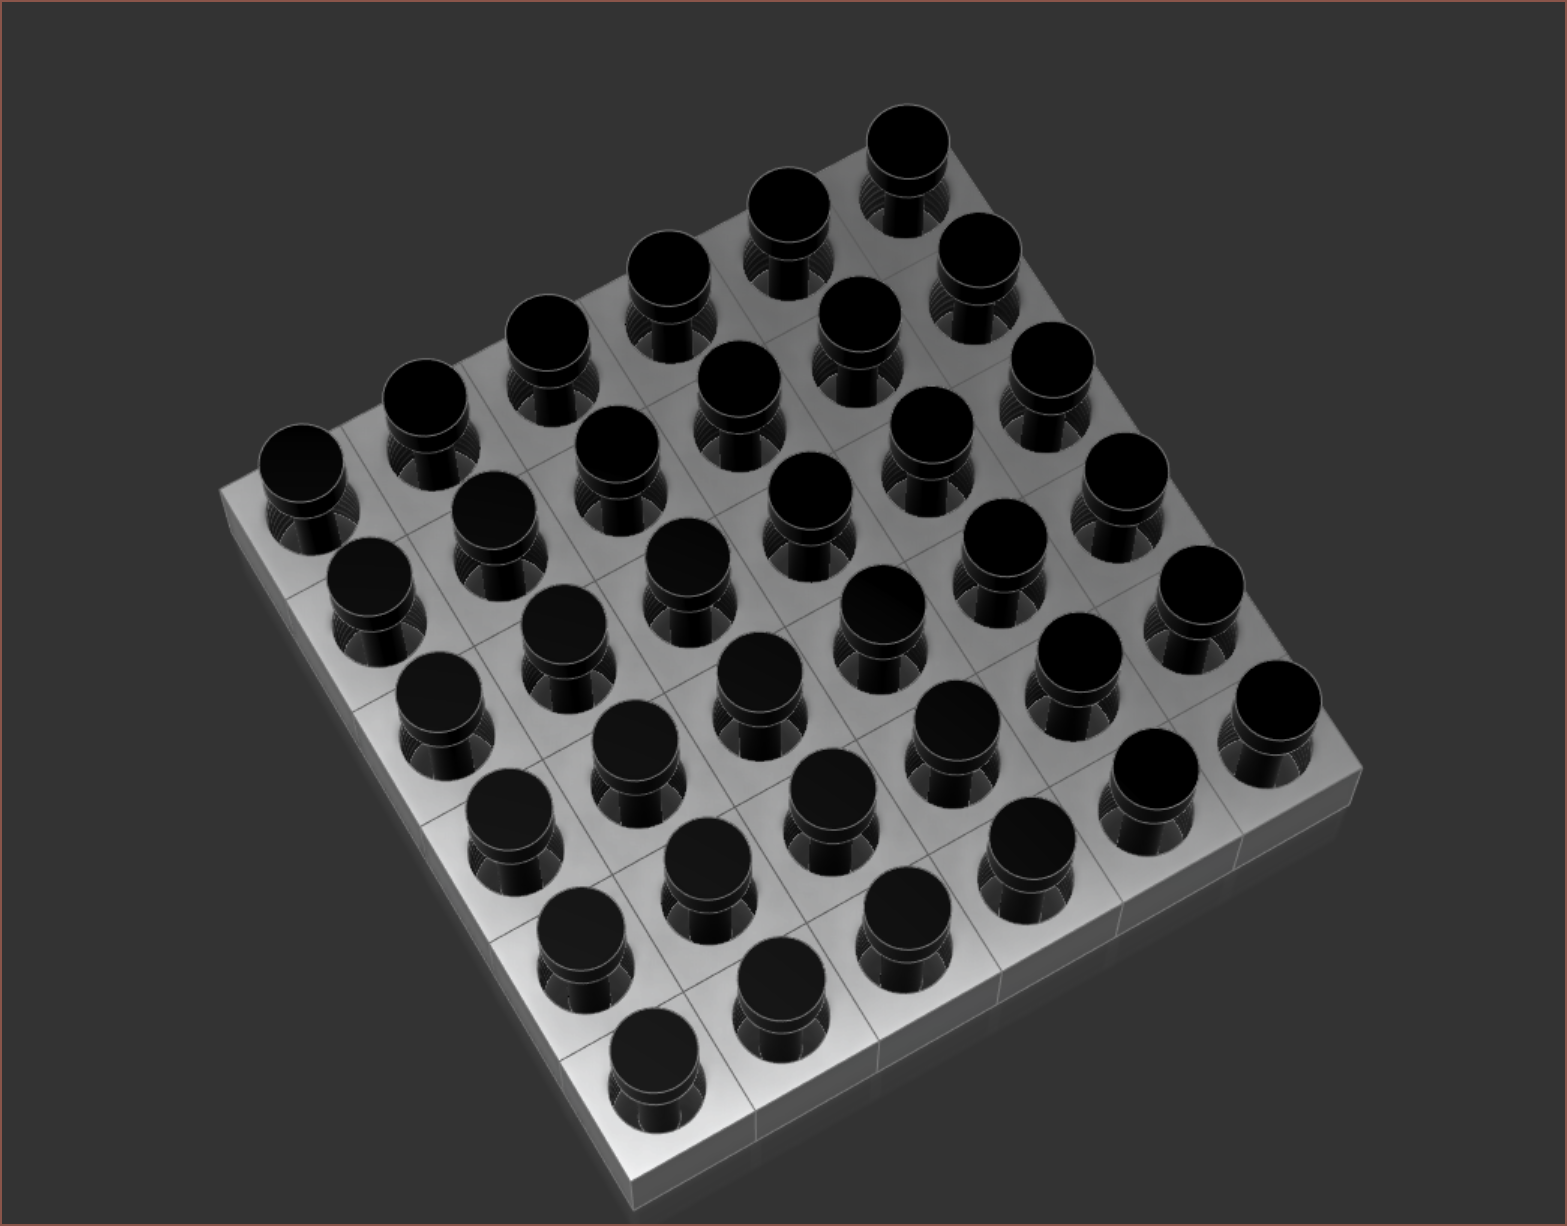 Alternatively, ths could be an excuse to use the hundreds of M8 bolts I bought that were planned for
 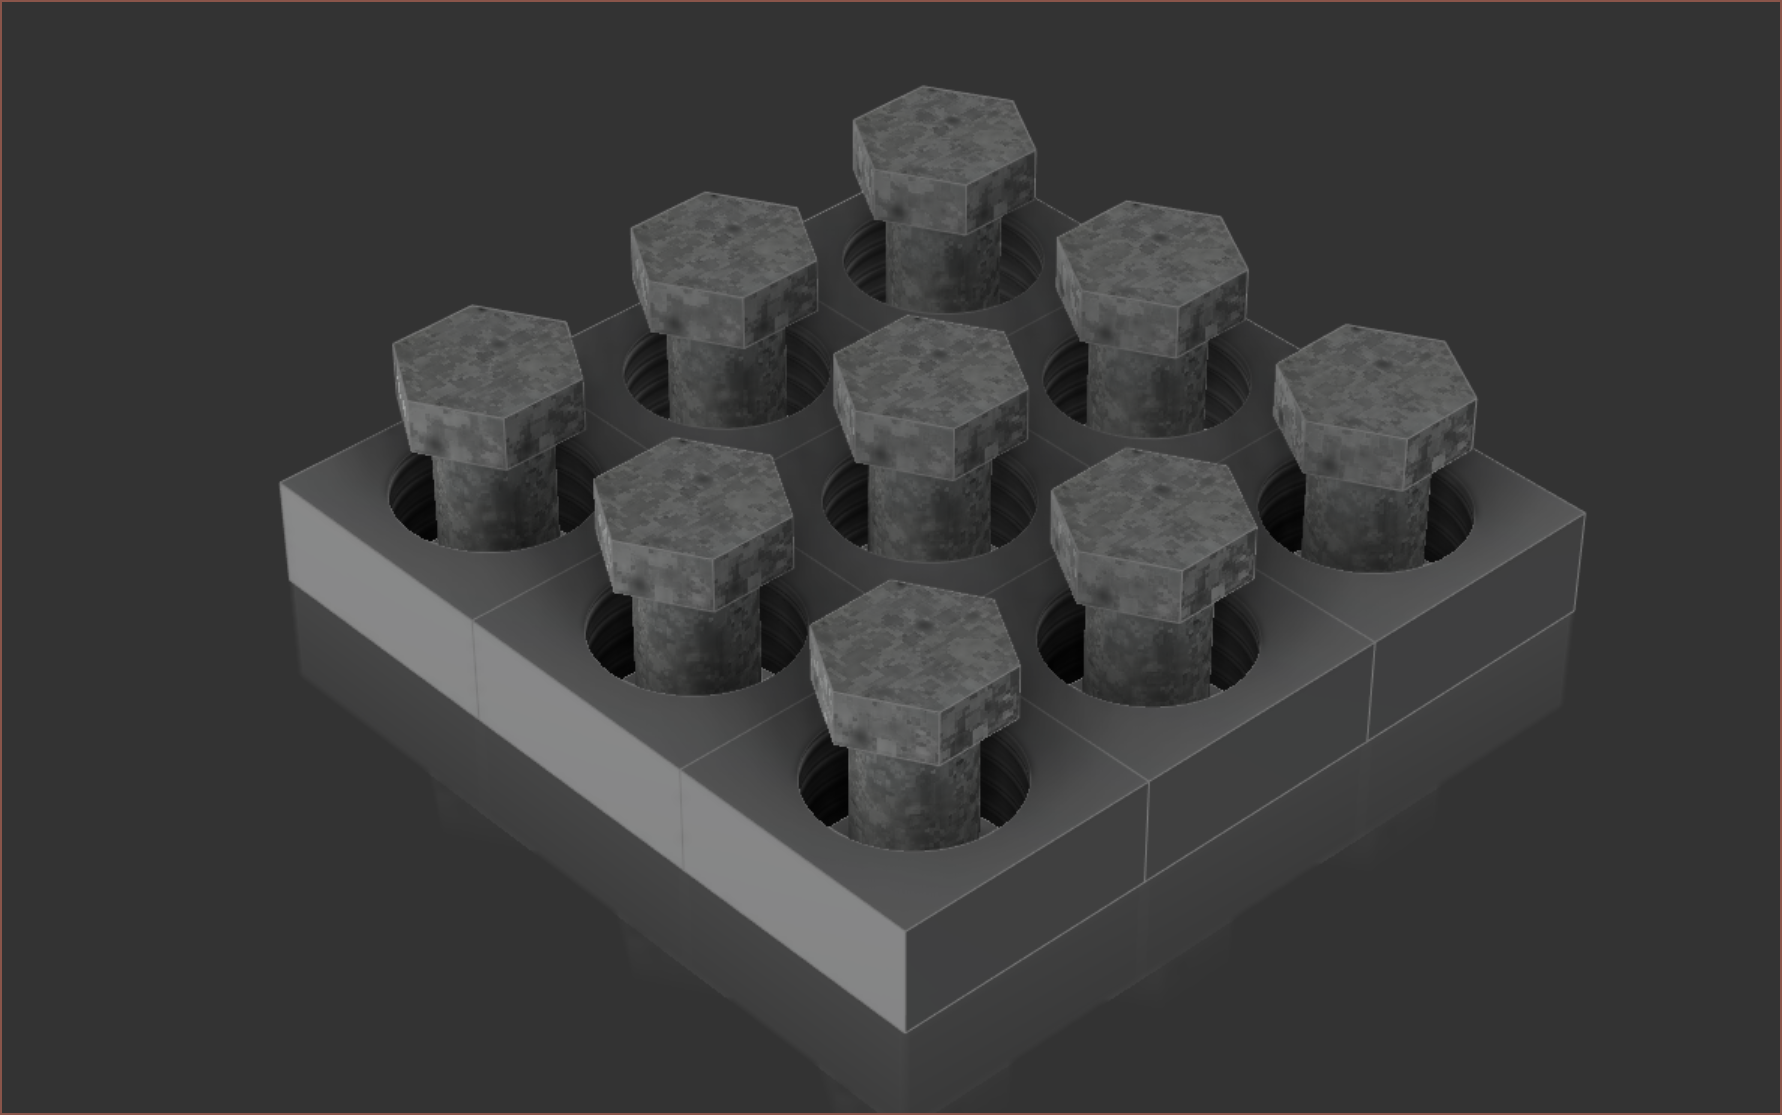 In any case, I'd rather not have to manually drill 528 16mm holes into an expensive...
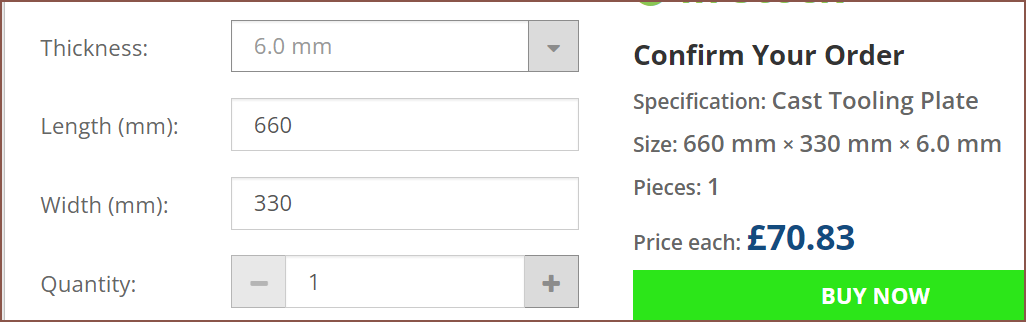 oh right. The bed is larger now than when I last got prices. I probably should resimulate too, now that I think about it.
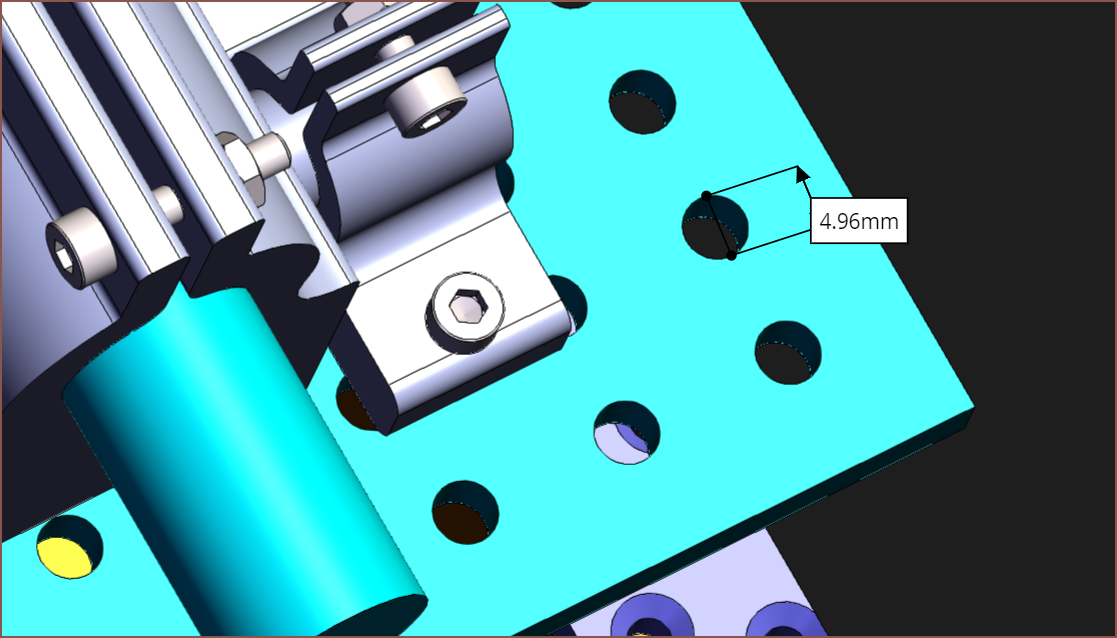 The holes in
 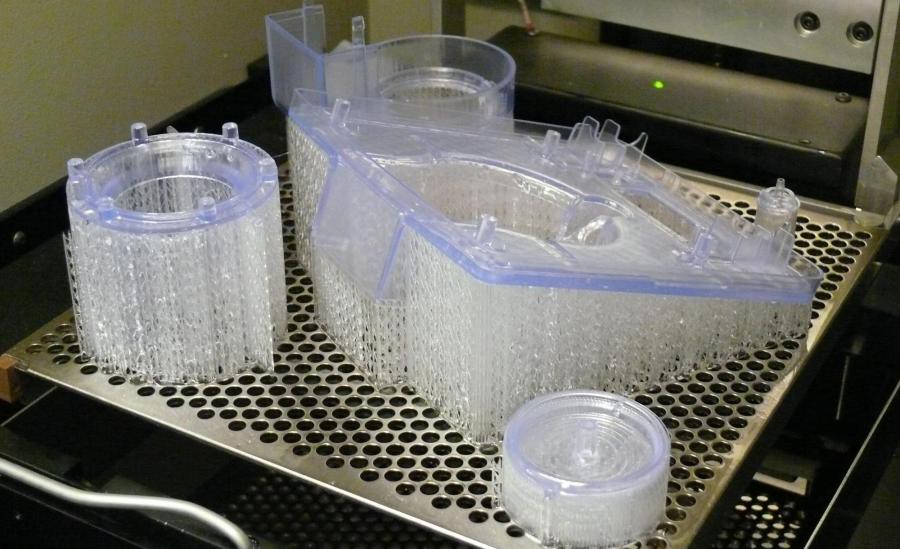 And is it me or are they getting away with just a perforated sheet of metal?
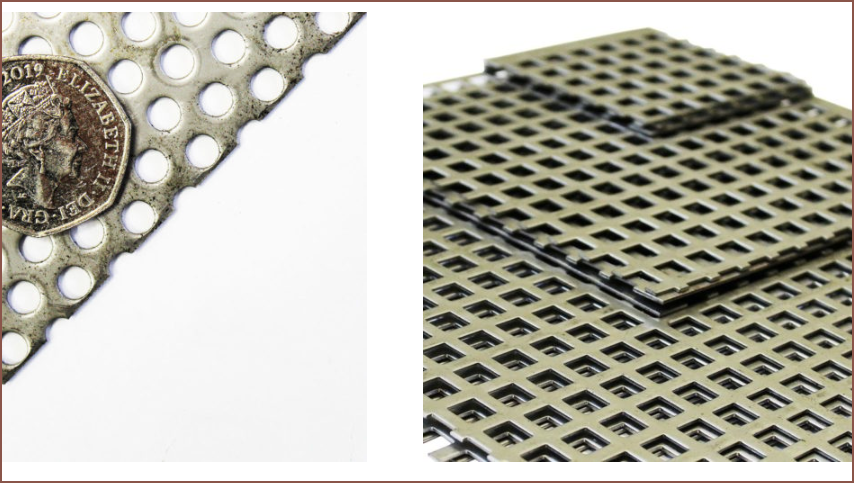 Ooo you can even get it in squares. It's a shame I can't seem to find some spare bed listing or something that indicates what sla beds are made like.
 Idunno about you but that looks A LOT like a perforated sheet with some backing grid. And every industrial printer is using it like it's the standard.
 For some, unexplained reason, 10mm and 20mm pitch just get skipped.
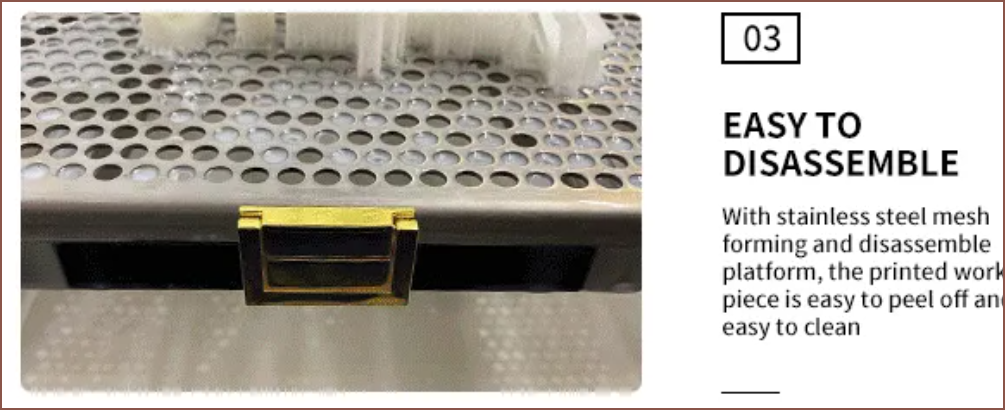 Thanks Alibaba for telling me what this material is. It's 100% + verified + blue checkmark + no ratio stainless steel.
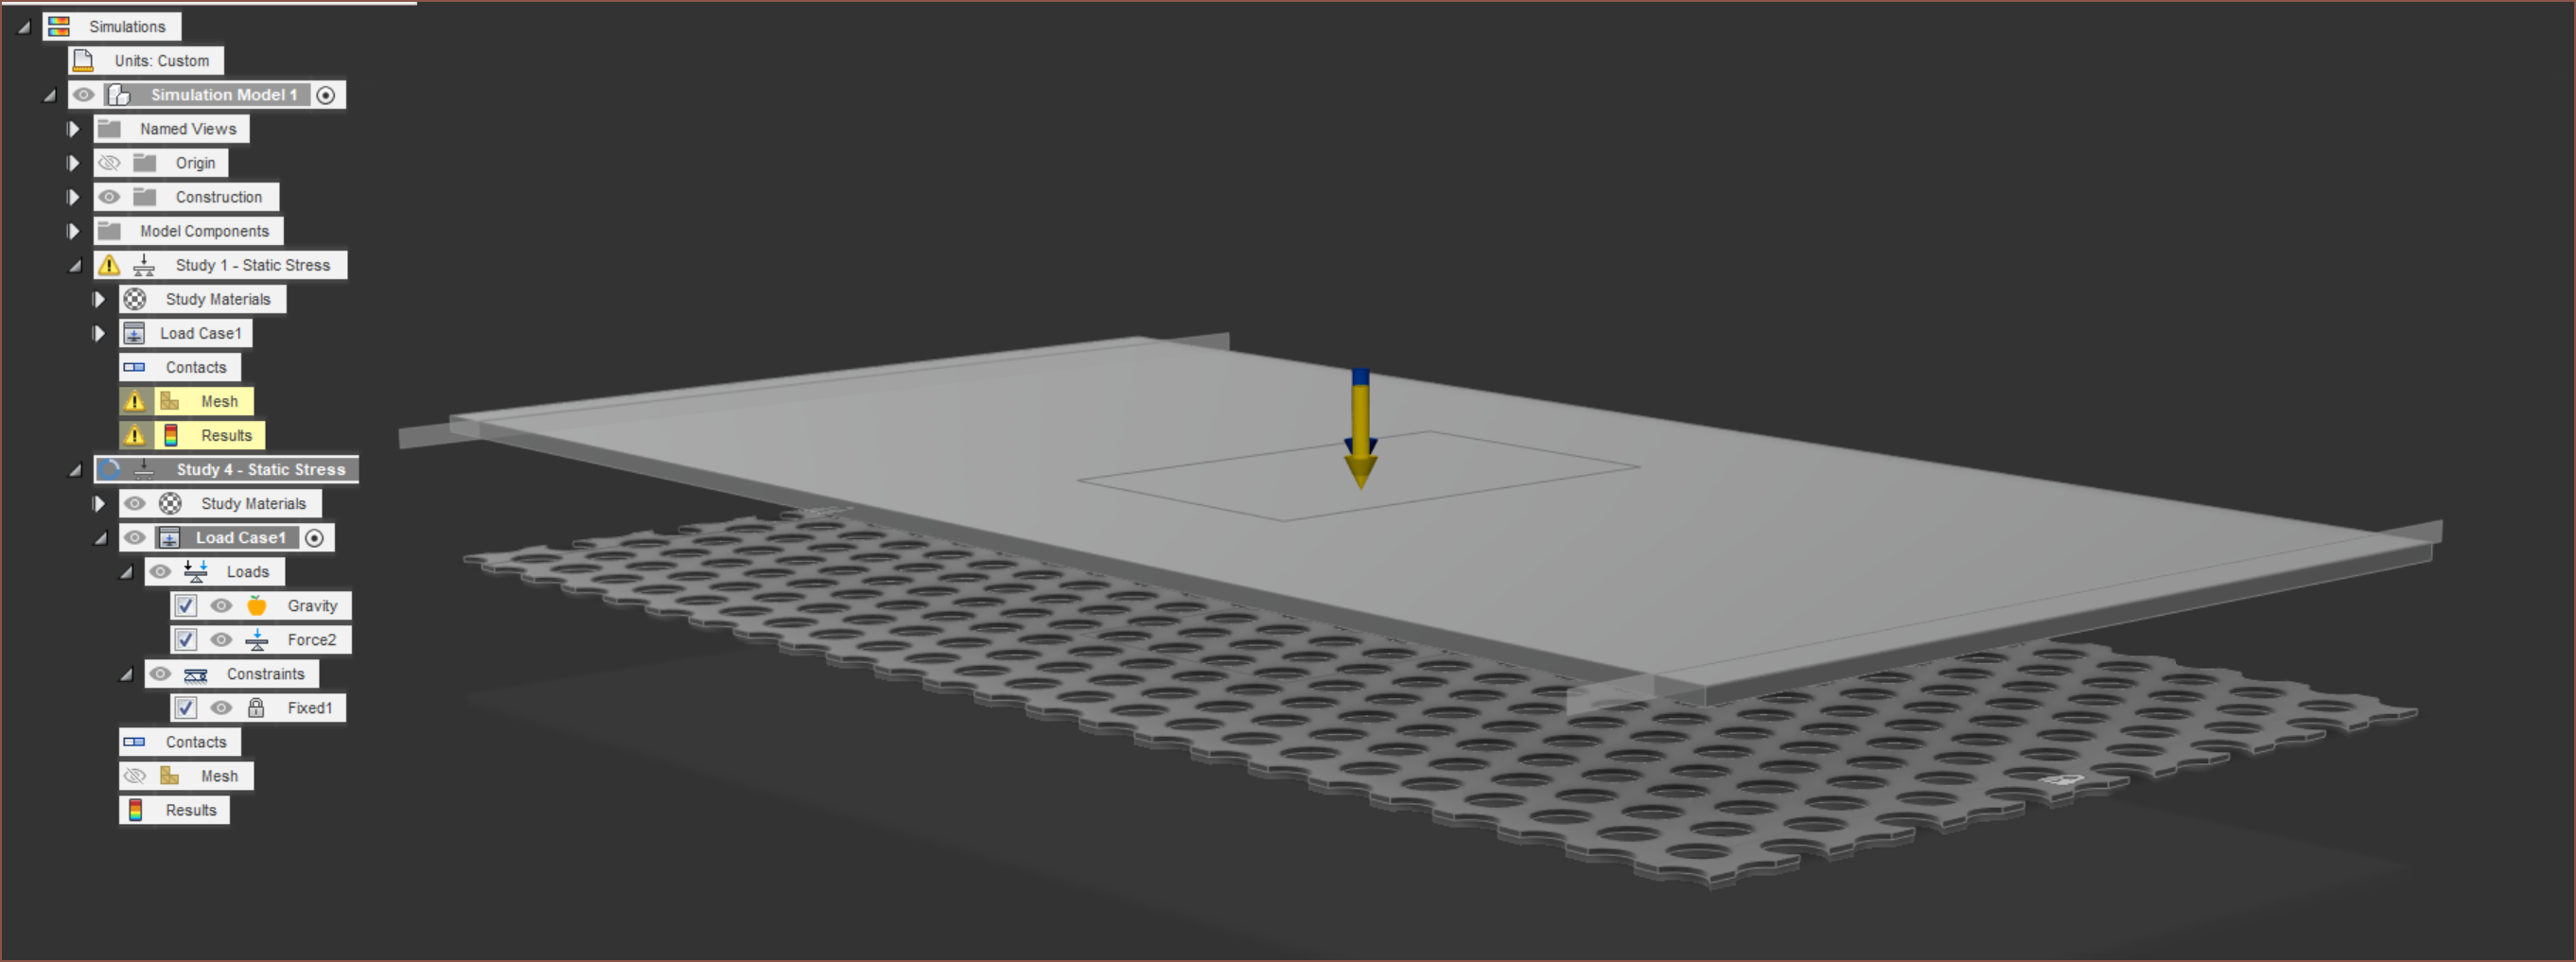
 okay...
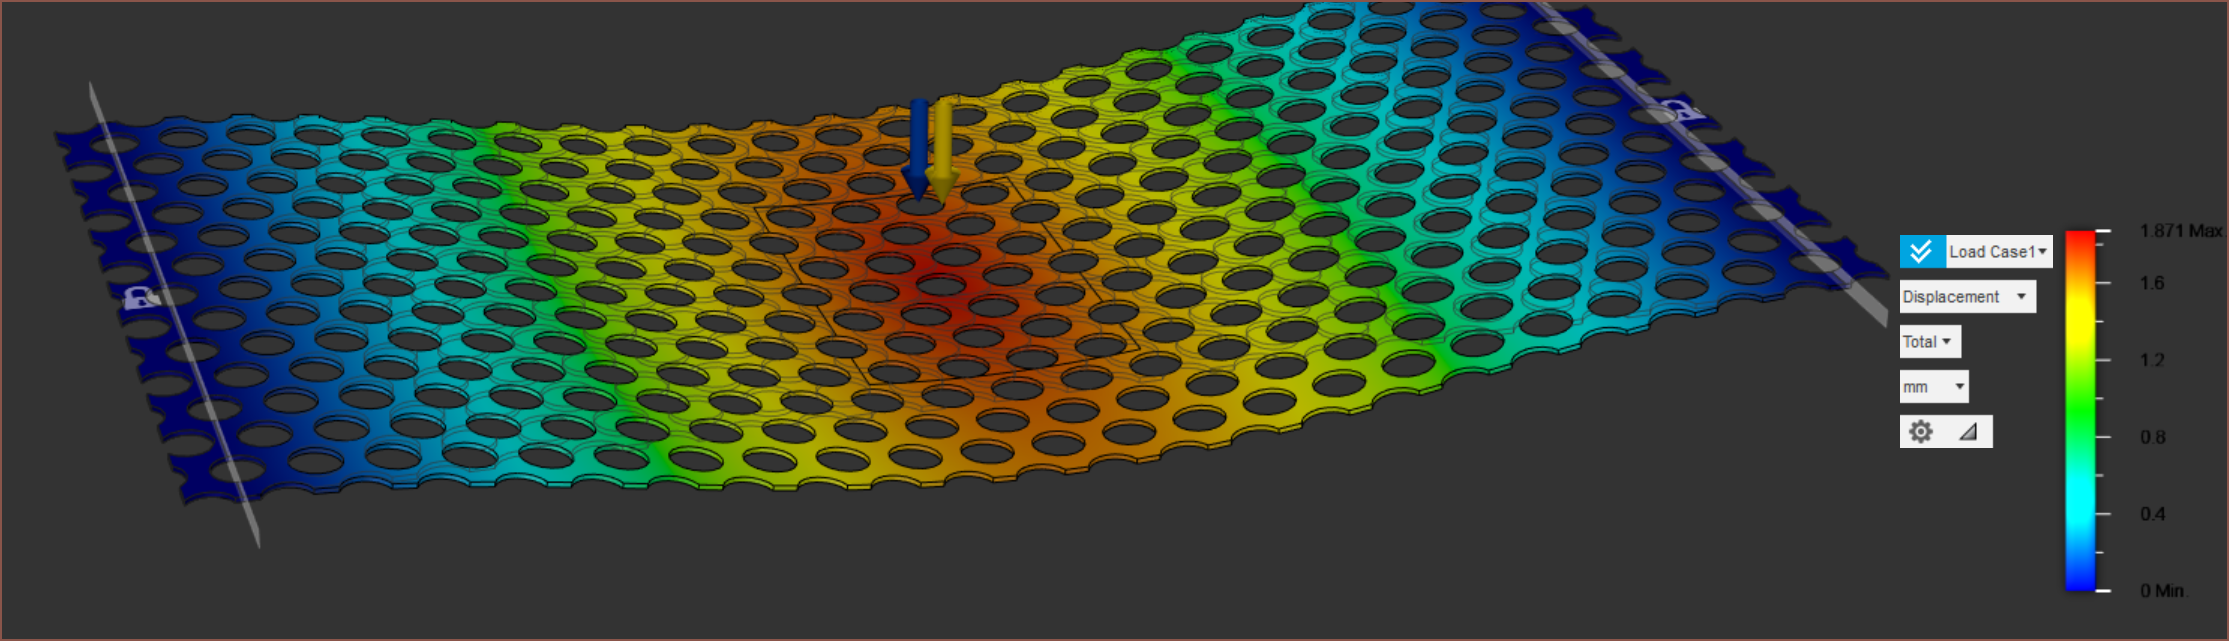 So for a 2kg load, I'm down almost 2mm.
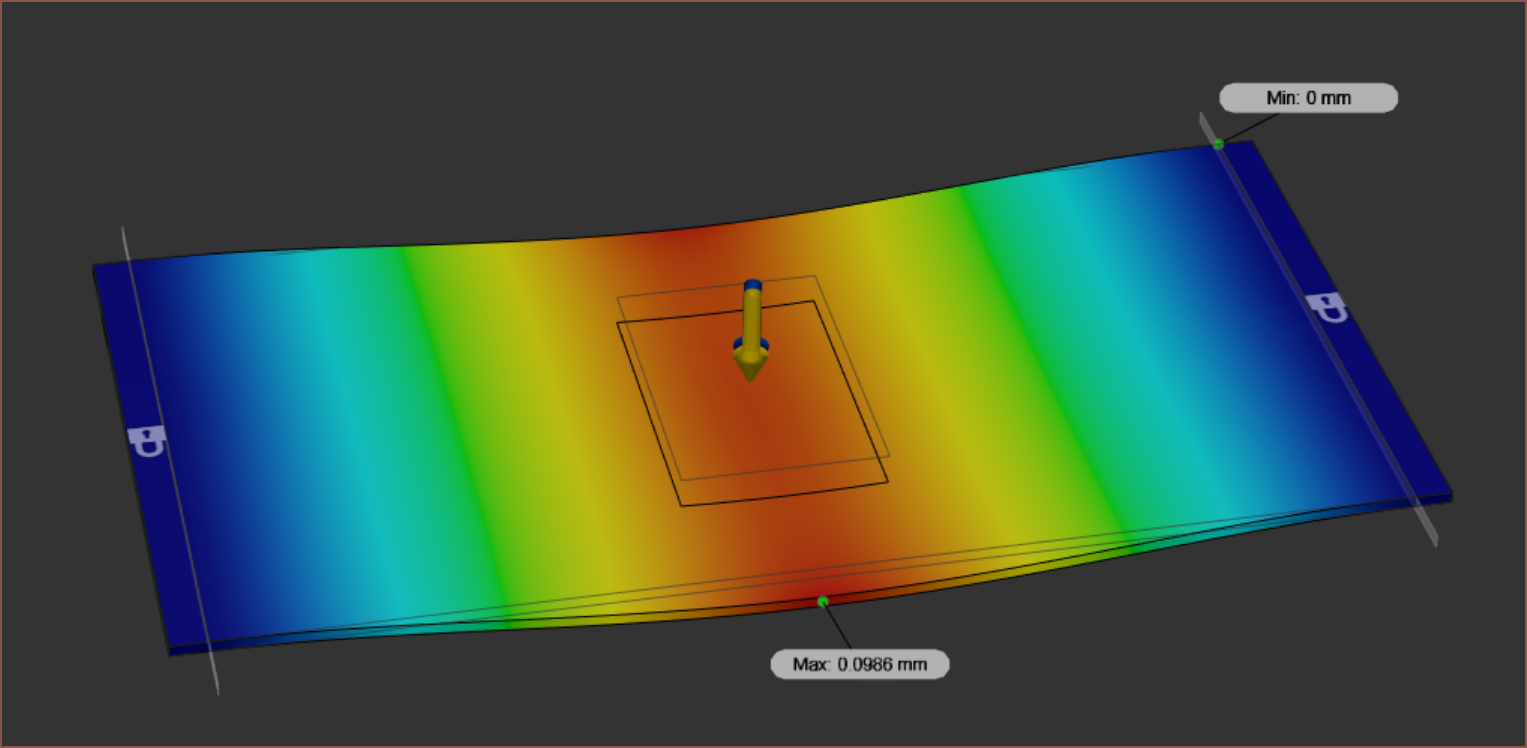 Yeah uh that's a big difference.
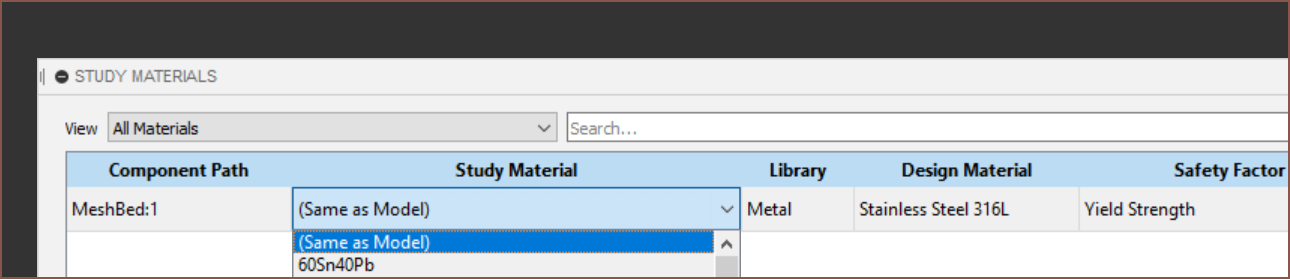 I do wonder if this has anything to do with it.
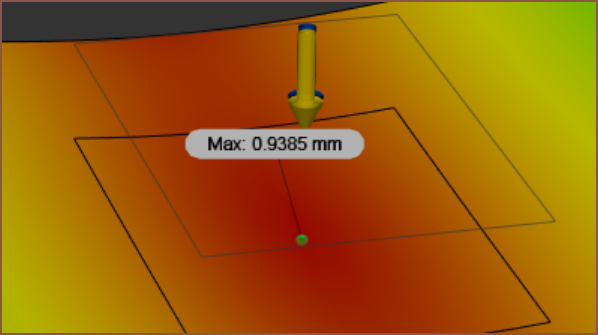 Okay so the holes certainly do something to the stiffness alright. I still feel like it's salvagable by just adding rods underneath like what the industrial printers do.
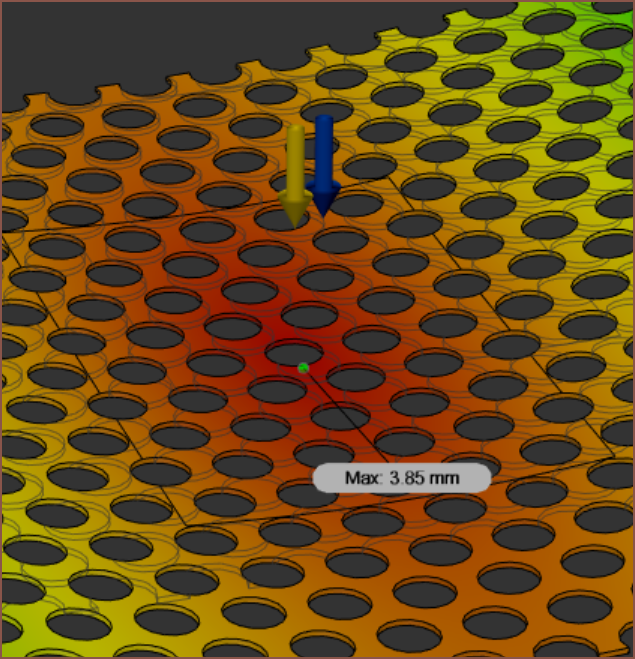
 But I feel like I'm still on the right track here... again, the entire, MASSIVE, industrial, £££££ printer market seems to have confidence in this material. A 2KG load in a 110x164mm area is also kind of unrealistic. It's just what Me In The Past already had set up.
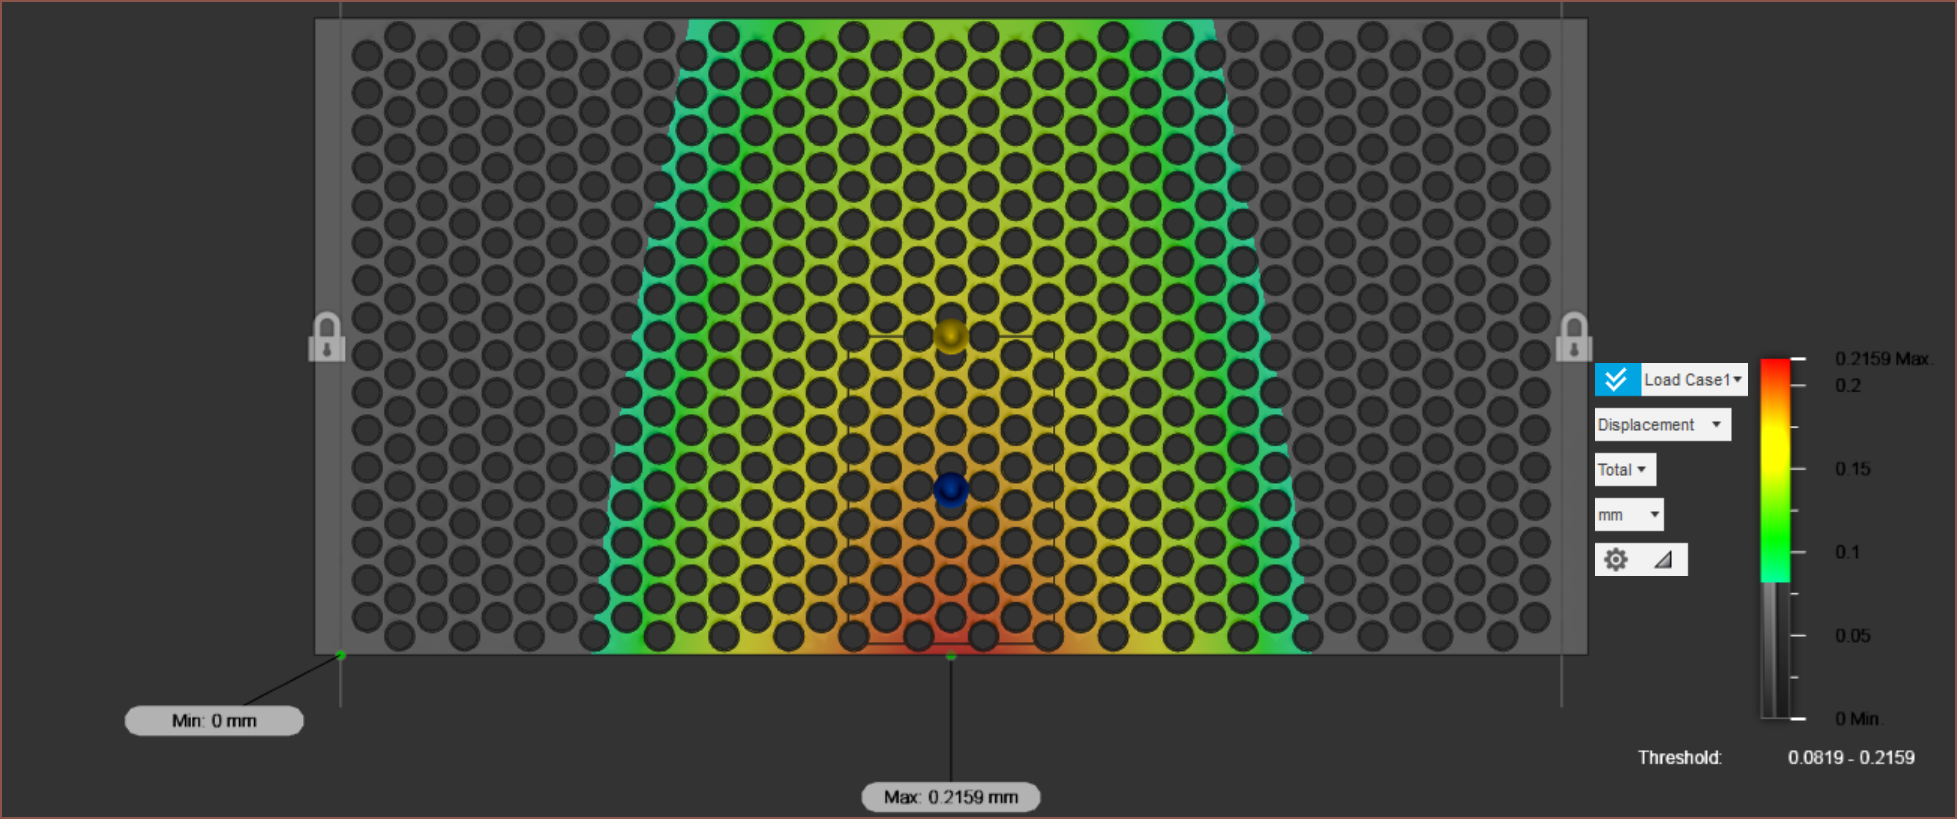 I've done a simulation of a 10N load on one side of a custom tooling plate filled with 610 M16 holes. This is really testing for the possible displacement when the part is pushing against the PET film, but since I have no actual force data, I just thought 10N would be a bit more standardised going forward.
 For both I've set the threshold to start from approx 80um, or 1 standard layer height (for this printer).
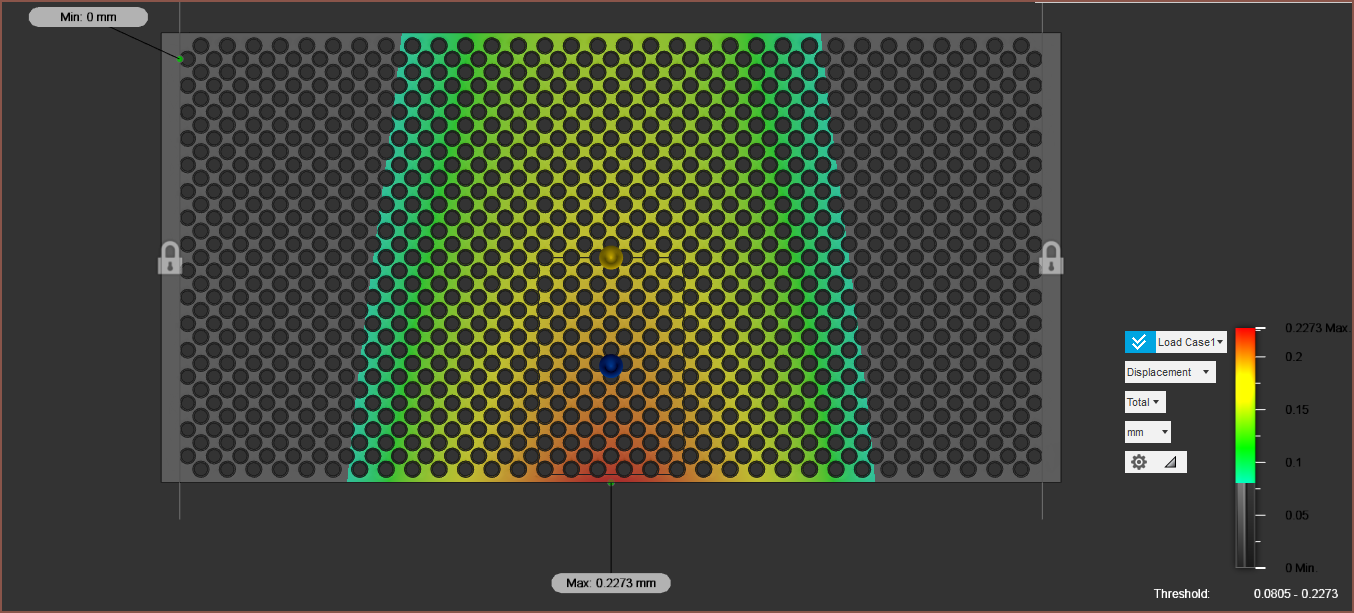

 I'm hoping that, during the printing process for L^3, shrinking predominantly happens vertically. To put another way, a 100um layer of photopolymer shrinks to 80um after being iradiated by the diode laser.
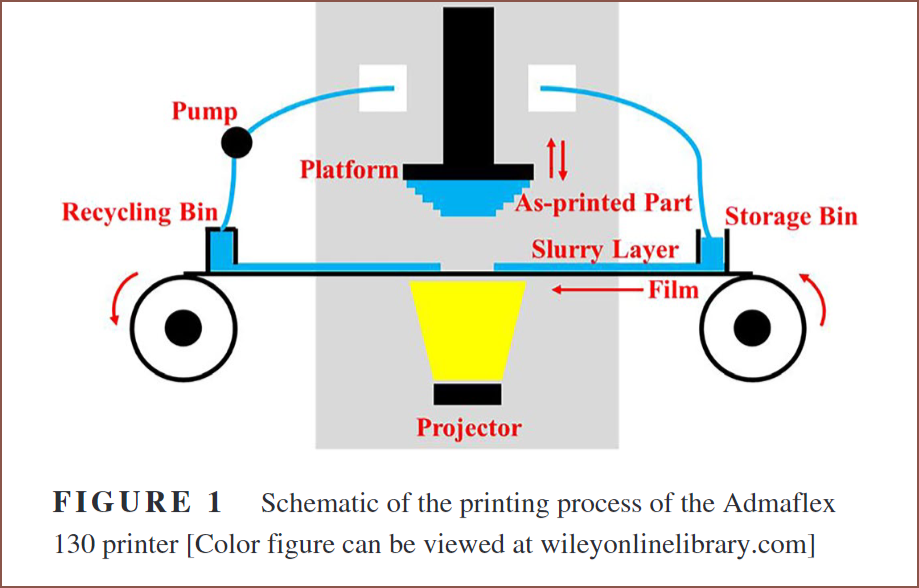
 With a description as confident-sounding as this, I think I can assume that I'm out of the bulk research stage and moving into the development stage. I can't think of anything now, but there's a low but not 0 probability of discovering a new innovative feature to implement whilst modelling the printers. Also, the Slim/Small is expected to change from 305mm -> 355mm in Y footprint for the Placement Block.
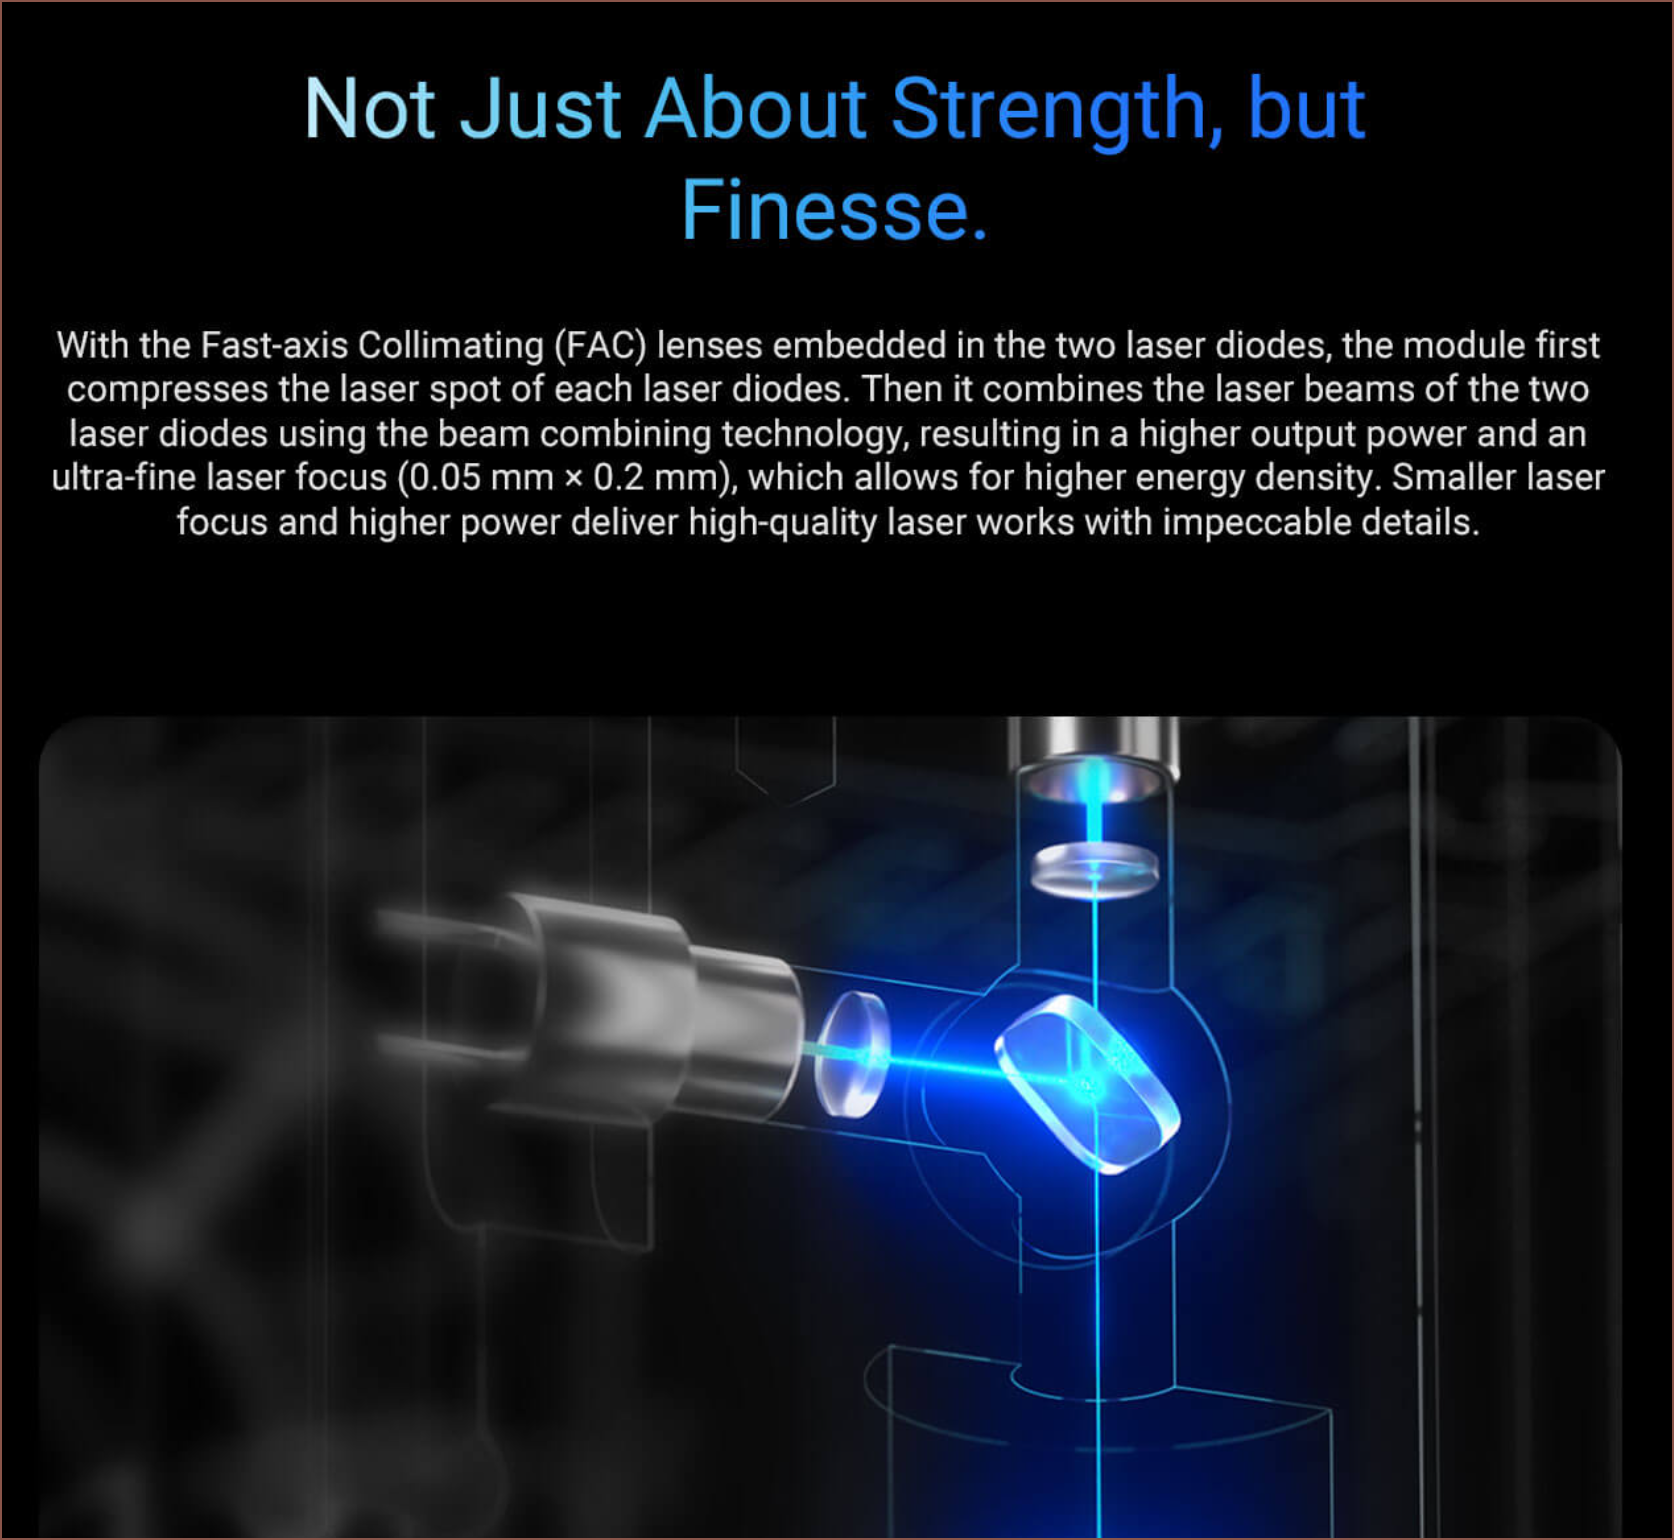 The above is from Snapmaker's AliExpress listing. I saw it right at the start of the day and it's what got me thinking of lasers in the first place. It's >£400 at the time of writing and they advertised 10W, so I was wondering why. Other than getting the impression that Snapmaker is like the engineering version of Dyson, I eventually deduced that it was because of the optics and dual diodes. For the rest of the log, I'm just going to refer to lasers in their output power (unless talking about specific lasers on AliExpress).
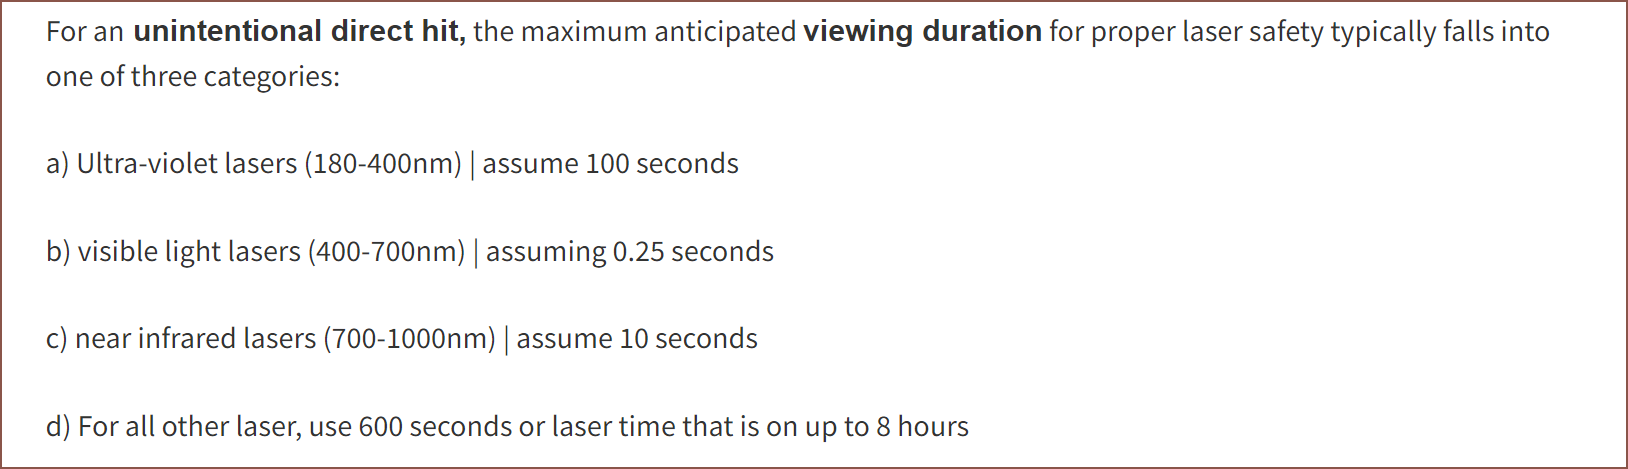

 I've been wondering why the 80W version is cheaper than the other 80W version on their same store, but while they look identical, only at this present moment that I'm writing this log that I see that the codenames are different so obviously there's got to be some change I don't know about. I just didn't want to pick a laser that was going to spontaneously bump in price, even if AliTools said that £132 is some of the highest seen in recent months.
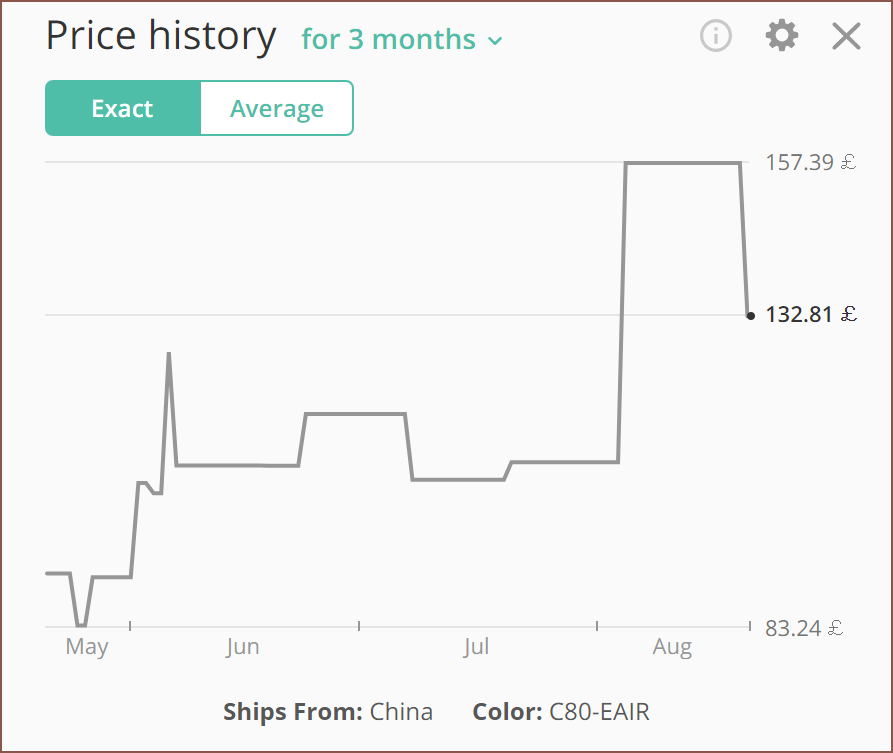 There are other "80W" lasers that have the same 10W output power, but the TwoTrees has a larger 69x157um dot, the gold one doesn't say and the orange one has a bold claim of 10um, though I suspect it's 100um.
 Due to the toxic fumes of resin printing already, I'm planning on electronic locks on the doors that only unlocks when VOCs have returned to a safe level. These locks will also be on when the laser is in use.