Close
0%
0%

VGAtonic

CPLD-flavored VGA Video card

pkPK
Similar projects worth following
Do you remember when 640x480 was a high resolution?

How about when *hundreds* of colors was a huge palette?

Does the pure awesomeness of dithering cause tears of nostalgia to well up in your assaulted-with-pixel-density eyes?

You've found the right project!

We've undertaken the ambitious challenge of fitting first generation display technologies - VGA and NTSC - on the smallest programmable logic device we think we can to create an embedded video card. Targeted for microcontrollers and headless Linux development boards and devices, VGAtonic promises to bring all the retro-video goodness you can shake a stick - or speak SPI - at.

The Executive Summary

  • Version 1 is done! Get everything you need through the links here to build your own.
  • 640x480 Video @ 8 bit color over SPI.
  • 5v, 3.3v, 2.5v SPI Tolerant (Power it with 5v though!)
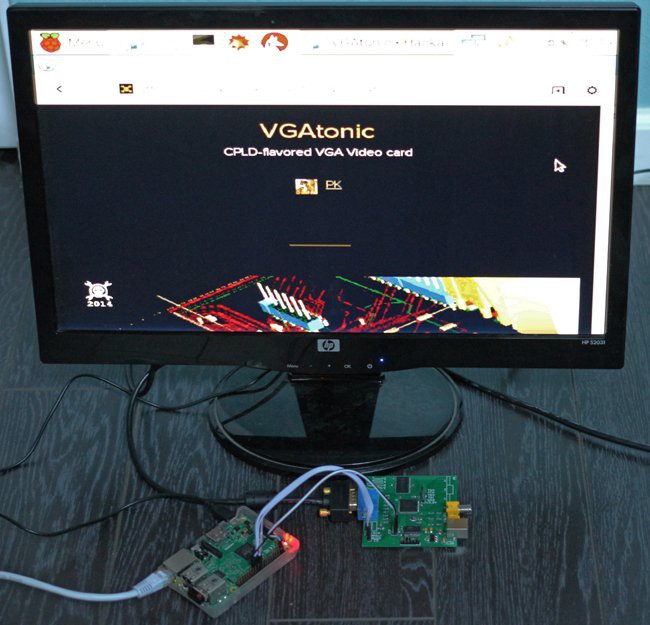
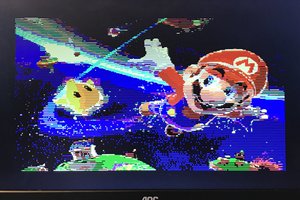
  • Framebuffer driver for Raspberry Pi 2 Model B using 62.5 MHz SPI, 25 frames per second at full glorious 640x480x8bpp (see screenshot and movie!).
  • Example driver code for Arduino (Intel Galileo Generation 1 Board). (Also can work on a regular Arduino if you don't need to store 640*480*8 bits in the code)

The Engineer's Report

As there are a number of interesting "display-driver-less" dev boards and embedded linux products on the market nowadays (not to mention the 3 PogoPlugs and the Intel Galileo and Edison in my own parts bin), I set out to find a solution for getting reasonable video out of the world's collection of headless parts. Along the way I built a framebuffer for the Raspberry Pi 2 Model B (headless, but not display-driver-less!) as well due to the great ecosystem... and the tons of prior art!

VGAtonic v1 was my effort to make said headless parts connect to the displays people already have lying around - monitors and TVs with VGA input.

Our goal was modest - 640x480 is still the fallback, worst case resolution for lots of applications - so we'll target VGA's original 640x480 spec. Technically, the original VGA asked for just 4 bit color (read: 16 colors), but as an analog protocol we'll double the number of bits to 8 to get 256 colors.

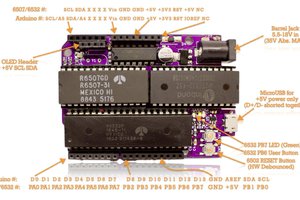
For the brains, we used a 4MBit ISSI IS61LV5128AL-10 with a Xilinx XC95144XL CPLD providing the brawn and the timing. Our first reference design, a roughly 3"x3" PCB, was already released, and we decided to use a programmable oscillator (Linear Technology's LTC6903) and a microcontroller (Atmel's ATTiny 2313a) for board support and experimentation.

BOM is roughly $23-$32 a board depending on your skill and experience (I went 3.5 out of 5, the .5 works with some pin remapping so I got lucky).

  • 1 × Xilinx XC95144XL 144 Macrocell CPLD
  • 1 × ISSI IS61LV5128AL-10 100 MHz 4MBit Static Ram
  • 1 × Linear Technology LTC6903 Programmable Oscillator
  • 1 × ON Semiconductor NCP1117ST33T3G 3.3V Low Dropout Voltage Regulator
  • 1 × Atmel Corporation ATTiny 2313a Microcontroller

  • The Loose Threads in 2015

    PK09/20/2015 at 02:57 0 comments

    Hey folks, lots of new stuff posted over at the 2015 log of VGATonic.

    I recently pushed a couple alternate firmwares:

    • One for 848x480 (and 424x240) VESA compatible 16:9 output
    • One for 320x240 in 16 color NTSC

    Go check it out if you're still following along; we've even got a second revision of the board which is much smaller!

  • More Platform Support for VGATonic

    PK07/18/2015 at 00:56 0 comments

    If you're still following, note that incremental updates have been moved to my log for the 2015 Hackaday Prize.

    I wanted to update you today, however, with some of the major changes you can find over there now:

    • Examples/Driver Support for Multiple Platforms
      • Arduino
      • Raspberry Pi
      • Beaglebone Black
      • Odroid C1
    • 4 Hardware Accelerated Resolutions:
      • 640x480
      • 320x240
      • 160x120
      • 80x60
    • 4 Hardware Accelerated Bit Depths:
      • 8 bits (256 colors)
      • 4 bits (16 colors)
      • 2 bits (4 colors)
      • 1 bit (B&W)

    I hope to have some updates for you very soon on the asynchronous serial side, along with an update on the Linux Driver side for the Intel Edison. Stay tuned, preferably on the newer one! (I'll continue to update here, but updates will be slower, of course.)

  • Declaring VGATonic v1 Finished.

    PK06/14/2015 at 23:26 0 comments

    I felt bad about leaving you folks in a weird quasi-finished 98.4% done state. My motivation recently came back so I finally finished a framebuffer implementation for the Raspberry Pi 2 Model B. That's right - "startx" in all of its glory on this part we dreamed up a year ago.

    (If that doesn't bring a tear to your eye, maybe that 1994-era color depth will!)

    So, if you remember, the big doubt when starting the project was whether we could even fit all our logic on a CPLD. We did it - and we have like 30 macrocells to spare(!) on this 144 macrocell part.

    Okay, fine, maybe I just wanted the challenge of the small part, but even though I had the project working well as a "Digital Picture Frame" 10 months ago... I had to see what we could do attached to real equipment.

    I heard you guys like VGA, so here's VGATonic opening the VGA project VGATonic's project log page and running on a VGA monitor. At 25 frames per second:

    So, hurry over to GitHub and build yourself a copy: https://github.com/dqydj/VGAtonic

    And what now? The motivation continues! Parsing the Hackaday Prize 2015 Rules, I see we can build on what we've got since we didn't make the Semifinals cut! Here are the caveats:

    1. A new project page must be created

    2. The project must show meaningful development during the course of the Contest.

    So, let's move this party to the new page: VGATonic v2.0 promises to be a great time. I'll upload a video there soon so you can see it.

    This time I'll try to add all the features this year, okay? No waiting until 2016.

  • Working Example Code for the Intel Galileo (Arduino Mode)

    PK09/03/2014 at 03:15 0 comments

    I wanted to share some working code for the Intel Galileo board I've been showing in my videos.  With this update I'm declaring partial victory over this project, because now you can at least reproduce what I've shown in the videos.

    Enjoy!

    https://github.com/dqydj/VGAtonic/tree/master/First_Draft

    Motivation has waned a bit, but here's where I plan to go with this before I hit my 100% wish list:

    • User Mode in Linux (Done!  Just need to make a formatting/commenting effort and pull it off the Galileo)
    • Kernel Module / Framebuffer in Linux (This is the big one - in progress...)
    • NTSC Output activated (Not started)
    • Add features to CPLD firmware (Not started)

  • Breakout Boards for .5mm TQFP ICs

    PK09/03/2014 at 02:41 0 comments

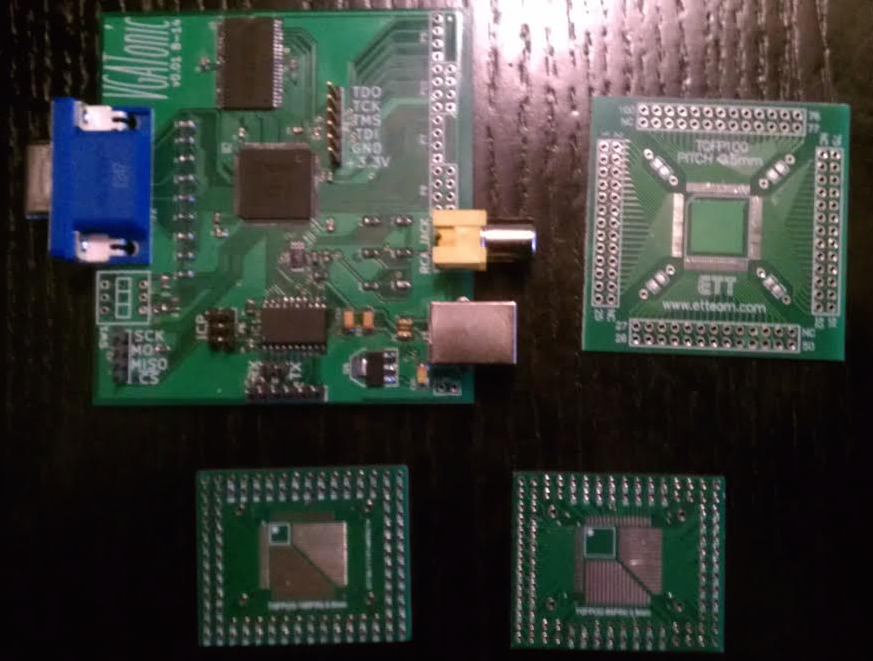
    In response to a question in the comments by mylistgroups12, I wanted to show two of the breakout boards I acquired when starting this project.  I should note: I originally thought I might fit everything into a smaller CPLD (recall this post), which was in a 64 .5mm QFP size.  Still, I got a few breakouts which support the larger, 100 pin size - but even with the 64 pin broken out (I did 5 to practice with the smaller CPLD, but only added pins to one) it was tedious to wire Vcc/Vss.

    In the top right, of course, you can see VGAtonic - roughly 3" x 3", for scale.

    In the upper right is a breakout board I bought from Futurlec: http://www.futurlec.com/ (Currently: select 'Components' at top, then on the left 'Sockets', 'SMD Adapter').  It can only support an 100 pin chip, but it makes the pins easier to use/count.

    On the bottom is both sides of an adapter I bought on ebay from user e-sale2010.  I'd try searching 'QFP Adapter' - but this is nice because you can use anything from 32 - 100 pins in the .5mm pitch.  However, the pin count will be funky - I had to make a spreadsheet to convert the labeled pin number to the actual pin number on the CPLDs.

    Hope this helps!

  • CPLD Firmware Uploaded!

    PK08/29/2014 at 15:57 0 comments

    The moment that a few of you have been waiting for - a glimpse at my VHDL - is now here.  See the newest code in our git repo: https://github.com/dqydj/VGAtonic/

    You'll want to bring that into ISE Webpack and synthesize it.  I've been programming my CPLDs using a Bus Pirate; you can see that methodology here.

    Look in this directory for all of the demo code and design documents so far: https://github.com/dqydj/VGAtonic/tree/master/First_Draft

    The How to Use file details how this protocol works - it's very simple, I promise.

    I'll be back soon with firmware for the ATTiny onboard VGAtonic's reference design, along with the client code used in the Youtube demo.

  • The Game Goes On

    PK08/26/2014 at 16:01 0 comments

    This weekend saw 0 progress made on VGAtonic while I was in LA for an event - and, unfortunately, VGAtonic didn't make the semifinals cut for the Hackaday prize.

    Don't worry about VGAtonic, though - I'll be following through (even if I don't hew as closely to the original guidelines).  I would hate to leave the Pogoplugs and the Galileo headless at this point!

    I'll be cleaning up my beta code and adding comments, so look for two pieces of firmware (the microcontroller and the CPLD onboard VGAtonic) and the Galileo code I showed running the demo - well, with more generic pictures.  I'll also add the python script I used to create my header files.

    Other Graphics Projects

    On the other end of the spectrum from VGAtonic, I hope you'll check out GPL-GPU... which is, like stated, a full GPU.  Open sourced.  I hope you'll check that project out if you'd like a look at a fully-featured graphics controller.

    I also read with great interest Andy Brown's recent article about creating a sprite-based video controller on a Xilinx Spartan 3 FGPA.  I think you'll find his choice of RAM very interesting if you follow this project!

    Stay Tuned!


    We'll be back with more updates in the near future - follow us here or on our git repo!

  • The Project Deadline Limbo

    PK08/21/2014 at 05:12 0 comments

    I couldn't resist one last update before the project entries lock... and it's a big one:

    That's right; I've got a working prototype here.  

    640x480 8 bit color VGA video is possible in a 144 macrocell CPLD (spoiler alert: it's possible on an 109 macrocell CPLD or less, actually).  Bitmap conversion is done with a Python script, preprocessing was in Adobe Photoshop.

    On the technical side, it wasn't immediately evident how to jam 7 bitmaps into Arduino header files.  So, here's how to increase your sketch size if you've got a Galileo.

    How to Increase Sketch Size on an Intel Galileo (on a Mac)

    Getting 7 images to fit in an Intel Galileo Arduino sketch was a bit of a feat - but know this: the default sketch maximum size is a lie!  

    On my Mac, I was able to change it by right clicking the IDE in my Applications folder, choosing 'Show Package Contents', then 'Contents' -> 'Resources' -> 'Java' -> 'hardware' -> 'arduino' -> 'x86' -> 'boards.txt'.

    Here's what I changed the Galileo I section to:

    ##############################################################
    
    izmir_fd.name=Intel® Galileo
    izmir_fd.upload.tool=izmirdl
    izmir_fd.upload.protocol=sam-ba
    izmir_fd.upload.maximum_size=29491200
    izmir_fd.upload.use_1200bps_touch=false
    izmir_fd.upload.wait_for_upload_port=false
    izmir_fd.upload.native_usb=false
    
    
    izmir_fd.build.mcu=i586
    izmir_fd.build.f_cpu=-m32
    izmir_fd.build.core=arduino
    izmir_fd.build.variant=galileo_fab_d
    #izmir_fd.build.variant_system_lib=libx86_izmir_gcc_rel.a<br>

    The important part being that 'maximum_size', of course - by default it's set to 262144 bytes.  640*480 pixels (each with a byte of color info)?  307,200 bytes.  So, yeah, it was kind of arbitrary - and worse, you can't even fit one whole bitmap.

    But it's not completely arbitrary - you'll get spurious errors in your Arduino IDE once you make the change (or maybe only because I used such a big number?), so save (a lot) more often.

    A Working Prototype!(!!)

    I know the focusing was pretty bad in the video, but the picture isn't perfect and there are some improvements I'll be making before I release any code.  I've got it writing to RAM every cycle: an unnecessary ~9.5ns /WE assertion zooming around the board and upsetting the rest of the PCB.   I'll clean that up and put code up on the repo soon (find it in our info section).

    But, hey, doesn't that look great?  And, even at only 8.33MHz SPI it's not too painful of a refresh.  I'll see how we can do with a Linux framebuffer and improved firmware.

    Stay tuned, and thanks for following!

  • Ticking the Prize Boxes (and the System Design Document)

    PK08/20/2014 at 03:59 0 comments

    I'm trying to tick off all the boxes before the Hackaday Prize deadline tomorrow - you should be able to find sample code in VGAtonic's git repo (license: MIT), an introduction video, a prototype video (VGA/NTSC), some pictures, and a BOM. 

    The connectedness portion of the project comes from two directions:

    • SPI - literally a peripheral communications protocol (well, maybe a loosely defined generally accepted language, anyway - it's like digital slang)
    • Graphics - VGA and NTSC for the screens
    • And Bonus #3 (for the philosophers!) - Aren't meaningful graphics really just one way for humans to interact with machines?

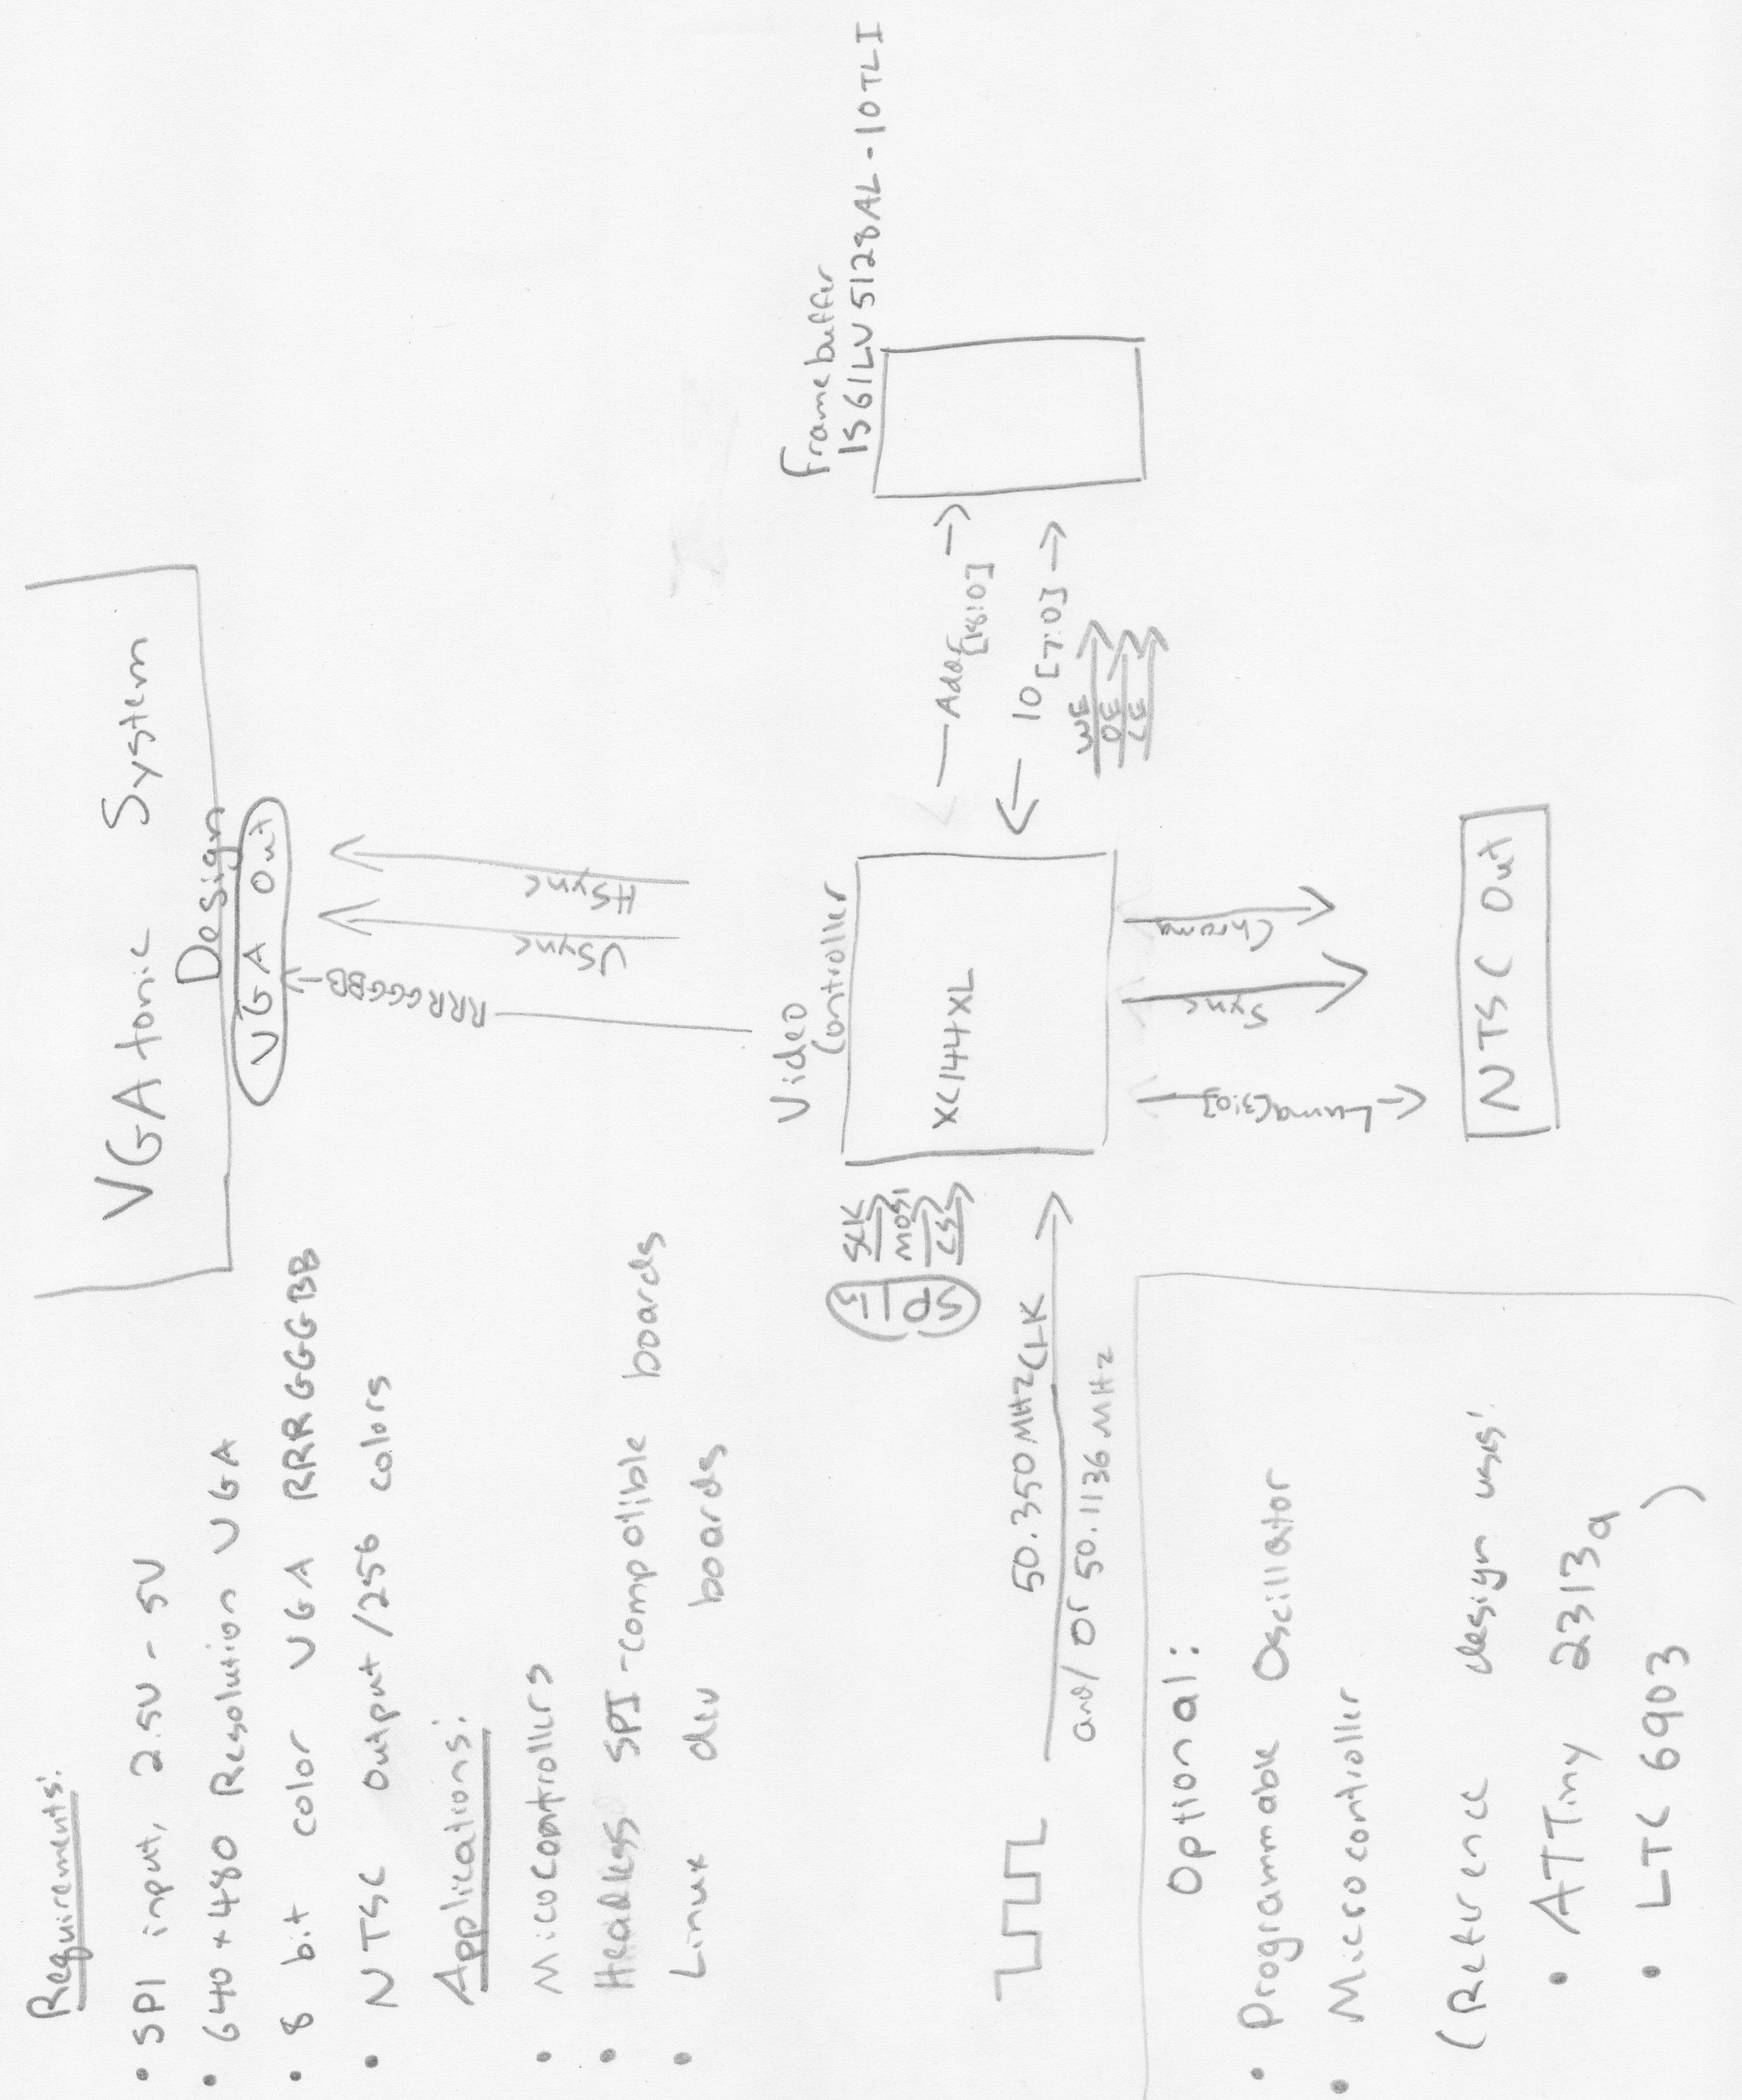
    The one thing I think I'm lacking is an overall design document, so I drew something up with my "I'm-usually-typing-not-writing" penmanship:

    Really, it's not that complicated of a document - I've mostly been a software guy in industry, so my magic, if I actually have any, comes in the code.

    "Hardware without software just generates heat." - Doug Fisher

    I won't tease it too much tonight, but I've got something else for you folks before the entry deadline - stay tuned, and thanks for following!

  • Breaking Down the BOM, Costs per Board

    PK08/16/2014 at 16:45 0 comments

    Let's talk about costs - because when you buy parts in the quantities I am, it's hard to determine exactly what the cost per board is (although we can try).

    Part Name #/Board Cost/Part Cost/Board Quantity Purchased Where? Part Number
    ATTiny 2313a 1 1.11 1.11 10 Newark 68T3554
    Bourns PTC Reset Fuse 1 0.134 0.134 10 Newark 83K0399
    47uF Tantalum 1 0.4029 0.4029 10 Newark 60R5862
    LTC6903 1 3.33 3.33 5 Newark 57M0173
    10uF Tantalum 2 0.168 0.336 20 Newark 01M8216
    USB B Connector 1 0.646 0.646 5 Newark 14N8154
    RCA Connector 1 0.7582 0.7582 5 Newark 89K7618
    VGA Connector 1 1.3 1.3 5 Newark 54M6031
    NCP1117ST33T3G 1 0.387 0.387 10 Newark 67H7013
    3 Bit DIP Switch 1 0.22 0.22 10 eBay
    XC95144XL 1 5.8 5.8 5 Digikey 122-1372-ND
    IS61LV5128AL-10TLI 1 4.39 4.39 10 Jameco
    .1uF Ceramic X7R 11 0.008 0.088 4000 Jameco
    PCB Service 1 1.19 1.19 10 Elecrow PCB
    1uF Ceramic 1 0.008 0.008 Owned
    Male Headers 18 0.001 0.018 Owned
    10k 0805 1% Resistor 6 0.008 0.048 Owned
    4.7k 0805 1% Resistor 1 0.008 0.008 Owned
    510 0805 1% Resistor 4 0.008 0.032 Owned
    1k 0805 1% Resistor 5 0.008 0.04 Owned
    2k 0805 1% Resistor 4 0.008 0.032 Owned
    4k 0805 1% Resistor 1 0.008 0.008 Owned
    Shipping 1 3.079 3.079 10 Various

    A lot of the 'Owned' stuff is eBay specials.  The resistors mostly came from a single resistor sample pack and were, surprisingly, in spec (at least when I pulled them off the strips).

    My guess: with zero wastage, $23.37 a board.  I'll be soldering manually, so there are some hidden costs:

    • I'm going to destroy something, probably some XC95144XLs and IS61LV5128ALs because Murphy's Law.  Capitalized, let's call it $32.50 a board with part destruction to be conservative.
    • Again, I'm hand soldering - I'm not the best solderer in the world, so the fact that we've got a .5mm pitch 100 pin part means my estimate is around an hour a board.  I've got to roll out my kit, gather my supplies, use my paint stripper to recover mistakes, etc.
    • I'm not making 10 boards... so I'll have extra parts.  You decide whether this matters to you, your spouse, your kids, etc.  I'm not counting it because I value the well-stocked parts drawer.

    So: $23.37 - $32.50 a board in small quantities, depending on your level of soldering competency.  Plus that hour of your time - you'll have to value it yourself (I run a finance web site, and we've discussed that exact topic - you can't use what you make at your day job).  In short, if I was selling these and soldering manually, I'd be charging a bit more than $0.

View all 20 project logs

Enjoy this project?

Share

Discussions

freefuel wrote 04/18/2023 at 21:27 point

I'd love to see this Saturation based image format implemented in hardware, https://r0k.us/graphics/png16Tech.html#fc16

  Are you sure? yes | no

Benjamin Miles wrote 01/02/2018 at 20:58 point

  Are you sure? yes | no

PK wrote 06/16/2018 at 22:04 point

There was none, everything was procedurally generated. You can see the pattern in the YouTube video.

  Are you sure? yes | no

Hacker404 wrote 01/02/2015 at 01:48 point

Hi again PK,

I am back after the xmas break and it's time to look at my projects again.

I am still waiting on some parts for using the XC9572XL (TQFP44) with some SRAM.

The 44 pin package doesn't have the pin count for what I need at the end.

For soldering the TQFP44 I have been making a big blob of solder and running it along an elevated edge of the chip so the excess solder feeds of at the bottom corner and doing the same for the other three side.

Can you tell me if this - Can I get away with attempting to solder a chip on to a breakout board (same as yours from futurlec) in the same way for a TQFP100 0.5mm or am I wasting my time attempting this?

The tracks of the 0.5mm breakout don't seem to have enough space between them for the solder to run off without leaving a bridge.

Alignment will also be a big issue for me, any tips? I can just barely see the pins of a TQFP44. I am trying to make a digital microscope but that is a way off yet.

  Are you sure? yes | no

PK wrote 01/03/2015 at 00:04 point

"Can I get away with attempting to solder a chip on to a breakout board" - yes, absolutely.

"am I wasting my time attempting this?" - In my opinion, this is true as well, heh. I would suggest skipping the breakout board for this project and going straight into CAD. Using one of the larger breakout boards (I did it for 'just' 64 pins while testing) was very painful... and the results were a hilarious mess of spaghetti jumper wires, that sort of worked when you didn't get too close to it or jostle it.

Short traces in a CAD program in a cheap Fab service will beat it every time... and will usually be faster than waiting for Futurelec (or eBay) anyway.

For alignment, I didn't use a microscope, but I did use a thin tipped soldering iron, some solder paste (and lots of braid!) from a generic eBay seller, and some of those head attachment dentist tool head things ('head magnifyer' on Amazon works as a search). Also pick up a tweezer set for the fine adjustments - once everything is exactly aligned and you tack down the corners, it's actually pretty easy to do these thin pitches, and might be similar to how you did the larger pitch. It's a bit harder to remove the bridges as you suspect, so tread lightly on the solder and enhance your braid skills.

I screwed up a couple chips - but I had a heat gun for paint, and it worked perfectly to remove the mistakes. Mask off the area with tinfoil, hit the chip with heat, and keep poking it with a tweezer until it slides off. Warning: don't touch it for a few minutes after, haha.

  Are you sure? yes | no

Hacker404 wrote 11/18/2014 at 20:27 point
Hi again,
I played around with timings to see how the monitor reacts (LCD).

What I found is that it really doesn't matter where the sync pulses are as long as they are there and (I would assume) there is sufficient front an back porches.

Auto adjust will detect where the start and end of a H line by where there is color info. If you make the last cell black on all lines then the remainder will be horizontally stretched to fill the screen width when you auto adjust.

Not so with lines. The monitor detects VGA timing model by H and V sync frequency as well as polarity. If you generate less lines the screen will still start with the first line and there will be a black area at the bottom where the lies are missing, no stretching to fill the height.

So given that there is no vertical stretching, any changes to horizontal resolution will also result in a change to the aspect ratio. So this is probably not all that useful in most cases.

I have a timing glitch that puts an extra half a pixel at the end of a line because the counter registers AND active area register are updated on the same rising_edge(CLK).

I read your code and see that you are using CLK'EVENT and I will give that another go. I couldn't do it before because I was coding it wrong.

I have been using registers for the sync pulses (and H & V active) instead of combination logic like your code. I thought combination logic could introduce unwanted transitions due to timing delays in the counter chain. I will try your method as well. So far, I see in my synthesis reports that I am using extra macro's for combination logic rather than registers so the register method may well be fine for this device. Will see what is better.

I looked at some old retro computers and the timing models they used. Aspect ratios were essentially ignored and timings were chosen so that simple combination logic could generate Sync's, Active's and counter resets. Most of them had a much smaller active area as they worked with glass tube monitors that were rounded on the corners.

I also thought that if I have a graphics mode (in a BMP like format) that has 8x8 px in a 8x8 cell and then have a simultaneous text mode that has 5x7 px in a 6x8 cell then I could squeeze more text per line. This would slow text but that doesn't matter if the graphics is still fast.

I will write back later.

  Are you sure? yes | no

PK wrote 11/19/2014 at 17:01 point
Awesome - please keep us posted as it seems you're nearing the heavily detailed oriented part of the project. I'll tell you that I eliminated a bunch of "off by one" type errors even in the posted code, and a few minor timing errors that caused vertical banding due to rounded clocks.

And yes, horizontal timing you may as well hit - at least with your pulses. You can double up lines by hitting your memory twice if you're memory constrained though. But 320x240 or something is only easier on the horizontal side since you have to hit the 480 lines anyway.

You've probably done some testing, but I should mention it anyway - if you think you're working, try it on a few monitors. For me, that was the best for my NTSC work, as it revealed some rather hilarious color differences... but it might reveal something important for VGA as well.

  Are you sure? yes | no

Hacker404 wrote 11/23/2014 at 10:27 point
I am stuck waiting for parts now. The next step to get this working with some RAM. The only RAM I have in DIP is 70nS so it is too slow. I have 10nS RAM in a SOJ36 package but I can only find SOJ to DIP adapters up to 32 pins. I have ordered some 10nS RAM in a TSOP 32 package and I should have adapters here.

I still can't work out what format to use. If I go 400x300px then I have 40nS per px. If I use a BMP style layout then there is 60,000K RAM at 4 bits per px.

BMP will take up a lot of address space and the CPU will be slowed down by having to do so many writes to update the screen. I can fit tiled format into a much smaller address space which would be faster overall but tiled will be more than one read per px.

The object of this for me is to have a Z80 working with VGA. If I also include a atMEGA1284 for IO, keyboard etc then I can have it do most of the work and the the CPLD only has to do the fast stuff. ie I could get the CPLD just to do one line at a time under the control of the atMEGA.

Timing is going to be the challenge - VGA at 50Mhz with a 25MHz dot clock, an atMEGA at 20 MHz with one clock per instruction and a Z80 at 20 MHz with 3 or 4 clocks per instruction all time sharing the same RAM and busses.

I have a Papilio one (500K) here and I think it has about 16K BRAM so I might play with that while I am waiting for parts. I just have to work out how to use BRAM.

  Are you sure? yes | no

Hacker404 wrote 11/06/2014 at 06:54 point
Hi, Now I have a checker board pattern on my monitor. I have definitely moved on from flashing a LED on an Arduino lol.

I am trying to use the standard SVGA (I think) at 800px 48Khz / 600px 72Hz and 50Mhz px clock.

My actual output is 400 x 300 px / 50 x 37.5 char in a 8x8 px cell at 25MHz. There is no real 25MHz px clock as the cells (color boxes) are 16x16px in the original 800x600px.

All the standards that I can find say that both sync signals should be positive for this mode but my monitor will only auto adjust correctly if I invert the hsync. The ysync polarity makes no difference.

I think in your code you ordered the signals: sync - front porch - active area - back porch.

I have ordered them: active area - back porch - sync - front porch.

Could this be causing my problem?

I still can't drive ISE but I have discovered that if I keep impact open I can re-program without re-entering the programing config (It won't save the config).

I am wondering if it really matters what the px clock is? Can't I use an arbitrary px clock as long as the active / sync timing conforms to some standard?

I will go and try the 25.175 MHz standard at 25.000 MHz and see what happens. I will try it two ways.

1) Everything running slower so that the sync etc are longer.

2) Correction for the slower clock so the sync etc are the correct length.

I am using the LogicStart MegaWing off my Papilio One for the VGA port so the signal voltages should be right. Only eight colors though.

  Are you sure? yes | no

PK wrote 11/08/2014 at 21:29 point
"I am wondering if it really matters what the px clock is? Can't I use an arbitrary px clock as long as the active / sync timing conforms to some standard? " - yes, you've got it. The most important thing is sticking very close to the published timings, and, as you expected, to keep the states in a consistent order. Your prior art can be my Arduino example - I use a sloppy hacked/doubled 16MHz clock at 32 MHz to hit the 25.175MHz timings... with slightly hilarious results. http://dqydj.net/how-to-produce-640x480-vga-color-video-from-an-arduino/ . Just calculate how many clock cycles make up each state you're targeting, and be willing to experiment by adding or subtracting a few until your monitor is happy.

Also, as long as you do the syncing, actives, and the porches in the right order, the monitor should be able to lock on to the signal you're sending... it's your choice (or, possibly, dictated by your coding style) the actual order you check/program for them in the code.

  Are you sure? yes | no

Hacker404 wrote 10/31/2014 at 10:02 point
PS: I am using the 800x600 SVGA mode that has a 50Mhz pixel clock as my board has a 50MHz active oscillator. I was going to try to clock out at 25MHz and repeat each line to get an effective resolution of 400x300. Once it is up and running (just as a test pattern) then I will play with using 25MHz instead of 25.175MHx in a resolution of 640x480 VGA and 320x240 QVGA. I will probably end up going with 400x300 as it is 50x37 chars which is easier to read text from at 8x8 pixels per char, than lower resolutions.

My code is linked below if you are interested. It's a mess and the front and back porches may be reversed. I will fix it tomorrow.
http://forums.hackaday.com/viewtopic.php?f=5&t=5058&p=20147#wrap

  Are you sure? yes | no

PK wrote 10/31/2014 at 15:37 point
I *think* I know what happened (I won't dig too far as you seem to have gotten past the initial hurdle) - you tried to update a variable on two clock edges. While you can do that with the newer Coolrunners, the XC95s that we are using won't be able to do that. It's not fatal - you just need to fake it (and you've got 50 MHz, so you can do the same interleaving). Details for my memory scheme are here:

http://hackaday.io/project/1943/log/6464-yes-but-why

Basically, Use the 50MHz clock as is, but divide it into reads & writes. It gets hacky, but you can then use your clock in your combinatorial logic to pulse reads/writes:

CYCLE just goes from 0 to 1 - basically, a 25MHz clock from a 50.
Output enable from your memory when CYCLE is 1
Write enable when CYCLE is 1 and CLOCK is 0 (this will be a 10ms pulse for you)
Address is enabled only when outputting
Data (be careful here, as it's two way) - High Z normally, only active write write enable

Most modern monitors should be able to lock to your 25MHz @ 640x480; I even have an example of monitors doing it at 32 MHz (haha): http://dqydj.net/how-to-produce-640x480-vga-color-video-from-an-arduino/

On another note, thanks for sticking around - my motivation is a bit sapped, but this will gnaw at me until I finish the last couple of features. Please let me know how I can help you further, and if I disappear, you can summon me from my other site as well (dqydj.net)

  Are you sure? yes | no

PK wrote 10/31/2014 at 15:41 point
If you do end up sticking with 400x300, you can still do it - but you'll probably have to move your writes to the blanking intervals. That's roughly 30% updates per frame (we can technically do 100% with the current scheme on these parts, but in practice you can't, haha).

  Are you sure? yes | no

Hacker404 wrote 10/31/2014 at 09:46 point
Hi,
I got some horizontal and vertical counters happening, just enough to generate HSYNC, VSYNC and the mask for the active time of the display. That's my first VHDL that does more than flash LED's. Your code helped heaps. Thank you for that. I think I am finally on the way with VHDL. I loaded the code into my XC9572XL board and read the signals back with my OpenBench Logic Sniffer. It is running as coded but I think I may have the front and back porch back to front. Depends if there front and back to the active area or front and back to the sync. No big problem to change. Next step is RGBHV and after that RRGGBBBHV. I will probably use a RAMDAC as a color pallet so 8 bits is fine. The RAMDAC I have is 8 bit select and 3 x 8 bit to analog.

Thanks again.

  Are you sure? yes | no

Hacker404 wrote 10/30/2014 at 23:13 point
Back again.
My computer died about a month ago. It's up an running again now. I now have a Xilinx DLC9-LP programmer. An I have loaded the Xilinx ISE.

I had only just started VHDL and then resorted to schematic entry when the computer died. This time I tried schematic entry again and found it just too frustrating with the ISE. When I went back to VHDL entry I discovered that I had completely forgotten the little that I had learnt lol. Still lots of bugs with ISE that I am working trough. It seems to be having trouble with windows long file names and keeps reporting that it can't find files and for some reason I have to reconfigure the programming software every time I want to program.

I am just at the stage of writing enough VHDL to flash a led on the board I have -
http://www.chinalctech.com/index.php?_m=mod_product&_a=view&p_id=1016
It's much like yours but has onboard regulation and a 50 MHz active oscillator. It based on the XC9572XL.

I looked up specs for the Z80 and the above chip and found that the Voh of the XC9572XL (3.3Volt chip) is above the Vih of the Z80 so that's a good sign lol.

I am going to plod along with this chip for now even if it lacks enough macros for the end project. I want to try different timings to see what works best.

I saw another project on HAD today -
http://hackaday.com/2014/10/30/a-graphics-card-for-a-homebrew-computer/
Where the designer used a window within the full screen size to ease the timing demands. I am wondering if the pixel clock frequency is all that important with a modern monitor. Perhaps - as long as the active time and syncs are right then you could display a full screen with a different pixel clock. I will play with this and see. If it gives trouble then I will try different sync frequencies (different res for the monitor) and use a pixel clock that is an integer division of the expected frequency. ie monitor expects 25.175 but gets half that frequency. I will see what I can do from 50 MHz / x first as it's easy to get 50 MHz xtals but not so easy for 25.175 MHz and the like.

100 MHz would be good stating point if I can get away from anything derived from 25.175. Then I could divide to 20 MHz for the CPU and atMEGA1284, if is use one and 25 MHz for the pixel clock. I will also try clocking a 20 MHz Z80 at 25 MHz and 25.175 MHz. I know the atMEGA is easily overclocked as long as I use an active oscillator and not the internal crystal driver.

I am still waiting on fast SRAM (10nS) but I have some older 55nS SRAM to play with for now. I also have a color palate / RAMDAC to play with. Even if I don't have enough macros for a full interface I should still have enough to make some test patterns as proof of concept.

One thing that is obvious from your pic above is just how much board real estate is taken up by a LQFP 100 to 0.1" adapter. The adapter is half the size of the completed board. This is going to be a problem I have to face if I am going to use 0.1" pin spacings. I have considered PLCC sockets as they are 0.1" but also and extra expense both for the socket and the more expensive chip. Smaller 44 pin chips like a LQFP Z80 can easily sit on a LQFP to DIP adapter but 44 pins is probably not going to be enough IO for the CPLD.

Can I ask what CAD you using for your boards? I have to learn this to lol. I am just learning to make single sided boards by toner transfer. I don't want to take on double sided, they will have to come from a PCB manufacturer. I have used expressPCB and DIPTrace as they suit the manual manufacture process well but I expect they are not good for a PCB manufacturer. Any adapters will have to be double sided as there's just not enough room to do it on a single sides board for DIP adapters.

I know some of the XC95xx series come in a 84 pin PLCC, I am not sure if they come in a 84 pin LQFP but if they did then this may be a good compromise.

Anyway I will do some VHDL tutorials and have a look at your code.

Thanks, and keep up the good work!

  Are you sure? yes | no

Hacker404 wrote 09/02/2014 at 08:37 point
Can I ask which breakout board you are using in the picture - and where you bought it?

  Are you sure? yes | no

PK wrote 09/03/2014 at 02:42 point
Sure thing - I broke down both adapters I purchased and took another photo in the recent entry.

  Are you sure? yes | no

Starhawk wrote 08/06/2014 at 21:44 point
Just wanted to say: way cool project, and way cool results so far! Skull given, and project followed ;) Can't wait to see where this goes.

  Are you sure? yes | no

PK wrote 08/07/2014 at 04:37 point
Thank you! I've got some other stuff I just need to write up - documenting can sometimes be the greatest challenge, haha.

  Are you sure? yes | no

Darren wrote 08/06/2014 at 19:22 point
Why not use r2r resistor networks?

  Are you sure? yes | no

PK wrote 08/07/2014 at 04:36 point
For which schematic? I think you might be looking at my non-related AVR VGA post - I have the CPLD schematic with the output stages/ladders on page two.

For the AVR, they're actually implied - you'd have to look at the original on my site for my output stage, but it's all 510 ohm resistors as well ( I had a reel of like 200 of them - close enough to the 470 ohm I wanted in that).

  Are you sure? yes | no

Darren wrote 08/07/2014 at 05:43 point
The prepackaged ones like what bournes and others make.

  Are you sure? yes | no

PK wrote 08/07/2014 at 16:02 point
To be honest? A surplus of 510 ohm resistors in the parts drawer, and I didn't want to buy anything else. I had a reel of 510s for a computer project I worked on some time back - worked out well enough for this.

  Are you sure? yes | no

Benchoff wrote 08/05/2014 at 04:38 point
NTSC and VGA? Nice job.

You *are* entering this into the hackaday prize, right? All you need to do is tag the project with "TheHackadayPrize"

  Are you sure? yes | no

PK wrote 08/05/2014 at 05:35 point
That would have been a pretty bad oversight, eh? Thanks for the heads up!

  Are you sure? yes | no

Hacker404 wrote 07/25/2014 at 05:41 point
I am going to try something similar with a XC9572XL. Perhaps QVGA. I want it to work in with a Z80 and SRAM. I chose the lower pin count chip because it's easier to adapt to DIL.

I am new to HDL. I tried VHDL and I can do most things but I still lack experience. I tried Verilog and it's much easier to code with but I have trouble imagining how the code is implemented unlike VHDL. Now I have resorted to schematic entry.

It would be great to see your HDL as it will get me to understand it better.

  Are you sure? yes | no

PK wrote 07/27/2014 at 00:42 point
I learned Verilog first, but didn't touch any HDLs for a few years. When I came back to the game, I picked up VHDL and haven't looked back... and I write C++ at my day job (go figure). I prefer the strongly typed statements and the 'compiler' telling me what's sloppy - I think this project will be a lot more thought through than if I used verilog.

I definitely think you'll have a lot to reference with this project. Also, I think QVGA or even quarter-NTSC would be a reasonable target for a Z80. Have you thought about color depth yet? If you can accept 4 bit color instead of 8, you can do 160x120x4 = 76.8 kbits which is cheap and you can easily do in a DIP package... and everything will refresh 2x as fast as 8 bit.

I'll post a bit of VHDL soon - I want to record a demo working for video, as well as show my first draft on my SPI input scheme in the next few days.

  Are you sure? yes | no

Similar Projects

Does this project spark your interest?

Become a member to follow this project and never miss any updates