-
How to Connect Cricut to Computer: All Devices Covered!
3 days ago • 0 commentsDo you want to connect Cricut to computer? Here is the complete guide that explains everything you need to know about Cricut connection. If you are a new user, then let me tell you that connecting Cricut to a computer is a cakewalk. You can connect them using Bluetooth as well as USB ports.
As a Cricut expert, I want to guide you through the connection process so that whenever you buy a new Cricut machine and need to connect it to your Windows or Mac, you can do so easily. I still remember the days when I was doing my Cricut setup; I found it really easy and never thought that it’d be so easier than I thought.
Connecting your Cricut will be easier when you start using it. In this guide, I will connect a Cricut machine to a Mac and Windows with Bluetooth and a USB cord. Let’s get started!
Connect Cricut to Computer via Bluetooth
Before connecting your Cricut to a PC or Mac, ensure you have placed your machine in the right place. But what is the right place? Well, it is nothing, but any flat surface will work great for it. You can go for the table as well. I think that will work best.
Also, remember that the distance between the machine and your computer should not exceed the limit of 15 feet. Now, let’s connect them:
For Windows
- In order to connect, you will need to open the Settings tab. To do this, press the Windows key and the I letter key on your keyboard.
- After that, you will see your Settings opening.
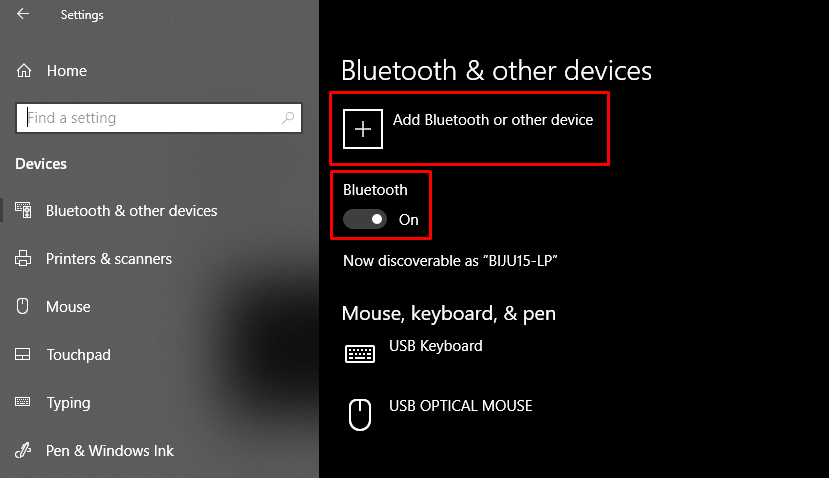
- In Settings, you have to select the Devices option.
![]()
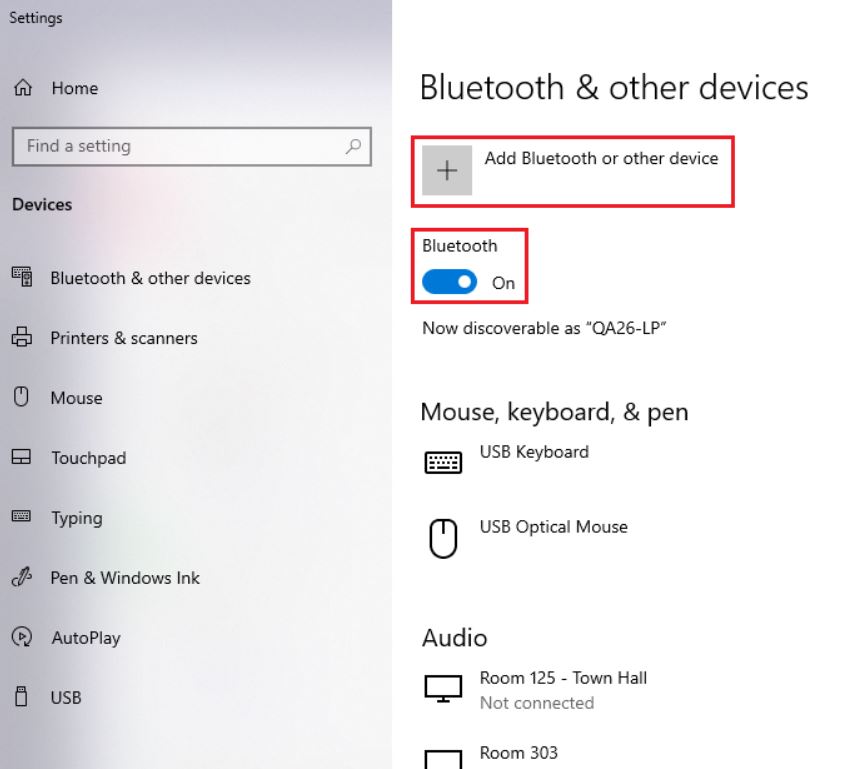
- Under the Devices option, you will need to go to Bluetooth and turn it on.
- Once your Bluetooth is turned on, you have to hit add a new device to your Bluetooth. Hence, click Add Bluetooth or other device.
![]()
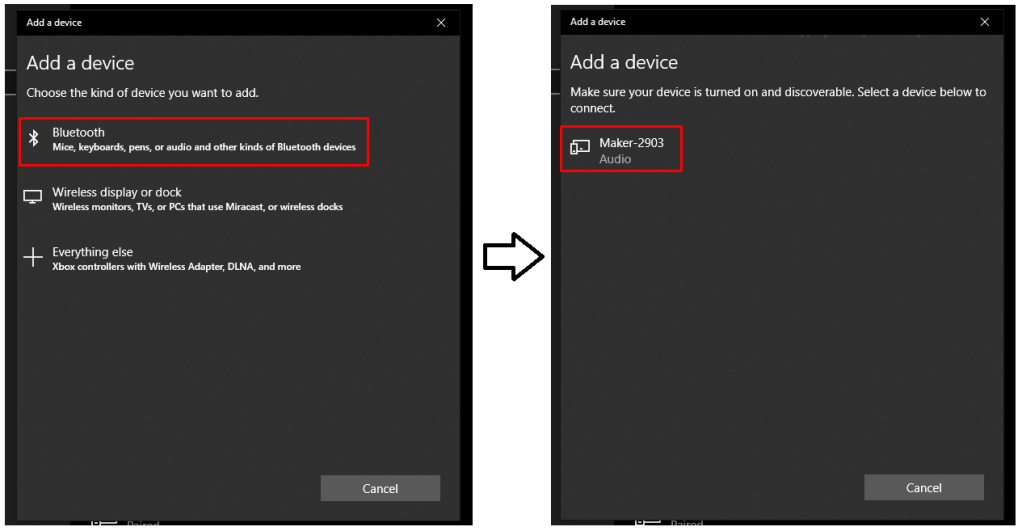
- Then, you will need to select Bluetooth because you are going to pair a Bluetooth in-built Cricut machine.
- Now, wait a couple of minutes until you find your PC detects your machine. Once your PC has found or detected it, you need to select it to complete the pair.
For Mac
- Turn on your Mac and properly plug all its cords into the wall outlet.
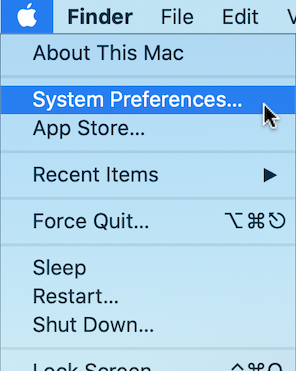
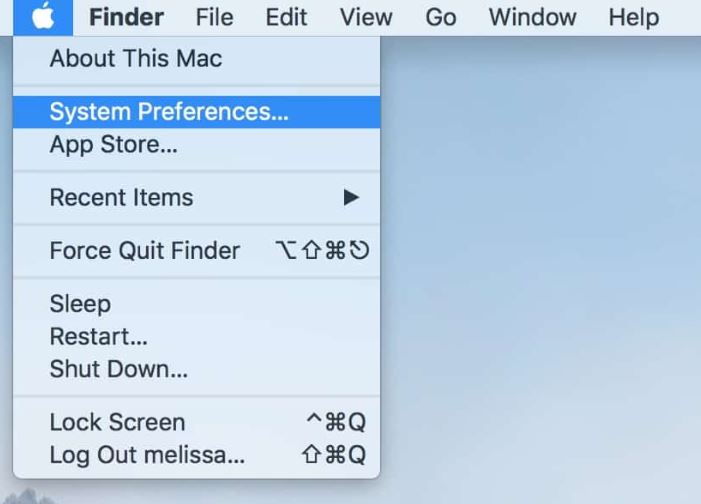
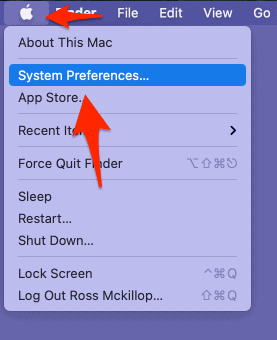
- Once you have switched on your Mac, go to the Apple menu on your MacBook.
- After that, you should select the System Preferences option.
![]()
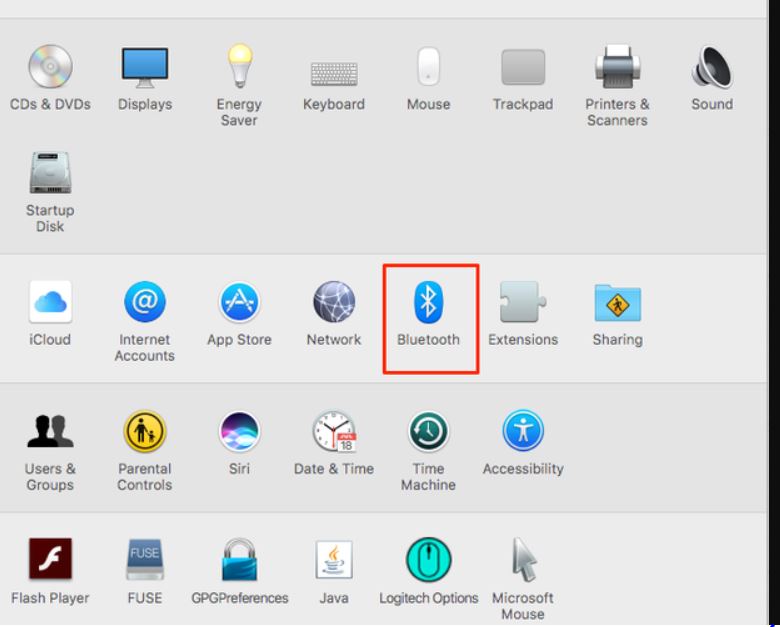
- Then, try to find your Mac’s Bluetooth and ensure it is turned on. If it is not, then you need to turn it on.
![]()
- Once Bluetooth is turned on, you have to wait as your Mac’s Bluetooth is trying to find the nearby Bluetooth device.
- Make sure you have turned on your machine so that it can be detected by the Mac.
- Next, select your Cricut from the available list.
- Lastly, you will be connected to your MacBook when the pair is done.
Connect Cricut to Computer Using a USB Cable
You can also connect your machine to your computer using a USB cord, except for Cricut Joy, which doesn’t have a USB port. The rest of the Cricut models, such as Explore, Maker, and Venture, can be connected through a USB cable.
In order to connect using a USB cable, you should grab the USB cord’s one end and insert it into your desktop’s USB port. Similarly, hold the other end of the USB cable and insert it right into your Cricut’s port. After that, your Cricut will connect to your USB cable.
Now, you know how to connect Cricut to computer using both Bluetooth and a USB cord.
FAQs
Question 1: Why won’t my Cricut connect to my computer?
Answer: There could be many reasons that can hinder you from connecting Cricut to your computer. I have mentioned the reasons below; please take a look below:
- Check your Bluetooth: First, go to your computer and phone settings and make sure you have turned on your Bluetooth.
- Device pairing: Here, you should try unpairing your device and then re-pairing it.
- Check your firewall: Sometimes, the firewall blocks some devices, disabling them from being found by Bluetooth. Go to your settings and make changes to it.
Question 2: Which Cricut machine doesn’t connect via USB?
Answer: Cricut Joy is the one and only machine...
Read more -
Cricut Design Space Install: All Devices Are Covered!
06/26/2024 at 12:56 • 0 commentsSearching for a guide to setting up a Cricut machine for yourself? Wondering how you can install the Cricut software? If the answer is yes, you are at the right place. Here, I am going to explain everything about the Cricut Design Space install procedure. After reading this blog, you will be able to download the Cricut app on your operating system. You can use any phone or computer to work on Cricut, and you will find it easy to install the software.
Cricut Design Space is an innovative application that works easily on mobile devices and desktops. You can get the software on your Windows, Mac, iOS, or Android device and use it for free. In this write-up, I will talk about downloading and installing the Cricut software on any of these devices.
Cricut Design Space Install on Your Windows PC
The Design Space app is easy to install on your PC. Windows computers are compatible with the software, but you have to make sure some of the things that you are using are correct. The computer must be Windows 10 or newer versions.
This is the process to download and install the Cricut Design app on a Windows computer:
- You begin the process by connecting the computer to a stable internet connection. Without the internet, it is impossible to download the app.
- Then, you should open a web browser on the computer.
- Next, go to cricut.com/setup and tick the box in agreement with the Cricut terms and policies.
- Now, click on the Download link. The process of downloading may differ for various browsers on your computer.
- When you download the file, you should go to the folder where the app is downloaded and open the file.
![]()
- You have to double-click on the file before the installation begins.
![]()
- If the computer asks, you may have to agree that you trust the app to be installed on your computer. The computer does this to make you aware that you are not downloading something that can damage files on your PC.
- You will see the Install button. Select it, and the installation process will start soon.
- After you install the app, log in with your Cricut account to work on DIY projects.
![]()
Cricut Design Space Install on a Mac Computer
If you don’t have a Windows computer and want to work on your MacBook to use your Cricut machine, you will have no trouble installing the app on your computer. Just ensure that you are using macOS11 or newer versions. Here is the process of installation:
- Connect the MacBook to a stable internet network to download the app.
- Next, open the browser on your computer and head to cricut.com/setup. There, you will see the Cricut app. All you have to do is click on Download.
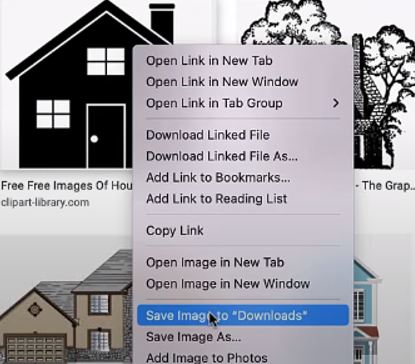
- If you are prompted to select a folder for the file, select one. If you do not choose a folder, it will automatically be downloaded to the Downloads folder.
![]()
- Now, go to the folder and open the file by clicking twice on it.
![]()
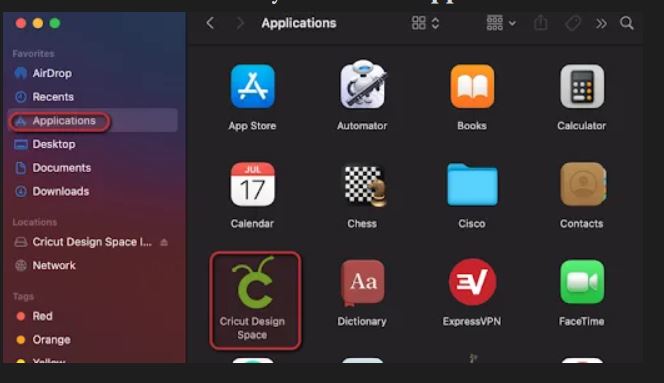
- Here, you will see two icons. You are supposed to drag the Cricut file into the Applications folder.
![]()
- To launch the software, you should open the file, and you will see that the app has started installing.
![]()
- You must wait until it is downloaded. When it is installed, you can open it, sign in with an account, and start working on your crafts.
Download and Install Cricut Design Space on iOS
If you want to use a Cricut machine but do not have a computer, there is nothing you should worry about! The technology has become advanced, and you can easily install the Cricut app on your iPad and iPhone. To know the process of installing the app on your device, follow these steps:
- Just like computers, your phone must be connected to the Internet to download the Design Space app. Connect your device to the Internet.
- After that, open the phone and navigate to the App Store.
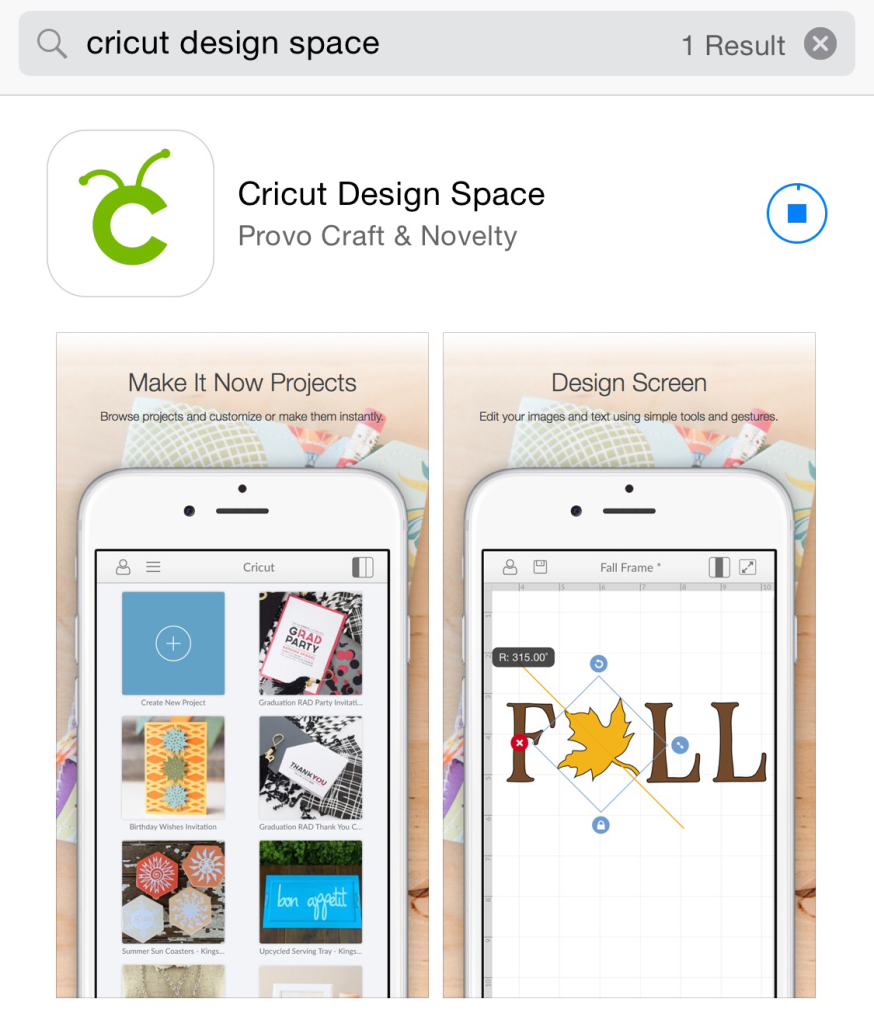
- There, you will see a search bar at the top of the screen. You have to tap on it and type the Cricut Design Space app. And then start searching.
- You will see a square icon with a C letter written in the middle. You...
-
7 Incredible Cricut Projects Ideas to Try in 2024
06/20/2024 at 13:02 • 0 commentsAre you looking for Cricut projects ideas? Look no further than this guide, where you will find 7 stunning project ideas that you can try using your Cricut machine.
The day I started working on these Cricut projects, I made many crafts that I could show you. However, these projects are very close to my heart because my mom helped me with them. Although she is not a pro crafter like me, she wanted to spend some time with me, so she asked me if she could help me in some way.
Since then, she’s been helping me create these crafts. Therefore, I am grateful for her creativity and some of the ideas that I have included in my projects. Without any further ado, let‘s dive in to explore ideas for Cricut projects!
1. Stickers
![]()
Stickers can be used to decorate many things; you can elevate your holiday decorations, gifts, invitations, photo albums, and more. When a novice crafter asks me for the best Cricut projects ideas, I tell them to try stickers out, as they are easy to make in no time. You can make them using your Cricut, be it Cricut Joy or Maker machine; all work really well.
2. Shirts
![]()
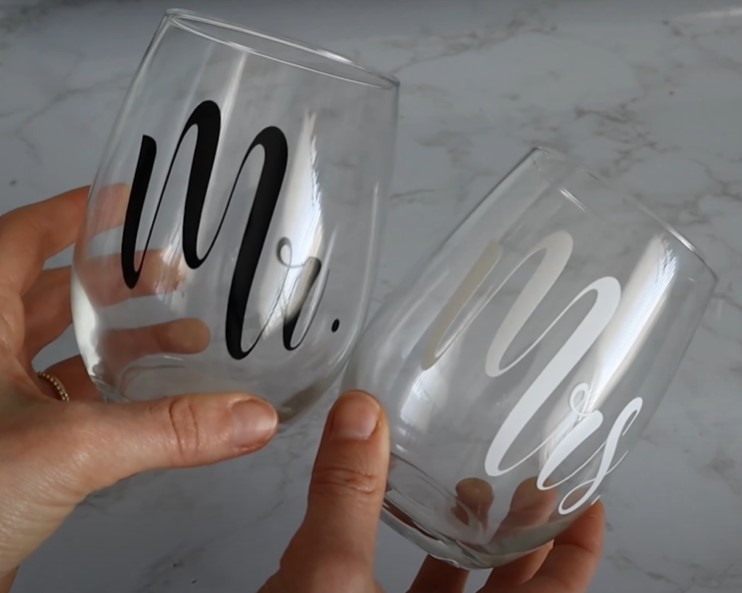
Want a personalized shirt for someone you love? Personalized shirts are the best option for people looking for clothing that reflects their unique identities and preferences. The beauty of such personalized shirts can not be avoided easily. It is also the best way to grab the attention of someone who is wearing this shirt. Let’s now create a sense of connection with Cricut by making this personalized shirt, which is one of the best Cricut projects ideas.
3. Wall Decor
![]()
Creating a well-designed, well-decorated bathroom is the best way to achieve a healthy lifestyle. Therefore, I made this bathroom wall decor, which looks fantastic and gives proper instructions to anyone using it. This wall decor not only creates a good impression but also optimizes the space. Thanks to Cricut, it helped me so much in making my bathroom extra space utilized.
4. Cake Toppers
![]()
Is there anyone’s birthday or anniversary coming soon? Decorate them using your Cricut’s smart cutting feature that cuts intricate designs in one go. With this beautiful cake topper, you can take any event to the next level, adding a personal touch to the cake or desserts or any treats that you like. With Cricut, you can create a custom design for your cake and also add someone’s name.
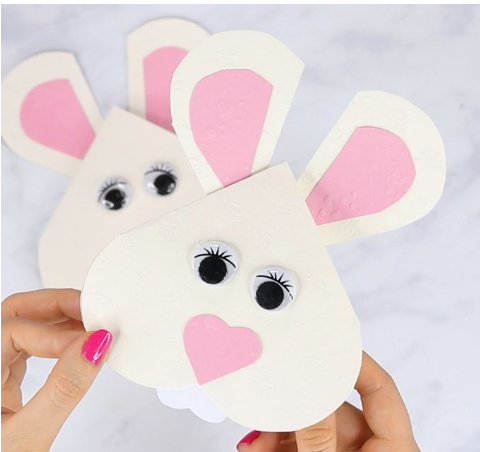
5. Cards
![]()
If you ask me another way to make someone’s day romantic, you can make cards and offer them to make them feel special. Cards can deepen your intimacy, trust, and emotional support between you and your partner. So, if you are looking for Cricut projects ideas such as cards, grab your Cricut and create them to solidify the bond you share with your loved ones.
6. Tote Bag
![]()
Why carry a plastic bag for shopping? Let’s replace it with an eco-friendly tote bag that looks beautiful as well as strong enough to carry your things. You can personalize it as per your choice and add some interesting graphics that draw people’s attention easily. Depending on the size of the bag, you can create it in one go. Pay attention to details and let people admire your creativity.
7. Labels
![]()
Decoration is a must to elevate a celebration for any special occasion. Hence, candles can add charm to any party or grand celebration. Besides, if you are planning a romantic date with your partner, you can decorate a room or place with them. For labeling your candles, you can add a lovely line such as “I love you” or “Be you tiful” in a humorous way.
FAQs
Question 1: What are the Cricut projects ideas for the office?
Answer: If you want to decorate your office or make it personal, there are multiple options available. So, if you are searching for the best projects, take a look at the projects below that you can do for your office.
- Labels
- Notebooks
- Wall vinyl graphics ...
-
Cricut Design Space Setup: A Step-by-Step Tutorial
05/31/2024 at 12:03 • 0 commentsIf you are looking to buy a Cricut machine, then you must learn about the Cricut Design Space setup. Setting up the Cricut software on your device is an easy task and can be done in a few steps. In this blog, I am going to write all the information you need to setup the Design Space app.
Cricut Design Space is an application that works on all Cricut machines. It is an amazing app that is compatible with any operating device you are using. It is available for free on your phone or computer (iOS, Android, Mac, or Windows). You can download it from the Cricut official website and connect it to your device. The Design Space is a free app, so you can use it to start cutting and crafting at home. However, if you want to use all the features that Cricut offers, you can get its subscription, Cricut Access.
Easy Cricut Design Space Setup Guide
Before you download the Cricut Design app, you have to setup your machine. After the setup process is done, download the app and log into your Cricut ID so that you can connect your machine to the app and work on your DIY projects. Follow the steps in the section below:
- To setup the Cricut machine, you first have to open the machine and device you are using.
- Then, connect the machine to your device via Bluetooth or a USB cable.
- After that, connect your device to the Internet.
- Now, go to cricut.com/setup and download the Cricut app.
- Next, open the Design Space app and log into a Cricut account.
- If you don't have a Cricut ID, then you will need to create one.
- Once you log in with your username and password, the Design Space setup is complete.
Connect Cricut Machine to Your Operating System
It's important to connect your Cricut to a device so you can easily download and log into the Cricut software. Follow the steps below to connect:
- Before you start the connection process, you should first plug in the machine and give it a power supply.
- Once the machine is on, connect it using Bluetooth or a USB cable.
- To connect the machine with USB, you have to connect one end of the cable to the machine and the other end to the device. Make sure the USB cable is not strained.
- To connect the machine via Bluetooth, go to your computer or mobile device and open Settings. You have to remember that the distance of the device from the machine should not be more than 10-15 ft.
- In the Settings, you will find Bluetooth settings. Open it.
- In the Bluetooth settings, you will see the option to search for nearby Bluetooth devices. Click on it.
- Now, you will see all the devices that are available to connect to your computer. Click on the one that you want to connect. The device will be connected.
Download Cricut Design Space on Your Device
For the Cricut Design Space setup, the most important thing you have to do is download the Cricut app. The software is available to download for free on any device you are using. Do as written below, and you will learn how to download it on your device.
- To download the app, connect your device to the Internet.
- Now, go to cricut.com/setup on your computer's browser.
![]()
- On your phone, go to the Play Store and search for Cricut Design Space.
![]()
- After that, click on Download and wait.
- Open the downloaded folder and click on the file to start the process of installation.
- You may be asked to agree on the terms & conditions of your device. In such a case, click on Agree.
- When the process of installation is done, open the app and log in with the Cricut ID and password.
![]()
Create a New Cricut Account ID
To use all the features of Cricut Design Space, you must log into your account. But if you do not have a Cricut ID, you don’t have to worry about it. Follow these simple steps, and your Cricut account will be created.
- Open the Cricut software and go for the Sign Up option for a new account.
- Fill in the details, such as your name, email, and other details, as needed.
- Agree to the Terms and Conditions of the app to proceed. ...
-
How to Install Cricut Explore Air 2: A Complete Guide
05/29/2024 at 12:13 • 0 commentsCricut Explore Air 2 is a magnificent machine if you are looking to get into the world of crafting. It is a budget-friendly Cricut machine that you can use to cut different types of materials and work on various DIY projects. To install Cricut Explore Air 2, you will need to follow a few simple steps. In this blog, I am going to write about them, and after reading them, you will be ready to go.
![]()
In this guide, I will introduce you to the Explore Air 2 machine, explain the installation process, how to download Cricut Design Space, and so much more. Without any further delay, let’s get started.
Introduction to Cricut Explore Air 2
Cricut Explore Air 2 is an amazing cutting machine and the best addition to the Cricut family. The machine gives you a great opportunity to cut and craft your materials. With the help of the Explore Air 2 machine, you can cut more than 100+ materials, such as cardboard, leather, paper, cardstock, vinyl, fabric, and more. You can rely on this Cricut machine for your daily crafting.
![]()
It comes with an automatic function that allows you to cut a range of materials. This machine can do complex projects in a very simple way, so it’s a great choice for your DIY projects. Let’s move on to the installation procedure in the section below.
Install Cricut Explore Air 2: Quick and Easy Steps
To install the Cricut cutting machine, the first thing you have to do is unbox it and set everything up, like the power supply and internet connectivity. I will tell you all the basic steps you need to follow.
- To get started, you have to unbox the Cricut product and remove the protective covers.
- Next, check for the items in the box and make sure no item is missing.
- After that, plug in the Cricut machine and power it on.
- Then, connect your machine to your computer or phone using a USB cable or Bluetooth.
- Go to cricut.com/setup on your device and download the Cricut Design Space app.
- Open the Design Space app and sign in with a Cricut ID and password.
![]()
- If you are a first-time Cricut user, create a Cricut account.
Download Cricut Design Space on Your Operating System
Cricut Design Space is the software that you can use to choose designs, fonts, and projects for your crafting. Downloading the app is crucial to install Cricut Explore Air 2 on your device. To download the software, follow these steps:
- Initially, go to an internet browser and open cricut.com/setup.
- Then, press Download to start downloading the Design Space app.
![]()
- After that, you will see that the file is saved in the Downloads folder.
![]()
- Next, go to the Downloads folder and double-click the file to open it.
- Now, agree to the Terms and Conditions, and the installation process will start.
- When the installation is complete, sign in to your Cricut account.
Create a New Cricut Design Space Account
When downloading the Cricut app is done, then log into your Cricut ID. In case you are new to Cricut and do not have an account, you can create one. Simply follow these steps:
- Go to your mobile or computer and open a browser.
- After that, you should go to the cricut.com/setup website.
- Now, insert the Cricut ID and password to log in.
- If you are new to Cricut, create an account using the steps below.
- Next, click on the Sign Up to create a new account.
- Then, you will have to insert your name, email, and country.
- Also, input the strong password and remember it.
- Agree to the terms & conditions and follow the directions to proceed.
- Lastly, complete the sign-in with the newly made Cricut account.
Conclusion
In short, you read everything you need to know to install Cricut Explore Air 2. It is a great machine if you want to explore the world of crafting. This was an important procedure for you if you want to install the Cricut cutting machine. In this blog, you learn how to unbox the machine after buying it and then set it up. Once the Cricut machine is set up, you have to download the Cricut Design...
Read more -
How to Connect My Cricut Maker 3 to Bluetooth: Easy Guide
05/21/2024 at 12:40 • 0 commentsHow to connect my Cricut Maker 3 to Bluetooth is the most frequently asked question I receive from my readers. The question is easy to answer, and I will make it easier for you.
I remember the day I got my first Cricut Maker 3 machine. I was a little bit, but somehow, I learned to connect Cricut to a device using Bluetooth. When I can do this, you can also do it in no time. For this, you will need a compatible computer or mobile device to which you want to connect. Let’s learn how to connect a Cricut machine with different devices, including Windows, macOS, iOS, and Android. Let’s delve into this blog and start establishing a connection.
How to Connect My Cricut Maker 3 to Bluetooth on Windows?
Connecting your Cricut cutting machine to a Windows computer using Bluetooth is not rocket science. By following the simple steps given below, anyone can easily connect their Cricut to their PC.
Here’s how to connect Cricut Maker 3 to Bluetooth on Windows 10:
- Before connecting, find a flat surface on which you can place your Cricut product.
- After that, confirm whether the distance between your PC and Cricut is within 10 - 15 feet (Make sure it doesn’t exceed 10 feet).
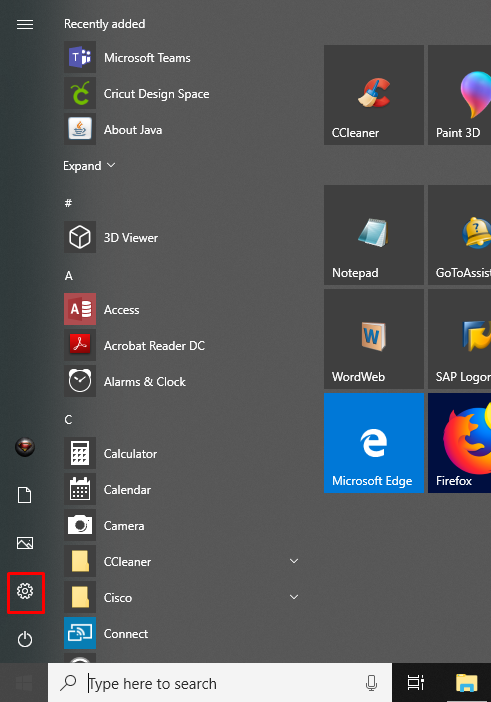
- Now, you should go to your Windows desktop and click on the Start menu located in the taskbar below.
- Next, you will see a small circular gear icon, which is your Settings. Click on it to open Settings.
![]()
- As you enter your PC’s Settings, you will see the Devices option. Click on it.
![]()
- Then, look for the Bluetooth option.
- In the following step, check if your Bluetooth is ON.
- If it is turned on, click on Add Bluetooth or other device.
![]()
- Afterward, you must select the Bluetooth option.
- Wait a while for your PC until it finds your Cricut machine.
- Once it is visible on your list, select the model to pair, and that’s it.
How to Connect My Cricut Maker 3 to Bluetooth on Mac?
Cricut is easily compatible with the MacBook. Besides, the first and second steps are the same for all devices as for the Windows computer. So, take out your Cricut machine outside or unbox it if you haven’t done it yet and start connecting it to your Mac.
Here’s how to connect Cricut Maker 3 to Bluetooth on Windows 10:
- Again, the first and second options will be the same as for the PC (See the above step for the PC).
- Now, you have enabled Bluetooth. To do this, proceed to the Apple menu.
- Then, select the System Preferences option.
![]()
- Here, you need to search for the Bluetooth option.
![]()
- When the Bluetooth is ON, you have to select your Cricut machine from the available...
-
Cricut Explore Air 2 Setup: A Comprehensive Guide
05/17/2024 at 12:50 • 0 commentsCricut Explore Air 2 is a magnificent machine if you want to start crafting and cutting your materials. If you are looking to buy a new Cricut machine and wondering what you should go for, I would suggest you buy an Explore Air 2 machine. The Cricut Explore Air 2 setup is one of the first things that you are going to need to learn. In this blog, I will cover everything you will need to know, like what’s in the box, complete machine setup procedure, and many more. So, without any further delay, let’s get started now!
![]()
What Comes in the Cricut Explore Air 2 Box?
Before you start setting up your machine, you have to open the box and check for the tools and the supplies. When you open the box, you will see the following things:
- Welcome kit
- A Quick Guide Book
- Cricut Explore Air 2
- Power Adapter (To connect your machine to electricity.)
- USB cable (To connect the Explore Air 2 machine to your device.)
- Fine-point blade and blade housing (It is pre-installed)
- Accessory adapter & pen
- Cricut LightGrip mat (12x12)
- Sample materials for your first cutting
![]()
Cricut Explore Air 2 Setup on Your Operating System
You have to follow the steps below to setup your Cricut cutting machine on your computer or smartphone.
- To setup the machine, the first thing you have to do is open the box.
- Check if all the required tools are there or not. Usually, tools are not missing, but in some cases, a few tools may be missing. If any tool is missing, you can contact your seller, and they will provide it.
- Once all the tools are there, you have to plug your machine into electricity using a Power Adapter.
- After that, connect Explore Air 2 with your computer or phone device using a USB cable, or you can also connect it via Bluetooth.
- Then, download the Cricut Design Space app on your device from cricut.com/setup.
- If you already have it, check if it is the latest version or not. If it does not update the software, it works smoothly.
- Once you connect the machine to your device, sign in to your Cricut ID.
![]()
- If you don’t already have one, you will need to create a new account.
Download Cricut Design Space on Your Device
You have to download the Cricut Design app on your phone or computer in the process of the Cricut Explore Air 2 setup. You can download it from the Internet. Full details are given below.
- If you are using a desktop, you have to go to the browser and look for the app on cricut.com/setup.
- In case you are using mobile, open the Play Store app and search for the Cricut Design Space software.
- When you see the app, click on Download, and it will start downloading the app.
- The software will be saved in your system as downloaded files.
- Open the saved files and click on the app before starting the process of installation.
- Now, you have to click on the Install icon of the app.
- Open the Cricut app to log in, and you are ready to start crafting.
How to Create a Cricut Account on a Device?
Before starting to cut on your Cricut cutting machine, logging into your Cricut account is necessary. You may log in if you have already made an account. But if you do not have an account, there is nothing to worry about. You can create an account by following these steps.
- Open your phone or computer and go to the Internet browser.
- In the browser, go to cricut.com/setup and download the Design Space app by clicking on the link.
- Tap on Create a Cricut ID and wait for your details to be filled in.
- There, you will see a series of columns where you have to fill in the details. In the first column, you have to provide your email address.
- In the next column, fill in the password. Make sure you put a password that is not difficult for you to remember. So that the next time you sign in, you won’t have any problem.
- In the following column, you have to fill in your full name.
- You are almost ready with a new Cricut account. Just follow the directions that the app asks for.
- Finish setting up the account...
-
How to Connect Cricut Maker 3 to Bluetooth: Full Guide
05/14/2024 at 11:40 • 0 commentsWhether you want to connect Cricut Maker 3 to Bluetooth or a USB cable, this step is always recommended when you are up to the Cricut setup! However, this blog will especially focus on how to connect Cricut Maker 3 to computer and mobile devices.
Like many of you, I remember the day I started crafting with my first Cricut Explore Air 2, purchased with my savings. The excitement was real, but so was the confusion. I found myself unable to connect my device to the Cricut machine, a common issue for beginners. However, with the help of the internet, I was able to overcome this challenge and learn the steps to connect my Cricut machine.
Besides, the connection is exactly the same for all devices. Being an expert in crafting, I can teach you to connect your Cricut Maker 3 to your Windows, MacBook, Android, and iOS devices. So, let’s get started now!
Connect Cricut Maker 3 to Bluetooth on Windows 10
When it came to establishing a connection with Windows computers, I was very excited. It is still a cakewalk for me. I can do it within a minute, and so can you! Yes, you can also make this connection in a couple of minutes. Let me show you how.
Here are the superb, simple steps you need to follow to connect Cricut to a PC via Bluetooth:
- Look for a flat surface like a table and place your Cricut within 10 to 15 feet.
- Then, you have to go to the Start menu and navigate to Settings.
- After that, select the Devices option.
- Next, turn on the Bluetooth.
- Also, hit Add Bluetooth or other device.
- Now, click Bluetooth and wait for a couple of seconds until you see your machine in the available list.
- Click on the visible Cricut machine in the list and complete the Bluetooth pairing.
Connect Cricut Maker 3 to Bluetooth on MacBook
Thanks to Cricut, we can use Cricut on our MacBook without any hassle. However, the first step would be the same for Mac as for Windows 10. To learn the steps to connect to Cricut, users need to do the following:
- Turn on the Mac and Cricut cutting machine.
- Next, go to your Mac’s Apple menu and select System Preferences.
- After that, you have to look into the Bluetooth option.
- Now, turn on the Bluetooth.
- And then you must wait until you find a Cricut machine on the available list.
- Once your Mac’s Bluetooth detects the machine, you have to click on it and hit Pair.
Connect Cricut Maker 3 to Bluetooth on Android
Android devices, including Samsung, Google Pixel, LG, Motorola, and One Plus, are compatible with Cricut machines. Hence, if you want to connect Cricut Maker 3 to your Android devices via Bluetooth, you need to go through the following steps:
- Go to your Android smartphone, then search for the Settings section on it.
- After that, you will need to move to the Bluetooth option.
- Now, you have to turn on the Bluetooth.
- Next, you have to wait and visit until your device finds your nearby Cricut model.
- Once you see the Cricut machine, click on it to pair it.
- Finally, you have connected the Cricut cutting machine to Bluetooth.
Connect Cricut Maker 3 to Bluetooth on iPhone/iPad
Are you using an iPhone or iPad? You can also connect your Cricut to Bluetooth on these devices without hassle. To connect, you have to follow the steps below:
- Head to the phone’s Settings.
- When you finally reach the settings, you need to go for the Bluetooth option.
- Then, enable the toggle button to turn on the Bluetooth. ...
-
How to Download Font to Cricut: Infuse Stylist Texts in Crafts
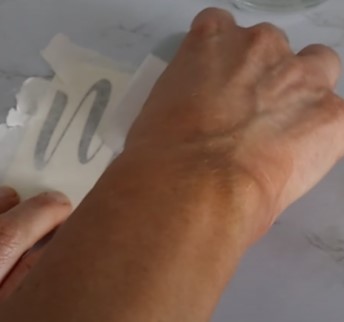
05/13/2024 at 12:59 • 0 commentsDo you know how to download font to Cricut? No? Don’t worry, I’ve got your back! Recently, when I was up for creating personalized shirts, I started looking into my Cricut Design Space for some interesting or stylistic fonts that I could use in my design. Finally, I downloaded many catchy fonts that appealed to me and were the best fit for texts I would add to my T-shirt design.
But how did I download these fonts? Well, I have already answered this in this write-up. Anyone looking for the best eye-catching fonts that look amazing if you use them in projects like T-shirts, mugs, coasters, and much more? Are you ready to download fonts in Cricut Design Space? If so, let’s get started!
What Are .TTF and .OTF Fonts?
Before I explain the steps to download Cricut fonts to your computer and mobile device, I would like to introduce you to two important terms: .ttf and .otf.
When deciding between .ttf and .otf font files, it’s essential to understand the basic difference between the two. .ttf files represent TrueType fonts, while .otf files represent OpenType fonts. While both are widely used and compatible with various platforms, there are distinctions that may influence your choice.
OpenType (.otf) fonts are generally more advanced than TrueType (.ttf) fonts. They often offer additional features such as extra glyphs, embellishments, and special characters. These added features can provide more design options and flexibility when working on projects.
Given the enhanced capabilities of .otf files, I typically prefer them over .ttf files for design projects. However, it’s important to note that .otf files tend to be larger in size compared to .ttf files. This means that .otf fonts may consume more storage space on your device or server.
How to Download Font to Cricut on Windows?
Let’s understand the steps to download Cricut fonts to Cricut Design Space on a Windows PC. Downloading fonts is fun; just go through the following steps. Follow the simple described below to download the fonts on Windows:
- Browse the internet to find the desired font.
- Download any font that you like by simply clicking on the Download button.
- You will need to move to your Downloads folder on your PC.
- Locate the downloaded .ZIP file and double-click to open and unzip it.
- Then, you have to extract the font files from the .ZIP folder to access them for installation or use.
- Following the extraction, double-click on the font file with either the .otf or .ttf extension.
![]()
- Subsequently, follow the on-screen prompts to install the font onto your PC.
![]()
How to Download Font to Cricut on Mac?
Those who are Mac users can download the font on their Cricut by following the simple steps below. Follow the quick steps mentioned below to download the fonts on Mac:
- Download the font from the internet of your choice.
![]()
- Then, double-click on the folder that contains the .zip file to extract its contents.
![]()
- Afterward, navigate to the Finder window.
- From there, double-click on the font file.
- Wait for the font preview to open, then proceed to click “Install Font.”
![]()
How to Download Font to Cricut (iOS Smartphones)?
If you’re an iOS user looking to install fonts for your Cricut machine, you can do so using the free iFont app. Here’s how:
- Download and install the iFont font management app from the App Store.
- After that, you should open the iFont app.
- Tap on the Font Finder icon in the lower toolbar.
- Select the Installer and tap the Install tab next to your font name.
- In the following step, follow any pop-ups that appear.
- Exit the iFont app and go to your device’s Settings.
- Choose “Profile Downloaded” and tap on Install.
- Enter your passcode, then tap Install again, and allow.
- Finally, tap Install once more to complete the font installation process.
How to Download Font to Cricut (Android Devices)?...
Read more -
Discover 5 Best Printer for Cricut Projects in 2024
05/10/2024 at 12:17 • 0 commentsSearching for the best printer for Cricut projects? If so, look no further; I can help you with that! The only reason we need a printer for crafts is because we want to make some stickers, for which we need to use a Print Then Cut feature. I don’t know whether you have heard this term before, but some Cricut machines come with this new feature that makes creating a project that requires printed images. Cricut then cuts those printed images accordingly.
There are many printers in the marketplace, but which one is better? Well, this is what I will tell you in this blog. I know it can be daunting for many novice crafters when they start making their first project using a printer and Cricut machine. But you don’t have to worry at all, as I am with you in finding the best printers for Cricut users. Let’s get started!
1. Canon PIXMA TS9521C Printer
![]()
If you are looking for the best printer for Cricut projects, look no further than this Canon PIXMA TS9521C printer. This model has a big printer size and is also heavy compared to other branded printers, making it the perfect choice for your crafts. If you want something that prints high-quality images in no time, then the Canon PIXMA TS9521C printer is the perfect choice for you!
There are many pros and cons of using this printer. So, let’s get into it.
Pros:
- Front and rear loading tray
- Wireless feature
- 20-sheet ADF
- Scanner
- Long-lasting ink
- Connect to Alexa
- Support the Canon PRINT app
- Memory cards can be inserted
- Wireless
- Apt for printable sticker paper
- Touch screen
- Works with mobile devices
- Large paper size (Supports 12 x 12 cardstock)
- Borderless printing
- Yields high-quality prints
Cons:
- Ink cost is really high
- Higher price
- Slower print speed
- Not portable
2. Epson EcoTank Printer
![]()
If you still couldn’t find the best printer for Cricut projects, chillax! So, what I think is that it is the perfect choice for those who are into everyday printing. Not only that, it can also be suitable for those who want the best sublimation printer. However, the one thing that you need to know is that this printer will use only sublimation ink. Besides, you can’t use any other inks that you use for other printers. So, what are the pros and cons? Let’s know it further!
Pros:
- Support printable sticker paper & cardstock
- Easy to use
- Best sublimation printer
- Yields high-quality prints
- Wireless feature
- Long-lasting ink
- Less printing costs
- Support with mobile devices
Cons:
- Faster speed than Canon PIXMA
- Complex ink refilling
- Bulky in size & heavy
3. Canon TS6420 Printer
![]()
If you trust the Canon brand, you can use the Canon TS6420 printing device. Also, it is the best printer for Cricut projects, with top-notch features and great quality. It can also help you explore the Print Then Cut feature. So, without wasting much time, you will need to know the pros and cons of using a Canon TS6420 printer; let’s explore:
Pros:
- Handle thicker paper
- Support the Canon PRINT app
- Wireless feature
- Print, copy, and scan
- Works with mobile devices
- Support Auto duplex printing
- High-yield ink cartridges
Cons:
- Less paper capacity
- A separate photo tray is unavailable
- Ink is pricy
4. HP Envy 6455E Printer
![]()
The HP Envy 6455E printer is the best printer for Cricut projects. Since it is a mid-range printer, it has satisfied many crafters. So, whether it is about price or quality, this Envy model will provide everything you need to try the Print Then Cut feature. You have to try this model for better quality, especially if you are looking for something in the mid-range.
Pros:
- Borderless printing
- Reasonable price
- Capacity to hold 100 sheets
- Wireless feature
- Suitable for prints, copies, and scans
- Less expensive ink refills
- Occupies less space
- Works with smartphone
Cons:
- A separate photo tray is not given
- Higher cost
5. Canon PIXMA TS3320
![]()
Last but not...
Read more -
How to Download Cricut Design Space: Beginner’s Guide
05/09/2024 at 12:44 • 0 commentsWhen someone asks me how to download Cricut Design Space, the only answer I can give them is to visit Cricut’s official site. Sometimes, users worry too much about the Cricut download and installation process. But they are always afraid of making mistakes. Therefore, they prefer to ask experts like me, who have been in this domain for many years.
It gives users a sense of relief when they receive help doing something from their seniors. Even I prefer to do the same. But most crafters do not have someone to guide them. But this blog can reach everyone. As an expert, it is my responsibility to answer everyone’s most frequently asked questions, like how do I download Cricut Design Space to my computer? Let’s delve into this blog and start downloading the app on various devices, such as Windows, Mac, Android, and iOS.
How to Download Cricut Design Space on Windows?
Before downloading the Cricut app on your Windows computer, you must know the basic need for a Windows system to run this software. These basic needs include Windows 10 or later, 4GB RAM, 2 GB free disk space, and a USB or Bluetooth. Once you meet these requirements, you are ready to follow the steps below.
Here are the steps to download the Cricut software to a Windows PC:
- You will need to turn on your Windows desktop.
- Now, you must select the Start menu from the Windows computer’s taskbar.
- Then, you should go to your Chrome or another internet browser that you prefer.
![]()
- Further, in the browser search bar, you have to type the URL design.cricut.com.
- After that, you will need to press the Enter tab on your keyboard.
- Next, navigate to a section where you need to click on a checkbox from where you can download the software.
![]()
- Also, you should select the Download tab and download the app immediately.
- Once you have downloaded the app, you will need to follow the steps on the screen to install it quickly.
How to Download Cricut Design Space on Mac?
For Mac users, the system needs to download Cricut software, which is a bit similar in terms of hardware only. For example, a Mac user needs to have at least 4GB RAM and 2GB of disk space. However, they need macOS 11 or higher.
Here are the steps to download the Cricut app to a Mac computer:
- Navigate to your Chrome browser on your MacBook.
- Then, put the URL design.cricut.com on your search bar.
- After that, you will need to click the checkbox to enable the Download button.
![]()
- A new screen will appear where you have to select the location where you can save your download file.
- And then click the Save option and start downloading.
![]()
- Once you have got the Cricut software, look for the Downloads folder and double-click the .dmg file.
![]()
How to Download Cricut Design Space on Android?
Now, you can run your Cricut using your Android device. All you need is a compatible device with Android 10.0 or later. Once you get the right phone device, you are ready to embark on your creative journey with Cricut.
Here are the steps to download the Cricut app to an Android device:
- The first step is to go to your Play Store and download the Cricut Design Space app.
![]()
- As you search for Cricut Design Space on the Play Store, you will notice an app with a green C icon. You have to click on it.
- After that, click on the Install tab to download the app on your phone.
![]()
- After completing the software, you will get the application installed on your Android phone hassle-free.
![]()
How to Download Cricut Design Space on iOS?
Luckily, Cricut is not limited to Android devices. It also supports iOS devices, including iPhones and iPads. With iOS 15 or later, you can use Cricut software smoothly and hassle-free.
Here are the steps to download the Cricut Design app to an iOS smartphone:
- Switch on your iOS device (iPhone/iPad) device.
- Then, you will need to find the App Store app to download the Cricut Design Space.
![]()
- On the app store’s search bar, type Cricut Design Space. ...
-
How to Use Cricut Joy to Create a Project: A Stepwise Guide
05/08/2024 at 11:56 • 0 commentsA week ago, I visited my friend Anna’s house and saw her fixing her Cricut Joy machine to make something. I asked her if she wanted help, and then I taught her how to use Cricut Joy correctly. I felt really good after helping her, and I thought, why don’t I share this with all the beginners struggling with their latest Cricut cutting machine?
![]()
As a professional crafter and Cricut expert, I often create content related to trends happening in the Cricut. I often get queries about how to use and set up the machine. My schedule is always tight, so I can’t get time to reply to each one of them. So, I prefer to write blogs on the most asked topics. In this blog, I’m going to address the small Cricut machine: Cricut Joy. Let’s get started with it!
What Comes Inside the Cricut Joy Box?
![]()
Before I show how to use Cricut Joy for beginners, the first step you will need to do is unboxing your Cricut machine. This is to ensure that your machine’s box has all the necessary equipment or not. Below are all the equipment listed.
- Your Cricut Joy machine
- StandardGrip mat
- Power adapter
- Fine point pen
- Smart vinyl samples
- A welcome card
- 50 pre-made projects
- 30 days free trial for a Cricut Access plan
Once you check all the tools and supplies inside, you’re good to go to set up your machine and use it to make a project.
How to Setup a Cricut Joy on Your Computer?
Before you get started learning to use a Cricut cutting machine, you need to set up your Cricut machine. Below are the steps to learn how to use Cricut Joy with your computer.
Step 1: Turn on Your Cricut Joy
Your first step in setting up a Cricut is to turn on your machine properly. Below are the steps for it.
- First, install your Cricut machine on a clean, cool, and flat surface near your electric unit.
- Then, take the power cord from your machine’s box and connect one end to the Cricut machine and another end to the power outlet.
- Turn on your machine, and then it will flash a light indicating that it has turned on.
That’s how you can turn on or activate your Cricut cutting machine.
Step 2: Connect a Cricut Joy to Computer
In this step, you need to connect your Cricut product to the computer via Bluetooth. Note that you can’t connect Cricut to a computer via USB, as it doesn’t support USB. Below are the steps to do it.
- First, turn on your machine and keep it about 10-15 feet away from your computer.
- Now, find the Bluetooth option on the computer and enable it.
- Allow your computer to recognize your Cricut model.
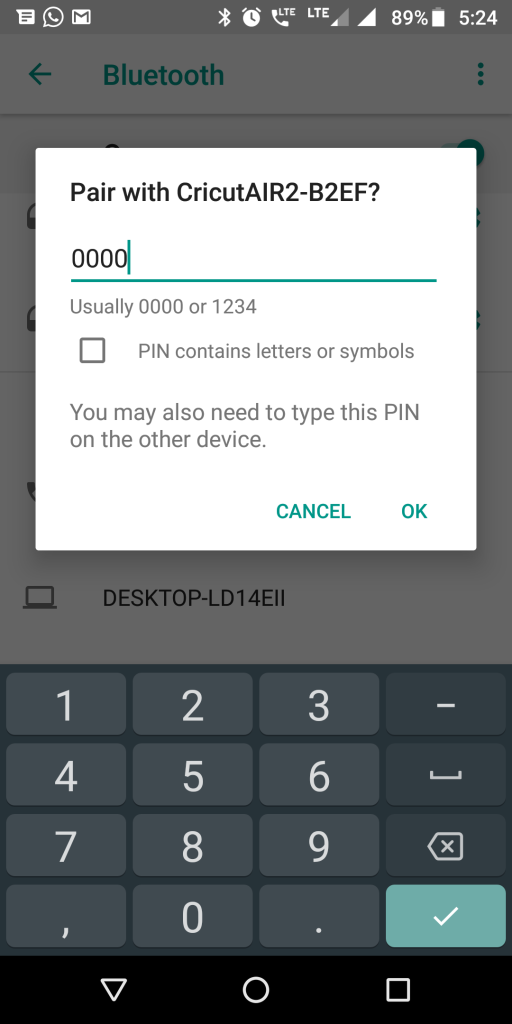
- After that, choose your Cricut model from the list and type a PIN code of “0000” if the screen asks you to do so.
- Next, click on the Connect button.
Finally, your Cricut cutting machine is connected to your computer, and you’re ready to use it for making projects.
Step 3: Download Cricut Design Space Software
The Cricut Design Space app is very important to access your Cricut machine and create designs using the Design Space features. Look at the steps below to download and install it on your computer.
- Visit cricut.com/setup on your internet browser and agree to Cricut’s terms of use and privacy policy.
- Once you get the software installed, sign in to your Cricut ID using your username and password.
- In the case of a smartphone such as Android or iOS, you need to install the Cricut Design app from the App Store or Play Store.
Once you get the app, you can continue with the Cricut New Machine Setup and setup your Cricut product.
How to Use Cricut Joy to Make a DIY Project?
Finally, you are going to learn using a Cricut machine. Check the items that you’ll need while creating your project.
Here is a list of accessories you need during the project:
- Brand new Cricut Joy machine
- Cricut smart vinyl
- Desktop or mobile
- Transfer tape...
-
Cricut Cutting Machines: Find the Best Crafting Tool in 2024
05/06/2024 at 12:19 • 0 commentsOwning Cricut cutting machines means that you are entering a new world and unlocking a new level of creativity. It also helps many crafters turn their hobby into a profession or start a side business for extra income. Last week; I invested all my savings into buying a crafting machine so that I could take the lead on making new DIY stuff. Undoubtedly, I am very happy to have added my Cricut machine to my art room.
Ever since its foundation, Cricut Inc. has established its name as the most famous craft plotter manufacturer across the world. To meet its customers' needs, the company keeps introducing new models in the market. Currently, it is ruling the crafting industry with the ultimate Cricut machines that have their own specs. If you want to learn all the models in depth, then check out this guide.
1. Cricut Maker
Since its launch, the Cricut Maker has been winning the hearts of DIYers. It is a certified craft plotter that can cut approximately 300+ materials and make complicated cuts and designs. In addition to cutting materials, this Cricut cutting machine can draw, write, engrave, emboss, and so much more. In addition, the Cricut Maker supports home inkjet printers and has Bluetooth wireless technology. The DIY projects that can be made from Cricut Maker are Acrylic signs, coasters, bookmarks, water bottles, and so much more.
![]()
2. Cricut Maker 3
Cricut Maker 3 is the new member of the Maker family, added in 2021. It is the ultimate Cricut cut machine that blows everyone's mind with its amazing speed and sharp blades. This Maker model works with 300+ materials and is compatible with many tools and materials. Apart from cutting, it can also easily write, foil, draw, and engrave on the materials. Some of the projects that you can make out of Cricut Maker 3 are a doormat, leather keychains, labels, cupcake toppers, and so much more.
![]()
3. Cricut Explore 3
Among Cricut cutting machines, Cricut Explore 3 is an upgraded version of Explore Air 2 that uses Smart Materials without a mat. Also, this craft plotter precisely cuts 100+ materials into any shape and size. Other than that, it can also draw, foil, score, and write on the material. In addition, this Cricut smart cutting machine is compatible with a printer and is an ideal choice for making Print Then Cut stickers. The DIY projects that can be made out of this craft plotter are graduation caps, wood signs, wooden wreaths, and the list goes on.
![]()
4. Cricut Explore Air 2
Equally important, Explore Air 2 is a Cricut personal cutting machine that will surely turn all your DIY ideas into materiality. With this classic craft plotter, you can easily move your craft status from an 'Idea' to 'I Did It.' Just like its previous version, Explore Air 2 can only cut 100 materials. However, it works with six different tools and has Bluetooth wireless technology, which can make impossible work possible. If you own this cut-die machine, then you are capable of creating projects like tote bags, ornaments, earrings, tumblers, etc.
![]()
5. Cricut Joy
Cricut Joy is a small, portable, easy-to-carry craft plotter carrying on the Cricut cutting machines blog. This craft plotter cuts more than 50+ materials and can also write, foil, and draw as per the instructions. Also, this machine can cut difficult designs within a few minutes and has a Bluetooth connectivity feature. Some of the ultimate crafts that you can make out of this craft plotter are greeting cards, stickers, labels, and so much more.
![]()
6. Cricut Joy Xtra
In addition to Cricut machines, let's talk about the latest version of Cricut Joy, which is the Cricut Joy Xtra machine. This model is a little bigger and heavier than its ancestor, and it looks great anywhere it is placed. Talking about its capabilities, this craft plotter can cut 50+ materials and cut intricate designs accurately. The projects that you can create out of Cricut Joy are labels, birthday cards, hangers, and...
Read more -
How to Setup Cricut Maker 3: All Devices Are Covered!
05/06/2024 at 12:18 • 0 commentsCricut machines are versatile and have been hitting the market for a long time. I have also been a Cricut user for the last three years, and it has been wonderful for me. I love creating my favorite crafts, all thanks to my Cricut Maker 3 machine. Well, I’m a Cricut expert and a professional crafter. I also have my own online craft business. Over time, I changed my priorities and became a full-time blogger and a YouTuber. Now, I teach my readers everything that I have learned till now. In this blog, I’m going to teach you how to setup Cricut Maker 3.
Since Cricut Maker 3 is one of the smart cutting machines in Cricut’s lineup, I am excited to tell you about its setup procedure. All Cricut users must read this blog carefully to explore something new they don’t know. So, let’s get started with the blog now!
What Comes Inside the Cricut Maker 3 Box?
![]()
Like all the electric machines, Cricut Maker 3 also comes with its tools and accessories. You’ll have all of this inside the box. So, let’s see what you’ll get inside the box.
- Brand new Cricut Maker 3
- USB cable
- A fine point blade
- A power adapter
- Sample materials to practice
- 30-day free trial subscription for Cricut Access
Using all these Cricut accessories, you can get started with your Cricut cutting machine. Note that this machine doesn’t come with Cricut mats, pens, and cutting blades, unlike the first Cricut Maker. However, this new version is even more efficient than the previous one.
How to Setup Cricut Maker 3 on Computer (Windows/Mac)?
If you want to set up your Cricut on a computer, look at the steps below to complete the process.
- In the first step, connect your Cricut product to the power supply.
- Then, plug your computer into the computer via a USB cord.
- After that, connect both devices via Bluetooth.
- Now, head to the cricut.com/setup on your internet browser.
- Continue with downloading and installing the Cricut Design Space app.
- In the following step, continue with the on-screen steps.
- Next, sign in to your Cricut account using the right login credentials.
- Finally, your setup process will be completed, and you’ll get prompted to do a test cut.
That’s how you can setup a Cricut machine on your desktop either Windows or Mac. Let’s move ahead with the procedures for mobile devices.
How to Setup Cricut Maker 3 on Mobile (Android/iOS)?
If you want to setup your Maker 3 machine on a smartphone, like iOS or Android, you’ll have to follow the steps mentioned below.
- To get started, connect your Cricut cutting machine to the power supply.
- And then, turn on your machine.
- After that, connect your Android or iOS to the Cricut machine via USB or Bluetooth.
- Now, open your Design Space app and sign in or log in to your Cricut ID.
- If you’re a beginner, choose to create a new Cricut account.
- After signing into your account, click on the Menu and choose the New Machine Setup option.
- Lastly, your device will notify you that the setup has been completed.
That’s how to setup Cricut Maker 3 on your mobile device. Now that you know how to set up your machine, you can move forward with the project.
How to Download Cricut Design Space on Your Device?
As you know, you’ll need to download and install the Cricut Design app on your device. It is crucial to install this software as it will help you access your Cricut machine freely. Cricut allows you to setup the Cricut software on any device, whether desktop or mobile. So, let’s move ahead with the procedure here.
For Windows/Mac
For a desktop like Windows or Mac computers, check the steps below.
- In the beginning, open an internet browser of your choice; I chose Google Chrome.
- After that, navigate to cricut.com/setup.
![]()
- Then, you’ll see a screen with a Download option.
- Tick the box at the bottom to accept the Cricut Terms of Use and Privacy Policy.
- Now, hit the Download option and wait until the software downloads completely.
- The file will be saved under your Downloads...
-
How to Install Cricut Design Space: A Stepwise Guide
05/04/2024 at 10:51 • 0 commentsHey, if you are a novice crafter, then you need to learn how to download and install Cricut Design Space. This software works on both computers and mobile phones. Since I started crafting on the Cricut machine, I have also learned a lot of things, like how do I install Cricut Design Space, how to set it up, and more.
In order to download the Cricut app, you also need to understand the system requirements. This is very important when you are going to install the software. Otherwise, the Cricut Design app will not work or will cause some errors. So it is better to install it with a compatible device. Now, let’s start the installation process without doing anything further!
Install Cricut Design Space on a Windows PC
I will now teach you how to download the Cricut Design app for Windows computers. Once you download it on your PC, you can install it simply by following the on-screen instructions. But Ensure you are using the latest Windows 10 or later OS version.
Here are the steps to install the Cricut software on Windows:
- You will need to move to the design.cricut.com on any browser.
- Then, begin to download the Cricut app after reading the terms of use.
![]()
- When you have downloaded the application, go to your folder.
![]()
- Find the download app in your folder and open it by double-clicking it.
- After that, your installation will begin.
![]()
- Once you have installed the software, you will notice your application on your desktop.
Install Cricut Design Space on Your Mac System
Mac users should have at least macOS 11. If they are higher than macOS 11, then it’d be a cherry on the cake. Besides, ensure your CPU is 1.83 GHz and has 4GB RAM. In addition, 2GB of free disk space is enough for running this software.
Here are the steps to install the Cricut app on a Mac:
- To get started, navigate to any browser.
- Afterward, visit design.cricut.com.
![]()
- Now, you should download the app to your Mac by hitting the Download tab.
- When it is done, you need to double-click on the mouse to open the .dmg file from the browser.
![]()
- Additionally, you have to start the installation process on Mac.
- To install, drag the Cricut icon to the Applications icon.
- Next, double-click the Applications icon.
- Now you have installed the Cricut software.
Install Cricut Design Space on an iOS Smartphone
If you are going to install the Cricut software on your iPhone or iPad, you should have an iOS 15 or higher version. Rest assured, good internet speed is required for the software’s installation.
Here are the steps to install the software on an iOS device:
- On an iPhone/iPad device, go to the App Store app.
- Then, search for Cricut Design Space.
- Afterward, you will see a Cricut app with a C icon on it.
- Hit the Get button and wait until it installs completely.
![]()
- After some time, you will find the app on your device.
Install Cricut Design Space on Your Android Phone
Android users must use Android 10.0 or later. Older versions cause trouble, so it is better to use the latest Android phone to run the Cricut software. Here are the steps to install the app on an Android phone:
- Firstly, launch the Play Store app and then type in Cricut Design Space.
![]()
- Then, you will notice an app with a green C icon.
- Hit the Install button to install the Cricut Design app.
![]()
- After installation, you will find the app on your phone.
That’s all for downloading and installing the Cricut Design Space app on your desktop computer (Windows and Mac) and mobile device (iOS and Android). Now, you can start making your unique designs and beautiful DIY projects with your Cricut machine.
FAQs
Question 1: How to download Cricut Design Space for free?
Answer: Well, Cricut Design Space is already free software, and you don’t need to pay anything to download it. Cricut offers this software to every user for free and never charges a single penny. Besides, for those who are looking for a Cricut Access plan, access...
Read more -
Cricut Explore Air 2 Connect Bluetooth: A Stepwise Guide
04/30/2024 at 11:21 • 0 commentsHey, are you looking for a guide that teaches you about Cricut Explore Air 2 connect Bluetooth? If yes, then you are in the right place. Through this blog, I will teach you how to connect a Cricut cutting machine to a computer and mobile device using Bluetooth. In this guide, I have explained the steps for Windows, macOS, iOS, and Android.
As a beginner, I understand the initial challenges of starting a crafting journey with Cricut. But with discipline, I was able to create something new every day. In fact, I was so inspired by my progress that I decided to pursue crafting full-time. The experience was really beneficial, as I learned not only to set up and connect the machine but also to create intricate designs.
Let’s delve into this blog and learn how to connect Cricut Explore Air 2 Bluetooth to Windows, Mac, Android, and iOS. Let’s get into it!
Cricut Explore Air 2 Connect Bluetooth on Windows
When it comes to connecting a Cricut machine to a Windows computer, I find it superbly easy. It was the first computer that I used when I started my first crafting journey, using an older version of Cricut. To connect your Cricut to your Windows PC, follow the steps that I have written below:
- In the beginning, find a flat surface.
- Place your Cricut Explore Air 2 on it.
- Maintain a gap of about 10 - 15 feet between your computer and Windows PC.
- Next, you need to head to your taskbar.
- After that, you will have to click on the Start menu.
- Now, you have to open Settings. To do this, click on a gear icon.
![]()
- As you are on the Settings page, you need to move on to the Devices option.
![]()
- Afterward, you have to turn on your Bluetooth.
- Then, simply select Add Bluetooth or other device.
- Post this, select the Bluetooth option.
- Wait until your PC detects your Cricut Explore machine.
- Once detected, click on it to pair.
Cricut Explore Air 2 Connect Bluetooth on Mac
Mac was the second and last computer I have used. After Windows, it was my best decision to go with Mac. I switched to a Mac because I wanted a more secure device, and as a professional crafter and a business owner, it was essential for me to use a Mac for my Cricut.
- Look for a flat surface such as your table.
- Place your Cricut Explore machine on it.
- Once you have placed your Cricut in its right place, maintain a distance between a computer and the Cricut.
- To maintain a gap or distance, ensure your Mac is within the range of 10 to 15 feet.
- After that, navigate to the Apple menu > System Preferences.
![]()
- Then, check for the Bluetooth option on your Mac.
![]()
- In the next step, turn on the Bluetooth.
- Wait and see if your Cricut is detected.
- Once it is visible, select it to connect.
Cricut Explore Air 2 Connect Bluetooth on Android
When I first tried to use an Android device, I was really excited. It was a great feeling I had ever had when using my Cricut on an Android device. Be it Motorola or Samsung Galaxy, Cricut supports a wide range of Android devices. Let’s start!
- Setup your Cricut by placing it in the right place, such as a flat surface or table.
- After that, you need to power it on.
- Once it is powered on, ensure that the gap is not more than 15 feet between your Cricut and your phone.
- On the following screen, head to Settings.
- Now, to access Bluetooth, reach the Bluetooth option.
![]()
- Then, turn on your Bluetooth.
- Once Bluetooth is on, you will need to select the name of the Bluetooth module.
![]()
- When it asks you to enter the four digits of your PIN, then enter 0000.
- After that, your Cricut cutting machine will be connected to an Android device via Bluetooth.
Cricut Explore Air 2 Connect Bluetooth on iOS
Being an iOS user, using Cricut with this device is not only handy but also safer than using an Android device. iOS users can get security as well as a handy feature to connect your Cricut to an iPhone or iPad.
- Place your Cricut properly within a range of 10 to 15 feet.
- Also,...
-
How to Use Cricut Infusible Ink: A Comprehensive Guide
04/30/2024 at 10:44 • 0 commentsEager to learn about infusible ink and create a project with it? Here, you’ll get it all in detail. I’ve been using Cricut machines for the last five years, and there is nothing left that I haven’t used to date. I also started as a beginner, but soon, I experimented with many Cricut accessories. Today, you’ll learn how to use Cricut infusible ink to make a personalized T-shirt. You’ll get a step-by-step guide to learning how to use infusible ink.
![]()
Before I move on to the final steps, I would like to share with you something that you need to know about Cricut infusible ink, like what it is, how it works, and how you can best utilize it to create your projects. Let’s get started!
What You Need to Know about Cricut Infusible Ink?
I know creating a new project seems exciting, but at the same time, the chances of silly mistakes increase, too. It’s always better to learn before you start. Infusible ink is a different type of ink used for creating professional-looking projects using a range of materials. You might have used iron-on vinyl or HTV, which are usually applied over the surface or your material and then peeled off, leaving the design.
However, there is a different case with infusible ink. This ink works on the sublimation principle and fuses with your material without leaving any residue. Thus, it gives you a typical printing look but with ink. To make an infusible ink project, you’ll need to use infusible ink sheets and infusible ink pens.
How to Use Cricut Infusible Ink to Make a Shirt?
You know what infusible ink is and how it works. It’s way better than the vinyl projects and leaves a permanent design on your material. Get ready to learn how to use infusible ink transfer sheets on shirts and create customized T-shirts.
Step 1: Select an Infusible Ink Material and Apparel
You have two options: Either you can cut your designs onto an infusible ink transfer sheet or draw the designs using your infusible ink pens and markers. In this guide, you’ll learn to cut and apply your infusible ink transfer materials to your final project. Note that I’m not teaching you how to use the infusible ink and markers here. So, if your main focus is on them, I’ll recommend you move on to another tutorial. Here, we go with the other steps to learn how to use Cricut infusible ink.
![]()
Step 2: Draw a Design in Cricut Design Space
This step includes making a desirable design using special software from Cricut. I’m mentioning a few steps here that you can go through to understand how you can use this software.
- To start, launch the Design Space on your PC and click on the New Project option.
- Then, you can select a suitable design from your Cricut library or create your original design on the canvas.
![]()
- If you’re using a pre-made design from the library, you’ll have to upload that file on your Design Space canvas.
- When you are ready with your design, hit the Make It option.
- Don’t forget to mirror your design before sending it to the Cricut mat.
Step 3: Cut Your Infusible Ink Transfer Sheets
It’s time to use an infusible ink transfer sheet to cut it. To proceed, use these steps:
- To start, load your infusible ink transfer sheet on your Cricut sheet.
- Now, hit the Load button on your machine to load the Cricut mat and hit the Go button to start cutting.
- Let the machine perform the cutting.
- Unload your Cricut mat, clean it, and remove the cutting mat from your infusible sheet.
- Weed the cut design using a weeding tool.
That’s how you’ll finish the cutting process. Let’s continue learning how to use Cricut infusible ink transfer sheets.
Step 4: Get Ready With Your Materials
In this step, you’ll have to use a Cricut EasyPress to transfer the design onto your shirt. Follow the steps below to learn how to apply the transfer sheet.
- Initially, set up your Cricut EasyPress mat on a clean surface and fix your cut project on top of it. You can also use a cardstock to support your apparel.
- Now, you can...
-
How to Connect Cricut Explore Air 2 to iPhone: Full Guide
04/29/2024 at 12:02 • 0 commentsHey, Cricut enthusiasts! Do you know how to connect Cricut Explore Air 2 to iPhone? No? That’s all right! I am here to teach you everything from system requirements to simple and quick steps to connect your Cricut Explore model to your iPhone.
Last year, I got my first iPhone 15, and being the DIY enthusiast that I am, I wanted to use my Cricut using my new iPhone😁. Seriously, I have been crazy about iPhones ever since I got them. But what did I do to use my Cricut with my iPhone? Do we need to connect it to Cricut? If so, then how can we do that? Don’t worry. I have answered all these questions in this blog. So, what are you waiting for? Dive deeper into this blog and connect your iPhone and Cricut together in no time! Let’s get started!
System Requirements for iPhone to Connect to Your Cricut Machine
Now, let’s learn to connect Cricut Explore Air 2 to iPhone. But wait! Have we done everything required? Well, no! I need to tell you the system requirements for the Cricut Design app.
This Cricut software runs on compatible devices only. For this, you should know the basic needs we need in our devices. Since we are going to connect our Cricut to an iPhone, we will only check the requirements for this device.
- Operating System: iOS 15 or later
- Internet: Minimum 2 -3 Mbps for download & upload
- Offline Feature: Cricut can work offline on iOS devices
- Compatible Devices: iOS 17, iOS 16, or iOS 15
Now that you have understood the basic requirements, you need to look into your iPhone. Now, let’s dive into the steps to connect your Cricut Explore Air 2 to your iPhone 15.
Connect Cricut Explore Air 2 to iPhone via Bluetooth
Since I got my new iPhone 15 machine, I have wanted to connect it to my Cricut machine so that I can use it easily. For this, I had to connect my Cricut to my iPhone. Below, I have described the steps completely in stepwise:
- In the beginning, navigate to your iPhone 15 smartphone.
- After that, you have to open the Settings app.
![]()
- Now, it’s time to turn on the Bluetooth. To do this, you can go to the toggle button and enable it from there.
- Afterward, you will need to wait for a while.
- Then, let your iPhone 15 find your Cricut cutting machine.
- Once your mobile phone has detected your Cricut machine, click on it to pair.
![]()
Now, you have learned to connect Cricut Explore Air 2 to iPhone. Since you have connected it with an iPhone, I will walk you through the steps to teach you the uses of this machine. Let’s jump into it.
How to Use Cricut Explore Air 2: 3 Easy Steps
As I have taught you to establish a connection between your Cricut and iPhone, let’s learn to use this machine.
After connecting to Cricut, I will move to the next step, i.e., downloading and installing a Cricut application on my iPhone. Below, I have described the simple steps for the same:
Step 1: Download the Cricut Software
- First, you need to use the App Store on your iPhone device.
- After that, go to the search bar and type Cricut Design Space.
![]()
- Then, you will need to find and select the Cricut software from the shown results.
- Next, tap the Get tab to install the Cricut app on your iPhone.
![]()
- Once you have downloaded the app, you can launch the software to setup the machine.
Step 2: Setup a Cricut Cutting Machine
Setup is necessary for the new cutting machine. Let’s see how to setup a Cricut before using it:
- Once you have paired up and downloaded the Cricut, you need to launch the Design Space app on your iPhone.
- You need to sign in to the Cricut account by following the instructions on the display.
- Following this, select the Cricut model from the given list.
- You need to complete the setup by following the on-screen commands.
- After completing the setup, you have to perform a test cut, which we will learn about in the next step.
Step 3: Perform a Test Cut on Cricut
By performing a test cut, you will learn how to use a Cricut machine. Let’s dive into it:
... Read more -
How to Sign in to Cricut Design Space: A Step-by-Step Guide
04/25/2024 at 11:31 • 0 commentsWant to know how to sign in to Cricut Design Space? Also referred to as Cricut Design Studio, it can be defined as "a full-featured design experience that connects to all Cricut machines." This software will inspire you to create anything—for work or home. In simple words, it is a canvas to which you give a proper layout to your imagination. With the help of shapes, images, fonts, and other tools, you can make your ideas come into reality.
You can also use the Cricut Access plan, which unlocks unlimited library use along with the software. Crafters with a plan can save a certain amount while shopping for crafting supplies from the official website. If you want to know about the app download & sign-in process, then stick to the very end.
Step 1: Download Cricut Design Space on Mac
The most prominent thing of the sign in to Cricut Design Space process is getting it on the individual device. You are informed that this design software can be installed on Windows and Mac systems. If you are a Mac user and want to get it on your computer, then take a look at the steps given below:
- Start the process by switching on your system and then navigating to the Safari web browser.
- After that, open the Cricut official website, tick the checkboxes, and hit the Download option.
![]()
- Now, choose your system Downloads folder and click the Save button.
![]()
- Next, go to the folder where the file will be saved and double-click it.
- At this point, move the Cricut Design app to your system Applications folder.
- Also, open the Applications folder and double-click the Design Space.
- Then, you need to hold on till the app is getting launched on your Mac system.
- After a few seconds, read the small Mac notice and tick the Open button.
![]()
- Following this, you will see the Cricut software on your Mac's main screen.
- If you are already a Cricut user, sign in using your login credentials.
![]()
- On the contrary, if you aren't a registered user, then you need to register yourself.
- To register, you need to click Create Cricut ID and start entering the required details.
- Finally, you can start creating your custom designs with the app.
Once you get this design software on your computer, you can use this app to make your designs by creating a separate account.
Step 2: Create a Cricut Account ID
Before trying to sign in to Cricut Design Space, you must check whether you are a current user. If you aren't, you must create your account by following the steps mentioned below.
- After completing step no. 1, open the installed app and hit Create a Cricut ID box.
![]()
- On the new web page, start filling in the details such as email address, password, first name, last name, and country.
- Following this, read the Terms of Use & Privacy Policy and tap the Create Cricut ID given at the middle of the page.
![]()
- The process will end when you will receive your respective Cricut ID and password via email.
Since you have completed creating your account, take a step forward and learn about signing into your Cricut account. With your separate ID, you can access your profile anytime from anywhere. Besides, you can pursue it even when the app isn't connected to the internet.
Step 3: Sign in to Cricut Design Space
If you are all ready to draw your crafts on the app canvas, then check out the information below. It will guide you through the steps that you need to take while signing into your account:
- Before you sign in to the Cricut app, install the app and create your account.
- After that, fill in your Cricut ID & password, and then tap the Sign In box.
![]()
- Give a pat on your back as you can now adore the Cricut Design app features and draw new favorite designs.
Once you sign into your account, you are ready to enter the world of crafting. Before all others, you are also informed that this easy-to-download app can be installed easily on Windows, Android, and iOS systems.
Conclusion
Summing up the blog, Design Space is the primary...
Read more -
Cricut Setup on Computer: A Guide for Windows and Mac
04/24/2024 at 12:56 • 0 commentsA few days back, my friend called me who had just bought a new Cricut machine. Her name is Ria, and she was a little anxious about setting up her new Cricut machine for the first time. Since I’m a Cricut user and a professional DIYer, I helped her with the Cricut setup on computer. Just like my friend, there are many users out there who are conscious about their Cricut setup. Hence, I’m writing this blog to tell you everything that I told my friend to help her.
I share my best crafts with my readers, and it makes me happy. When I get queries on my social media accounts, I get excited to answer each one of them. And the best type of answer is writing a blog. Here, you will get to know everything about a Cricut machine setup on a Windows and Mac computer. So, let’s start here!
Minimum System Requirements for Cricut Machine Setup
The first thing you all keep in mind is that your Cricut machine runs with a special software called Cricut Design Space. You’ll have to install this software on your computer in order to use your Cricut and design anything you want.
Moreover, when you’re installing the Cricut software, you have to ensure that your system is compatible with it. Below, I’m mentioning some minimum system requirements that your system should have. Only you can proceed with the Cricut setup on computer.
For Windows
- System version- Windows 10 or the latest
- RAM- 4GB
- CPU- Intel Dual Core/AMD Processor
- Connectivity- USB and Bluetooth
- Resolution- At least 1024 x 768 px
For Mac
- System version- macOS 11 or the latest
- RAM- 4GB
- CPU- 1.83 GHz
- Disk storage- 2GB
- Connectivity- USB and Bluetooth
- Resolution- At least 1024 x 768 px
When you know about the minimum system requirements, the Cricut setup on a PC becomes easier.
Download & Install Cricut Design Space on a Computer
Before getting ahead with the Cricut setup on computer, let’s learn to download and install the Cricut app. Check out the procedures below.
Windows
Explore the steps below to download and install the Cricut software on your Windows computer. Check them out here.
- In the beginning, open an internet browser and navigate to www.cricut.com setup login.
![]()
- Now, tick the checkbox to accept the Cricut Terms of Use and click on the Download button.
- After that, let the software download and save into your Downloads folder.
- When your app is downloaded successfully, move on to your folder and double-click on your file.
- Next, allow the installation process when your window asks.
- Lastly, sign in to your Cricut ID using the Cricut login details.
Finally, your Windows PC has the Cricut Design software to start designing with your machine.
Mac
Check the steps below to learn how to download the Cricut Design Space on a Mac computer. Then, you can proceed with the Cricut setup on computer.
- To start, head to an internet browser and search for the design.cricut.com.
- Now, tick the box to accept Cricut Terms of Use and hit the Download button.
- After that, allow your system to download the software and save it into a folder.
- Then, open your Downloads folder and double-click on your Design Space file.
- Next, drag the Design Space icon to the Applications folder and allow the installation.
- Under the Applications folder, double-click on the Design Space file to open it.
- When your Mac computer asks you to open the app, choose the Open button to proceed.
- Finally, sign in or log in to your Cricut account using the Cricut login ID.
Now, you can enjoy the Cricut Design Space software to start creating your unique designs and beautiful projects.
Cricut Setup on Computer (Windows and Mac)
Here is the final part: Cricut setup for beginners. Check the steps below to setup your Cricut machine on your computer.
Windows
After checking the minimum system requirements for Windows PC, you can finally move ahead to setup your Cricut on Windows. I’m using the Bluetooth connection to connect the devices...
Read more -
Cricut Explore Air 2 Machine Set Up: A Guide for Beginners
04/24/2024 at 12:27 • 0 commentsMy grandchildren gifted me a Cricut machine on my 50th birthday a few days ago, and I was overjoyed. My favorite of the Cricut series is the latest version of the Explore series, the Cricut Explore Air 2. This versatile machine is designed with simplicity and value in mind. I need to execute the Cricut Explore Air 2 machine set up on my Windows and Mac computers to create unique designs on fabric.
Once I am done setting up this Cricut Explore model on a desktop, connecting devices via wireless and wired methods will be easy. Putting everything aside, I must download the Cricut software onto my separate computer. I will also be able to make DIY projects on a regular basis. This post covers everything from setting up Cricut Explore Air 2 to connecting it to a computer.
Cricut Explore Air 2 Machine Set up on Desktop Using a USB Cable
If you want to draw your ideal do-it-yourself craft out of Explore Air 2, you must set up this Cricut machine on my Windows/Mac systems. To perform this method laudably, keep an eagle eye given to you underneath:
- Lay the first stone of the setup process by unpacking this model and other supplies.
- After that, plug it into the supportable wall pocket and turn it on.
- Now, connect it to your desktop via a USB cable or pair it wirelessly.
![]()
- Following this, open your device's web browser and go to design.cricut.com/setup.
- Next, download the Cricut software, sign in, or create your Cricut ID.
![]()
- Afterward, go through the instructions shared on your system screen.
- Then, start setting up the device by following the instructions.
- Finally, your Cricut Explore Air 2 machine set up will end when you are called to do a test cut on the material.
With the finalization to set up Cricut Explore Air 2 on desktop, go forward by getting to know about connecting the Explore Air 2 machine to Windows and Mac computers.
Connect Cricut Explore Air 2 to Desktop via Bluetooth
As said in the above paragraphs of this tutorial, there are two ways to connect this Cricut machine to your desktop. One of the easiest and most popular methods is connecting them wirelessly (Bluetooth). Below are the tips that will make your process straightforward:
For Windows
Once you are done with the Cricut Explore Air 2 machine set up, let's discuss the process using which you wirelessly execute the process:
- Get going with the process by switching on your machine and within 10-15 ft of your Windows.
- Now, open the Start menu >select Settings (Gear icon) and then choose the Devices option.
![]()
- After that, cross-check that your Windows system's Bluetooth is on.
- If it isn't, move its toggle to the right side, and it will instantly be activated.
- Next, choose Add Bluetooth or other devices at the top of the Bluetooth option.
![]()
- Further, tick the Bluetooth given inside the Add a Device section.
- Then, a new pop-up window will open on your device screen.
- At this point, look for your machine model and click it.
![]()
- By referring to these steps, both of your devices will be connected to each other.
- Close the Settings tab, open the Cricut app, and go to the New Product Setup page.
- Conclude the process by checking that the wireless connection process among your devices has been done correctly or not.
With the assistance of these steps, it will become child's play for you to connect the Explore Air 2 machine to a Windows PC wirelessly.
For Mac
After concluding the Cricut Explore Air 2 machine set up on Mac, let's take a step forward by examining the steps for connecting your computer to this machine.
- Redo step 1, which you performed while wirelessly connecting this craft plotter to Windows.
- Further, tick the Apple icon given on the left side of your home page.
- Then, select the System Preference and click the Bluetooth icon.
![]()
- Now, check that your Mac system's Bluetooth is on, and click the Turn Bluetooth On option.
![]()
- Following this, tap the Cricut Explore model given inside...
-
How to Connect Cricut With Bluetooth to Computer & Mobile?
04/20/2024 at 11:49 • 0 commentsDo you want to connect your Cricut machine with a Bluetooth connection? You can learn it here. The easiest way I find to pair your Cricut is through a wireless connection, such as a Bluetooth connection. Since I’m a professional Cricut user, I have set up many crafting machines in the past few years. When I started writing, I got a great response from my audience. Now, I have started writing more informative blogs, and here I’m to teach you how to connect Cricut with Bluetooth.
Get ready with your Cricut machine and a compatible device, like a desktop or phone. Once you complete the wireless connection, your crafting journey becomes easier and better. Note that I’m not including the Cricut heat presses in this blog. You’ll only get the steps for Cricut cutting machines.
How to Connect Cricut With Bluetooth to Desktop?
There are Cricut machines that have in-built Bluetooth features such as Cricut Maker and Cricut Explore Air 2. Hence, you can easily connect these machines. But, if you are working with the older Cricut models including Cricut Explore and Cricut Explore one, you need to purchase a Bluetooth adapter. When you’re ready, let’s start with the connection steps.
Windows
As a Windows user, you can easily connect your Cricut via Bluetooth. Follow the steps below and continue with the connection process.
- To start, ensure that your Cricut product is only 10-15 feet away from your PC.
- Also, make sure that both your devices are ON.
- Now, check your PC for the Bluetooth feature.
- To check the Bluetooth feature, launch the Device Manager and search for the Bluetooth Radios option. (Note: If your machine doesn’t have the Bluetooth feature, get a Bluetooth adapter from the market).
![]()
- After that, open the Control Panel on your PC and head to the Devices and Printers option.
- Next, click on the Add a device/Add a Bluetooth device option.
![]()
- Allow your PC to recognize your Cricut machine.
- Select the Bluetooth option and start the pairing process.
- If the window asks you to enter the PIN code as “0000.”
![]()
- In the following step, click on the Next button.
- Finally, the pairing process will be completed.
That’s how to connect Cricut with Bluetooth to a Windows PC.
Mac
To connect your Cricut to Bluetooth on a Mac, check the steps below and proceed.
- In the beginning, make sure that your Cricut is only 10-15 feet apart from your Mac.
- Now, verify whether the Bluetooth option is ON on your Mac.
![]()
- To check, head to the System Preferences option and locate the Bluetooth option.
- After that, open the Bluetooth option. If you see it off, turn it on.
- On the next screen, select your Cricut model from the devices list.
- Then, tap on the Pair option to connect your devices.
- Next, enter “0000” in the prompt box and hit the Pair option.
- Lastly, both devices will be paired successfully.
That’s it for connecting your Cricut machine to a Mac via Bluetooth. Let’s go ahead with the connection on a mobile device.
How to Connect Cricut With Bluetooth to Mobile Devices?
If you want to connect your Cricut to Bluetooth on a mobile device, let’s check the steps below.
iOS
To learn how to connect Cricut with Bluetooth to phone, follow the steps mentioned below.
- In the first step, ensure that your Cricut and iOS devices are only 10-15 feet apart.
- Now, open the Settings option.
![]()
- After that, search for the Bluetooth option and turn it on.
![]()
- Select your Bluetooth device from the devices list.
- Now, your iOS device will start the pairing process.
- Next, enter the PIN code as “0000” and hit the Done button.
![]()
- In the next window, allow your window to go ahead.
- Then, hit the Allow button to continue.
- Finally, your window will move you to the Design Space.
That’s how to connect Cricut with Bluetooth to an iOS device.
Android
To connect your Cricut machine to an Android device via Bluetooth, follow these steps.
- Ensure that...
-
How Do I Connect Cricut to Bluetooth: Easy Setup Instructions
04/17/2024 at 12:39 • 0 commentsA few days back, I added a Cricut machine to my craft room, and now I am looking for the right info on how do I connect Cricut to Bluetooth. It is a minimal topic to you, but it is crucial for all crafters. The most important step I should do is to set up my Cricut machine and then connect it to my computer and mobile device. Cricut is an American brand that develops crafting machines that cut various materials. Besides creating DIY projects, the Cricut can connect to PCs and smartphones.
Until now, I have learned that my Cricut machine can easily connect to other devices using a USB cable and Bluetooth. After connecting both devices, I can design numerous customized projects within minutes. Refer to this guide if you are looking forward to getting any Cricut model.
How Do I Connect Cricut to Bluetooth on My Desktop?
Most crafters prefer to connect their craft plotter to a desktop by enabling their desktop Bluetooth. Get to know about the steps that you need to take while wirelessly connecting your Windows or Mac computer to any Cricut machine:
Windows
Take the help of the below steps as it will help you understand how to connect Cricut to a Windows computer using Bluetooth:
- Kickstart the wireless connection process by checking that your machine is on.
- After that, ensure that both of your devices are kept at a distance of 10-15 ft apart from each other.
- Now, go to the Start menu and click the Settings tab (visible as gear icon).
![]()
- Next, click the Devices option and confirm that the Bluetooth is on.
- If the Bluetooth is off, enable it and press the Add Bluetooth or other device option.
![]()
- Following this, tap the Bluetooth button inside the Add a Device window.
- At this point, you must hold on until your Windows computer is looking for nearby devices.
- Afterward, choose your craft plotter from the list, and your wireless connection process will be finished.
- Conclude the process by opening the Cricut New Product Setup page and checking whether the connection has been built successfully.
Also, Mac users are instructed to pay special attention to the coming section of the blog.
Mac
Subsequently, the mandatory set of instructions that you need to take while wirelessly connecting the craft plotter to a Mac computer is as follows:
- First, turn on your Cricut machine and place it within the range of 10-15 ft of your Mac device.
- Second, open the Apple menu > select System Preferences and look for the Bluetooth option.
![]()
- Third, enable your Mac Bluetooth by ticking the Turn Bluetooth On button on the left side of the page.
- After enabling Bluetooth, choose your model anime from the list given in the Devices section.
- Through these steps, your machine will connect to your Mac within a few minutes.
On the other hand, if you are a mobile device user and want to learn about the connection process, read the following section.
How Do I Connect Cricut to Bluetooth on My Mobile Devices?
It doesn’t matter whether you own an Android or an iOS device. This part will teach you many things if you are a passionate crafter and want to create new things.
Android
Check out the coming pointers, as they will help you come across the steps needed to be taken for wirelessly connecting the craft plotter to an Android device:
- Initiate the method by checking that your Cricut is on and set within 10-15 ft range from each other.
- Next, move your phone home screen, look for the Settings tab, and open it.
![]()
- Afterward, click the Bluetooth option and check whether it is on or not.
- If it isn’t on, enable it by moving the toggle to the right-hand side.
- Now, select your Cricut model from the list visible on your screen.
- Lastly, your machine will now connect to your Android device.
On the other hand, get to learn how do I connect Cricut to Bluetooth to iOS devices in the next section.
iOS
Further adding to the blog, let’s discuss connecting iOS devices (iPad, iPhones) to machines by enabling...
Read more -
Cricut Design Space Mac: A Comprehensive Guide
04/16/2024 at 11:47 • 0 commentsIf you are using a Cricut machine, it is obvious that you know about the Cricut Design Space app. And you are here just to learn how to start with Cricut Design Space Mac? Well, I can help you use this Cricut software on your Mac computer. I have a small Cricut business, and I am an expert in using the Cricut machine along with its software. Before starting my DIY shop, I used to make many projects and sold some of them on online websites. I understand the need for this software in crafting and thus decided to create a useful post for all crafters.
Through this post, my aim is to help Cricut users use its app on their Mac computers. Thus, I will cover the minimum system requirements for Mac, plus the downloading and installation steps for the software. So, you will find this post helpful when using the Cricut software on a Mac computer.
Cricut Design Space Minimum System Requirements for Mac
Do you have no idea you need to know the system requirements to use the app on your system? Mac users can look into the criteria below and find whether the app is able to work on their systems or not. If they fail to meet, the app will not work on their devices.
- macOS 11 or later versions are needed.
- CPU should be 1.83 GHz.
- RAM needs to be at least 4 GB.
- Free disk space of a minimum of 2 GB should be available.
- Either a Bluetooth connection or a USB port is available.
- Display with minimum 1024px x 768px screen resolution.
If your Mac device fulfills the above requirements, you can move further with learning how to use Cricut Design Space on Mac. I will cover the downloading and installation process of the Cricut app in the next section.
Cricut Design Space Mac Download
After you know that your system is compatible with the Cricut software, you can move on to your next step by downloading it to your system. I am listing below a step-by-step process that helps you download the app quickly and hassle-free.
- At the beginning of the process, move to your Mac computer and power it on.
- In the next step, go to the search bar on your Mac device's browser.
- Now, your Cricut machine will start finding the operating system you are using.
- You will now see yourself on the Cricut website.
- On the website, look for the I Agree option.
- Next, make sure to check the box and tap on Download to begin the procedure.
- A Download icon will appear on the page.
![]()
- After you see the Download icon, click OK and follow the steps to download.
- Finally, the Cricut app downloads to your Mac computer.
Did you download Cricut Design Space Mac successfully on your Mac computer? You can now move next to install the downloaded Cricut file on your system. To do this, read the next section of this blog, which includes steps to install the app.
How to Install Cricut Design Space on Mac?
If you want to use the Cricut Design app on your Mac system, read the given below steps and follow them carefully. This helps install the software efficiently on your system.
- When you start to download the file, go to your Mac system first.
- Next, go to the browser in your system.
- You can also find the downloaded file in your Mac's destination folder.
- Thereafter, you need to drag the file to your Applications folder.
![]()
- Try to find the Cricut Design app in your Applications folder.
- Click on the Cricut symbol in the Applications folder.
![]()
- The above steps will move you toward installing those files.
- Then, a notification will appear saying to trust the application.
- When the notification appears, click on Yes.
Now, after you install the Cricut Design Space Mac application, your job is not yet over. You will now have to create a User ID or start logging into your Cricut account.
How to Log Into a Cricut Design Space Account?
Cricut and Mac users can log into the Cricut app and start creating their favorite projects in a time-saving way. But the question is how they can do it. Check the steps mentioned below....
Read more -
Cricut Bluetooth Connection: Quick and Easy Pairing Guide
04/12/2024 at 11:12 • 0 commentsHey, Cricut enthusiasts! I hope you all are doing well! Today, I have come up with an important topic that all beginners out there might be waiting for. This is nothing but a Cricut Bluetooth connection. As the days pass, I can see Windows and Apple launching their new operating systems. Due to this, it becomes difficult for you as a newbie to understand the methods used to connect Cricut to various devices. Whether it is a computer or mobile device, you will need a solid solution so that you can easily establish a connection between your Cricut and your device.
But you know what? I am a professional crafter with years of expertise in making connections between Cricut and devices. Yes, you heard that right! I have been making crafts with Cricut ever since Cricut launched a Cricut Explore One machine. So what are you waiting for? Let’s dive in to learn how to connect Cricut Bluetooth on a computer and smartphone.
Cricut Bluetooth Connection on Your Windows PC
Most people still use Windows computers, whether Windows 10 or 11. Whatever it is, make sure you are using Windows 8 or later. The previous version, which is older than Windows 8, is not supportable at all. So, if you have Windows 10, you are good to go. Let’s start the connection now:
Note: I know you don’t need a specific operating system to connect to Cricut, but later on, you will be downloading the app; hence, it is a must to prepare in advance.
- In the beginning, power on your Cricut machine.
- Keep your Cricut on a flat surface and have a distance of 10 - 15 feet from the computer.
- Afterward, go to the Start menu option and then to PC Settings.
![]()
- After that, you have to go to the option Devices.
![]()
- Here, Bluetooth must be turned on.
- Once you have turned on the Bluetooth, click the Add Bluetooth or other device tab.
![]()
- Now, select Bluetooth and wait for your Cricut model to be visible on the available list.
- Once it is shown in the list, click on the Cricut machine that you are using and then proceed.
![]()
- Ultimately, you have successfully connected to your Windows computer.
Cricut Bluetooth Connection on a Mac Computer
Now, for Mac, you will need to use macOS 10.13 or later. Despite this, you must have a CPU with 1.83 GHz; the minimum RAM should be 4 GB. In addition, 50 MB of free disk space is required. Without any much delay, let’s get into the steps below:
- Let’s first turn on the Cricut machine by plugging its power cord into the wall outlet.
- After that, you will have to place the computer so that it is at least 10 feet from the cutting machine and Mac.
- Now, head to the Apple menu and choose the option System Preferences.
- Look for the Bluetooth option on your Mac and turn it on.
![]()
- Once it is on, you have to wait for a while to find your Mac in your Cricut machine.
- Once found, click on your Cricut machine from the presented list.
Cricut Bluetooth Connection on an Android Device
When it comes to Android devices, you must use Android 6.0 or higher. You can use both mobile devices and tablets, as Cricut supports both devices properly. Now, let’s shift our attention to the steps described below:
- Even for mobile devices or tablets, you need to place your Cricut and computer within 10 to 15 feet of each other.
- Then, you should need to go to Settings on your phone.
- After that, simply look for the Bluetooth option on your Android phone.
- If you find that your Bluetooth is switched off, turn it on.
- When you have turned on Bluetooth, select the name of the Bluetooth module that is visible on the list.
![]()
- If you are prompted to enter the 4-digit PIN, then type 0000.
![]()
- Finally, hit the OK button, and your Cricut will be connected.
Cricut Bluetooth Connection on an iOS Smartphone
iOS device users must have iOS 11 or later. However, it doesn’t matter whether you are using an iPhone, iPad, or iPod. Cricut supports all of them hassle-free.
- Switch on your Cricut cutting machine. ...
-
Cricut Explore Setup: A Complete Guide for Newbies
04/09/2024 at 12:02 • 0 commentsAre you looking for a guide on the Cricut Explore setup? If so, I’ve got your back! The Cricut setup is easy if you follow the correct steps. Since the steps are so simple, you will love doing it again and again. Did you know that when I started my journey with Cricut a few years ago, I knew literally nothing about it? My years of experience as a self-made crafter have taught me a lot. From setting up my Cricut to creating complex projects using my Cricut Explore, it was a great experience.
Since I am a crafting expert, my only purpose in writing this blog was to help beginners become self-made crafters like me. And trust me, it is not that difficult. So, let’s start by setting up the Cricut Explore machine. I will explain everything in a stepwise manner so that you guys can digest it easily. Let’s dive in!
Step 1: Checking Minimum System Requirements
The Cricut Explore setup on Mac is not as difficult as you think. Even if you are a beginner, you need to check whether your Mac can run this software. If not, you need to get another computer. Having a computer with compatible features is necessary. We can’t compromise.
Here are the system requirements you need to check before setup:
- macOS 11 or later
- CPU should be 1.83 GHz
- Minimum Required RAM is 4 GB
- The display should have a minimum 1024px x 768px screen resolution
- A USB port or Bluetooth is required
- 2 GB free disk is needed
Checked? Does your Mac meet all the requirements? If yes, congratulations on completing your first step for the Cricut Explore setup. Now, let’s move to the most exciting part – UNBOXING!!!😍
Step 2: Unpacking the Cricut Product
![]()
I am really crazy about unboxing! It gives me immense pleasure. If you also feel the same way, let’s start unboxing and see what we get inside the box. So, the items I saw in my Cricut Explore box were as follows:
- Cricut Explore machine
- Welcome card book
- USB cable
- Power adapter
- Premium Fine-Point Blade & Housing
- Free trial subscription to Cricut Access
- Free pre-designed projects in the Design software
- Materials for a practice cut
It was amazing, no? Now, it’s time to open our Cricut machine.
Step 3: Open Your Cricut Explore and Turn It On
Now, you will have to place your Cricut surface on the table. To connect your Cricut and Mac via Bluetooth, you must maintain a distance of no more than 15 feet between them. So, you have to press the Open button to lift the upper lid, and then the front part will open automatically.
Finally, you need to switch on the Cricut cutting machine.
![]()
To do so, you have to use the power cord to switch it on and plug the other end of the cord into the machine’s wall outlet.
![]()
Afterward, you need to click on the Power button.
![]()
Step 4: Download the Cricut App on MacBook
So, when I downloaded Cricut Design Space on Mac for the Cricut Explore setup, I didn’t know that the rest of the setup process would be done using this software. Let me show you the simple steps:
- Open a browser and navigate to design.cricut.com.
- Then, click the checkbox to accept Cricut’s Terms of Use and Privacy Policy.
- After accepting the T&C, you will need to hit the Download button.
- Once the Cricut app is downloaded, head to the downloads folder.
- Next, head to the .dmg file and double-click it to move to the next step.
- You will need to drag the Cricut icon to the Applications folder and begin installing the app on your computer.
Step 5: Connecting Cricut to Your Mac
In order to learn how to setup wireless Cricut Explore, you have to connect it via Bluetooth. Therefore, I have explained the steps to connect Cricut to Mac using Bluetooth. Follow the steps and establish the connection in no time:
- Turn on your MacBook.
- Once your Mac is turned on, keep it near your Cricut machine.
- Now, from the Apple menu, select the System Preferences.
![]()
- Here, find the Bluetooth option on your Mac computer.
- Afterward, turn the Bluetooth on....
-
How to Download Cricut Design Studio: An Easy-to-Learn Guide
04/03/2024 at 11:42 • 0 commentsDo you want to show your creative side to the world? If so, you need to Download Cricut Design Studio. You may be wondering what exactly Design Studio is. Don't worry; I will be your tutor and provide all the details related to this Cricut app. Starting from scratch, it is a Cricut Design Space software that will help you create DIY projects and give you access to the ever-growing library.
For the past seven years, I've been using a Cricut machine and the Cricut software to make new designs. This free-to-use app supports all Cricut models and runs smoothly on Android, Windows, iOS, and Mac devices. Along with the app, you will also get a Cricut Access plan, which offers various benefits to users.
Are you curious to learn more about the Cricut app? This tutorial will be very beneficial. It details the system requirements and download method.
System Requirements for Using Cricut Design Studio on Computers
Before using the Cricut app, check whether your device fulfills the system requirements. If it doesn't, you won't be able to operate this design software on your device. Don't get anxious; this section will introduce you to the system requirements for Windows and Mac systems.
Windows
To download Cricut Design Studio on your Windows computer, you must know the system requirements needed for the computer, whose details are given below:
- Operating System: Windows 10 or its latest version.
- CPU: Intel Dual-Core or same AMD processor.
- RAM: 4GB RAM with 2GB free disk space.
- Connection: Availability of USB cable or in-built Bluetooth.
- Display: Minimum 1024px x 768px screen resolution.
- Broadband Connection: Minimum 2-3 Mbps for downloading & 1-2 Mbps for uploading.
Mac
In addition to the blog, it is time to discuss the system requirements needed for the Mac system:
- Operating system: macOS 11 or the most recent version.
- CPU: 1.83 GHz.
- RAM: 4GB with 2 GB free disk space.
- Connection: supports both wired and wireless connections.
- Display: Minimum 1024px x 768px screen resolution.
- Internet Connectivity: Minimum 2-3 Mbps to download files & at least 1-2 Mbps to upload files.
After coming across the Cricut Design app's basic system requirements, let's save time and refer to the most essential part of this blog. You are very well aware of what I am going to talk about. Yes, it's about downloading this Cricut app on your computer system. You need to pay special attention to the coming content to do so.
How to Download Cricut Design Studio on Windows?
For all the Windows users out there, it's time to pull up your socks. You will be introduced to the process of getting the Cricut software on your system. Follow the below tips as they will assist you in downloading this easy-to-get design software on your device:
- Inaugurate the process by turning on your desktop and pressing the power button.
- Then, visit the search engine of your choice (Chrome, Mozilla Firefox, or others).
- Next, navigate to design.cricut.com and choose the Terms & Conditions checkbox.
- Afterward, tick the Download button inside the white box at the page's center.
![]()
- When the file gets downloaded, open the browser or Downloads folder.
![]()
- Following this, double-click the Cricut file and tap the Trust the application option.
- Now, you will see a setup window providing the installation status.
- Further, go back to your PC's home screen and open the app.
- After the app opens, start your project by creating your personal account or signing in with your Cricut sign-in credentials.
![]()
- Following this, add your Cricut app to the Taskbar for easy reach, and enjoy creating your designs on the canvas.
This method will make it much easier for you to install the Cricut Design app on your Windows computer. Don't try to skip any step; otherwise, you might encounter an error while opening the app.
How to Download Cricut Design Studio on Mac?
On the contrary, you must understand the importance of getting the Cricut...
Read more -
How to Download Images From Cricut Design Space: Full Guide
04/01/2024 at 11:19 • 0 commentsWere you aware of how to download images from Cricut Design Space? It is true, as Cricut software is the most crucial feature crafters need to use while using the Cricut machine. Also, it can use the downloaded images and convert them into cuttable images. Most beginners ask about downloading and uploading images to the Cricut app. Simply put, it is a straightforward process that allows you to get the image on your device within a few seconds.
In addition, you can download the image from a web browser for free or through a Cricut Access subscription plan. Are you ready to learn the facts about taking pictures while preparing your favorite project? If yes, then this blog is perfect for you, as it will explain the entire method in simple words.
Step 1: Search and Download An Image
If you intend to learn about how to download images from Cricut Design Space, open the search engine (Google Chrome, Safari, MS Bing, and others) and look for your image. After the list opens, right-click and click the Save as Image or Save Images to Downloads option.
![]()
After successfully downloading the image, go to the Downloads folder and check whether it has been downloaded perfectly. If it isn't appropriately downloaded, try re-downloading it from another search engine. Also, you can try downloading different images and checking the internet connectivity.
Step 2: Upload Your Image to the Cricut App
Following this, turn on your device and open the Cricut software, which is visible with the other installed app on the Home screen. To learn how to download images from Cricut Design Space, create an account or sign in by noting down your Cricut ID and password.
![]()
Next, you will land on the new web page and press the New Project present at the top-right-hand side or in the center of the page. Now, click the Upload tool given under the Menu bar on the left side of your canvas.
![]()
Following this, click Upload image > Browse, and your device's Downloads folder will instantly open. Now, select your downloaded image and then click the Open button. After that, click the Complex > Continue option. At this point, you will instantly be connected to the background remover page.
Step 3: Remove Background
Subsequently, use the background remover tool by selecting the background of your downloaded image. Then, click on the places where you want to make the changes and click the Apply & Continue button at the bottom right side of the page. Plus, choose the Cut Image and remove the background of your downloaded image. Following this, tap the Upload button present at the bottom right side of your page.
![]()
Step 4: Upload SVG File to Cricut Design Space
Afterward, you will see the edited image under the Recently Uploads > choose the image and then click the Add to Canvas button. Equally important, resize your image and then select the Make It option. Further, select the image on the cutting mat and proceed towards the cutting process.
![]()
It doesn't matter whether you are using a Basic image or a Vector image; you need to follow some steps. If you aren't aware of the methods, refer to the section below.
Method 1: Upload Basic Images (Raster Images)
Further on how to download images from Cricut Design Space, choose the Basic images in .jpg, .gif, and .png and drag them to the Cricut software's Upload window. Now, choose the image type and then click the Continue option. Next, choose the Crop tool to remove, erase, and restore the unwanted background.
![]()
If you want to preview the edited image, press the Preview button on your screen. If you don't get the desired image, press the Hide Preview button and edit it. After making the modifications, select Continue to proceed to the next stage. Concurrently, name your image and choose Print Then Cut or a Cut Image. Equally important, click Upload, and your edited image will appear in the Uploaded Images Library section.
![]()
Method 2: Upload Vector Image
On the contrary, if you are using a .svg...
Read more -
9 Cricut Easter Cards Ideas for Making Creative Greetings
03/28/2024 at 12:31 • 0 commentsWith Easter just a week away, I know you are all focused on creating baskets, candy, and gifts. But it would be best if you do not forget to design customized greeting cards as they are the most famous and easy-to-make crafts. What if I told you to create your own Cricut Easter cards ideas at home? Yes, you heard right: the Cricut machine will help you make various invitations for the celebration.
If you are hardworking and love creating DIY projects, give the Cricut machine a chance to make greeting cards. With the help of the Cricut cutting machine, you can easily design invitations from any material. One of the best things about Cricut is that it is kid-friendly and will make them keen to learn something new. Keep exploring this blog to learn about the types of Easter cards that can be made using a Cricut machine.
1. Clothespin Animal Card
Do you want to see your kid take crafting to the next level? If yes, you should definitely make a custom-made clothespin Easter card. The clothespin easily gives a modern touch to the Cricut Easter cards ideas. Also, you can swiftly make this custom invitation by forming the design on the Cricut app and giving proper shape to the material.
![]()
2. Heart-Shaped Bunny Card
Are you looking forward to sharing your feelings with someone special at this festival? Don't worry—design a heart-shaped bunny card. You can easily make this cute-looking bunny by creating the design on Cricut Design Space and letting the machine do the rest of the work. Plus, you can also give this Cricut Easter project to your children or neighbors.
![]()
3. Rocking Easter Egg Card
Equally important, if you want to make one of your Cricut Easter cards ideas look more fantastic and stylish, designing a rocking Easter egg card should be on your list. It was pretty fun making this egg-stra special card. Beyond question, simple cards are everyone's favorite, but won't it be great to have a card that moves from one place to another? You can design the card using the correct Cricut machine, material, and other tools.
![]()
4. Foldable Egg Easter Card
Further adding to the post, keep your kids engaged with this fantastic foldable Easter egg card. You can make single-layer or multiple-layer cards for the festival and give them to the kids. In the beginning, it may seem a little harder to design this card, but as time passes, you will make it within a few minutes. You must use the correct cutting machine and compatible supplies while forming this project.
![]()
5. Hoppy Easter Card
Subsequently, if you have a hectic schedule and want an instant, good-looking card, the Cricut machine is here for you. To make this card, you must choose a design and load the supplies into the machine. Apart from making it look too glammy, you can add a good wish and give it to the guest.
![]()
6. Pop-Up Card
Equally important, show off your crafting skills by creating a customized pop-up card. To make this type of project, you must use Design Space and create your design on the canvas. Then, choose the compatible materials and systematically assemble all the pieces to make one of these Cricut Easter cards ideas.
![]()
7. Bunny Picture Card
Did you recently welcome a newborn baby, and will this be their first Easter? Then, you all must be very excited for the primary day. To make their day memorable, you can make a customized card with their cute photograph stick on it. Intending to finish this project, you need to be very particular while choosing the cut-die machine, materials, and other supplies.
![]()
8. Movable Bunny Puppet Card
In addition to the blog, you can take your creative skills to a professional level by designing a DIY movable bunny card. This craft allows you to easily move the puppet from one place to another, which will encourage your baby to participate in the physical activity.
![]()
9. 3D Bunny Card
Make a 3D bunny card with the Cricut machine to give your invitation...
Read more -
How to Connect Cricut to Bluetooth on Computer and Phone?
03/27/2024 at 10:19 • 0 commentsHey daydreamers! Are you here to learn how to connect Cricut to Bluetooth? If so, you are in the right place. In today’s tutorial, I will share the connection process, which is very important for new beginners who just want to start with Cricut stuff. Whether you use your computer or mobile device, you can easily connect your Cricut to Bluetooth.
I understand that for beginners, it might be exhausting or complicated, but with the right guidance, you will be able to perform the setup in no time. To learn more about this connection, you have to delve into this blog. Make sure you follow the instructions for your device. Let’s get started!
How to Connect Cricut to Bluetooth on Windows/Mac?
When I bought my Windows computer, I used it for my Cricut. It works really great, but gradually, I moved to Mac later. Whatever, I have connected my Cricut to both devices. Want to know how to do this? If yes, follow the steps below:
Windows
Here are the steps to connect your Cricut to Bluetooth on a Windows computer:
- Plug your Cricut machine to power it on and place it at a place of 10 - 15 feet from the computer.
- Also, you will need to move to the Start menu and then navigate to Settings.
![]()
- Thereon, you will need to choose Devices.
![]()
- Here, confirm that you have turned on the Bluetooth.
- Once you have turned on the Bluetooth, click on the Add Bluetooth or other device tab.
![]()
- Now, you will want to select Bluetooth and hold for a moment for your Cricut to be visible on the list.
- Once it is visible, tap on the Cricut model name and proceed.
![]()
- Finally, you have done the pairing of your Cricut.
Since you have connected your Cricut to a Windows computer using Bluetooth, let’s move on to learning how to connect Cricut to Bluetooth on a Mac computer.
Mac
Here are the steps to connect your Cricut to Bluetooth on a Mac computer:
- Here, you need to power on your Cricut first and then start your Mac.
- After that, you should place your Mac in such a way that there is 15 feet of distance between your Cricut and Mac.
- Then, you will have to move to the Apple icon and then open the System Preferences option.
![]()
- Next, look for the Bluetooth option given on your Mac.
![]()
- Now, check to confirm whether you have turned on the Bluetooth.
- Lastly, select your Cricut machine from the given list.
In the next section, I will help you connect your Cricut to mobile devices. Android users and iOS users can move to the suitable section accordingly.
How to Connect Cricut to Bluetooth on Android/iOS?
Connecting Cricut to a mobile phone is a breeze. With easy-to-follow instructions, you will get your desirable phone connected to your Cricut in no time. Start following the steps mentioned below:
Android
Here are the steps to connect your Cricut to Bluetooth on Android:
- Power on your Cricut cutting machine and ensure it is 10 to 15 feet away from your mobile device.
- After that, you will need to move to your phone Settings.
- Now, go to the Bluetooth option.
- If Bluetooth is turned off, then enable it.
- Once done, you should choose the name of the Bluetooth module that is visible on the list.
![]()
- If it asks you to enter the four digits of your PIN, then enter 0000.
![]()
iOS (iPhone & iPad)
Here are the steps to connect your Cricut to Bluetooth on iOS smartphones:
- Make sure you have placed your Cricut at an adequate distance. Also, you have to head to the phone Settings.
![]()
- Now, you need to turn on the Bluetooth and see your Cricut machine.
- When you see your machine on the list, you need to select the machine model to pair.
- Here, you might be asked to enter the four-digit PIN; if so, enter 0000.
- Lastly, you will need to tap the Pair button.
![]()
Now, you have learned how to connect Cricut to Bluetooth on a computer and mobile device, and you can thrive in your crafting journey.
FAQs
Question 1: How to fix Cricut won’t connect to Bluetooth?
Answer: Below are some steps...
Read more -
How to Make Cricut Wine Glass: Full Tutorial
03/22/2024 at 12:51 • 0 commentsLast month, my son proposed to her childhood girlfriend, and she said yes! Since then, they have planned to make everything perfect for their special day. Being a mother and a businesswoman, he entrusted me with the duty of creating a custom-made Cricut wine glass, especially for them. It's crystal clear that it is very difficult to create any design on glass as it is a sensitive material.
With a Cricut cutting machine, I won't have to worry because supplies help me balance everything. The possibilities for making projects with the Cricut machine are endless. If you intend to make wine glasses with Cricut, there are a few supplies needed to help users complete their art quickly. In this blog, I will introduce you to the steps that will help you create the glass of your choice.
Stage 1: Create a Design on the Cricut App
If you intend to make a Cricut wine glass, open the Cricut designing software (Design Space) and tick the New Project option. After that, press the Upload tool, select your design from your system folder or given under the Recent Uploads,and then press the Insert Image button.
![]()
Now, fill in the space between the letters by selecting the Weld option mentioned under the Layers panel. Next, select the whole text, increase its size per your preference, and change its color from the material color dropbox.
After deciding on the text color, tick the Make It box and check that the design is correctly aligned. If not, return to the canvas, make the required changes, and hit the Make It button again.
![]()
Stage 2: Turn on Your Cricut Machine & Cut the Material
In order to choose the Cricut wine glass material, press Browse All Materials and select your material from the list before you. After finalizing the material, click the Done option and change the blade pressure to Default. Following this, load the Fine-Point Blade into Clamp B properly.
![]()
Then, cut a portion of your Cricut material and place it on the BlueGrip cutting mat. Next, load your mat and press the machine's flashing power button. At this point, you are supposed to wait till the Cricut machine is cutting the material. After the process ends, remove the material from the BlueGrip mat.
![]()
Stage 3: Remove Your Design & Apply Vinyl
Following this, take your Cricut weeding tool and remove the extra vinyl covering your main design. Now, use alcohol-free baby wipes or a lint roller to clear your glass blank. After that, cover your design with a Cricut transfer tape and use a scraper tool to connect the design and the tape properly.
![]()
Stage 4: Reveal Your Cricut Wine Glass
After a few minutes, start peeling off the transfer tape and then trim the extra tape with the Cricut scissor. Following this, place the design with your fingers or scraper tool to avoid any space or wrinkles between the design. Finally, start peeling off the transfer tape and repeat the same steps to stick the design on the second glass.
![]()
Congratulations on successfully completing your first-ever glass project made with a Cricut machine. I wish you all the best in the future and hope you shine like a star in the crafting world.
Final Words
This blog helped you understand the complete process of making customized Cricut wine glass using a craft plotter and its supplies. However, it's compulsory for all users to ensure that they are taking the correct steps while making any glass-related craft out of a cut-die machine. Keep going by making new projects, as they will boost your creativity skills.
Frequently Asked Questions
Question: Can I Put Customized Cricut Wine Glasses in Dishwasher?
Answer: If a customized Cricut wine glass is made with permanent adhesive vinyl, you can surely place it inside the dishwasher. To increase their lifespan, you are advised to wash the glass with your hands using warm water and light soap. This will balance the quality and shininess of the glass.
Question: Where Will I Get Unique Designs for My Wine Glasses?
Answer: The Design...
Read more -
How to Pair Cricut Maker 3: A Beginner's Guide
03/20/2024 at 13:13 • 0 commentsViola, all my lovely audiences, I know you must have many questions about where I have been for the past few days. Don’t get anxious; I will answer all your questions. As part of my family, I want to share some good news: I finally bought a Cricut Maker 3 machine. Since then, I have included this Cricut model in my craft room, and I have examined different research papers explaining how to pair Cricut Maker 3 with a smartphone.
This Cricut model is the company’s most powerful cutting machine. To make it work, all DIYers need to do is set it up and pair it with a mobile device. In addition to the pairing process, they must get the Design Space app from Google Play or the App Store. Pay special attention to this guide, as it will share all the info about the easy pairing process.
What Supplies Come With Cricut Maker 3?
Before laying the first stone of pairing Maker 3 with smartphones, all DIYers must buy certain supplies. It will help them form the project as per their choice without facing any issues and within a few minutes. Take a look at the names of the primary crafting items below:
- Cricut Maker 3 cutting machine
- Design Space account
- Cricut cutting mat
- Premium Fine-Point Blade + Housing
- Welcome card & USB cord
- Power adapter
- Cricut Access free subscription
- Materials for a practice test cut
How to Setup Cricut Maker 3 on a Smartphone?
Equally important, if you want to access this Cricut cutting machine with smartphones for crafting purposes, you must set it up. If you are newer and don’t know how to pair Cricut Maker 3 with Android or iOS devices, this section will benefit you. Follow the below tips to finish the setup process:
- You are supposed to start the process by unboxing and placing the machine on an equal-level surface.
- After that, connect the machine power cable to the compatible wall socket and turn on the Cricut product.
- Now, connect the cut-die machine to smartphones via a USB cord or wirelessly via (Bluetooth).
![]()
- Further, open the Play Store or App Store and install Cricut Design Space on your respective devices.
![]()
- Following this, go to the New Machine Setup page and tick on the Cricut Maker 3 option.
![]()
- Now, go through the instructions on your device screen to finish the setup process.
- Conclude the process by doing a material test cut on your cutting machine and check whether it works correctly.
How to Pair Cricut Maker 3 to an Android Device?
Further adding to this blog, all DIYers must know that this Cricut product has built-in Bluetooth technology. It connects with nearby smartphones wirelessly and shares designs during the cutting process. Have a look at the below-said steps to familiarize yourself with how to pair a Cricut Maker 3 with Android devices:
- Take a fresh step by verifying that your cut-die machine is enabled and ranges under 10-15 ft of your mobile phone.
- Moving forward, scroll down your home screen and press the gear icon present at the top right side of the screen.
- Now, hit the Bluetooth icon and turn on your device Bluetooth.
![]()
- If the Bluetooth is off, move the toggle to the right side and leave it for a few seconds.
- After a few minutes, you will see a column with the Available Devices name on your device screen.
- Now, press Cricut Maker 3, enter the PIN code (0000) inside the blank, and click OK.
![]()
- As a result, your Cricut machine wireless pairing with an Android device will finally be complete.
What’s more important about this Cricut model is its compatibility with all iOS devices. The entire method of pairing up this smart cutting machine with an iPhone can be read below.
How to Pair Cricut Maker 3 to an iOS Device?
While examining this part of the blog, you will be collecting vital steps following which you can effortlessly finish the method of pairing up Cricut Maker with iPhones:
- First, you need to ensure that your Cricut cutting machine is on and within a 10-15 ft range of the device.
- Following this,...
-
Cricut Setup for Mac: A Step-by-Step Tutorial
03/19/2024 at 13:23 • 0 commentsThe last time I visited my friend’s house, he was confused about the Cricut setup for Mac. So, I helped him with the entire Cricut setup. The process took a little longer as he wanted to learn so he could setup his next Cricut machine (that he will buy in the future) himself. While teaching him, I thought of writing this blog for people who are beginners and haven’t setup Cricut yet.
![]()
So, what are we going to get in this blog? Well, I want you to ensure that you have the system requirements for Mac. This is the first thing to ensure. Otherwise, incompatible Mac computers may interrupt the setup. Then, we will connect the Cricut to a Mac via Bluetooth and finally complete the Cricut setup. Don’t worry! The setup is a piece of cake, and you will be able to do it yourself in one go! Let’s get straight into it!
Minimum System Requirements for Cricut Setup on Mac
Now, you need to know the basic needs for the Cricut setup. It is essential to know the basic needs because we will download and install Design Space. If your Mac does not meet the basic needs, it will fail to run properly. Hence, you have to ensure that your Mac is compatible with Cricut.
Below, I have mentioned some basic system requirements. You can go through them and check accordingly:
- Operating System - macOS 11 or later
- CPU - 1.83 GHz
- A USB port or Bluetooth Connection is required
- Disk - 2 GB
- RAM - Minimum 4 GB
- Display - Minimum 1024px x 768px screen resolution
If your Mac meets the above requirements, the Cricut setup will be easier for you! Now, let’s move to the next step, which is to connect Cricut to Mac via Bluetooth.
Establish a Connection Between a Cricut Machine and Your Mac
So, are you ready to complete the Cricut setup for Mac? But wait, there is something left! It is nothing but connecting Cricut to Mac via Bluetooth. Yes, first, we will understand the proper way to connect your Cricut wirelessly. After that, we will see how to setup Cricut.
Below, I have provided the steps to connect Cricut to a Mac computer via Bluetooth:
- First, you have to turn on Cricut and then power on your Mac computer.
- After that, turn on the Bluetooth on your Mac. To do this, you have to go to the Apple menu.
- Then, you need to select the option System Preferences.
![]()
- Afterward, look for the Bluetooth option and then turn it on.
- Next, select the Pair and enter the PIN code, i.e., 0000.
- In the last step, choose the Cricut machine and hit the Pair button.
Now that our Cricut is connected to a Mac via Bluetooth let’s focus on how to setup Cricut.
Cricut Setup for Mac: 5 Quick and Easy Steps
So, are you ready to setup your Cricut? Here, we are to setup our Cricut machines on Mac. I assume you have checked all the system requirements before following the steps below.
The simple steps that I have provided below are recommended for Cricut users to follow carefully:
- Confirm whether you have properly connected to Bluetooth (see the above section to connect).
- Then, you have to visit Cricut’s website - design.cricut.com/setup in your browser.
- When you are on the site, you will be moved to download the Cricut Design app on your Mac computer.
- Now, you should follow the steps presented on your screen to sign in or create your Cricut account.
- By following the screen prompts, you will be able to completethe Cricut setup for Mac.
Now, you will see that your machine is setup, and you can proceed to use it without much struggle.
FAQs
Question 1: Can I use my Mac computer for Cricut setup?
Answer: Certainly, yes! Cricut setup is hassle-free on Windows, Mac, Android, and iOS devices. Even a Mac can be the best computer you can ever use. The process of setting up the Cricut is quite similar on both Windows and Mac computers. But before proceeding to setup, you must ensure the minimum system requirements of your Mac so that you can install or run the Cricut app easily. However, the Design Space app is essential during setup....
Read more -
Cricut Mug Press Setup: A Beginner’s Guide to Get Started!
03/13/2024 at 13:46 • 0 commentsAre you looking for the steps for the Cricut Mug Press setup? I got you. Through this blog, I will share the easiest way to setup this Mug Press machine. Are you ready to learn it with me? Before we get to the final part, let’s discuss a little bit about a Cricut Mug Press. This machine is excellent for creating custom mugs for your DIY routine. You may be making it for your personal use or to sell it for some profit. But, whatever the reason, you’ll definitely be satisfied with this step-by-step guide to setting up a Cricut Mug Press. So now, let’s get started!
Cricut Mug Press Setup: Unbox, Connection, & Update
If you want to setup your Mug Press, you’ll have to go through a few steps to do it correctly. You’ll have to start with unboxing your press and checking all the necessary items inside its box. So, let’s learn it step by step.
Step 1: Unboxing the Cricut Machine
![]()
The first step is obviously to unbox your machine and check all its important accessories. After checking everything inside the box, you’re good to go. See what you’ll get.
- Power cord
- A warranty manual
- Setup instructions manual
- USB cable
![]()
When you’re satisfied with the unboxing part, here you go with the final step. Let’s check them. However, if you find something missing in the box, immediately contact the vendor from whom you purchased it.
Step 2: Connect Your Cricut Machine to a Device
In this step, you need to connect your Mug Press to your device, whether a PC or a smartphone. Let’s see the steps below.
- Once you unbox your machine and check everything inside it, you are good to go.
- In the next step, you need a compatible device like a PC or mobile phone.
![]()
- Now, connect your Mug Press to the power source and turn it on.
- After that, you can connect your machine via a USB cable and turn it on.
- Then, you can visit Cricut’s official website, cricut.com/setup.
- Next, hit the Download button to install the Cricut Mug Press app (Design Space).
- In the following step, click on the Setup or Activate button to begin setup.
- Also, you need to click on the Heat Press.
- Moreover, select your machine.
- Afterward, go with the on-screen prompts to continue.
- When the setup is complete.
This is the easiest way todo Cricut Mug Press setup on your device. Well, if you are setting up your Mug Press for the first time, you’ll need to update its firmware as well. Let’s check it too.
Step 3: Update the Firmware for Cricut Mug Press
So, are you a first time user for Mug Press? If yes, you will have to update the firmware too. Check out the steps below to learn them.
- First of all, you need to connect your Mug Press to the power supply.
- Hit the power button for 5 seconds until you see the orange light flashing.
- After that, you should connect your Mug Press and PC via USB.
- Then, open the Design Space software on your PC.
- Now, you should Sign In to your Cricut account with the right credentials.
- Next, tap on the Design Space Menu and move to the New machine setup.
- Also, go to the Heat Press option and select your machine.
- Afterward, go with all the on-screen prompts.
- Your software will identify your machine in a few minutes.
- The update will start on the following window.
- You can remove the USB cable from the Mug Press and start using your machine.
That’s all for the Mug Press firmware update. Now, the process is complete for your Cricut Mug Press setup. Finally, you’re ready to start using your machine.
How to Set Temperature on Cricut Mug Press?
Once you have setup your Mug Press successfully, you can adjust temperature settings to use it in your projects. While creating a Mug project, it is an important step. Look at the steps below.
- In the first step, head to the Temperature Settings mode and ensure that the machine is ON.
- Then, press the power button for at least ten seconds.
- Now, you will observe the LED light flashing.
- After that, you’ll see the power button flashing in orange. ...
-
7 Must-Have Cricut Joy Bundles to Step Up Your Crafting Game
03/12/2024 at 17:37 • 0 commentsEvery DIYer will agree that Cricut Joy bundles help them personalize and customize projects daily. Launched in 2020, the Cricut Joy is the smallest cutting machine that can cut 50+ materials with its sharp blades. Apart from that, it also offers a variety of pens, tools, materials, and other essential supplies that help in creating gift tags, greeting cards, stickers, decals, and so much more.
In addition, this Cricut machine also provides different bundles, which can be considered a great start for newbies. However, it is necessary to keep certain items in the bag to get the best results from the Cricut machine. Plus, the Cricut Joy bundle is budget-friendly, time-saving, easy to use, and easy to learn.
Before starting the crafting process, you must understand its role and how many are categorized for users. With the help of this post, you will learn some of the common bundles that will help you in giving proper shape to your project without any mistakes.
1. Cricut Joy + Essentials Bundle
Don't turn down the opportunity when you get to transform your best ideas into action. Inside the Cricut Joy bundles, this collection has fun materials to help you make the craft more eye-catching and jaw-dropping. While unboxing this bundle, you see Smart Vinyl, Smart Iron-On, Insert cards, and much more. Every item you are getting in this set will help you finish the craft quickly.
![]()
2. Cricut Joy + Label Making Bundle
Equally important, come out of your bubble and get ready to redesign your office or home with this Cricut Joy bundle. This Cricut set allows you to make customized labels of different sizes, shapes, and colors. You will make excellent and trendy labels with the supplies available inside this set. Simultaneously, the Label Making bundle is packed with Smart Label, fine point pen, Smart Label written paper, and others.
![]()
3. Cricut Brayer Tool
Apply your material on the Cricut cutting mat with the brayer tool. By using the brayer tool, you can evenly stick the material all over the material without any wrinkles, bubbles, or kinks with ease. Through this crafting tool, you can smoothly stick the material on the mat, and it is ideal for sticking fabric, vinyl, or iron-on.
![]()
4. Cricut Joy + Smart Iron-On Bundle
In addition to the Cricut Joy bundles, you can also have a Smart Iron-On bundle packed with materials that work without a cutting mat. Also, this Cricut material lasts up to 50+ washes and is compatible with light to heavy materials. Furthermore, the chances of making customized projects from this crafting bundle are endless. Plus, this bundle is best for making different kinds of crafts.
![]()
5. Cricut Joy Tote Bag
Keep your small, portable, and lightweight Cricut cutting machine organized and safe by storing it inside this tote bag. Made with a padded interior and custom pockets, this Cricut supply brings happiness to every crafter's life. Also, its shoulder strap makes it comfortable for the user to carry this craft plotter with them anywhere with them. Just like other Cricut Joy bundles, this crafting accessory plays a vital role in making any project.
![]()
6. Cricut Joy + Smart Vinyl Bundle
Subsequently, the DIYer can make all their DIY dreams come true with this mesmerizing and gorgeous bundle. With the small portable cutting machine and Smart Vinyl bundle, the user can make various water-resistant and fade-resistant designs. Users can stick the designs on water bottles, glasses, and mugs and show their hidden crafting skills. Inside one of these Cricut Joy bundles, you will find Smart Vinyl & transfer tape to help you make the project quickly.
![]()
7. Cricut Joy + Insert Card Bundle
Lastly, add a personal touch to any occasion by making customized cards with this bundle. This crafting tool allows you to make cards of different sizes, shapes & materials. Inside this bundle, you will get a card mat, Insert card, fine point pen, extra fine point pen,...
Read more -
Cricut Joy Setup: Kickstart Your Crafting Adventure
03/09/2024 at 12:04 • 0 commentsEvery user dreams of turning their DIY ideas into reality. All they need to do is complete the Cricut Joy setup on their respective computers and smartphones to make their dreams come true. This smart, compact, and portable cutting machine can effortlessly cut 50+ materials with precision. It comes with built-in Bluetooth technology to connect both devices wirelessly. Users can control this Cricut machine digitally by downloading the Cricut Joy app from the Play Store or App Store.
Besides that, this Cricut cutting machine can repeatedly cut up to 20 feet of Smart Materials and works with the Cricut Design Space app. Users need certain supplies and bundles to create custom-made projects. Keep exploring this blog to get overall details on the machine setup procedure.
Cricut Joy Setup on Your Computer (Windows/Mac)
Before starting any custom-made project using this Cricut model, all users must finish the Cricut machine setup on the computer (Windows/ Mac). Without a doubt, the method of setting up both these machines is simple and takes place within a few minutes. However, the DIYer needs to be very cautious during the setup process. To ease your work, pay special attention to the details below:
Windows
- Begin the process by switching on your Cricut machine using Cricut Joy and placing it within 10-15 feet of your computer.
- Following this, right-click on your mouse and tick the Device Manager option.
- After that, select Bluetooth to allow your computer to communicate with other devices.
- Next, close the Device Manager folder and tap the Settings icon.
- Now, press the Bluetooth & other devices and tick the Add Bluetooth or other device.
![]()
- Following this, click Bluetooth and hold on till your computer detects your cutting machine.
- After a few minutes, choose your Cricut model name from the list under the Add a device section.
![]()
- Finally, you will learn about the Cricut Joy setup completion process when you get the pop-up message.
Mac
- First, cross-check that both of your devices are on and within 10-15 feet of each other.
- Second, click the Apple menu and tick the System Preferences option.
![]()
- Third, choose the Bluetooth feature and press the Turn Bluetooth On (if your device's Bluetooth is off).
- After doing that, you will see Cricut Joy inside the Devices section. Hit the Connect or Pair option.
![]()
- During the entire process, your computer and iOS device will be set up together.
Cricut Joy Setup on a Smartphone (Android/iOS)
After finishing the Cricut setup with computers, you can wirelessly set it up with Android & iOS devices. You can refer to the below steps, and all your confusion about setting up smartphones with this Cricut product will come to an end:
Android
- Initiate the process by checking that your cutting machine is on and placed within 10-15 ft.
- After that, switch on your Android device and open the Settings tab on your home screen.
- Now, go to the Bluetooth page and move its toggle to the right side to enable it.
![]()
- Next, look for Cricut Joy under the Other Devices row and then tick it.
![]()
- After selecting it, you need to wait a few seconds for both devices to set up
- Lastly, you will get a pop-up message when the Cricut Joy setup is done successfully.
![]()
iOS
As the earlier part of the blog said, this Cricut model is also compatible with iOS devices. If you've recently bought any device but don't have any clue about how to set them up, then have a look at the below-mentioned steps:
- First, turn on your cut-die machine and check that your mobile device is within a 10-15 ft range.
- After checking that, open your mobile device, go to Settings, and press the Bluetooth feature.
- Next, activate your iPhone Bluetooth and choose Cricut Joy, available in the Other Devices section.
![]()
- Following this, you are supposed to hold on until the setup process between the devices continues.
- Finally, you will get a message about your Cricut Joy setup when...
-
How to Make Cake Topper With Cricut: A Stepwise Guide
03/07/2024 at 11:02 • 0 comments![]()
I understand you are pressed for time with an upcoming event at your house and need to know how to make cake topper with Cricut. No worries! You don't have to search elsewhere. I've compiled all the tips, tricks, and instructions you need in one blog.
Making a cake topper with the Cricut is not a mystery. Even if you are new to cake decorating, it's quick and easy. In my crafting room, you'll find many DIY projects. I recently used my Cricut machine to create a custom party cake topper for my son's birthday, and it turned out perfectly.
To help you, I will provide step-by-step guidance on creating a simple yet attractive cake topper. Once you've made it, you can try various designs using your Cricut machine. Follow the guide till the end and enjoy the procedure.
Step 1: Tools and Materials Required
I know you're excited to learn how to make cake topper with Cricut, but before diving in, let's see the materials you need.
- Cricut cutting machine
- Fine Point Blade
- Cricut cutting mat
- Computer with Cricut Design installed
- Hot glue gun
- Masking transfer tape
- A4 glitter cardstock
- Cake pop stick
After gathering all your tools and supplies, it's time to start crafting. Let's get started!
Step 2: Prepare a Design in the Cricut App
Open your computer and follow the instructions in the section below, but make changes to the text and whatever you see fit.
- Open Cricut Design Space on your computer and start a new project. Select the Text option and type in your desired text using the keyboard.
- Next, go to the "Fonts"section in the top edit bar and select "Filter," then choose "Writing"to display all available writing fonts.
- For this project dedicated to my friend Maria, who will be turning 40 soon, feel free to customize the text as you want.
- Resize the text to fit your cake by adjusting the size using the options in the top toolbar.
- To add color and manipulate the cake topper design in the Cricut app, ungroup the design.
- Simply select the text object, right-click, and choose "Ungroup."
Step 3: Editing the Text
How to make cake topper with Cricut requires editing cake toppers in Cricut Design Space.
- First, select the letters for "Happy" and click on "Group" to group them together. Repeat this process for the rest of the design: "Birthday" and "40th".
- To ensure that the design is cut in one go, rearrange the text or design accordingly. This will give you an idea of how your cake topper will appear.
- Once you have selected the entire design and clicked on "Weld," proceed to click on the "Combine" button located in the right corner.
Step 4: Adjust the Text and Add Colors
To make the cake topper more stable and noticeable, I am going to add layers. You can choose the layers as per your preference.
- First, click on the "Offset" to create layers for the design.
- Then, use the left toolbar to add colors to your layers, enhancing their attractiveness.
- Then, remove any unnecessary gaps by using the "Contour" button.
- Once your design is ready, click on the "Make It" button to proceed to the next step.
Step 5: Cut and Assemble Your Cake Topper
Once the design is prepared, let's learn how to make cake topper with Cricut. I will cut and weed the design, then assemble it.
- On the preparation screen, select "Load Type" as "On Mat" and click "Continue". After that, choose the base material as glitter cardstock.
- Next, return to load the cardstock onto the mat and insert the mat into the Cricut machine.
- Press the blinking "C" button to start cutting, and remove the mat once the machine stops cutting.
- If necessary, cut and weed out the negative parts of the design. Then, use a hot glue gun to stick all the layers together.
- Finally, attach the stick to the back of the cake topper using masking tape for the finished result.
Final Thoughts
Cake toppers are a great way to decorate your cake in your unique style. They are both beautiful and versatile, and making...
Read more

cricut help's pages
Cricut Inc. has introduced a new machine, Venture. It is the fastest and the largest Cricut machine with many tools and accessories.