Close
0%
0%

analog.io - A full stack IoT platform

A full stack project dedicated to easily collecting, analyzing and sharing IoT sensor data.

Similar projects worth following
analog.io is a full stack IoT web service and hardware platforms where people can create connected devices and share them with the world. It is designed to solve all kinds of world problems from air pollution, improving farm output or studying the bee population. It is really only limited by the users imagination.

From a software perspective, analog.io is a graphing front end that is backend agnostic. What this means is that users have the freedom to host their own data locally, within the analog.io cloud, or choice of 3rd party services such as data.sparkfun.com. At the moment only phant.io servers are supported but it is entirely possible and on the roadmap to support services such as thingspeak as well.

Semi Finals Video:


Quarter Finals Video:

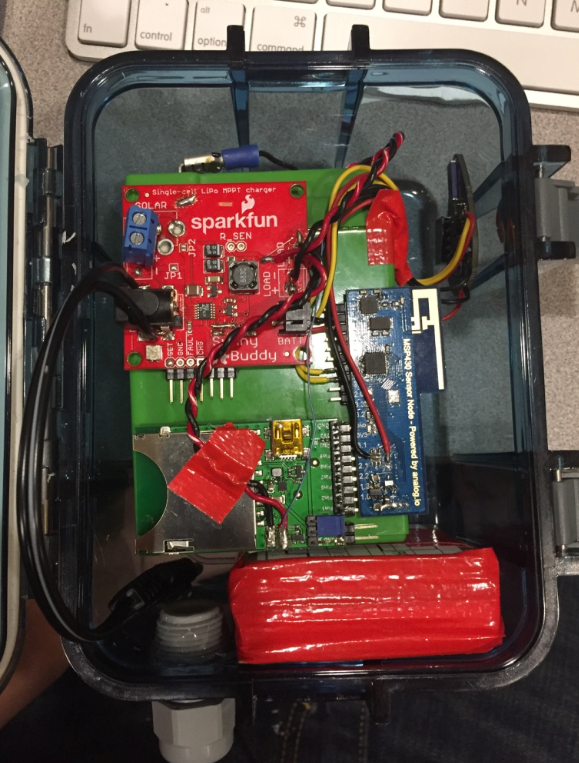
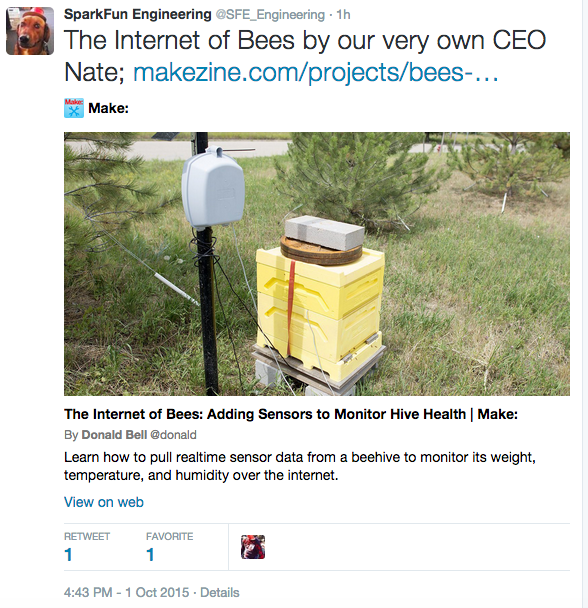
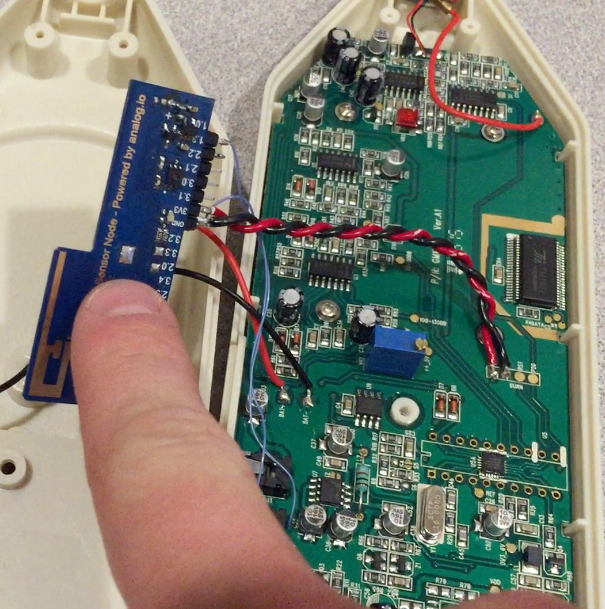
Many challenges today stem from the inability to cheaply and efficiently collect data, analyze it and share with others. My project, analog.io is a full stack development that aims to solve this issue. It has a very broad use case that could be used to monitor & reduce pollution, more efficiently heat or cool buildings, monitor water consumption, grow better food or learn more about our honey bees.

Nature is a very intertwined network of all kinds of data and my goal with analog.io is to create a community where everyone can come together for this common good.

Web Software Architecture:

analog.io is build on the Digital Ocean VPS cloud. These are basically linux servers running Ubuntu LTS 14.4. On Ubuntu I have install Ruby on Rails, Nginx and Postgres and deploy my application using Capistrano.

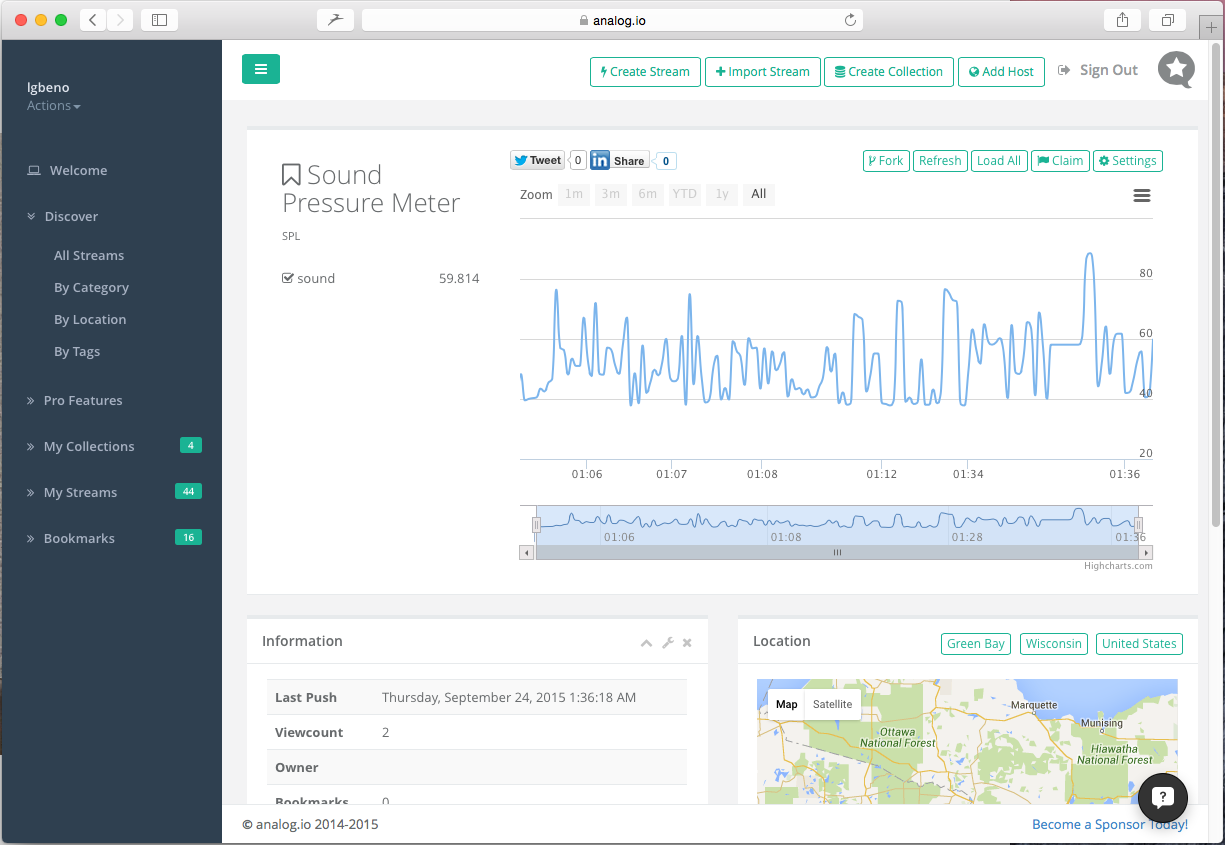
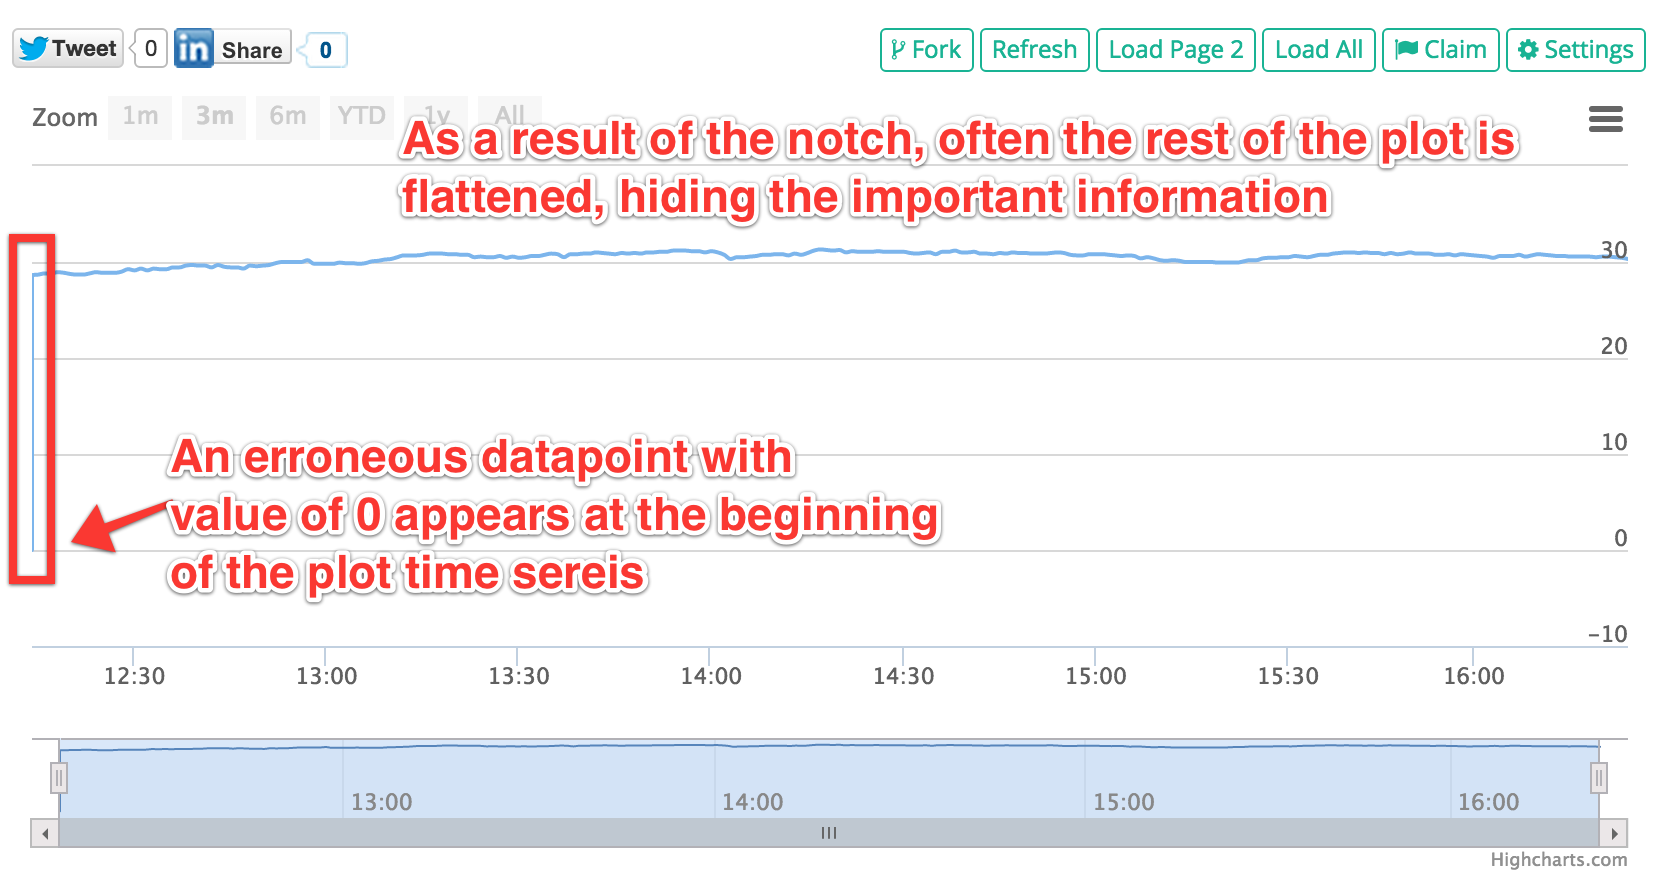
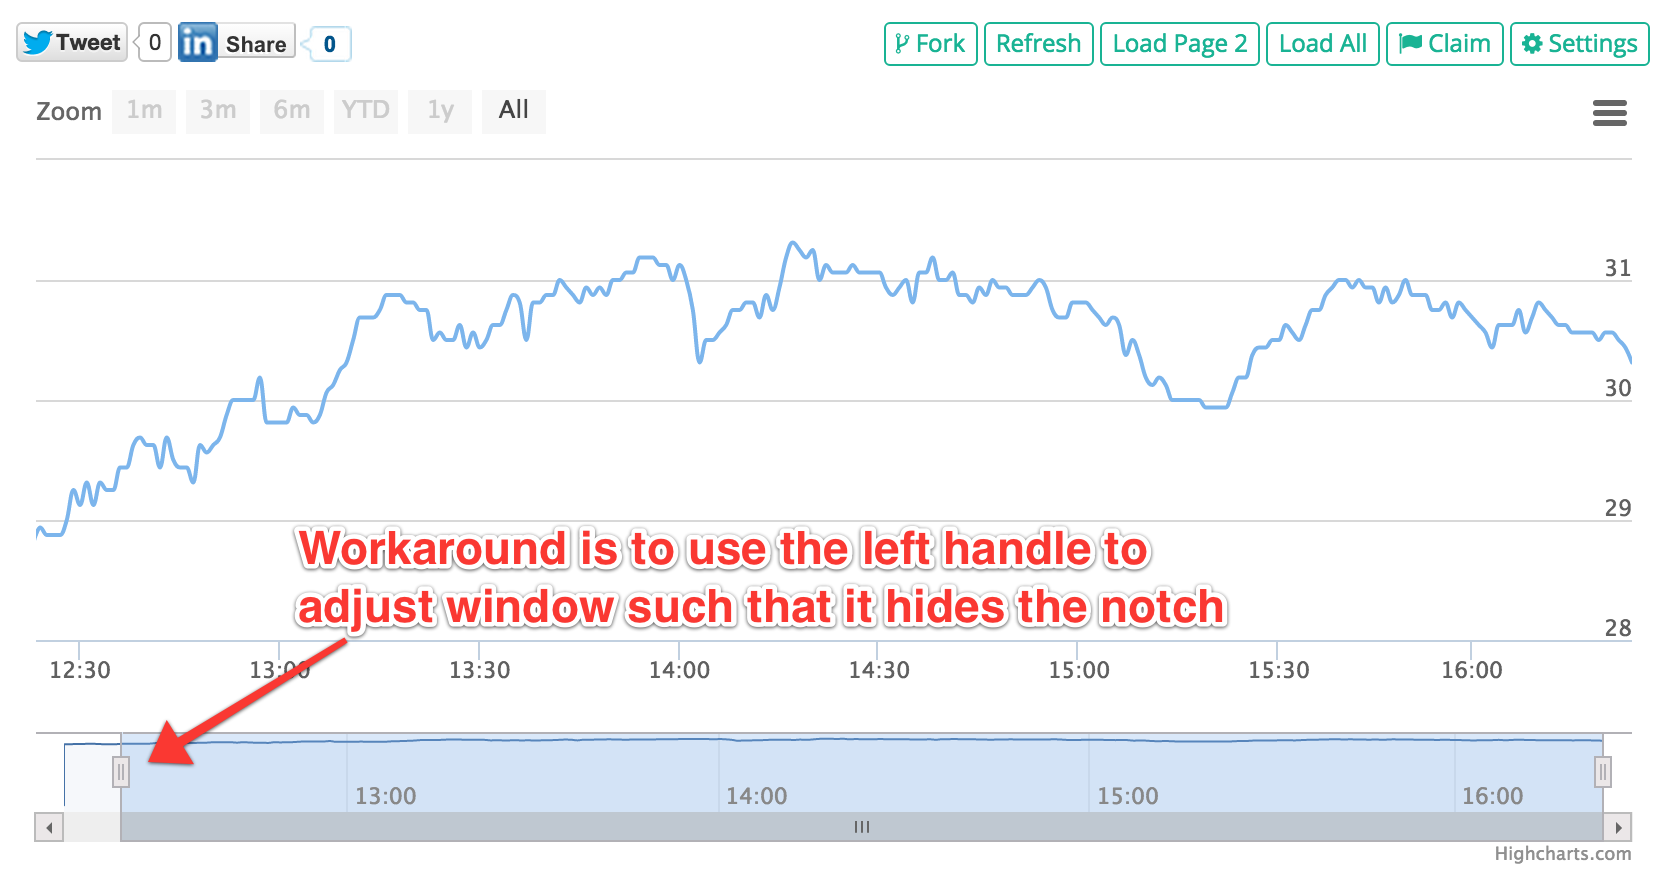
The application is developed in AngularJS and uses a Bootstrap Theme called Inspinia which I purchased from wrapbootstrap. For charts, the Highstocks library is used.

In addition to the web app, analog.io relies on separate "data backend" servers that store the actual IoT data. These backend servers run an open source library called phant.io. Phant was created by Sparkfun and is the infrastructure that data.sparkfun.com runs on. I have since forked phant.io and have been doing some modifications and improvements to it which I would ultimately like to merge back.

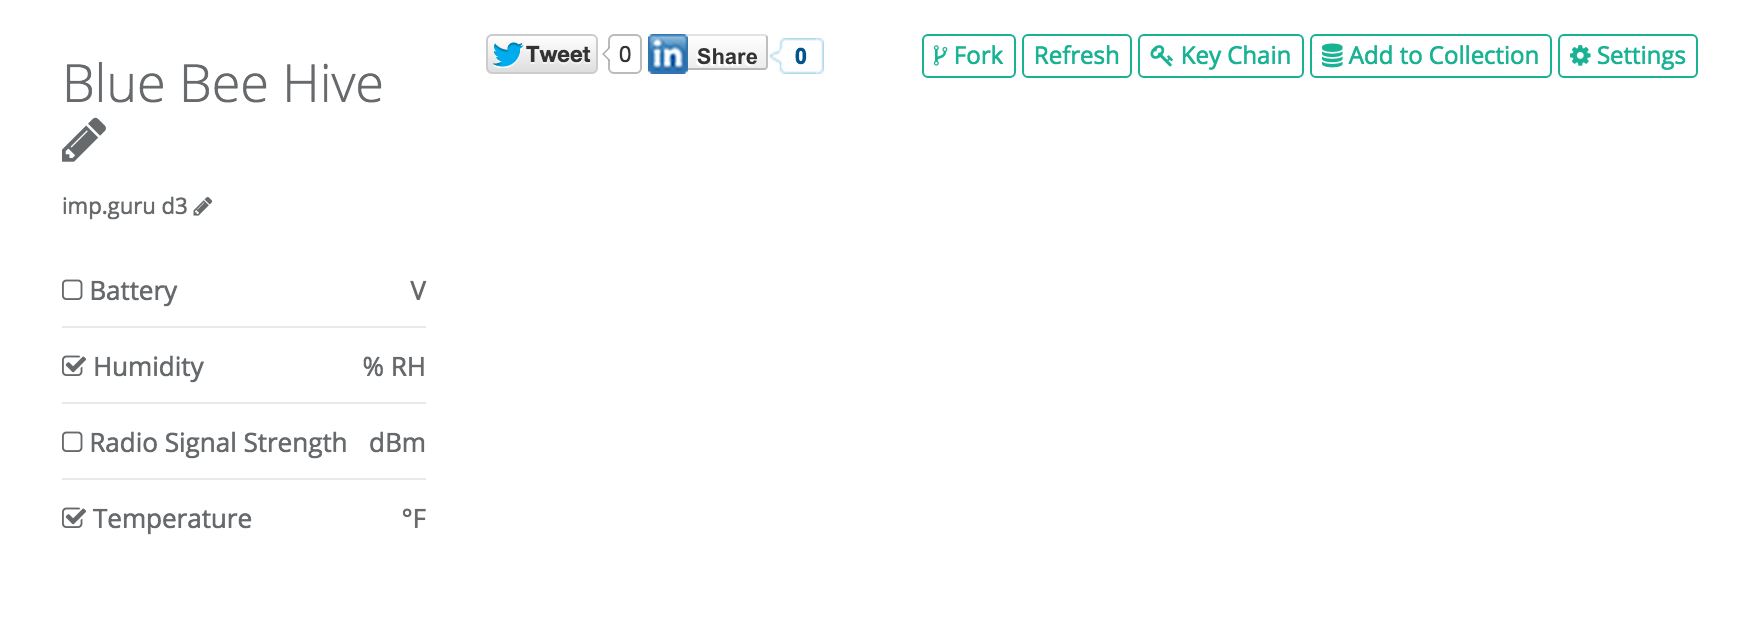
Phant.io is developed in nodejs and also runs in the Ubuntu environment. analog.io's AngularJS application makes API calls to the appropriate backend server to retrieve data. This means that analog.io can connect to any instance of phant, not just analog.io. I have experimented with building my own servers and also have 2 customers who I maintain private instances of phant for.

  • 1 × MSP430G2553IRHB Microprocessors, Microcontrollers, DSPs / ARM, RISC-Based Microcontrollers
  • 1 × RF75 HopeRF 2.4GHz Radio Transceiver
  • 1 × NCP1400ASN33T1G Power Management ICs / Switching Regulators and Controllers
  • 1 × NX5032GA-16.000000MHZ-LN-CD-1 16MHz XTAL
  • 2 × C1608C0G1H080D080AA Capacitors / Ceramic 8pF

View all 15 components

  • 2.4GHz to 915MHz Bridge

    Luke Beno10/09/2015 at 06:46 0 comments

    So I've talked a lot about both my 915 MHz Droplet radios as well as the new 2.4GHz MSP430 Sensor node. What I have been thinking about lately is creating a cluster of 2.4GHz nodes, use them to transmit from inside of the bee hive and then have a 915MHz radio that will transmit the packets over the long haul to my WiFi Bridge.

    This hybrid approach gives me the ability to have cheap nodes but still get the superior range of the 915MHz radio.

    Here are a few pictures. Normally I like to do a cleaner build with a single custom board. I've been meaning to spin this for a long time but for a variety of reasons, I never got around to it. Instead, since winter is moving in fast, I've decided to cobble something up out of random parts that I had laying around.

    The Hub is a 6V SLA battery which can be bought for very cheap, then there is a Sparkfun Sunny Buddy board that will act as a Solar battery charger. Then I'm using the Buck regulator from a Electric Imp April break out board, One of my MSP430 Sensor Nodes and a Droplet. The theory of operation is that the 2.4GHz radio is constantly listening, then if a packet is received, it sends it via UART to the Droplet which then in turn transmits the packet over the 915MHz radio link.

    The case is then a really nice polycarbonate box which I purchased from Menards for $6. Really the best deal on this box when compared to what can be bought on Digikey.

  • Didn't Make it to the Finals

    Luke Beno10/06/2015 at 20:27 4 comments

    Well, its about time to break the silence.

    If you didn't already know, analog.io didn't advance to the next round for the 2015 Hackaday Prize. I have to say that I'm bummed about it. I also 100% respect the decision of the judges. There are many things that I admit could have been better documented on the site and a more cohesive message for the judges about how the project relates to the evaluation criteria.

    Working as a professional, traveling often for work, having a wonderful wife and 2 awesome children with another on the way is a full plate. I especially give kudos to the Hackers and Makers here on hackday.io who have progressed their projects while also keeping everything afloat in their personal lives. It's stress full but also rewarding, totally under appreciated by the community where it seems like college students and younger professionals can run circles around everyone based off of the shear energy and time that they have at their disposal!

    Furthermore, I have an enormous amount of respect for those working in the less urban areas of the world where online is the only place to interact with people who share the same interests.

    Then there is the truly inspirational efforts of Patrick Joyce with his Eyedriveomatic.

    Bottomline is that there are a lot of great entrants that made it to the next level. I'm going to keep working on analog.io and think that there is still something very important about the project. I'm also willing to help any of the finalists with advice as I've done here.

    analog.io is a platform that can connect so many devices. I hope that I can work with one of the finalists to integrate their idea into the platform and showcase it in the process. Please contact me if that is the case.

    Finally, the last comment that I will say relates to Skulls. I've been really fortunate to get so many of them from many people. I would encourage everyone to be generous with skulls, there is nothing more encouraging than waking up and seeing in your feed that someone gave a skull. I will especially direct your attention to #Vinduino, a wine grower's water saving project it is a totally under skulled project so skull it up!

  • MAKE Magazine!

    Luke Beno10/02/2015 at 01:06 0 comments

    Nathan and I have talked a few times about our Beekeeping rigs. He's a super nice guy and a pretty big fan of analog.io This evening I was checking Twitter only to find a very interesting Tweet:

    Nathan did an awesome writeup about his beehives, you can read about it here http://makezine.com/projects/bees-sensors-monitor-hive-health/

    In the article he also discusses using analog.io to chart and analyze his data. This includes links to the data and plenty of pictures!

    It's truly an honor and another example of analog.io being used to do something that matters!

  • BLE Beacons with nRF24 and Arduino

    Luke Beno09/28/2015 at 20:17 0 comments

    Introduction

    I've spent a lot of time showing the MSP430 Sensor nodes and their capability of transmitting BLE packets. I wanted to clarify one thing because I don't think that I've done a great job so far highlighting how exactly this is done.

    The Sensor nodes use a very inexpensive RF Transceiver chip from HopeRF called RF75. Maybe you have seen the HopeRF RFM73 or RFM75 modules that are typically very low cost on eBay or other sites. With a few exceptions, these chips are cheaper clones of the venerable Nordic Semi nRF24 transceiver.

    NRF24 has been in the hobbyist community for a very long time. There are many different libraries for it and all kinds of exciting projects. Not only that but you can get nRF24 modules for many times less money than the individual chips on Digikey.

    I'm sure many of you just have some laying around your lab right now!

    Knowing this, I decided to to a quick project log about how you can test the BLE capabilities of nRF24 in less than 15 minutes.

    The Hack

    Let's start out by acknowledging the excellent work and creative thinking of Dimitry Grinberg detailed here on his blog: http://dmitry.gr/index.php?r=05.Projects&proj=11. Bluetooth LE fakery

    In my opinion, this is hacking at its best: use something for a purpose that it most certainly wasn't designed for but still works well. Dimitry made a connection here between the BLE standard and a nRF24 datasheet which is very impressive!

    Please try this at home:

    So here it is, super simple as demonstrated in the video above. Here is the Fritzing diagram for my setup:

    With the wires hooked up, it is just a matter of importing the following github library: analog_io_lib

    Then the code for the Arduino Uno goes a little something like this:

    #include <analog_io.h>
    #include <SPI.h>
    
    uint8_t x = 0;
    analog_io radio(9, 10, 8);   // CE, CSN, IRQ
    
    void setup()
    {
      // put your setup code here, to run once:
      //Serial.begin(9600);
      SPI.begin();
      SPI.setDataMode(SPI_MODE0);
      SPI.setBitOrder(MSBFIRST);
    }
    
    void loop()
    {
      // put your main code here, to run repeatedly:
      radio.print("Beacon #");
      radio.print(x);
      radio.flushBle();
      x++;
      delay(500);
    }

    And that is it, BLE packets in no time!

    You can pretty much use any BLE scanner app to see the packets. I use Light Blue Explorer or the Bluetooth Smart Scanner on iPhone.

    Enjoy! Skulls, Follows and your Comments are appreciated!

  • Creating a BLE Sound Level Meter

    Luke Beno09/24/2015 at 14:41 0 comments

    I have perviously written about Sensor Mania, this describes my workflow for coming up with new ideas for sensors and applications. Well yesterday when I received my sound level meter, I thought that a good way to spend the evening would be getting this meter to push data to the web!

    So heres a picture of the meter fresh out of the package:

    I was shocked at the size, it is a pretty large device, I guess I was just expecting something smaller. Regardless, I'm happy with it, I really liked the price and the user interface is clean and simple which is great.

    The one feature that was critical for me is that this unit had a DC output for its measurement. This interface is prime for attaching to my sensor node and that is exactly what I set out to do.

    Let's take a look inside:

    For $25, I'm pretty impressed with the build. In some ways for the number of components, I'm shocked that there is actually profit to be made for this unit. Regardless, I scanned through the board and found some very conveniently labeled test points and places to tie in my Sensor node. Here's the breakdown:

    As shown in the picture I soldered wires in on the signals of interest and connected them to a pin header which I intend to connect to the sensor node.

    One very convenient point about this unit is that the VCC test point turns on and off with the Meter power button. This is really convenient for power management of the device when it is powered off, essentially the sensor node is powered off as well.

    With connections in place, it is time for a little code. Here it is, less than 20 lines of code!

    #include <analog_io.h>
    #include <SPI.h>
    
    analog_io radio(P3_5, P3_6, P2_5);
    
    float sound;
    
    void setup()
    {
      SPI.begin();
      SPI.setDataMode(SPI_MODE0);
      SPI.setBitOrder(MSBFIRST);
      
      analogReference(INTERNAL2V5);
    }
    
    void loop()
    {
        sound = analogRead(A3)*0.244140625;
        
        radio.print(">");
        radio.print(sound,3);
        radio.flushBle();
    
        sleep(500);
    }

    I previously wrote about bridging these BLE packets to the web win an iPhone using some Tech BASIC code running on my iPhone. Here it is again:

    DIM uuid(0) AS STRING
    DIM watchdog AS INTEGER 
    
    BLE.startBLE
    
    BLE.startScan(uuid)
    
    
    SUB BLEDiscoveredPeripheral (time AS DOUBLE, peripheral AS BLEPeripheral, services() AS STRING, advertisements(,) AS STRING, rssi)
      IF MID(peripheral.blename,1,1)= ">" THEN
        PRINT peripheral.blename
        
        Comm.readHTTP(1,"http://lgbeno.analog.io/input/b9QmbEO2Y2Hg9yQl59qB?private_key=&sound="&MID(peripheral.blename,2,7),"GET","","head","")
        WHILE NOT EOF(1)
          LINE INPUT #1, a$
          PRINT a$
        WEND
        CLOSE #1
        watchdog=0
      END IF
    END SUB
    
    SUB nullEvent (time AS DOUBLE)
      watchdog=watchdog+1
      IF watchdog>30 THEN
        BLE.startScan(uuid)
        watchdog=0
      END IF
    END SUB
    Then there is the chart plotted on analog.io:

    Check out the video above for more details and an in depth discussion.

  • Demo Code from the Semifinals Video

    Luke Beno09/21/2015 at 20:45 0 comments

    915 MHz Sensor Node:

    #include <SPI.h>
    #include <AIR430BoostFCC.h>
    #include "I2C_SoftwareLibrary.h"
    
    #define SCL_PIN P2_6 ///< pin for SCL
    #define SDA_PIN P2_7 ///< pin for SDA
    SoftwareWire Wire(SDA_PIN, SCL_PIN); 
    
    #define ADDRESS_LOCAL    0x02
    #define ADDRESS_REMOTE   0x01
    #define DROPLET
    #define _address 0x40
    
    //#define NODE_NUM 4
    
    struct sPacket
    {
      int   node;
      float temp;       // Local node address that message originated from
      float rh;    // Local node message [MAX. 59 bytes]
    };
    
    struct sPacket txPacket;
    
    void setup()
    {
      txPacket.node = 9;
      
      pinMode(GREEN_LED, OUTPUT);
      digitalWrite(GREEN_LED, HIGH);
      
      pinMode(RED_LED, OUTPUT);
      digitalWrite(RED_LED, LOW);
      Radio.begin(ADDRESS_LOCAL, CHANNEL_1, POWER_MAX);
      digitalWrite(RED_LED, HIGH);
    }
    
    void loop()
    {
      Wire.beginTransmission(_address);
      Wire.write(0xE5);
      Wire.endTransmission(false);
      //Wire.endTransmission();
      //delay(20);
      Wire.requestFrom(_address, 2);
      while (Wire.available() < 2);
      uint16_t rhMS = Wire.read();
      uint16_t rhLS = Wire.read();
      
      Wire.beginTransmission(_address);
      Wire.write(0xE0);
      Wire.endTransmission(false);
      //Wire.endTransmission();
      //delay(20);
      Wire.requestFrom(_address, 2);
      while (Wire.available() < 2);
      uint16_t MS = Wire.read();
      uint16_t LS = Wire.read();
      
      //Serial.println(MS<<8LS,DEC);
      //Serial.println(MS,BIN);
      
      txPacket.temp = (MS<<8)+LS;
      txPacket.rh = (rhMS<<8)+rhLS;
      //Serial.println(t,0);
      
      txPacket.temp=((175.72*txPacket.temp)/65536-46.85)*9/5+32;
      txPacket.rh = (125*txPacket.rh)/65536-6;
      
      digitalWrite(GREEN_LED, LOW);
      Radio.transmit(ADDRESS_REMOTE, (unsigned char*)&txPacket, sizeof(txPacket));
      digitalWrite(GREEN_LED, HIGH);
      sleepSeconds(4);
    }
    2.4 GHz Sensor Node:

    #include <analog_io.h>
    #include <SPI.h>
    #include "I2C_SoftwareLibrary.h"
    
    analog_io radio(P3_5, P3_6, P2_5);  // P2.0=CE, P2.1=CSN, P2.2=IRQ
    const uint8_t txaddr[] = { 0xDE, 0xAD, 0xBE, 0xEF, 0x01 };
    
    SoftwareWire Wire(P3_0, P2_1); 
    //SoftwareWire Wire(P3_1, P1_3); 
    
    int node_num = 4;
    
    #define _address 0x40
    
    void setup() {
      pinMode(RED_LED, OUTPUT); 
      digitalWrite(RED_LED, LOW);
      SPI.begin();
      SPI.setDataMode(SPI_MODE0);
      SPI.setBitOrder(MSBFIRST);
    
      radio.begin();  // Defaults 1Mbps, channel 0, max TX power
    
      radio.setTXaddress((void*)txaddr);
    }
    
    void loop() {
      
      Wire.beginTransmission(_address);
      Wire.write(0xE5);
      Wire.endTransmission(false);
      //Wire.endTransmission();
      //delay(20);
      Wire.requestFrom(_address, 2);
      while (Wire.available() < 2);
      uint16_t rhMS = Wire.read();
      uint16_t rhLS = Wire.read();
      
      Wire.beginTransmission(_address);
      Wire.write(0xE0);
      Wire.endTransmission(false);
      //Wire.endTransmission();
      //delay(20);
      Wire.requestFrom(_address, 2);
      while (Wire.available() < 2);
      uint16_t MS = Wire.read();
      uint16_t LS = Wire.read();
      
      //Serial.println(MS<<8LS,DEC);
      //Serial.println(MS,BIN);
      
      float t = (MS<<8)+LS;
      float rh = (rhMS<<8)+rhLS;
      //Serial.println(t,0);
      
      t=((175.72*t)/65536-46.85)*9/5+32;
      rh = (125*rh)/65536-6;
      
      digitalWrite(RED_LED, HIGH);
      radio.print("{\"id\":\"N");
      radio.print(node_num);
      radio.print("\",\"t\":");
      radio.print(t,1);
      radio.print(",\"rh\":");
      radio.print(rh,1);
      radio.print("}");
      radio.flush();  // Force transmit (don't wait for any more data)
      
      /*radio.print(node_num);
      radio.print(":");
      radio.print(t,1);
      radio.print("F ");
      radio.print(rh,1);
      radio.print("%");
      radio.flushBle();  // Force transmit (don't wait for any more data)
     */
      digitalWrite(RED_LED, LOW);
      //radio.deepsleep();
      sleepSeconds(3);
      //sleep(4000);
    }

    915MHz Hub Code:

    #include <SPI.h>
    #include <AIR430BoostFCC.h>
    
    #define ADDRESS_LOCAL    0x01
    char escape_char = 0xFF;
    
    struct data_packet
    {
      int   node;
      float temp;       // Local node address that message originated from
      float rh;    // Local node message [MAX. 59 bytes]
    };
    
    struct data_packet rxPacket;
    
    void setup()
    {
      // The radio library uses the SPI library internally, this call initializes
      // SPI/CSn and GDO0 lines. Also setup initial address, channel, and TX power.
      pinMode(LNA_EN, OUTPUT);
     pinMode(PA_EN, OUTPUT);
    ...
    Read more »

  • Bridging BLE to Internet via an iPhone

    Luke Beno09/18/2015 at 04:30 0 comments

    In the analog.io quarter finals video, I demonstrated an MSP430 Sensor node measuring temperature and humidity then transmitting the data via BLE. I then was using an iPhone to collect the BLE beacons and push them to the internet.

    In this project update I will document the design for this demo. First let's take a look at the firmware. This code is written in Energia, it is the Arduino equivalent for TI MSP430.

    The code uses the Soft I2C library to communicated with a Si7020 sensor. the data from the sensor is then put into a BLE packet and sent off.

    Here is the Energia/Arduino code:

    #include <analog_io.h>
    #include <SPI.h>
    #include "I2C_SoftwareLibrary.h"
    
    analog_io radio(P3_5, P3_6, P2_5);  // P2.0=CE, P2.1=CSN, P2.2=IRQ
    const uint8_t txaddr[] = { 0xDE, 0xAD, 0xBE, 0xEF, 0x01 };
    
    #define SCL_PIN P2_4 ///< pin for SCL
    #define SDA_PIN P2_3 ///< pin for SDA
    SoftwareWire Wire(SDA_PIN, SCL_PIN); 
    
    struct ble_payload
    {
      uint16_t temp;
      uint16_t humidity;
    };
    
    struct ble_payload payload;
    
    void setup()
    {
      pinMode(RED_LED, OUTPUT); 
      digitalWrite(RED_LED, LOW);
      
      SPI.begin();
      SPI.setDataMode(SPI_MODE0);
      SPI.setBitOrder(MSBFIRST);
    
      radio.begin();  // Defaults 1Mbps, channel 0, max TX power
    
      radio.setTXaddress((void*)txaddr);
    }
    
    void loop()
    {
      // request temp 
      i2cWrite(_address,0x03,0x11);
      
      // wait for it...
      while ((i2cRead(_address,0x00) & 0x01) == 0x01);
      
      payload.temp = i2cRead(_address,0x01)<<8;
      payload.temp += i2cRead(_address,0x02);
      
      // request humidity 
      i2cWrite(_address,0x03,0x01);
      // wait for it...
      while ((i2cRead(_address,0x00) & 0x01) == 0x01);
      
      payload.humidity = i2cRead(_address,0x01)<<8;
      payload.humidity += i2cRead(_address,0x02);
      
      radio.bleSingleTransmit("ANALOG", (unsigned char*) payload, sizeof(payload));
      
      delay(6000);    // Send every minute
    
    }
    
    uint16_t requestTemp(){
      i2cWrite(_address,0x03,0x11);
      delay(2);
      while ((i2cRead(_address,0x00) & 0x01) == 0x01);
      return ((i2cRead(_address,0x01)<<6) + (i2cRead(_address,0x02)>>2));
    }
    
    int i2cWrite(unsigned char address,unsigned char reg,unsigned char data){
      Wire.beginTransmission(address);
      Wire.write(reg);
      Wire.write(data);
      Wire.endTransmission();
    }
    
    uint8_t i2cRead(unsigned char address,unsigned char reg){
      Wire.beginTransmission(address);
      Wire.write(reg);
      Wire.endTransmission(false);
      Wire.requestFrom(address, 1);
      while (Wire.available() < 1);
      return Wire.read();
    }

    Now let's take a look at the prototype iPhone app. Writing for iPhone an app is an uphill process so I was looking for a temporary alternate way to quickly prototype the iPhone as a wireless bridge to the internet. After doing some research I discovered TechBasic from Byte Works. It struck my interest because it enabled me to write code, running on the iPhone and had an API that worked with the iPhone BLE stack.

    I purchased the app and here is the code that I came up with on the iPhone side to receive the BLE beacons from the sensor node and forward them on to a datastream at data.sparkfun.com.

    BLE.startBLE
    
    DIM uuid(0) AS STRING
    DIM x AS STRING
    DIM rh, t AS DOUBLE
    DIM watch_dog as INTEGER
    DIM host, public_key, private_key AS STRING
    
    host        = "data.sparkfun.com"
    public_key  = "<public_key_here>"
    private_key = "<private_key_here>"
    
    BLE.startScan(uuid)
    
    SUB BLEDiscoveredPeripheral (time AS DOUBLE, peripheral AS BLEPeripheral, services() AS STRING, advertisements(,) AS STRING, rssi)
      IF peripheral.blename = "ANALOG" THEN
        FOR i = 1 TO UBOUND(advertisements,1)
          IF advertisements(i,1) = "kCBAdvDataManufacturerData" THEN
            x = advertisements(i,2)
            rh = VAL("0x"&MID(x, 2, 2)&MID(x,6,2))
            t = VAL("0x"&MID(x, 11, 2)&MID(x,15,2))
    
            t=((175.72*t)/65536-46.85)*9/5+32
            rh=(125*rh)/65536-6
    
            Comm.readHTTP(1,"http://"&host&"/input/"&public_key&"?private_key="&private_key&"&temp="&MID(STR(t),1,6)&"&humidity="&MID(STR(rh),1,6),"GET","","head","")
            WHILE NOT EOF(1)
              LINE INPUT #1, a$
              PRINT a$
            WEND
            CLOSE #1
            PRINT MID(STR(rh),1,6)&" , "&MID(STR(t),1,6)
            watch_dog = 0
          END IF
        NEXT
      END IF
    END SUB
    
    SUB nullEvent...
    Read more »

  • Updated User Chart

    Luke Beno09/18/2015 at 03:09 0 comments

    I figured that I would re-run the user growth analysis that I previously posted here after seeing the effects of the Hackaday Blog Feature. I'm very pleased to welcome more users to the community. Here's the data, not too much else to say :)

  • Working on a few Bugs

    Luke Beno09/17/2015 at 21:51 0 comments

    Being featured on the hackaday.com blog has been a great experience. Over the past 32 hours, about 80 people signed up for the site pushing the overall user count up to 500 people! When starting analog.io, I would have never expected it to grow to this level.

    In reviewing the activity and talking with those who have contacted me, 2 Recurring bugs have been identified that may have hindered everyones first experience with the site. For that I'm sorry. First impressions are very important.

    In the spirit of transparency and openness, I figured that I would share the bugs, my understanding on their root case, a recommended work around and what I plan to do to fix them.

    Missing Stream Data:

    The missing stream data bug occurs when a user selects a stream to view. Typically users find streams of interest from the index, click on the stream to view the data, the stream title and description loads but no data is showen. The image below is an example:

    Root Cause: This bug is caused when the data.sparkfun.com server purges old data using the phant reaper module. analog.io keeps an independent record of this data in its database and does not identify that the stream is no longer valid.

    Work around: Right now the only work around is to look to a different stream to see the data.

    Fix: A feature is planned for analog.io to scan through all stream records and verify that data is still available. The scan may also score the streams based on their last update and provide a rank. This will ensure that the best quality streams are shown first in the index.

    In the interim, I have added a manual function that I can selectively hide streams that are no longer valid.

    The notch bug:

    The notch bug appears as a vertical line at the beginning of the time series plot as shown below. Due to this "notch" the vertical scale of the chart is adjusted to cover all data. This scale change often compresses the meaningful data such that it looks close to a flat horizontal line.

    Root Cause: Data requested from the backend server is delivered in CSV format, the application then parses this CSV file into floating point number data that is used by the highcharts library. If the parser discovers a non numeric value in the CSV file, it automatically gives it a placeholder value of 0. Since the CSV file contains a header line, the first parsed value always resolves to non-numeric and results in a 0.

    Work around: One way to work around this issue is to adjust the horizontal window of the plot as demonstrated in the image below

    Fix: The fix is to change the parser such that it ignores trying to parse the header row.


    Thanks to everyone who joined, bugs are part of the development process and I'm very happy to hear about them for users and fix the as soon as practically possible.

  • Hackaday Feature

    Luke Beno09/16/2015 at 15:20 0 comments

    I'm very excited to see today that analog.io is featured on hackaday.com! Brian did an excellent write up.

    Certainly there is a lot of info here on the project page, I'm still working on polishing it up for the Sept 21st deadline. The web application is not bug free either so if you signed up and didn't have a good on boarding please tell me.

    To everyone who signed up for analog.io, followed the project, gave it a skull or posted a comment, Thanks!

View all 34 project logs

  • 1
    Step 1

View all instructions

Enjoy this project?

Share

Discussions

Michael Kemper wrote 03/10/2018 at 23:00 point

It would seem this project has died (the website isn't displaying data nor accepting new hosts). Hopefully Luke will reply to my email and this will make a comeback!

  Are you sure? yes | no

Luke Beno wrote 04/10/2018 at 17:10 point

Hi Michael, Yes, I've take quite a long break from analog.io, thinking about bringing it back.  That includes getting the certificate stuff all sorted out!  Still interested?

  Are you sure? yes | no

Michael Kemper wrote 04/10/2018 at 18:49 point

I very much am and I think others would be as well. I came upon it because I was using Sparkfun's Phant, but ended up installing my own on a raspi. I really like the way analog.io displays data... was the easiest and least fussy one I found!

  Are you sure? yes | no

Luke Beno wrote 04/21/2018 at 13:34 point

Thanks, we'll see what the future brings, I hope to get back into it although with 3 kids, spare time is a pretty scarce commodity.  In the interim analog.io is still useful if you waive the SSL errors.  Not really a good practice but it is possible.

  Are you sure? yes | no

BestWillInTheWorld wrote 06/25/2017 at 20:13 point

analog.io - SSL(TLS) cert expired.  

Is the project still alive?

  Are you sure? yes | no

AlfredC wrote 09/01/2015 at 07:21 point

Very interesting project! It was a breeze to set up an account on analog.io and visualize measurement data (CO2 level, temperature, humidity, air presssure) that my LiV RPi indoor air quality monitor is pushing to data.sparkfun.com. Here are couple of links for anyone interested to understand what LiV is and how it connects to analog.io. LiV device: https://hackaday.io/project/2636-liv-raspberry-pi-based-indoor-air-monitor  LiV data.sparkfun.comhttps://hackaday.io/project/7459-datasparkfuncom-push-data-from-raspberry-pi . This is a great project, keep up the good work!  

  Are you sure? yes | no

Luke Beno wrote 09/01/2015 at 07:36 point

Thanks Alfred, it really means a lot to me to hear that you got value from using the site!  Your air monitor project is a great addition to the site! 

  Are you sure? yes | no

Frank Milburn wrote 08/23/2015 at 17:35 point

Great project!  I got my sensor node last Friday and had it up and running quickly.  It is easy to use with lots of applications.  I have mine working inside a network of MSP430 nRF24L01 devices of my own design.  The example using Bluetooth LE worked without a hitch and I'm considering how to make best use of that.  Great work!

  Are you sure? yes | no

jrhaedt wrote 08/18/2015 at 01:33 point

I like this project and think you have a complete solution for showcasing internet of things connected devices.  Your platform can help all of us data nerds get familiar with what we always wondered about.  For example, the water usage example is very important on the west coast and could open people's eyes to consumption on a real-time basis.  I like all the hardware, software, and mobile applications you created as part of your entry.  Bravo!

  Are you sure? yes | no

Matt wrote 08/17/2015 at 14:07 point

This is a great project! I have problems with my internet connection slowing down to basically nothing from about 5pm - 11pm. Analog.io was the perfect tool for me to display a graph of my internet speeds throughout the day. I know the primary use is for IoT, but it perfectly fit my needs. You can see it here: http://analog.io/sAM or check out my project describing how I set it up here: https://hackaday.io/project/7166-speed-test

  Are you sure? yes | no

Similar Projects

Does this project spark your interest?

Become a member to follow this project and never miss any updates