 Johnny
-
Install Chirp on Debian/Ubuntu Linux
02/10/2024 at 00:35 • 0 commentsMake sure you have python3-virtualenv, libcairo-dev and libgtk-3-dev or newer installed.
Grab the latest chirp python wheel from: https://trac.chirp.danplanet.com/chirp_next/
On the day this page was written the latest release was next-20240208.
mkdir chirp && cd "$_"
wget https://trac.chirp.danplanet.com/chirp_next/next-20240208/chirp-20240208-py3-none-any.whl

# create virtual environment for python3.11, you can change this for whatever python3 you would like to use
python3 -m virtualenv --python=python3.11 .pyenv
.pyenv/bin/pip install chirp-20240208-py3-none-any.whl

# wxPython is required for GUI, but if you want
# to use chirpc (cli version) you don't need it.
.pyenv/bin/pip install wxPython

# create symbolic links
ln -s .pyenv/bin/chirp
ln -s .pyenv/bin/chirpc

# run chirp
./chirp
Enjoy!
-
How to install and use CHIRP(Legacy) for radio programming
04/01/2021 at 06:34 • 0 comments[edit: Wed 22 Nov 2023 - still valid]
I bought a Baofeng BF-T1 radio and needed to write the channel configurations into it, so I googled a bit and found out that it can be done with CHIRP but I could not find an easy way to install it without littering the operating system's Python.![]()
After checking CHIRP's requirements and dependencies I figured out a way to install it into a virtual environment without a single sudo ;)
Of course there are some preconditions, you need to have wget, xarchiver, python2.7, pip2.7 and virtualenv already installed and a permission for /dev/ttyUSBx devices or belong to dialout group, you may also need to install libcairo-dev / libgtk2.0-dev, below is the script: (should work for debian / ubuntu but WITHOUT ANY WARRANTY)
If you have python3, you can to install virtualenv using pip or python3-virtualenv using apt.
# I hope that this will be useful, but WITHOUT ANY WARRANTY;
# I DON'T TAKE ANY RESPONSIBILITY, USE AT YOUR OWN RISK.
# Copy this into a file install_chirp.sh and call it in the current bash session
# by typing: . install_chirp.sh
# this will create a new dir called "chirp" and will setup chirp for you
mkdir chirp && cd "$_"

# grab the legacy CHIRP tarball (chirp*.tar.gz)
wget -e robots=off -r -npd -A tar.gz https://trac.chirp.danplanet.com/chirp_daily/LATEST/

# download the packages
wget http://ftp.br.debian.org/debian/pool/main/p/pygobject-2/python-gobject-2_2.28.6-13+b1_amd64.deb
wget http://ftp.br.debian.org/debian/pool/main/p/pygtk/python-gtk2_2.24.0-5.1+b1_amd64.deb
wget ftp://xmlsoft.org/libxml2/libxml2-python-2.9.4-1.fc23.x86_64.rpm

# create virtual environment, activate it
# & install requirements with pip (this
# will install into the virtual env.
# -> .pyenv/lib/python2.7/site-packages)
python3 -m virtualenv --python=python2.7 .pyenv
source .pyenv/bin/activate || return
pip install pyserial pycairo

# extract the downloaded packages and copy them
# into the virtual environment
xarchiver -x . libxml2-python-2.9.4-1.fc23.x86_64.rpm
cp -r usr/lib64/python2.7/site-packages/* .pyenv/lib/python2.7/site-packages/
rm -r usr/

xarchiver -x . python-gobject-2_2.28.6-13+b1_amd64.deb
tar -Jxf data.tar.xz
rm -r data.tar.xz control.tar.xz
cp -r usr/lib/python2.7/dist-packages/* .pyenv/lib/python2.7/site-packages/
rm -r usr/

xarchiver -x . python-gtk2_2.24.0-5.1+b1_amd64.deb
tar -Jxf data.tar.xz
rm -r data.tar.xz control.tar.xz
cp -r usr/lib/python2.7/dist-packages/gtk-2.0/* .pyenv/lib/python2.7/site-packages/
rm -r usr/

# finally install chirp into the virtual environment
pip install chirp*.tar.gz
deactivate
ln -s .pyenv/bin/chirpw
sed -i '1i#!'`pwd`'/.pyenv/bin/python' chirpw

echo 'Now you can run "./chirpw" from '`pwd`
Now you can start chirp by running ./chirpw
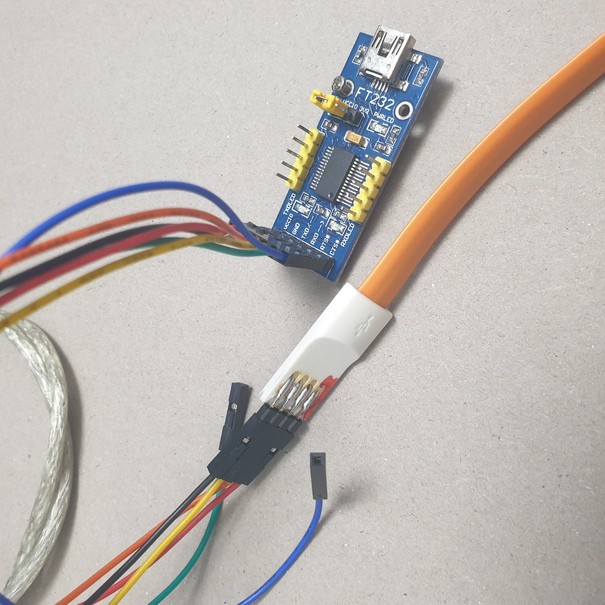
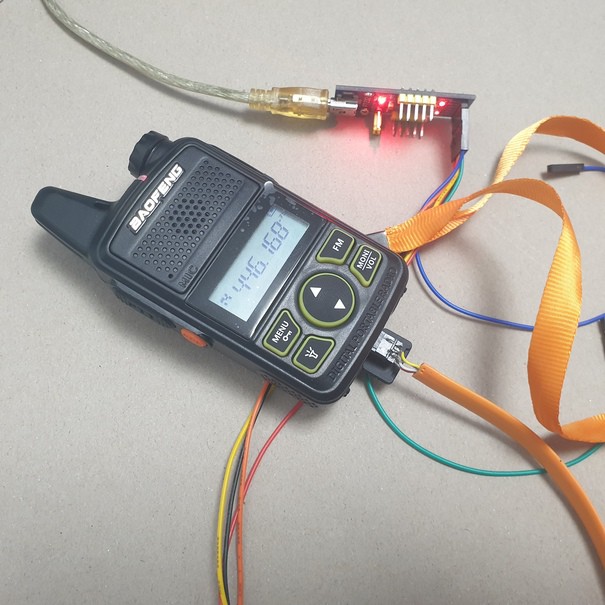
Here I found how to make a cable for programming my BF-T1:
I created my cable form an micro USB, switched ping 2 to pin 4 on the micro-b end, and soldered gold pins on the type-A side to connect it with female-female gold pin wires.
The photos below shows the cable, the FTDI board and the radio connected while being programmed.
![]()
![]()
And here is a video on how to install chirp using the scrip shown before and how to use chirp with BF-T1:#baofeng #bf-t1 #bft1 #BF-T1 #BFT1 #chirp #CHIRP #python2.7
This user joined on 02/28/2019.

 Just4Fun
 stupid
 John
John Kristjan Berce
 jean
jean Jason Bender
 AVR
AVR SHIVANI
 Alex
Alex Antonio
 David G. Simmons
 Martin
 Daniel James Evans
 agp.cooper