Close
0%
0%

SecSavr Suspense [gd0105]

The best of resin with the best of filament; is such a 3D printer possible?

Similar projects worth following
This is a project that explores the possibility of a consumer-grade resin printer based on VLM and MSLA concepts. BCN3D spin-off Supernova3d expects under $100K for their dual-material industrial solution, but I'm aiming to create a full colour (4-bit), Liquid Laminate Lithography (L^3) 3D printer under £2000 (≈$2,500 / €2,250).

The aims for the Suspense is to have:
- a build volume of 640 * 480 * 320mm
- be airtight enclosed with built in air scrubbing
- use scanner sensors for detailed layer imaging and quality control
- print in full colour at over 200 voxels per inch
- feature a Placement Block (unofficially called the Brick Of Innovation) that allows for:
--- embedding oriented/continuous fibre
--- dispensing silver adhesive for conductive traces
--- 2 pick and place tools for SMD components, and one for reusable, magnetic supports
--- an air assisted laser cutter with an 80x100μm dot for edge smoothing, laser-cutting and metal/ceramic si

Media

Inspiration and/or examples of working principle

The background music is also the music I mentally associate with this project.

Navigation

The title tag system is explained here, and the most up-to-date is used (so there may be differences compared to the tags actually present in the log's title). Notable logs have bold white text.

L1
[T] Initial thoughts and ideas

L2
[M][T] Initial Thoughts 2022 Colourized
L3
[R][T] Screen Choices
L4
[T] Modding an existing printer?
L5
[R] Compatible with advanced FDM strategies
L6
[T] Technology Naming?
L7
[R][T] Screen, NanoDLP and the Photon M3

L8
[R] Screen

L9
[R] Plastic film (and resin removal)

L10
[R][P2] Plastic film
L11
[T] Shelved -> Researching Project
L12
[R] Target amount of colours to print a figurine
L13
[T] Moving LCD and light source?
L14
[R] IPA / wash fluid cleaning / filtration
L15
[R] Screens and build volume
L16
[M] Concept idea
L17
[T] Quick Print Method
L18
[M] Glass shelf on concept
L19
[T] Suspense Small
L20
[T] Demo print idea
L21
[R] Dithering for Full Colour 3D Prints
L22
[T] Print times and the importance of layer cleaning
L23
[T] Layer cleaning and curing ideas
L24
[B][T] Current price estimate
L25
[M] SleepCinema / CeilingSingle Frame compatibility
L26
[T] Current deliverable
L27
[M] 3rd Concept
L28
[T] Photon M3 Screen
L29
[M] Carriages and 495mm X axis
L30
[T] VLM as a wearable
L31
[M] Aluminium plate simulation
L32
[M] Roller Belt
- Thought of a differential belt solution
L33
[M] Roller Rail Holder

L34
[M] Roller now with LEDs
L35
[T] I'm going to try for 10 cartridges
L36
[T] Continuous fibre attachment
L37
[M] Continuous Fibre Arm Sketch
L38
[M] Continuous Fibre Initial Belt Path
L39
[M] Initial Z Axis
L40
[R] Magnetic Bed
L41
[R] PET Film Search
L42
[T] 3D Printed Circuit Boards?
L43
[T] Roller cleaning, motor drivers and air filtration
L44
[T] Smaller cleaning roller
L45
[M] Starting to remodel the roller
L46
[B] Current BOM price
L47
[M] 19mm OD roller
L48
[M] Updated Bed Assembly
L49
[B] Cost Cutting
L50
[T] Inital thoughts for the resin cartridges
L51
[A] 24 Stepper Drivers
L52
[R] Polyjet patent has already expired
L53
[T] Larger cartridges over more Z
L54
[T] Airtight enclosure
L55
[T] Back to ballscrews?
L56
[T] Lead screws, actually. (and maybe no filters)
L57
[R] Knife vs roller
L58
[R] Embedded electrical components
L59
[R] Multi Material SLA
- Academic research found
L60
[M] UV LED 108W
L61
[T] Building both the Suspense and SuspenseSmall
L62
[M] Roller and bed assembly for Small
L63
[M] Optimised Bed Assembly
L64
[R] Contact Image Sensor for coating detection
L65
[B][T] Current BOM Price (and more scanner sensors)
L66
[M] Second Belt on Roller Rail Mount
L67
[M] Fixed-Free Leadscrew Z Axis
L68
[M] Screen Block
L69
[T] Merge Application Rollers with Screen Block
L70
[B][M] Slighty more Z, Roller cover and X rollers
L71
[M] Small Case Shape
L72
[T] String bowden and 2060 Z
L73
[A] Proposed technology name: L^3
L74
[T] Magnets for reusable supports
L75
[R] Reusable supports
L76
[T] New cleaning method required
L77
[R] Electrostatic and magnetic resin
L78
[R] Expected PCB price
- As in, the expected material cost for this machine to make a PCB
L79
[T] Cartridge solution
L80
[B][A] A solution has been mentally computed.
L81
[M] Starting the LCD/Charged panel switcher
L82
[T] Replace cleaning roller with silverpaste extruder
L83
[R] Polar molecules
L84
[R] Pick and Place (and silver paste)
L85
[T] SuspenseSizeable and Suspense^2
L86
[R] Laser Cutting
L87
[R][T] Quick Ideas for L^3 Additive Manufacturing
-
This one contains a lot of ideas and research and is constantly updated.
L88
[R] Ease Of Use
L89
[T][R] DIY 3D printing metal, without the furnace?
L90
[M][R] Auto Detach Bed
- Grid of spikes that goes through the build plate to detach parts
L91
[T][R] 3D Printed Mechanical Relay IC Chips?
- The start of the "mmRelay Array" idea
L92
[P] Scanner sensor and cable breakout
L93
[R] Q8100-60002 reverse engineering
- Name of the scanner sensor used.
L94
[P] Scaner cable works
L95
[M] Up-to-date Concept Render
L96
[T] Dual Stacked LCD to rival DLP sharpness?
L97
[R] Macrobase Bumblebee: Cheap 8 Stepper Motherboard
L98
[A]...
Read more »

  • [R] Mellow Fly D7: Cheap 7-stepper motherboard

    kelvinA02/05/2024 at 05:07 0 comments

    Just like with the 8-stepper Bumblebee, I was once again looking around for motherboards because of my Coaxial Hotend project and came across this:

    This Mellow Fly D7 v1.0 board is low cost, compact and has all the things that I actually need (UART-enabled stepper ports) and trims out many of the things that I don't (since they'd be on the Manta M8P V2.0). 

    The most notable ommision are EXPn, meaning that I'd only be able to use 1 motor expander (on the M8P). That should be fine, as with 2 Fly D7s and 1 BTT EXP MOT, the printer will have 25 steppers to work with.

    It might be useful that CANBUS devices can be connected directly to the board without a separate transceiver.

  • [R] BCN3D splits VLM business into Supernova

    kelvinA02/03/2024 at 18:42 0 comments

    It seems that more tech innovation news happened on Feb 2 than customers getting their hands on the Apple Vision Pro or me getting some test prints from the 4-in-1-out Coaxial Hotend. 

    I've just read on Fabbaloo that a company called Supernova has spun off from BCN3D and taken VLM with them. That sounds good considering BCN3D has been rather quiet on what I believe is a notable technology and the writer, Kerry Stevenson, ended the article with this:

    Someday it may be that Supernova eclipses BCN3D in size, especially if manufacturers catch on to VLM.

    Interestingly, this company is headquartered in Austin, Texas, which I assume is because that's where the US engineering talent pool seems to be outside of California.

    They had an event and here's the things that stood out to me:

    • It runs though as much as 2.5kg/hr.
    • It can print 2 materials in the same layer.
    • They can print in silicone's. The last time I read about 3D printing in silicone's, I heard it was quite involved (involved enough that there are a handful of companies that specialise in 3D printing silicone).
    • The maximum solution price has increased from "under $50K" to "under $100K".
    • They're re-opening the tech adoption programme.

    There was also a short clip of the actual printer printing:

    The XY resolution is 23 microns, so this must be one very high pixel-count LCD considering its size.

    Now I'm looking though their website and I'm already liking the sounds of the materials. For example, the longer oligomer chains reduces undesirable biological effects:

    This is important for wearable electronics, or parts that will experience a notable amount of skin contact (e.g. keyboard keys).

    Then there's the filled materials in 3 flavours: ceramic, metal (such as copper) and fiber:

    Seems there's a typo with "compressive strenght".

    All 3 of these are materials I'm excited about; ceramics and copper for electronics and then magnetic fibers with Fortify's fiber-aligning tech.

  • [X][T] Q8100-60002 uses the AMIS-722402?

    kelvinA02/01/2024 at 07:48 0 comments

    I did some looking into the printer series' that this scanner is used in, and all but one of them has "optical resolution: 2400dpi". Now this is actually really high, as resolutions in the datasheets that exist online are 200, 300, 600 and one or two 1200dpi. I looked into a handful of other sensors on AliExpress and the printers that they're used in have a 1200dpi scan. 

    The one used in #Magic Frame : Turn Everything into a Touch Area had 2700 pixels. For 216mm of scan length, a 2400dpi scanner would have at least 20,410px!

    Thus, I looked for a 2400dpi CIS chip, assuming that HP wasn't going to invent their own. The only thing I found was the AMIS-722402, with datasheets online (with the sharpest looking to be from Arrow as a PDF download).

    14.56mm wide per sensor chip means that 15 sensors would be put together to get over 216mm, resulting in 218.4mm of scanning length and 20,640px.

    By looking at other sensor datasheets, one of the things I noticed is that the communication protocol is rather standardised. There's a pin that starts the scan, a clock signal and, some N number of cycles later, the "video out" (aka sensor data) gets read 1 pixel at a time.

    For this chip, the clock is typically 2.5MHz but it sounds like the engineers expect the fastest, 3MHz, to be used more.

    So I was thinking to myself "That's all great and all, but shouldn't there be like some kind of examplar circuit in here?" and there was one at the back. I think I'm onto something:

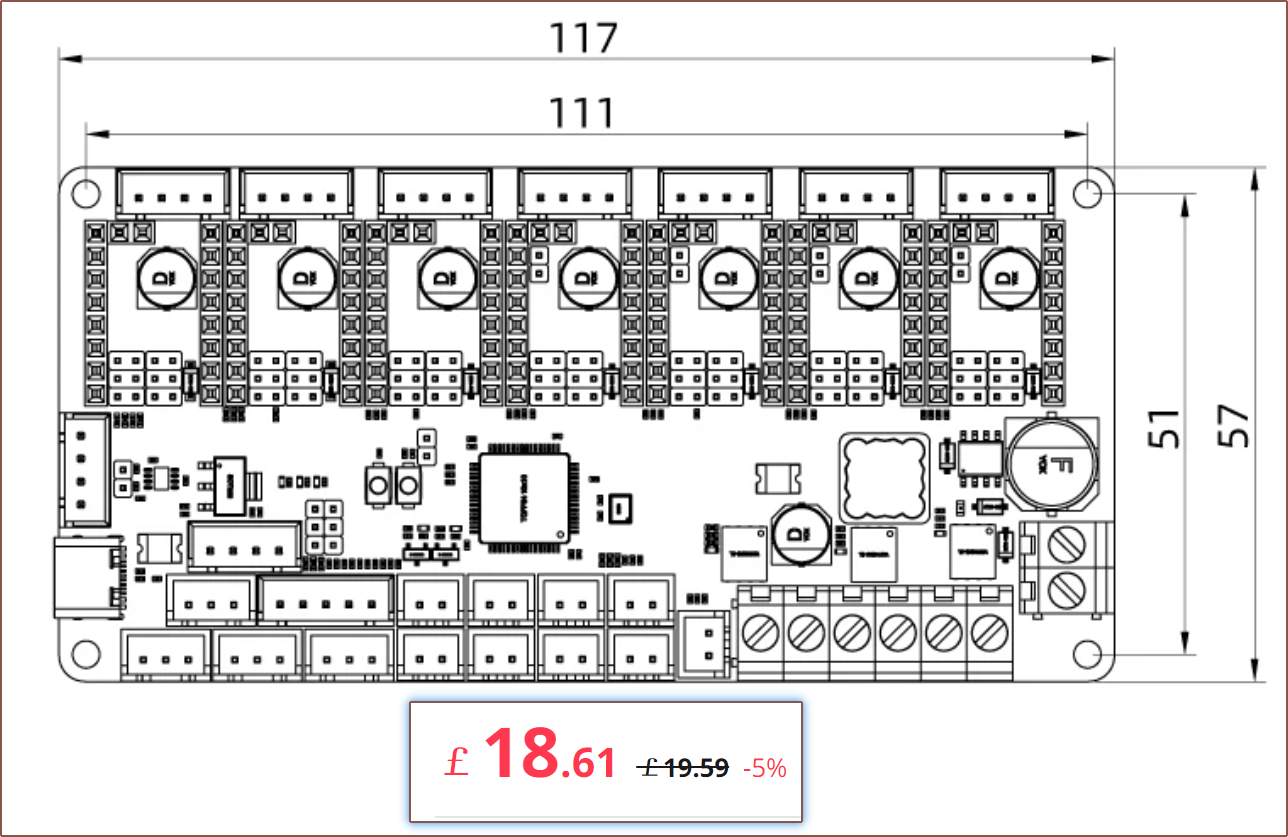
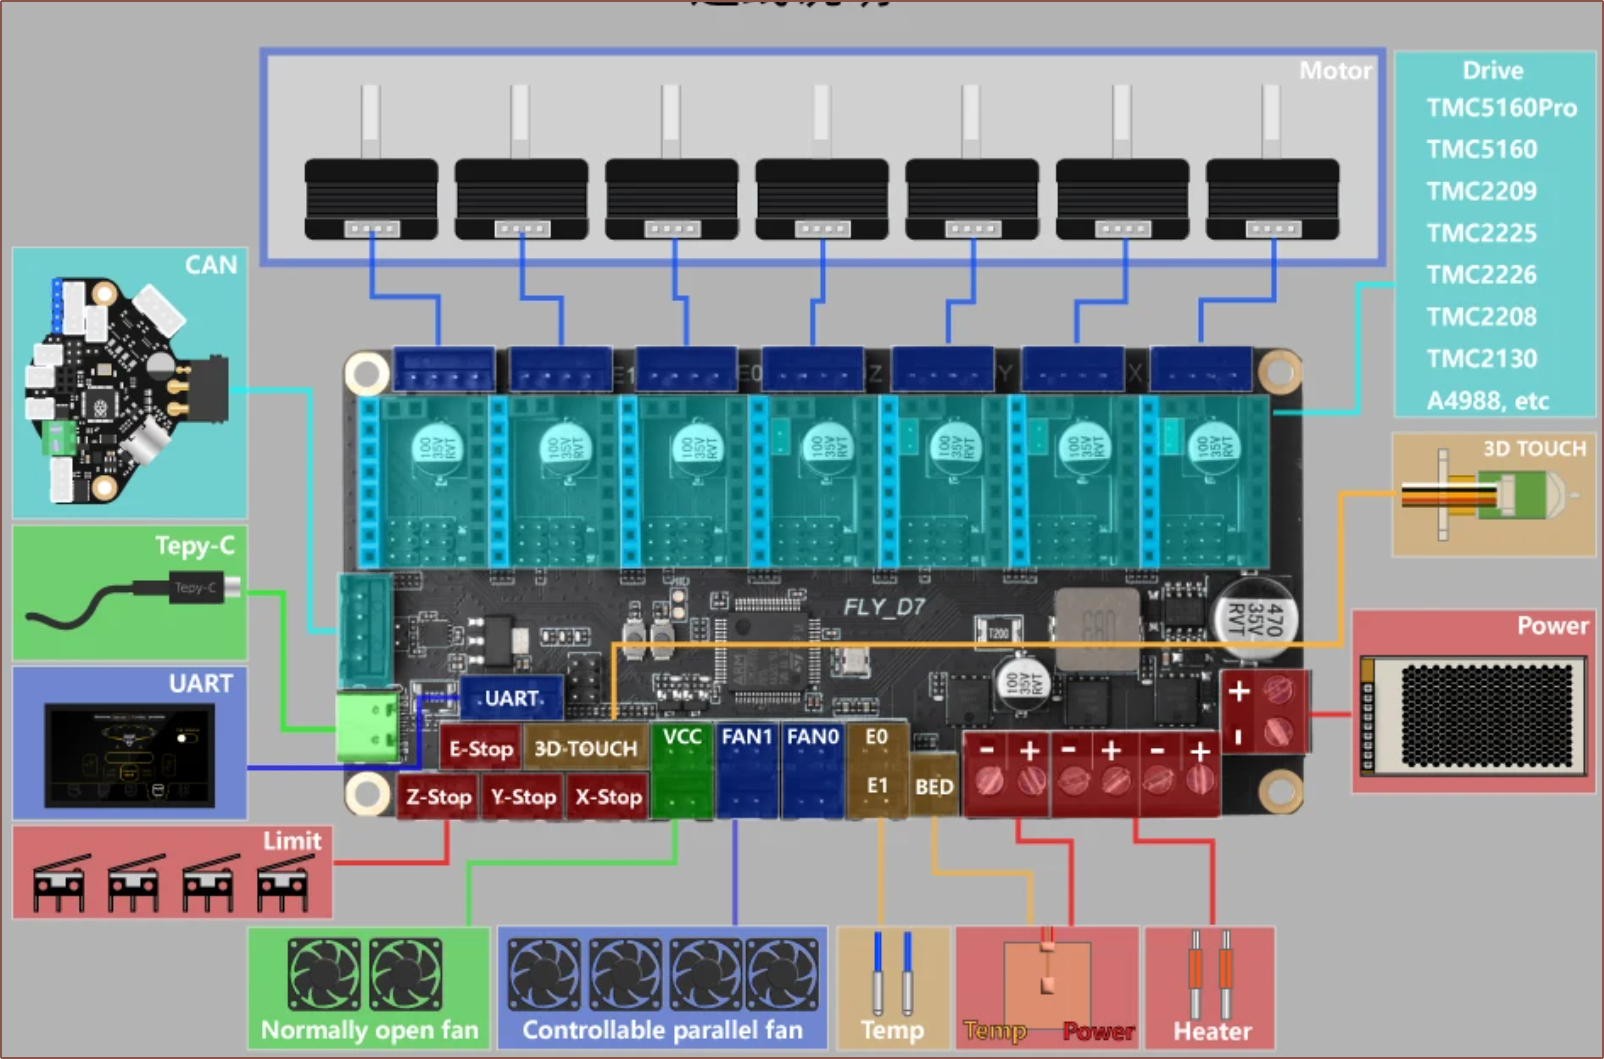
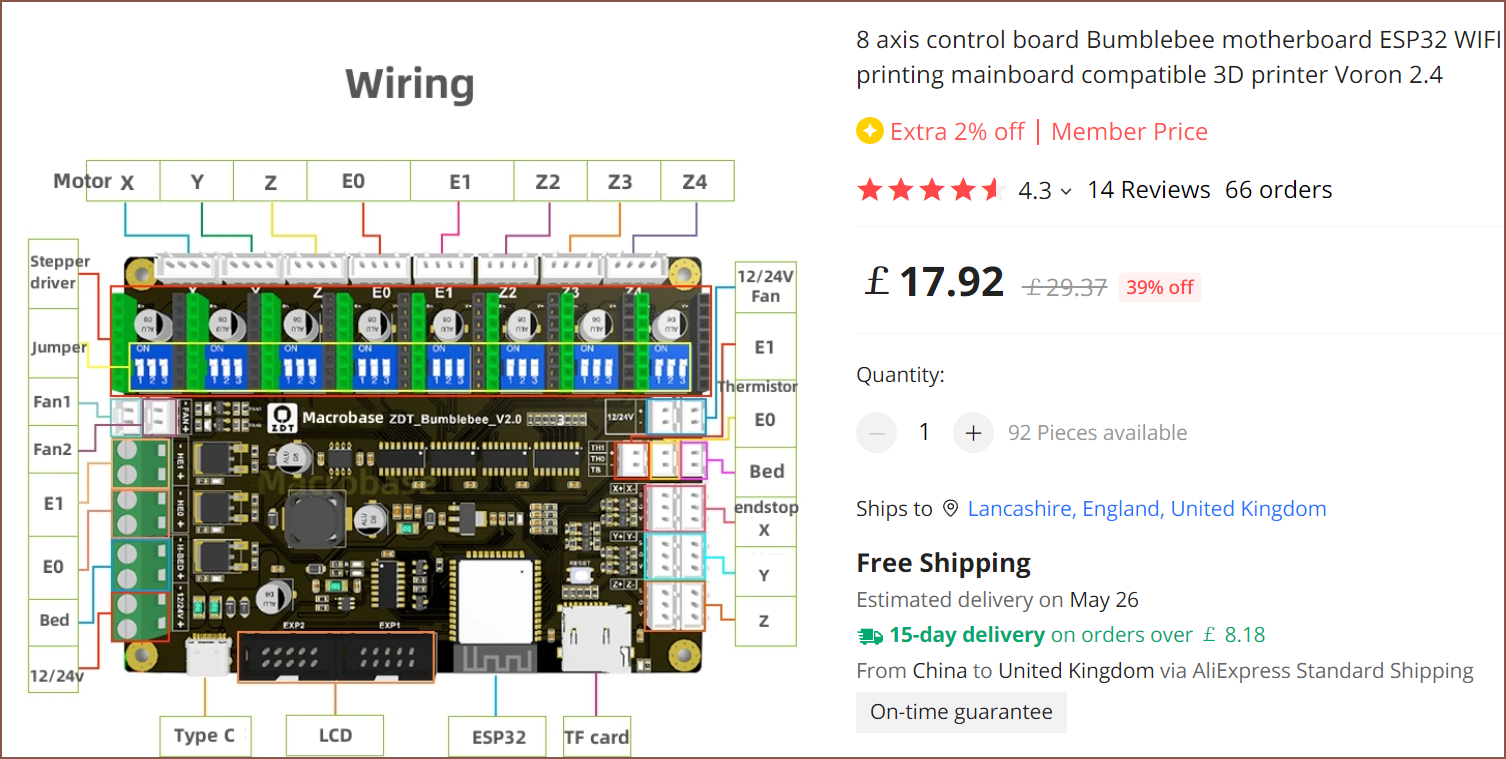
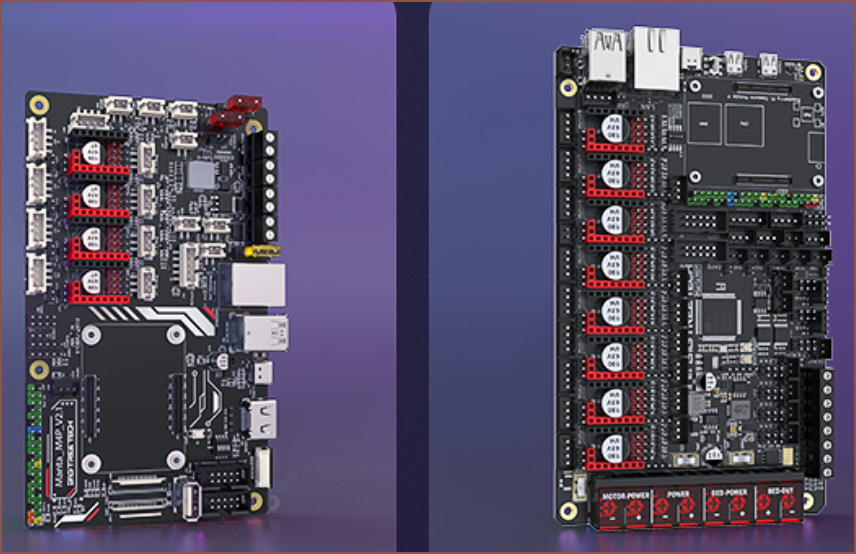
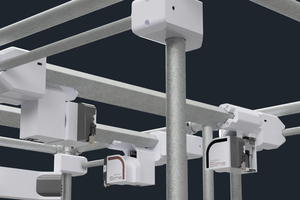
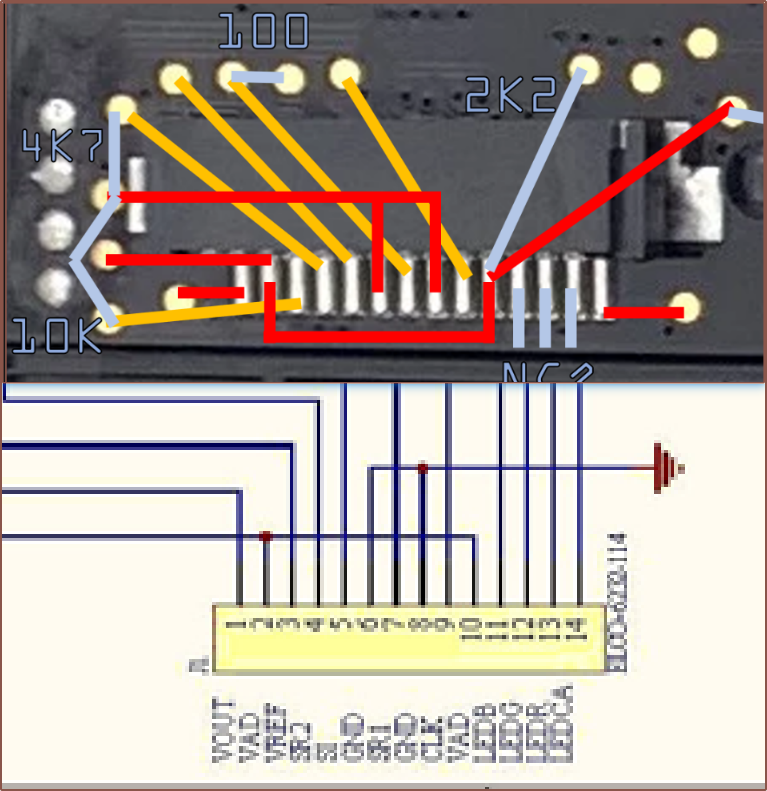
    I looked at the pinout here and many of them lined up with the pinouts determined in the past. One of them that was close but not quite was the assumption of "GND but not connected directly to the other GND" pin 3, and this is why:

    Technically, the pin can accept 0V, but it's actually expected to use 0.35V and determines the black-level voltage:

    Then there are select pins that determine how high a resolution is scanned. Lower resolutions bin pixels together, making them proportionally more sensitive.

    I connected the LEDs and found that Pin14 is LED Positive. I expected the entire white section to illuminate, but it's only a strip next to the lens array. I also found out that

    1. Red: Hits the set current limit of 200mA and thus drops till 2.17V
      1. Increasing the current limit didn't seem to make the LED brighter nor increase the voltage, so I tried a lower one.
      2. 2.2V was at about 150mA and slowly climbing
      3. 2.1V was notably dimmer, and 2.0V dimmer still.
      4. Thus, it sounds like I'm going to need a resistor on LEDR.
    2. Green: 5V at 107mA
    3. Blue: 5V at 166mA

  • [A] Details page before 11 Jan 2024

    kelvinA01/11/2024 at 11:07 0 comments

    I'm finally starting to revamp and equalize all my details pages so that the projects can be better understood and information hidden within the depths of logs can be more easily found. The below is the old Details page.

    [16 April 2022]

    So I'm going about my day and I see a link in a Discord channel to this video:

    Now, looking at the logo and red material that looked like paint, my expectation was that there was some marginally new resin technology and BCN3D was trying to make a new buzzword out of it. 

    I'm like "BCN3D. I get it. You're now getting into the SLA business and it's all new to you from an FFF standpoint.", waving jazz hands. "But can this 3D printing industry stop over-hyping marginally new technologies like it's the next generation of 3D printing??"

    However, everything changes when I get to the 30 second mark of the video and it's revealed that the camera actually isn't upside down for visually nicer footage and that the resin is seemingly suspended in air somehow.

    "What kind of Aperture Laboratories..."

    As soon as I see that the resin is stuck to a film, I'm like "AGHHHH!!! That's so simple, so obvious now that I've seen it! How has Me In The Past (or anyone else in the hobbyist 3D printing community) not thought of this?!"

    I'd love to end the thought there, but I've been thinking about what could solve the single-material and uncured resin handling issues of MSLA and what could bridge the gap between hobbyist machines and PolyJet. The reason I've never gotten an SLA printer is because, unlike FDM, the majority of my planned prints would be multi-colour, the uncured resin is toxic and the parts aren't ready fresh out of the machine.

    • Me In The Past thought of a multi-vat approach where one of the vats would contain cleaning fluid. There would be 3 or 4 vats and the centre Z column would rotate around to switch to them.
      • "Ahh but cleaning and moving would take so much time over the print job!"
    • Ok, what about a floating resin solution where the cleaning fluid is denser than the resin? With that, the part can just move down and be washed and cured while waiting for the previous resin to be sucked back to its reservoir and the next material is pumped in. This also means that you don't need much more space or more screens to add support for more materials available in a print job.
      • "Ahh but how would that deposition stay consistent. Isn't that a fair bit of plumbing work? And top-down approaches are susceptible to the machine being shaken or unlevel."

    So after I saw the video, I thought:

    • "That's it! That's the solution!!! Ouwgh but I don't want to wait until 2042 and beyond [to use this technology]. And it doesn't even seem like they've unlocked its full potential yet. I'm thinking like 8+ materials and washing during (or after) the print process before fully curing the part."

    Thus, this project is mainly for me to do something -- anything -- to inspire someone with the ability to research / develop this kind of printer into reality, if I haven't done so myself. Other reasons are so that I'm not keeping ideas in my head (writing Future Me some documentation to work with) and so that these ideas are in the public domain, meaning that any future patents can't be too vague and over-reaching.

    SecSavr Sol^2 [gd0045] is the slicing software for this machine.

    SecSavr Syrum [gd0141] is the project for materials research.

    This log here is where I'm posting little comments, though some of them are so large that they should've been actual logs.

  • [E1][A][R] I'm so back (for the 100th log)

    kelvinA08/08/2023 at 17:02 0 comments

    This isn't exactly what I had in mind for the 100th project log, but a few days ago...

    ... three, actually, I put all the SecSavr projects on the shelf because my highest priority project, #Tetrinsic [gd0041], expectedly hit a snag when trying to bring it out of the virtual and into the real world. I was thinking "Ouch. If this is what perils await me for a project that only has a few components, perhaps I should be realistic and shelve the research and design of a 3D printer, its printing software and its materials science research for some time in the distant future.", partially because I recently watched this Meta Quest AR mod whereby the designer went from start to finish in 6 months and his original concept was very similar to the final device, unlike Tetrinsic which has changed numerous times in its 19 months of development.

    Additionally, a few more days ago, I got onto the hopium train as they're now serving the room temperature superconductor LK-99. It's an inspiring ride that is best summed up by the following image going around:

    Most of this induced hopium energy has actually gone to being mentally prepared to continue tackling #Coaxial Hotend [gd0144], understandably because I'm essentially validating a discovery from Nozzleboss just as scientists around the globe are validating LK-99. I had to get off the train since, as you can see by the graph, the time period between evidence suggesting one or the other was getting shorter and shorter

    After shelving the SecSavr project, I went and researched other 3D printer projects, such as these below:

    The things I was able to gather was that

    • The material holders, due to their weight, probably should use a T12 leadscrew. However, in the persuit of longevity and minimal maintenance, multiple projects advise the use of ballscrews (with a decoupling mechanism)
    • It's possible to use 2 linear rails seperated by spacers to emulate an I-beam for rigidity.
    • If I actually had the skill, it would be possible to design the printer at a faster rate (based on the 4 months in 6 minutes video)

    Additionally, I found some articles on All3DP when searching for full-colour 3D printers:

    But the notable articles that eventually lead to me reversing my decision on SecSavr were these:

    • https://all3dp.com/2/diy-resin-3d-printer-sla/
      • At the time of writing, only 5 printers are on this list. It seems that only designed + built printers are on here, and no work-in-progress printers.
    • https://all3dp.com/4/bambu-lab-p1p-price-drop-first-gen-printers-a-55-100/
      • Which is a post about https://blog.bambulab.com/bambu-lab-anniversary/
      • With Tetent in mind, my takeaway from this blogpost is that I can put out a device that, while comparatively better than the competition, it's only partway where I wanted the solution to be. 
        • Personally though, I don't strive for "Better than the competition", but "It's just Better(TM)". I want something that I can finish and still use 5+ years later without a single change (which is a lower bar than it sounds, considering all my not-so-temporary temporary gear).
      • Bambulab is aiming for a printer with the kind of consumer-level maturity as an iPhone, and that's the reason why they only rate themselves 55/100.
        • (meanwhile I'm tilting my head like "Yeah... I'd put a 45, but that's primarily because I'm not a fan of sub-300mm printers and partially because I was hoping that a printer like the X1C would've existed in 2020, thus I was loosing hope by the time it rolled around in 2022.")
        • (But really though, it's only an extra 5cm for each axis! Hopefully, BambuLabs is developing a competitor to the Creality K1 Max, which is a 300mm competitor...
    Read more »

  • [E1][R] Laser Decision for Copper Sintering: 20W VF20

    kelvinA06/06/2023 at 14:59 0 comments

    The BOM has been rather stable, with the only thing that I wasn't sure about being the laser. I was considering a 5W 0.08*0.08mm spot laser for the #SecSavr Soapavr [gd0146], but more research shows that a 20W laser with a sufficient spot size is the way to go.

    Firstly, I was looking at the cutting depth of stainless steel with these kinds of wattages, and it seems that 0.08mm thick is possible so that's good enough for me:

    Then, I was looking at the recently announced 30 - 48W lasers. Unfortunately, there's some issues. Some of them have spot sizes that are 0.1*0.15mm or larger, meaning that the kW/mm^2 is still at around 20W laser levels. Most of them are 750g or heaver, as well as having dimensions exceeding 60x60x130mm. All of them are near or over 2X the price of the ZBAITU VF20 that is possible to get under £300 on sale.

    The next video I saw was about copper laser welding, which is essentially what I'm trying to do here.

    One of the cool things is that the tests were done without shielding gas. Anyway, the below slide is important:

    The 450nm laser used has a dot diameter of 0.6mm. Thus, for a 1kW laser, the power density is 3.5kW/mm^2. As you can also see from the graph, 100um depth is achieved at 600W, or 2.12kW/mm^2, for a travel velocity of 50mm/s.

    The VF20 has been measured to output 21.5W, though the meter also says "Wavelength: 600nm" even though this is a 445nm laser:

    The listing on Aliexpress says that the spot is 0.1*0.08mm, but their website says 0.08*0.08. I know that, when it released, the spot was the former, and it's possible that, after almost a year of making these modules, they've been able to shrink the spot size to 0.08*0.08mm. 

    They've also got a similarly priced XF20 that has a 0.08*0.08mm spot size claimed in some listings and 0.06*0.08mm claimed in others. While I find the flame detection and laser crosshair useful, it's height of 130mm with the air assist inlet on the top (meaning I need even more height clearance) and weight of 700g makes it harder to integrate compared to the 80mm tall, 364g VF20. The XF30 also shares the same build as the XF20.

    Power densities of the options:

    Power (W)Spot Size (mm*0.08mm)Power Density (kW/mm^2)
    200.10
    0.08
    0.06
    2.5
    3.125
    4.166
    21.60.10
    0.08
    0.06
    2.7
    3.375
    4.5
    300.08
    0.06
    4.688
    6.25
    32.4*0.08
    0.06
    5.062
    6.75

    *Assuming 5.5W diodes output 5.4W of power

    Conclusions

    • Obviously, the main conclusion I can take from this is that anything under 20W is unlikely to work. It also makes a bit of sense, since 10W and 5W lasers have existed for a while and yet there are no 3D printers that use them to sinter copper, but these 20W+ lasers are very recent and so it's possible that printers that use them are still in development.
    • It does seem like the spot size really affects the power density.
    • Coming in at about £575, it's unlikely that I opt for the 30W laser.

    [9 Jun: Edit 1]

    I'm just going to assume that the below specs are accurate:

    This is a 84W laser, the same as the 84W UV LED I'm planning to use for the #SecSavr Soapavr [gd0146]. I wonder if I should try powering the system on the 24V 5A (120W) power supply this comes with. Then again, since both L^3 SecSavrs have more things to power than a typical laser cutter, I should stick with a 200W PSU. 

    Then again, it could be benefitial to go with an external PSU, meaning that DIYers don't need to deal with mains connections at all (even if it's just screwing 3 terminal blocks).

  • [A] SecSavr Soapavr [gd0146]

    kelvinA05/07/2023 at 13:09 0 comments

    The SecSavr Suspense is quite large and I think it's slowing down my development as I feel the stakes are higher. Additionally, I can't make much (if any) progress towards #SecSavr Sol^2 [gd0045] or #SecSavr Syrum [gd0141] without actual hardware. 

    I already knew about all this last year and that's why I started thinking about the SecSavr SuspenseSmall, but its phyiscal size (more important in regards to development) and BOM cost (less important) grew so large that it couldn't really fufull its initial goal of having something that can fit somewhere in a house (without having to plan for it like a new furniture item) for a somewhat paletable investment cost.

    Thus, I've created a new project:

    #SecSavr Soapavr [gd0146] 

  • [R] Macrobase Bumblebee: Cheap 8 Stepper Motherboard

    kelvinA05/05/2023 at 19:28 1 comment

    So, after working on my multicolour FDM project, I decided to just aimlessly scroll AliExpress to see if there were any new and interesting products that I've never seen before, and I found a very low cost and low footprint motherboard, the Bumblebee from Macrobase:

    This is the kind of controller board I've been looking for, since the SecSavr Suspense uses so many stepper motors. It's much smaller (90 x 125mm) and cheaper than the MKS Monster, and could mean that I could opt for the £13.42 cheaper M4P instead of an M8P. I probably won't though, since the M8P is laid out more orderly. I've got to take wire management into account when making a motherboard decision.

    The M4P seems to have one more physical USB port (and not a header), but since I'm planning to have a lot of USB cameras dotted about like it's a mini-factory, I'll be using USB extension hubs anyway. 

    Anyway, 2 of those Bumblebee boards costs about the same price as many singular 8-stepper motherboards, so I'm just going to see it as a split-in-half 16 extruder motherboard and embrace the FREEDOM of going with as many stepper drivers as needed. I might give each stepper it's OWN stepper driver, putting the ones I'm most likely to need to tweak current values on the M8P and all the rests on 2+ Bumblebees.

    Oh right, I should mention that I'm going to be switching to 3 or 4 Z axis motors. Manual bed levelling should be a thing of the past, especially if aimed at consumers (though I'd imagine only prosumers would actually consider spending >£1500 on a Do It Yourself build).

  • [T] Dual Stacked LCD to rival DLP sharpness?

    kelvinA03/17/2023 at 14:27 0 comments

    The idea DIY Perks tried was to place 2 LCDs ontop of each other to increase contrast levels. 

    It was suggested a few times by the community to have the 2 LCDs front-to-front to increase light efficiency as opposed to a diffuser between the first and second to unpolarise the light from the first one. 

    I believe the main issue for this application would be to make sure that the two panels are aligned to retain the 0.04x0.04mm pixel size. Longevity would also be a concern.

    The reason why I'm thinking of that higher resolution is because of colour dithering and PCB printing, where I'd ideally like crisp voxels of the correct size. If one pixel is 10um larger than it should be when printed, it means that the voxel for the subsequent material would be 10um smaller than it should be, giving inaccurate colours / trace widths just because of the material print order.

  • [M] Up-to-date Concept Render

    kelvinA03/07/2023 at 20:30 0 comments

    This model is long overdue because the open-style SleepCinema idea was rejected a long time ago. As I mentioned in a TestCut [gd0139] log, I had an idea for a modern but boxy redesign.

    I model the actual thing really quickly (because I've only done the faces seen by the render camera) and then I look on GrabCAD for some castor wheels. After seeing a few, I think "You know what? I never liked castor wheels anyway. They're kind of large for heavy duty things and they don't respond to different movement directions all that well. This is a concept render anyway, so let's virtually spend £20 a wheel on some omniwheels!"

    So I found some omniwheels and it turns out that Fusion 360 can actually take CATIA files and turn it into something I can use in Fusion360.

    Made the wheels a light green because I like the look of it, added to the model, added a blue led texture to the base because I expected the box to look bland and took it to a render:

    The blue was overkill, but I then tried without any LED and it was expectedly dull. I then tried a more realistic white LED strip and I think I've now got what I was looking for: elegant, yet boring, but with a hint of modern interesting.

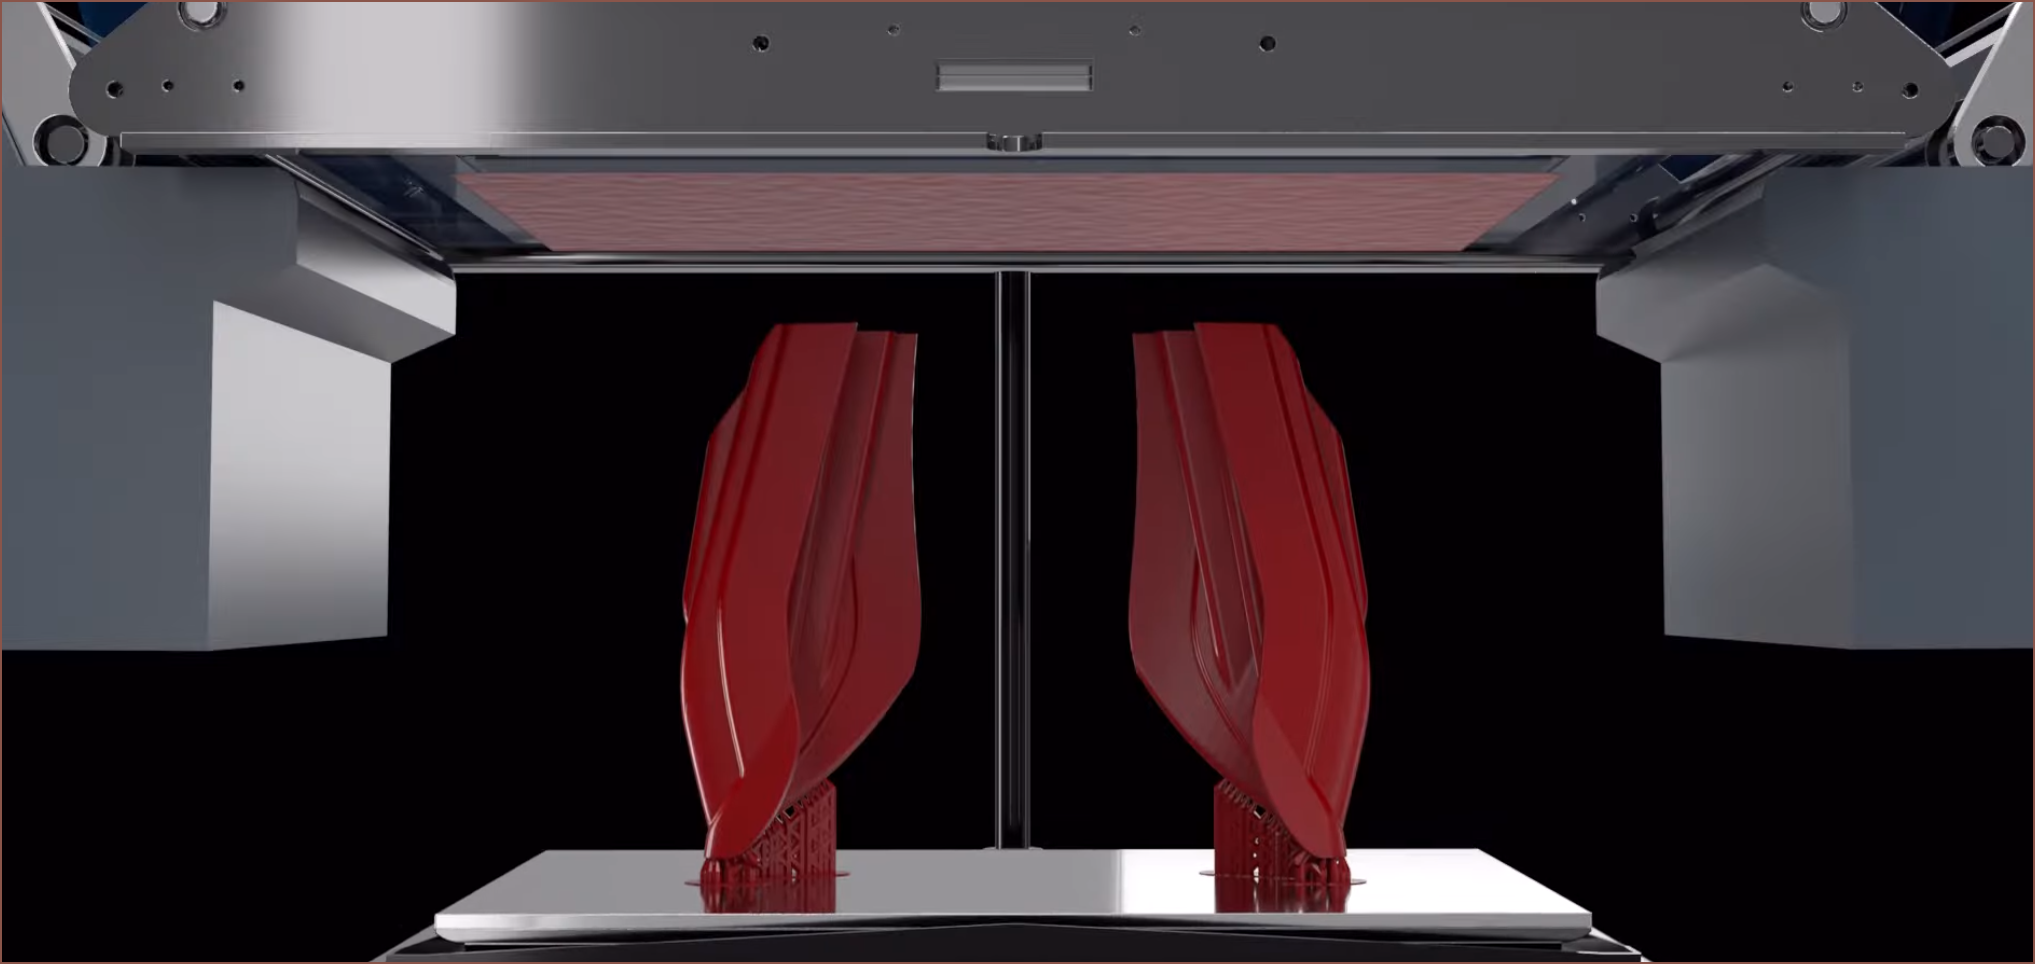
    Remember that interesting looking 3D printers are less likely to be "mass consumer" friendly, even though I doubt any mass consumer would be spending in the ballpark of £1500 (and potentially higher) to print AI generated 3D models.

    Lastly, add some handles and fillet the inside edge.

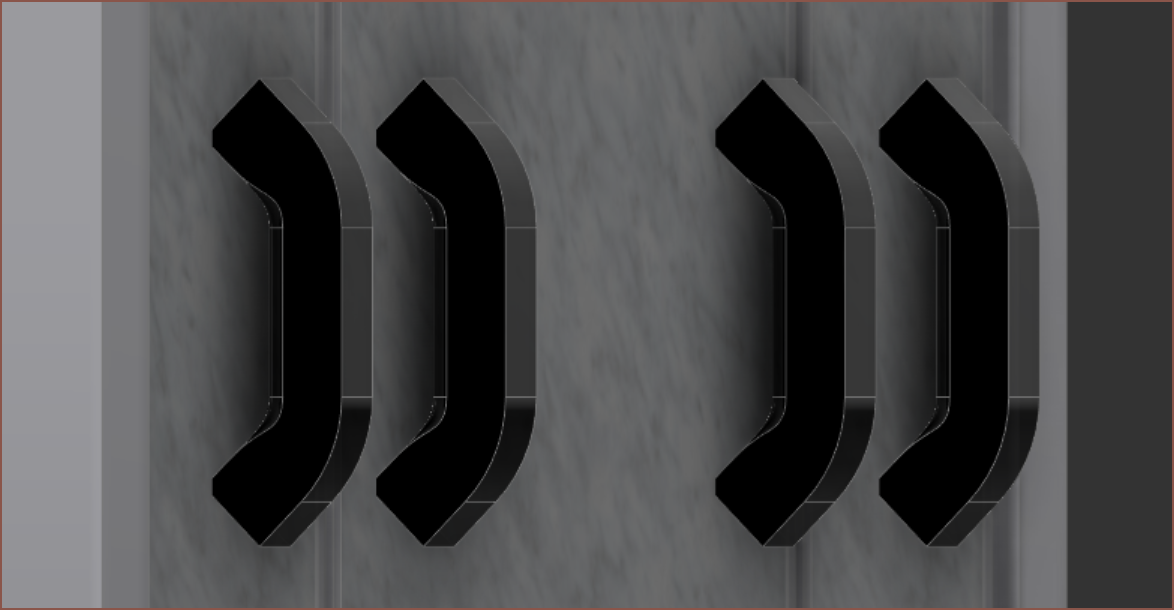
    Mn... not sure I like the look of that fillet. 

    I'll skip on the ergonomics for now. I do think the milky green looks quite peaceful and mind-clearing. Might as well change the wheels to more accurate colours since I can use the handles as the highlight colour.

    Copper looks REALLY modern and striking. The shorter FOV also helps. I think this is good enough for the final render after I reduce the length to 118cm (from 125cm). I've already reduced the depth from 60.5 to 57cm as I think it could be possible-- wait, is it? 

    No, I did the maths wrong and I need something more like 64cm.

    Final Render 1

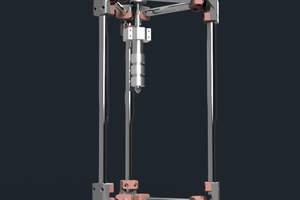
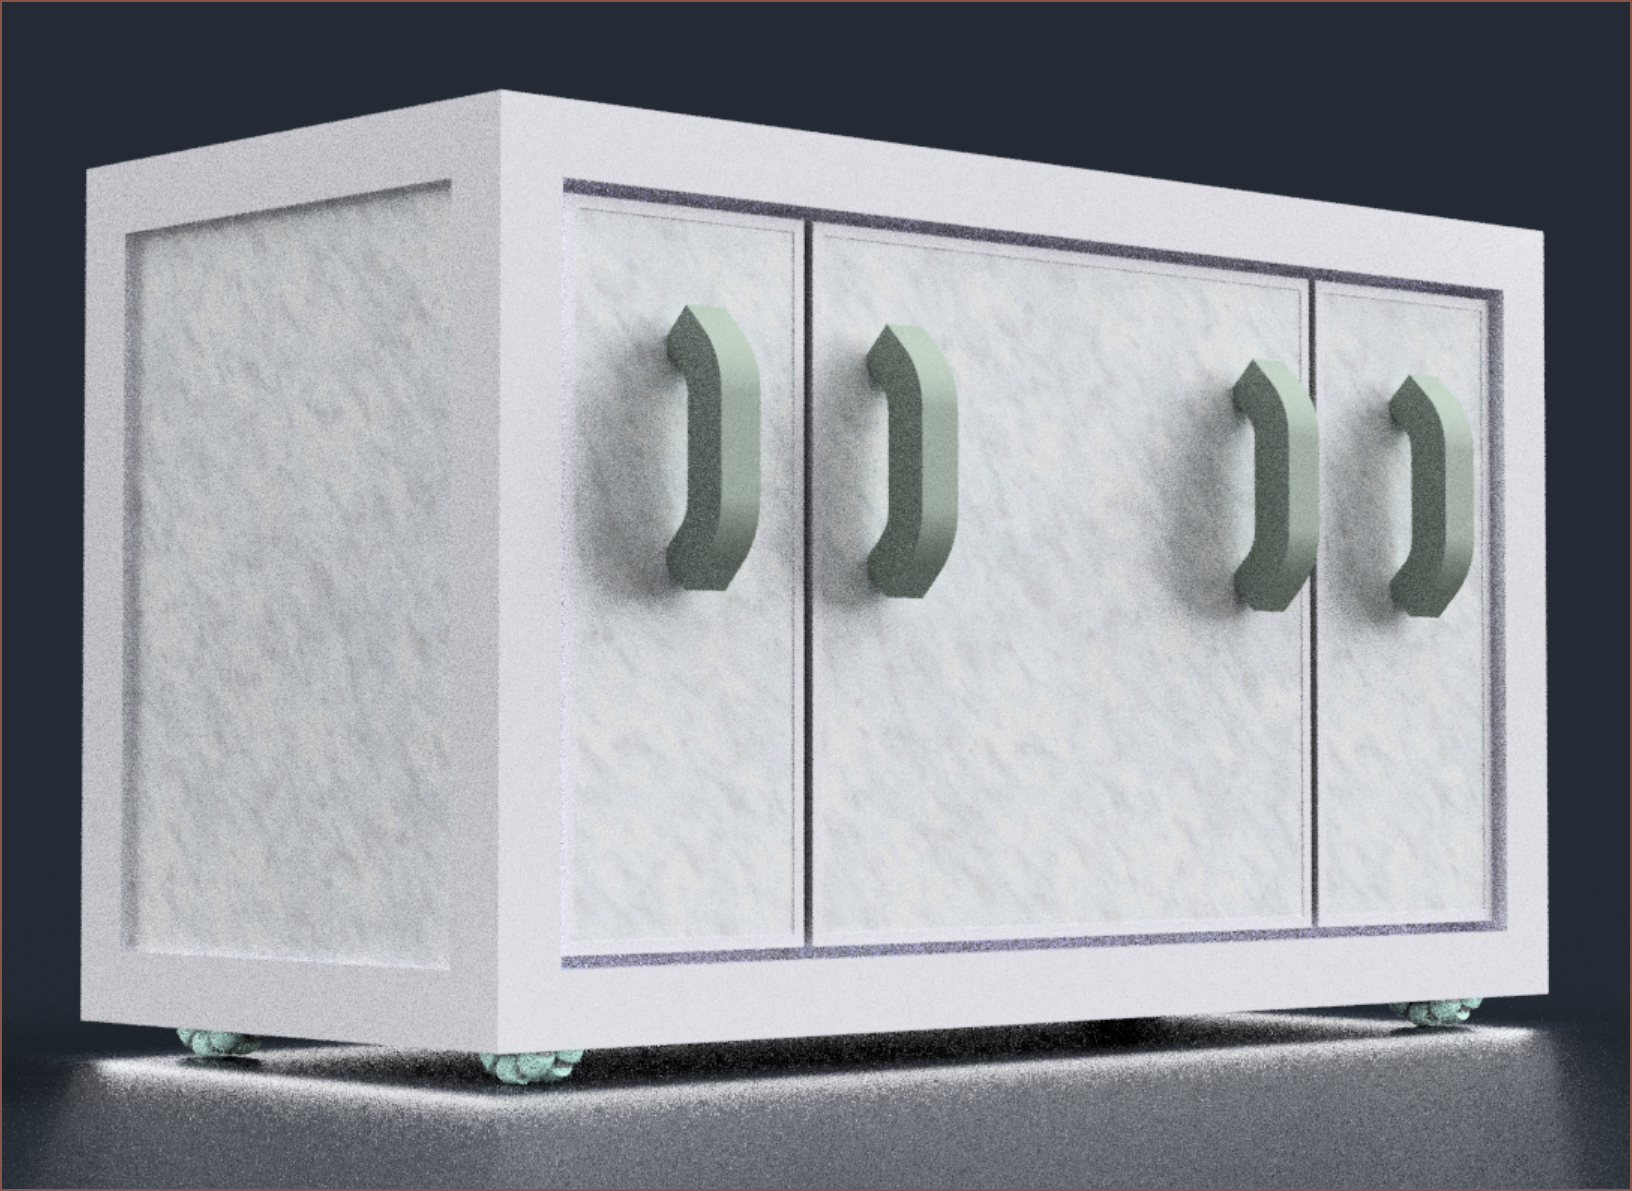
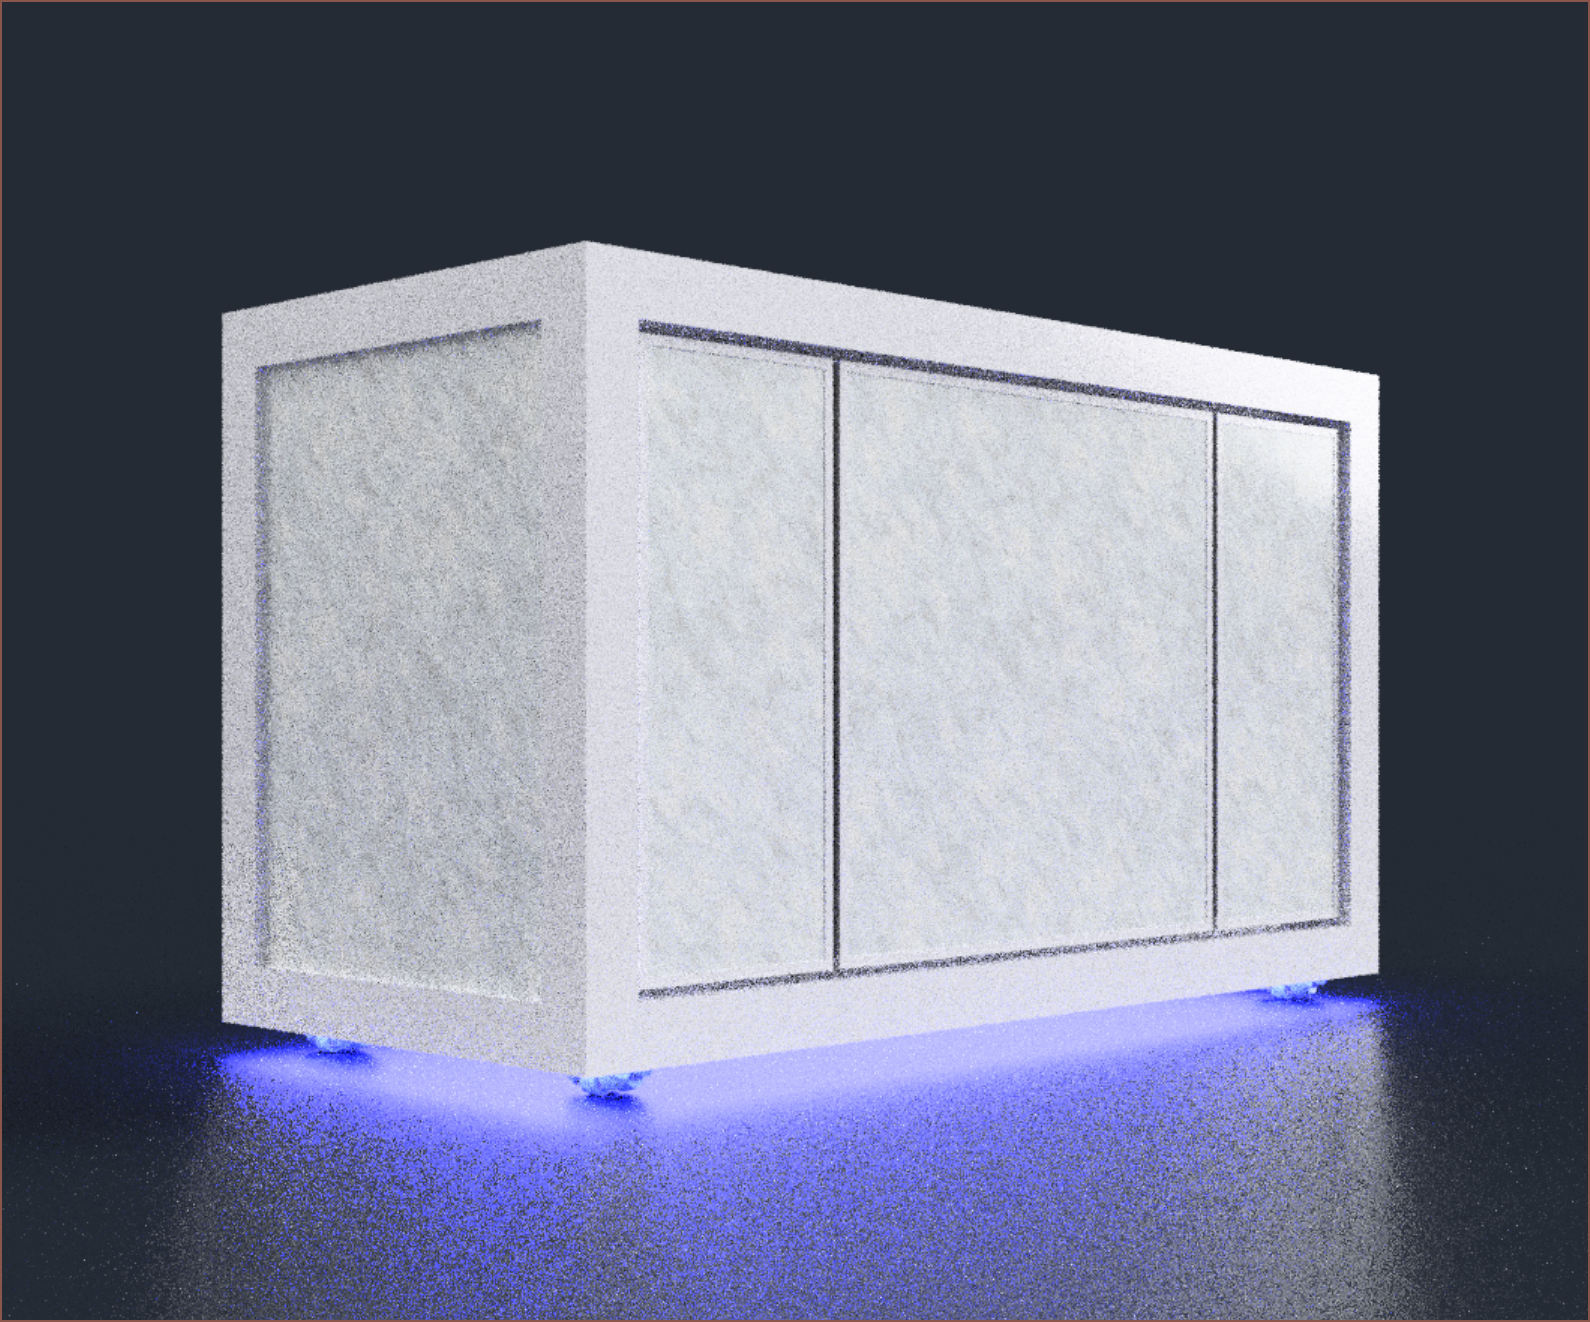
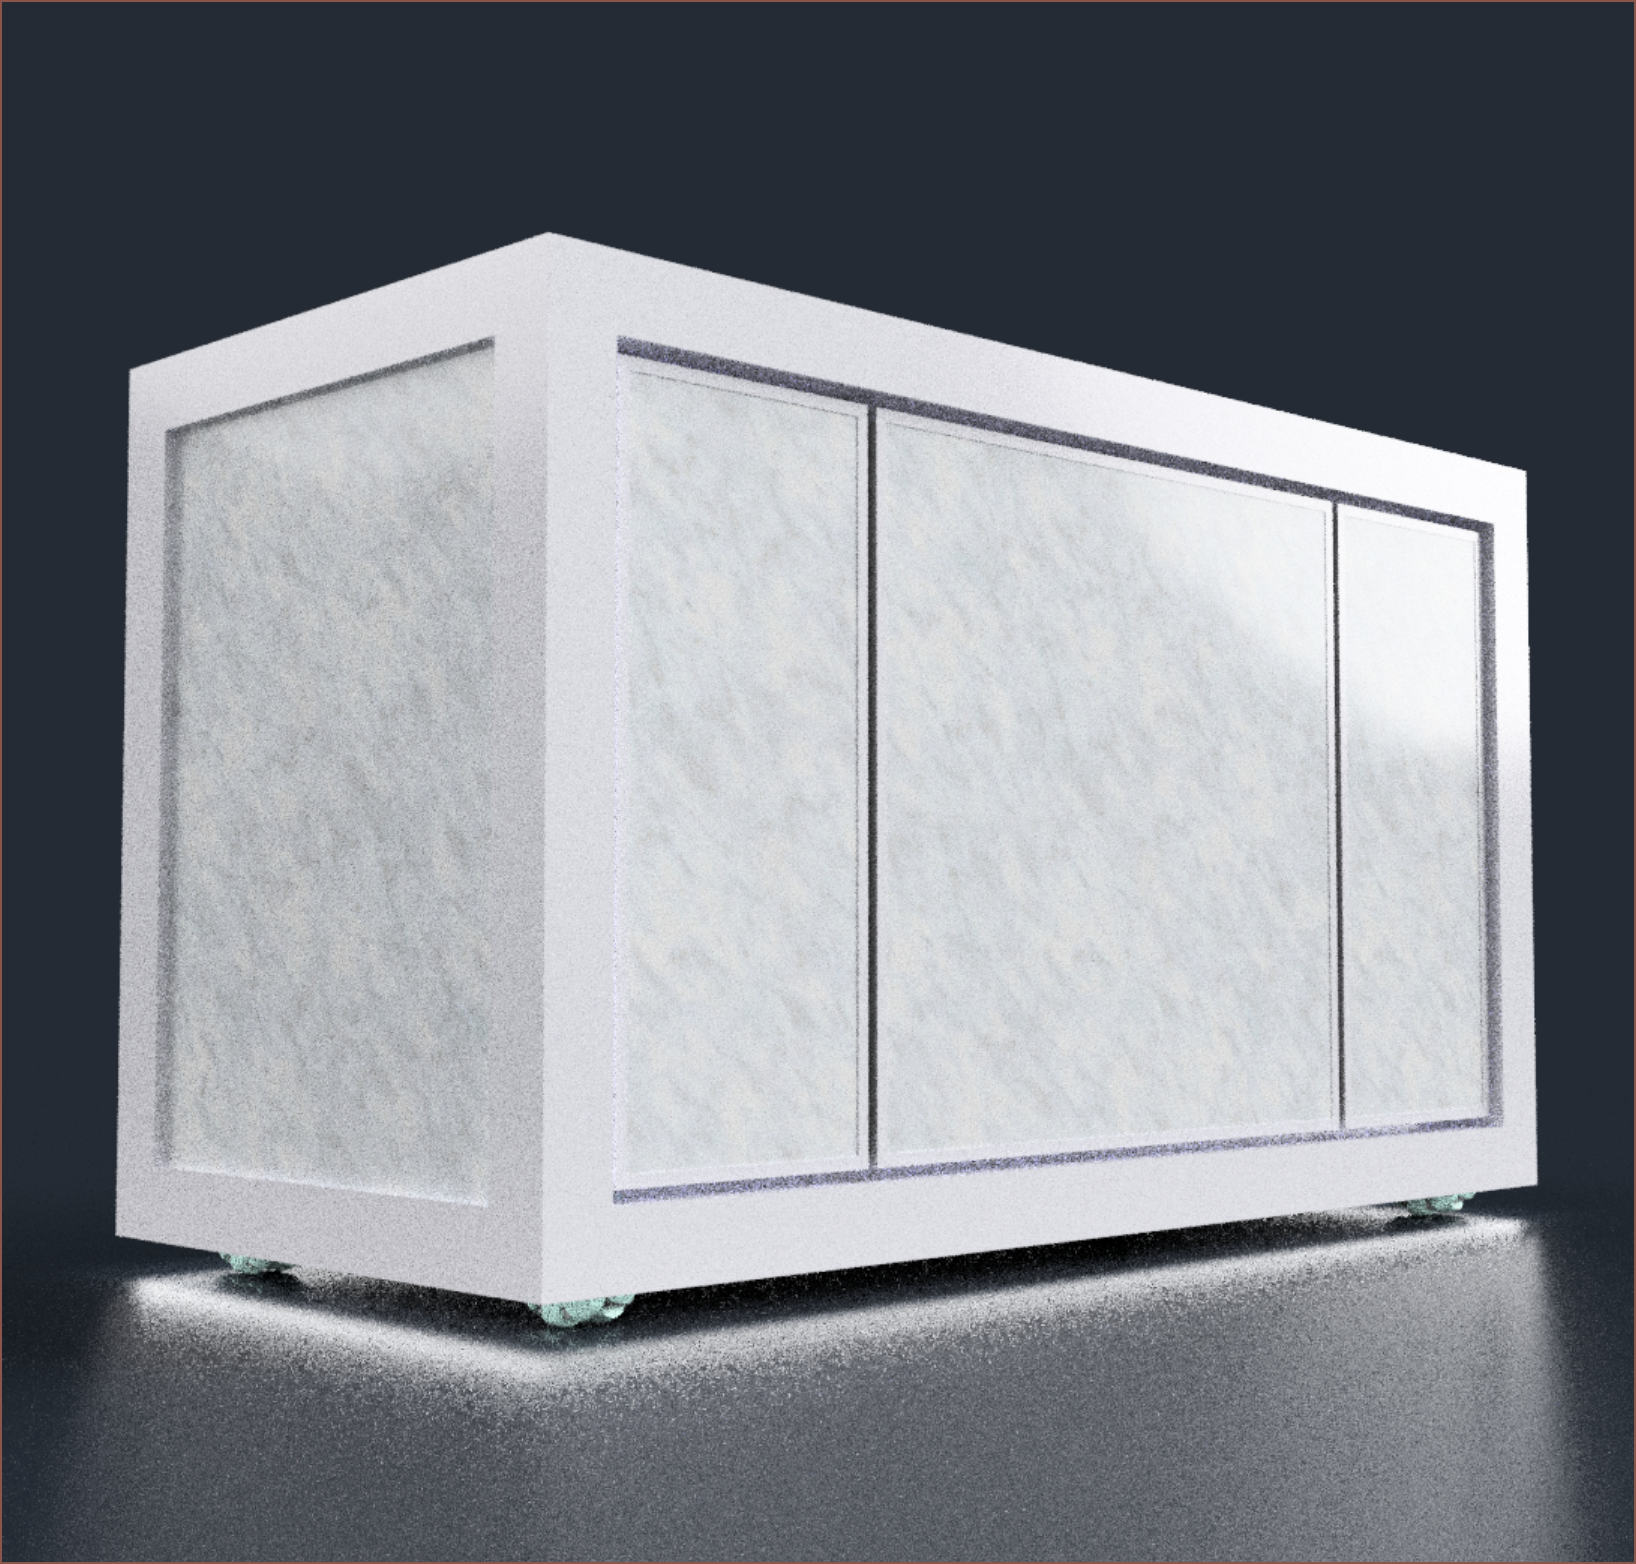
    Wow. This looks SO much more professional and worthy of its £1.5K+ expected BOM pricetag. Print volume aside, you have to realise that my indirect competitors are printers like the RatRig V-Core, Prusa XL, E3D Toolchanger, UltiMaker (if you squint), Raise3D, Voron, Anycubic M3 Max and probably a few others. The printer should look like £2Ks worth of kit.

    Improvements

    Hmmm... I'm looking at cupboards and the handles are rotated 90 degrees from what I've got, and there's only 1 handle for cupboard doors the same size as the main door. Speaking of that door, it's only 60cm long and the expected max print length is 65.2cm. The door also needs airtight sealing around it, so I don't think getting under 1.2m is actually going to be possible unless the print area is also reduced. I also think 3 seperate doors is not going to be efficient (when sealing is added) and will have to switch to 1 long door.

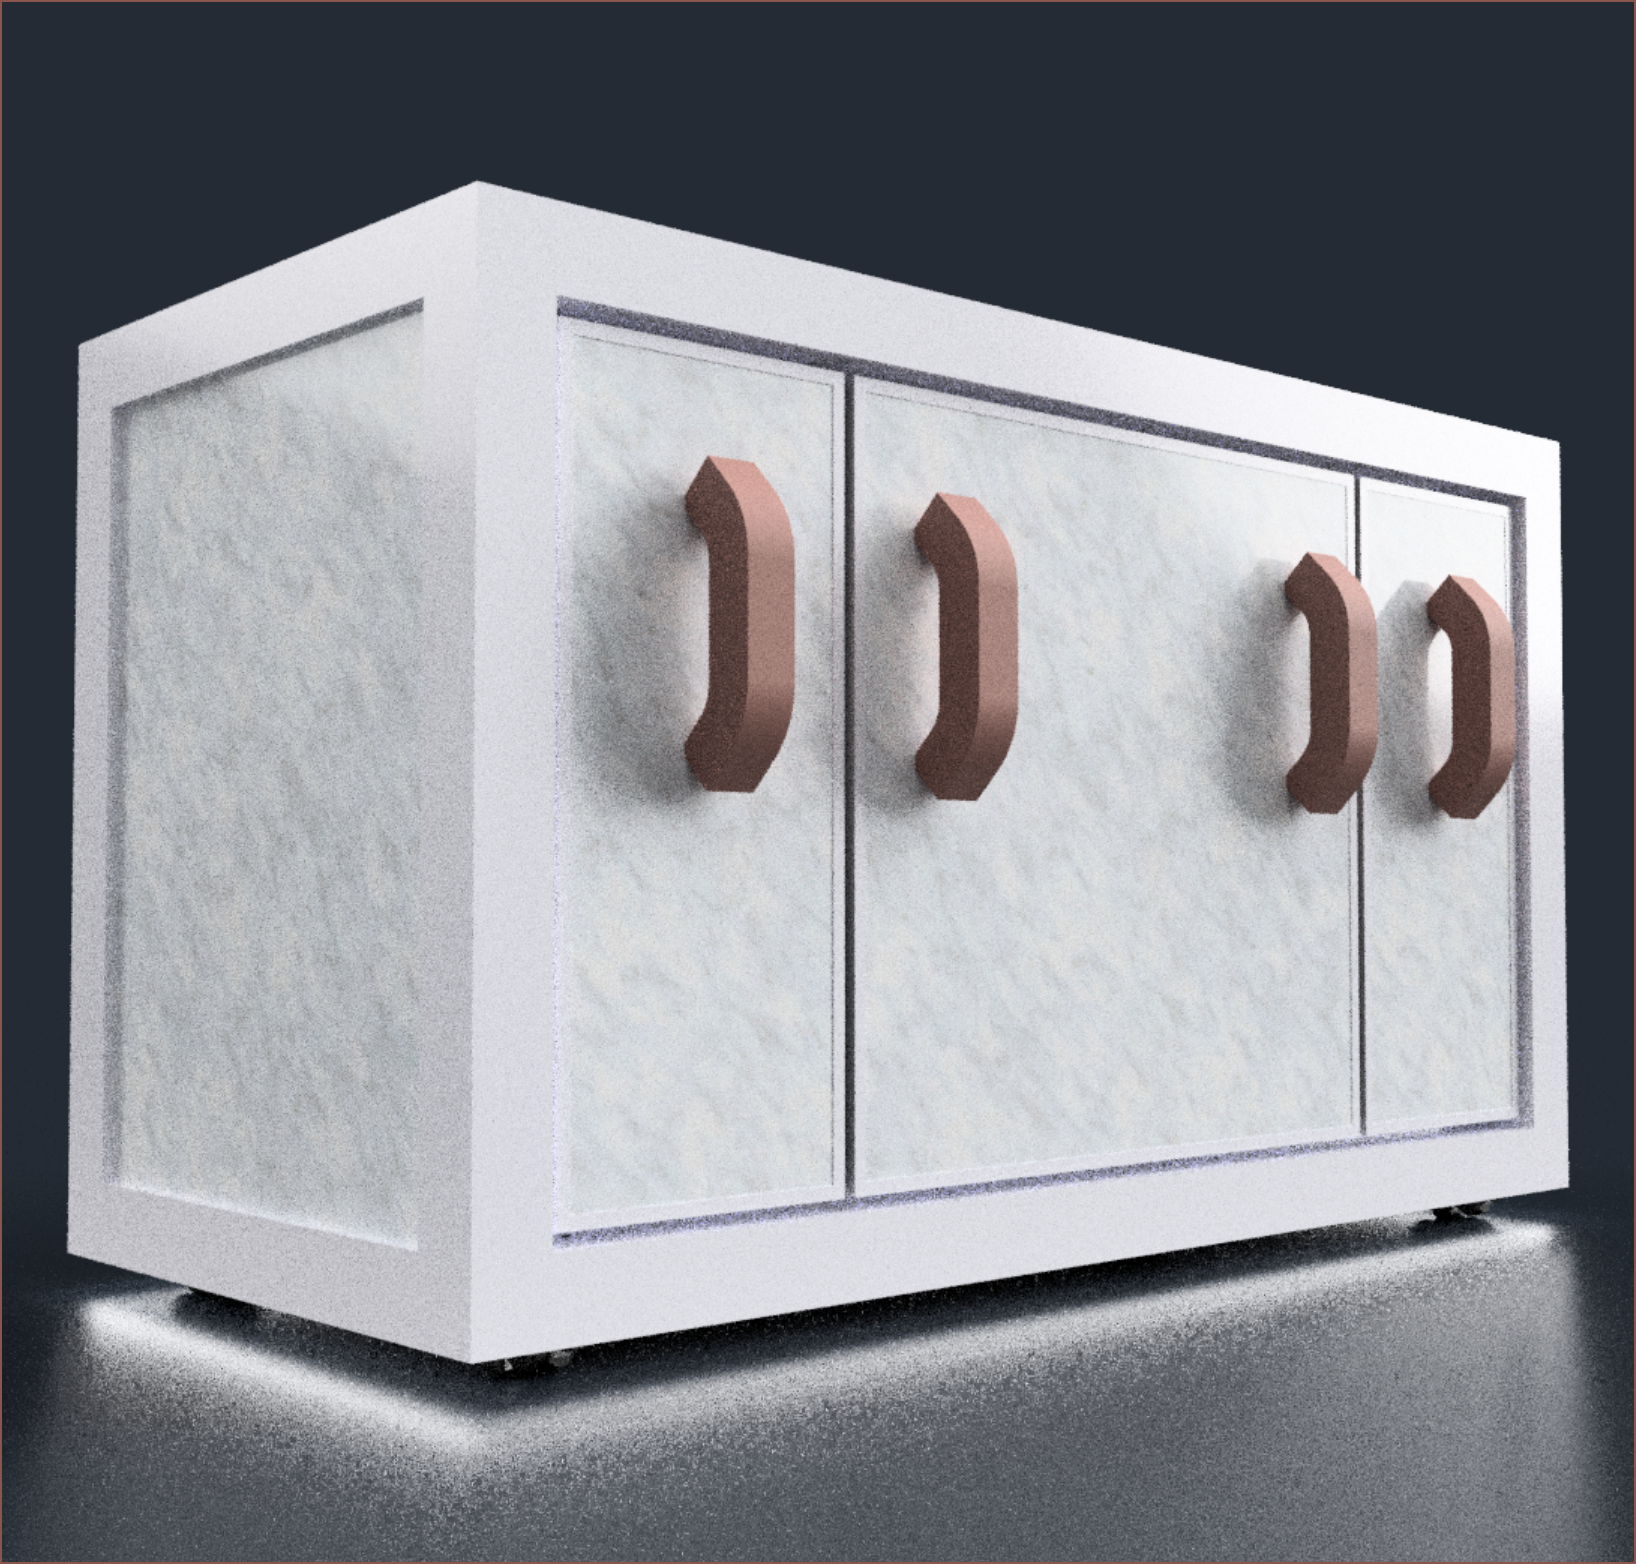
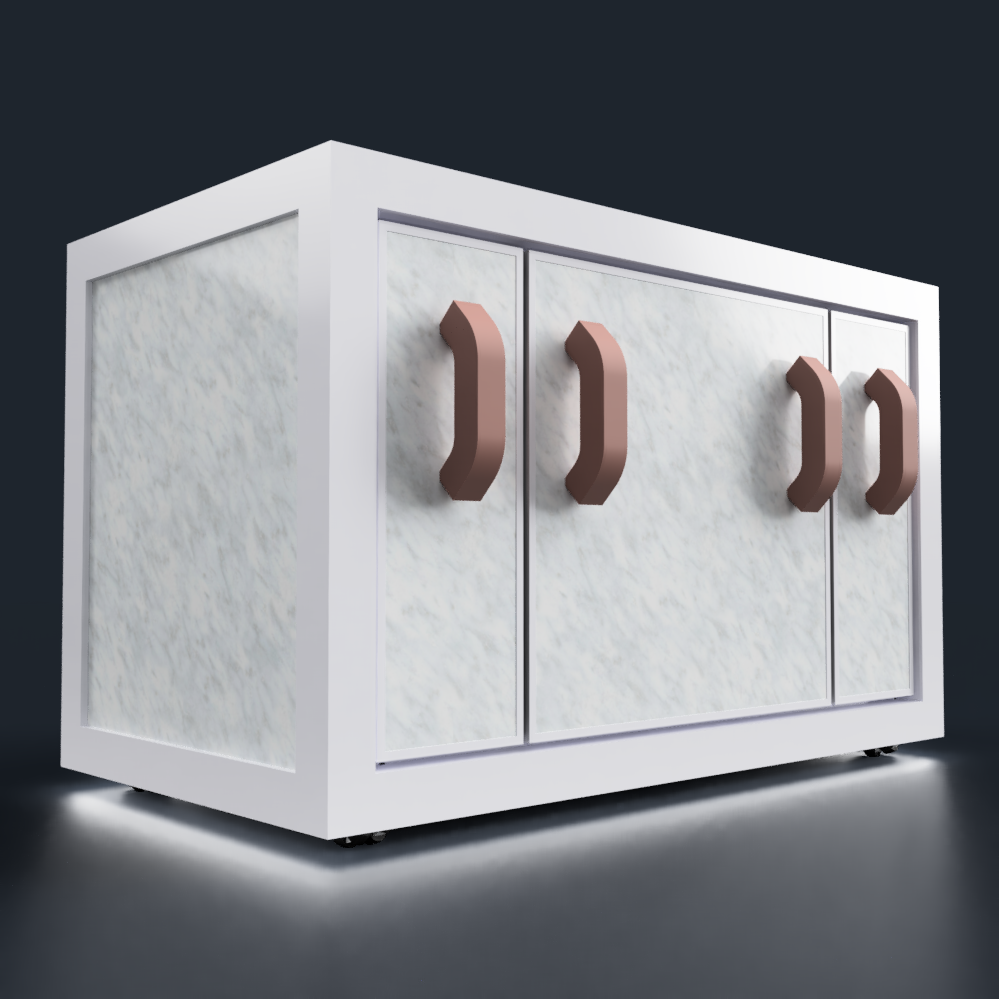
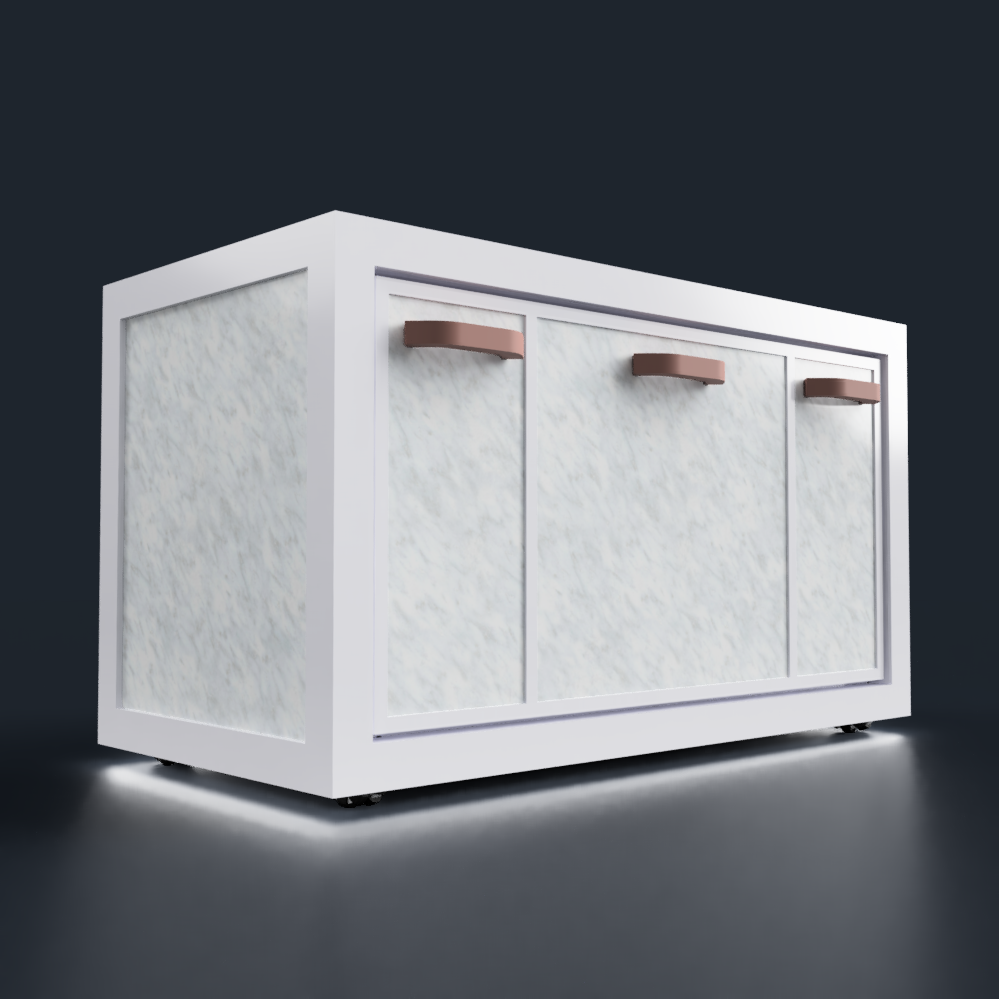
    Doesn't look as glamarous but those are the ergonomic rules and consumer expectations that I'm not about to go against. Now I know it looks like 3 seperate doors, but it's actually 3 seperate tiles in a single door, since each tile is 60 x 60cm and the printer is now 64 x 128cm in floorspace.

View all 104 project logs

Enjoy this project?

Share

Discussions

FulanoDetail wrote 11/11/2022 at 21:06 point

Hello, I just found this article here that made remember of your project: https://pubs.acs.org/doi/10.1021/ac403397r

Dunno if you already saw it, but I think it is worth the read :)

  Are you sure? yes | no

kelvinA wrote 11/11/2022 at 23:12 point

It's nice to read about the chemical and biological applications of 3D printing since I haven't heard much about it. I especially like the look of fluidics even though I don't have any practical use right now.

What lead to finding this research article?

  Are you sure? yes | no

FulanoDetail wrote 11/11/2022 at 23:35 point

I was just searching for 3d printing in general and the figure 5 of the article made me remember of this project because of the rolling film.

  Are you sure? yes | no

kelvinA wrote 11/12/2022 at 13:46 point

True. I heard about LOM ages ago with that full-colour paper printer.

Now that I think about it, It could be possible to make a micro L^3 printer with a transparent, spinning disk. The front area has the screen+build plate and the remaining area is for resin application rollers and their tanks.

  Are you sure? yes | no

Nathan wrote 08/26/2022 at 15:59 point

Interesting project! I'll be following

  Are you sure? yes | no

kelvinA wrote 08/26/2022 at 16:16 point

Glad to hear

  Are you sure? yes | no

[deleted]

[this comment has been deleted]

kelvinA wrote 08/25/2022 at 10:51 point

Wohoo! Thanks!

  Are you sure? yes | no

Paul McClay wrote 07/21/2022 at 05:33 point

"...and so that these ideas are in the public domain so that any future patents can't be too vague and over-reaching."

Thank you.

  Are you sure? yes | no

kelvinA wrote 07/21/2022 at 21:01 point

😂 Thanks for this comment.

  Are you sure? yes | no

Similar Projects

Does this project spark your interest?

Become a member to follow this project and never miss any updates